How to replace a Niva Chevrolet clutch with your own hands
The easiest way to deal with any breakdown is to contact a service station.
Clutch problems can be fixed there in just a couple of hours. But there is another way that will help you save money - repairing the car yourself. Let's start with the main thing. Let's figure out what clutch is. This is a device for changing gears in a car. When it fails, other components suffer: the gearbox and even the engine. In addition, each car has a drive (front or rear). The Chevrolet Niva has a full hydraulic drive. This will create additional difficulties. But if we have taken it upon ourselves, we will not retreat.
Next, let's take a look at possible clutch failures. For example, when a Chevrolet Niva’s clutch “slips,” the reasons may be:
- Burnout or severe wear of the linings. In such a situation, the disk needs to be replaced.
- Oil on the driven disc linings. Then we look for where the oil is leaking, eliminate the leak, and also wash the discs.
- There are situations when the clutch “leads”. This happens due to its partial shutdown. What's the matter here:
- the appearance of end runout or deformation of the driven disk. The optimal solution would be to replace the disk with a new one;
- air entering the hydraulics. In this case, you will need to bleed the system;
- the pressure plate is warped, then there is no option - change it;
- loosening the rivets of the linings. Only by replacing the entire set with a new one can the problem be solved;
- Broken pressure fork. May need replacement.
There are also such options: noise when pressing the clutch or when releasing the pedal. Still, there is no way to do it without disassembling the entire system.
How to replace the clutch in a Niva Chevrolet car
The main thing in this matter is patience and following the instructions exactly. And now the repair step by step:
- we stop at the inspection hole;
- remove the gearbox;
- if you decide not to change the pressure plate, then make notes about the location of the flywheel and casing;
- take a 8mm wrench and unscrew all the bolts that secure the disc to the flywheel. This can be done if the flywheel is held motionless;
- remove the driven and pressure disks;
- if there are signs of wear on the driven disk, then it needs to be replaced;
- Take a closer look to see if the damper springs are damaged. If yes, then the disk needs to be replaced with a new one;
- Let's examine the release spring petals. They must be at the same level and free of wear;
- Only if all indicators are normal, replacement of parts is not required. And if at least one of them does not match, the purchase of driven and release disks cannot be avoided.
An important point is the simultaneous replacement of the release bearing. If you don't do this now, you'll soon be dismantling the car again and replacing it.
Pay attention to the hydraulic cylinder
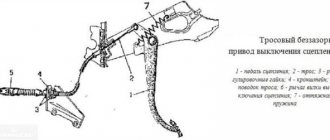
Fluid leak or incomplete clutch engagement? We take out the master cylinder and examine it. Is the case intact, scratches or signs of wear? So, we'll make do with the repairs. The drive operates using a working cylinder. You press the pedal, and through the rod system and hydraulics it transmits force to the fork and bearing. Through the rubber hose that connects the working and master cylinders, it happens
fluid leak. This leads to poor clutch release. After replacing the working cylinder, we make adjustments and bleeding.
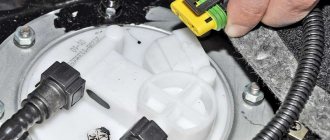
Need to remove and install a hydraulic clutch reservoir? This means you need to unscrew the tank cap and fastening nut, take out the tank itself and drain the liquid from it. Loosen the clamp and hose and disconnect completely. Noticed deposits inside the tank? Wash and reinstall. Fill with liquid and pump.
The repair was completed, but another problem appeared
The clutch pedal was flexible, and the entire system was rebuilt, but another concern arose: vibration appeared when the speed increased. The slight hum intensifies as soon as the engine speed increases. And most importantly, before the renovation there was no such problem. Some experts advise to drive for a while, and everything will pass. But it’s better not to risk it and disassemble the car again. Most likely, the problem is in the cardan, and the transfer case will need to be replaced. And you can do all this yourself. Did you cope with the first repair?
How to change the clutch on a Niva Chevrolet with your own hands: video inside
All motorists who have cars with a manual transmission know the role of the clutch. And they also know what happens to a car when the clutch loses. In this case, to correct the situation, you will need to visit a service station and replace the clutch there. This work usually takes 1–2 hours. Although this method of repair is considered fast, it is expensive. To save money, you can try to do this work yourself in the garage.
Clutch malfunctions on Niva Chevrolet
To accurately determine a clutch malfunction, it will not be enough to quickly list such points, since it is a fairly large unit. Therefore , only the main malfunctions that occur with the clutch will be given below .
- The clutch does not fully engage (slips) . Here the reason may be severe wear of the linings. You'll have to change the disk.
The clutch may slip due to wear or oiling of the friction linings of the driven disc.
You can determine the malfunction of certain clutch elements by the characteristic sound when the gear is engaged.
Replacing the clutch yourself
When the cause of the malfunction is identified, it will be necessary to carry out repairs and take measures to eliminate the breakdown .
If you do such work yourself, then this is a long process that will take a lot of time. And also all activities should be carried out according to the instructions.
Sequencing:
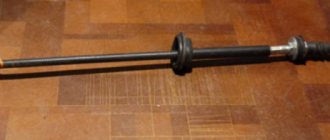
- Prepare a set of keys and a mandrel for centering the driven disk.
Mandrel for centering the driven disk.
We remove the gearbox.
We mark the relative positions of the disc casing and the flywheel.
We unscrew the six bolts securing the pressure plate to the flywheel.
Let's remove the pressure and driven discs and do a visual inspection.
We check the reliability of the damper springs.
We evaluate the condition of the pressure plate diaphragm spring.
When all these indicators are missing, then the disk can be left old , changing only the release disk. Assembly is carried out in reverse order.
Video about replacing the clutch on a Niva Chevrolet
Clutch from Chevrolet Niva
And this leads to a decrease in the resource of the driven disk. Adjustment algorithm So, before starting the adjustment process, you should turn off the ignition. This procedure eliminates the possibility of an accidental flash under the piston and accidental starting of the engine. By moving the gearbox lever to the neutral position, a gap of 0.1-0.5 mm is established between the clutch pusher at the very top of the Chevrolet Niva and the main cylinder.
Such a small gap is sufficient to disengage the driven disk.
It is regulated by the pedal travel limiter. Move the lever to neutral position.
Replacing the release bearing
This element is also important in the operation of the clutch. Using it, the clutch is engaged . If you hear noise when you press the clutch pedal, you will have to change the release lever.
Replacement sequence:
- Remove the bearing from engagement with the fork.
After such work, there is no need to adjust the clutch, since this process is carried out automatically.
Principle of operation
The node works as follows:
- When you press the pedal, the force is transmitted through the hydraulic clutch to the pressure fork. It puts pressure on the release bearing, displacing it towards the engine.
- The latter compresses the petals of the springs mounted on the clutch basket.
- The driving and driven disks begin to rotate independently of each other, breaking the connection between the engine and the gearbox.
- When the pedal is released, the clutch parts return to their original position under spring pressure.
- The discs connect and again transmit torque from the engine to the transmission input shaft.
Friction linings, release bearings and other clutch parts gradually wear out. In this case, you have to change individual parts or the entire assembly.
The principle of operation of the Chevrolet Niva clutch
A clutch is a unit that transmits torque from the engine to the gearbox . If it does not work properly, difficulties in shifting gears are observed, and engine performance also deteriorates.
The clutch has the following operating principle :
- When the car owner presses the pedal, the clutch is transferred to the pressure fork through a hydraulic drive. It puts pressure on the release bearing, which ensures its displacement towards the motor.
- The bearings compress the petals of the springs installed in the clutch basket.
- This ensures the rotation of the drive and driven disks. They have independent movement, which leads to a break in the connection between the engine and the gearbox.
- After the pedal is released, the springs relax, so all clutch parts return to their original position.
- After connecting the disks, torque is retransmitted from the engine to the gearbox input shaft.
Common faults
- Knocking or vibration when releasing the pedal. The problem occurs when the driven disk is deformed or its splines are worn out. The malfunction also appears if the engine is poorly secured to the supports or the diaphragm spring of the basket is deformed.
- The pedal sinks when pressed. This happens when the main or working cylinders break down, the hydraulic drive becomes airy, or the return spring or pressure fork breaks.
- The clutch does not disengage when the driver presses the pedal. The reason for this may be clogging or damage to the pipeline and cylinders of the hydraulic drive, deformation of the driven disk, the presence of scoring on its splines, breakage or change in the shape of the pressure fork, or diaphragm spring.
- The clutch is slipping. The problem appears when the friction linings attached to the driven disk are oiled or worn, the hydraulic drive is clogged, the pressure fork is jammed or incorrectly adjusted.
- Noise when pressing the pedal. A grinding, howling or whistling sound when the discs open is due to a faulty release bearing.
To eliminate most breakdowns, it is necessary to replace individual parts or the clutch as a whole.
Common clutch malfunctions - why bleeding is needed
The reasons for wear of the mechanism are varied . If the friction linings are severely worn or burnt, it is recommended to replace the disc. If oil gets on the friction linings of the driven disc, this indicates that the sealing parts are not working properly. The disk is washed and the cause of the leak is removed.
There are malfunctions in which the clutch does not disengage completely . This is observed when:
- Warping or end runout of the driven disk. For minor damage, repairs are carried out. A serious problem requires replacing the drive.
- Loose rivets on friction linings. The driven disk is replaced along with all other parts.
- Warping and distortion of the pressure plate, which requires its replacement.
When air appears in the system, it is pumped . If characteristic noises appear when you press the clutch pedal or when you release it, disassemble the clutch system and repair the damage. If the master or slave cylinder is broken, the pressure fork or return spring breaks, the pedal will fall when pressed. This is observed when the hydraulic drive becomes airy, which requires pumping the system.
How to change the fork without removing the gearbox?
You can replace the part without removing the gearbox. To do this, you don’t even have to drive the car onto a pit or a lift. You will need:
- carrying or flashlight;
- pliers;
- hammer;
- screwdriver;
- sharpener
The latter will be required for minor modifications to the standard fork. Otherwise, it will not be possible to put it in place without removing the gearbox.
- Using pliers, remove the return spring.
- Unscrew the clutch slave cylinder mounting bolts.
- Unsplit the rod and remove it from the plug.
- Remove the protective cover.
- Pull out the old plug. This must be done carefully so as not to break. Otherwise, the operation will be complicated.
- Finish the new fork on a sharpener: grind off the rivets to a height of 1-1.5 mm, chamfer the ends.
- Light it with a flashlight or carry it into the hatch.
- Rotate the release bearing and set the faces of the coupling to a horizontal position.
- Turn the ends of the spring towards the hole.
- Guide the fork, insert it into the hatch and carefully drive it inside using a hammer.
Important: the spring must be supported with a screwdriver. The tendrils should fall strictly between the two ribs of the fork.
- Make sure that the part rests on the ball joint.
- Direct the spring tendrils. They should wrap around the support.
- Install the protective cover.
- Replace the rod and screw the working cylinder.
- Reinstall the return spring.
- If necessary, adjust the clutch free play.
When does it make sense to repair and when to replace?
If the release bearing, as well as the main and working cylinders are faulty, the system is repaired . If noise occurs, the release bearing must be replaced. This part and the release fork are disengaged. The fork is moved to the side and the bearing is removed. Before installing a new bearing, it is recommended to clean the installation site. Before installation, the bearing and seat are lubricated with a special compound called Litol-24. Assembly is carried out in reverse order. Changing the bearing will ensure good clutch travel.
The purpose of the master cylinder is to transmit impulses from the pedal to the working parts of the clutch . If it does not turn on and off completely or fluid leaks out, then the cylinder must be repaired or replaced. Before repair, the part is removed and inspected. In the absence of major signs of wear and mechanical damage, the part is repaired. To do this, you need to flush the part with brake fluid. When cylinder components wear out, they are replaced with new parts.
The functionality of the clutch drive is ensured by the slave cylinder . To connect the master and working cylinders, a steel tube is used, on the lower edge of which a rubber hose is placed. Liquid periodically leaks through the rubber connection. After removing and repairing the part, bleeding is carried out. The clutch also needs to be adjusted.
To bleed the drive, put a hose on the working cylinder . One of the ends is placed on the valve of the part, and the second is lowered into the liquid. Depress and hold the clutch pedal. The procedure is carried out more than five times. After this, the valve is opened to release the air. The actuator adjustment will be successful if there is fluid leakage without air after opening the valve.
If the fork breaks, you do not need to remove the gearbox to replace it . Replacement is done using pliers, a carrier or flashlight, a hammer, a sharpener and a screwdriver. Pliers are used to remove the return spring.
The bolts on the clutch slave cylinder are unscrewed and the rod is uncoiled , which needs to be pulled out of the fork. After removing the protective glass, the plug is removed. Using a sharpener, the new fork is refined. The ends are chamfered and the rivets are ground down to a height of 0.5 millimeters. The release bearing is rotated in the hatch. In this case, make sure that the edges of the coupling are in a horizontal position.
The tips of the spring are directed towards the hole and a fork is inserted . She is carefully driven into the hatch using a hammer. It is recommended to check whether the spare part is adjacent to the ball joint. The antennae of the support are directed so that they cover the support. All other manipulations are performed in reverse order.
How to replace the clutch on a Chevrolet Niva with your own hands
All motorists know the role of the clutch in cars with a manual transmission. Also, every car owner knows such unpleasant moments when the clutch simply disappears. When you try to start, the clutch pedal is pressed idle, which causes a lot of inconvenience. In this case, the only option to correct the situation is to get to the service station and literally pick up the car from repair within 2-3 hours. Although this method can be called fast, it is still considered the most expensive. The only way to save money and get to know your iron horse a little more is to repair and replace the clutch in your garage.
This material will tell you exactly how to replace the clutch on a Niva Chevrolet car, as well as its repair and adjustment of components. Thanks to this material, you can also find out which clutch is best to install on a Chevrolet Niva SUV.
First, let's remember what a clutch is. So, this is a device through which torque is transmitted from the car engine to the gearbox. That is, the clutch changes gears on the box. If the clutch operation does not meet the required level, then this will negatively affect other mechanical components (gearbox, engine). The clutch drive on the Chevrolet Niva is hydraulic, without gaps and has automatic compensation for friction lining wear. The drive is an equally important part, since it supplies a signal from the driver to the working elements.
Kevlar clutch Chevrolet Niva
Chevy Niva is still more Niva than Chevy, that is, in fact, a real Russian SUV. This means that all components of the vehicle are subject to increased operational requirements. And to the clutch as well. STARCO understands this and offers Chevrolet Niva owners an enhanced clutch SPK22025KV with a Kevlar lining.
Equipment:
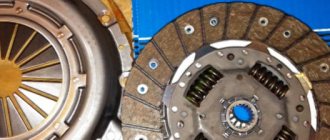
pressure plate (basket), driven disk, clutch with bearing, set of gloves.
Pressure disk, also known as basket.
The high power diaphragm spring provides a clamping force of up to 5000 Newtons. The clutch petals at the point of contact with the release bearing are hardened with high frequency current, which provides increased wear resistance. All elements of the basket are made using high-tech equipment. The solidity of the structure is felt thanks to reliable fasteners.
The plate is made of improved grade cast iron, which has increased strength, heat capacity and good indicators of the dependence of linear expansion on temperature. This means that under heavy loads the slab will not “float” in size and will not “lead”.
Release bearing ESPRA.
Has a body made of POLYAMIDE. This in itself is an expensive, high-quality plastic and it is made from primary raw materials - keep in mind that when buying cheap couplings, there is a high probability of encountering polyamide from waste or even very cheap Polypropylene, which can lead to quick failure of the coupling.
The bearing is not rigidly attached to the coupling. During operation, the contact of the release bearing with the petals of the diaphragm spring of the pressure plate self-adjusts. The bearing itself meets the accuracy class standard P5 and is filled with SUPER N KYODO YUSHI grease (Japan). Operates in a temperature range of -40 +180 degrees.
Kevlar clutch disc.
The disc hub is made of surface-hardened alloy steel, which imparts strength to the performance characteristics of the material. Hardness on the Rockwell scale is 60 units. If the hub is not hard enough, the input shaft will very quickly break the splines and the disc will have to be replaced. 8 damper springs (4+4 one-in-one design) plus a low-load damper that dampens small torsional vibrations. The 4+4 spring design entails a SIGNIFICANT increase in the service life of the disk, because it is they who take on and absorb all the shock loads that occur when shifting gears and when applying or releasing gas. Damper springs are almost the most loaded part of the disk, and on cheap disks they are the first to break, since good springs are not easy to make and they cost accordingly.
The spring life of the STARCO Kevlar disc is designed for 2,000,000 complete compression-extension cycles.
Some information about Kevlar.
Scientists from the American company DuPont gave him a start in life long ago. Body armor and armored helmets are made from this material. And it was created for the automotive industry... for reinforcing tires (of course, not the cheapest ones). In general, our experience tells us that a low price for something most often indicates weak technical and tactical data of the product. Of course, Kevlar clutch linings are not made entirely from Kevlar, it is only partly added to the mix. Why are we doing this? The 4*4 cars that we all love so much tend to get stuck in swamps, swamps and snowdrifts. To return home, we often have to play with the gas and clutch pedals, allowing it to partially slip. It is at this moment that the pad begins to get very hot and often develops a specific smell. The smell means that the pad could not withstand the high temperature and began to “float”. To avoid this, a pad was invented (not by us, of course) with the addition of Kevlar thread as a reinforcing fiber (in cheap, short-lived discs, other materials are used to reinforce the pad). In cases of severe burning, the lining becomes completely “oiled” and can reach the point where you are towed out of the swamp) But not with the STARCO KV Kevlar clutch. Because Kevlar raises the “oiling” temperature to approximately an impossible 400*C, since it does not melt, but decomposes at temperatures of about 450*
Therefore, when you buy and install a STARCO KV clutch on your favorite fields, skid to your health or just drive and forget about the next clutch replacement) All of the above indicators allow this clutch to “go” up to 100 thousand km.
Types of clutch faults
The clutch drive is a whole mechanism, so there are many reasons for the malfunction of this part. We will not consider all the malfunctions, since this information is already available on the global network, but we will pay attention only to the main reasons.
So, the main malfunctions when the clutch drive in a Niva Chevrolet slips, that is, it is incompletely engaged:
- The friction linings are too worn or have burned out. In such a situation, you can solve the problem by replacing the disk.
- The presence of oil on the surface of the friction linings of the driven disk, which indicates a malfunction of the sealing parts. In this case, you can get by by washing the discs with the obligatory removal of the cause of oil leakage.
There are also malfunctions that lead to the clutch starting to move, that is, it is not completely disengaged. The reasons for this phenomenon are as follows:
- End runout or warping of the driven disk. In such a situation, repairs can correct the problem, provided that the damage is minor. But most often, the presence of such a malfunction indicates the need to replace the disk.
- Friction lining rivets are loose. The driven disk will need to be replaced with a set.
- Air in the system. To do this, it is necessary to bleed the system.
- Distortion and warping of the pressure plate. Malfunctions of this kind can be resolved by replacing this part.
There are still malfunctions that will require replacement of some parts and components. Malfunctions can be identified by characteristic signs:
- You hear characteristic noises when you press the clutch pedal;
- Similarly, noises are heard, only when the clutch pedal is released.
All these malfunctions indicate one thing - you need to disassemble the clutch system and repair the breakdown.
Clutch replacement
Having found out the cause of the malfunction, it is necessary to take appropriate measures to eliminate it. Let's look at how to replace the clutch on a Chevrolet Niva together with the release bearing.
So, repairing or replacing the clutch is a fairly long process, so first you need to be patient and carry out all the steps according to the instructions. Replacement includes the following sequence of actions:
- Install the Niva Chevrolet SUV on the inspection hole for ease of repair work.
- Stock up on the necessary set of tools: screwdrivers, wrenches and a mandrel in order to be able to center the driven disk.
- Replacing the clutch requires removing the transmission to get to the unit itself.
- After removing the gearbox, you need to make marks for the location of the casing and flywheel. But this is only necessary if the old pressure plate will be used after replacement.
- Next, using the “8” key, you will need to unscrew all six mounting bolts. These bolts secure the clutch disc to the flywheel itself. To carry out the unscrewing procedure, it is necessary to keep the flywheel stationary.
- Now you can carry out the process of dismantling both disks: driven and pressure.
- It is important to inspect the driven disk. If there are cracks, chips, signs of wear, etc., then such a disk must be replaced.
Replacing the clutch in the field
Immediately after the new year, on January 7, I finally changed the clutch in the field, and at the same time changed the clutch master and slave cylinders. Replacing the clutch on a field and on a single-wheel drive is a completely different task in terms of labor intensity. I changed my clutch for two days, although I did a lot of other things along the way. It is highly advisable to call a friend for help. I managed to do everything alone, but next time I will try to do it with an assistant.
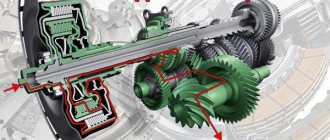
So, let's begin our difficult journey. Replacing a clutch in a field is one and a half times more troublesome than on a conventional front-wheel drive. The Niva also has a transfer case and two cardan drives, all of which are bolted together and to the gearbox. The photo shows that the front driveshaft has already been removed.
A picturesque view of the razdatka, then RK. In principle, there is no point in completely unscrewing the rear driveshaft. Simply unscrew the RK from the flange and put it aside. As in the photo.
I remember that year I wrote a little about the intermediate shaft. He became the reason for leaving the trophy raid on the first jersey. In the photo, the new shaft for 21213 is a CV joint, one part of it is essentially a standard “grenade”. The old-style crosspiece cannot be found in stores, which is sad. There are some being analyzed and I think I heard that they are making non-original ones. I didn’t buy it right away, I needed to drive it, so I took the standard one again. Its peculiarity is that if damaged, the car is immobilized. On the old cross shaft, according to people’s stories, you can somehow slowly get to the repair site.
In order to remove the steering wheel, it is necessary to release the locking and downshift levers from above. To do this, the entire manual transmission cover is removed. The casing is on large self-tapping screws, for a Phillips screwdriver. Under the casing, right from the cabin, we can see the donut of the washout.
Then we go down under the car and unscrew the transfer case supports. But before doing this, using an awl, scissors, or something sharp, we outline the position of the supports relative to the bottom. In the photo you can see a mark around the studs - that's what it is - marks. We need to put the transfer case in the same position when we put it back. Using a 13mm ratchet with a long head, unscrew the nuts from the studs, 4 of them, two for each support. Next you will need an assistant or your own stupidity. We grab the transfer case and carefully remove it so as not to damage the studs. One of the most annoying problems with old fields is the transfer case studs. If it breaks off, rots, or the threads come off, it will be difficult to secure the transfer case properly. There will be noise and vibration. You can change the stud by drilling it out from inside. I had to do just that, but now the inserted bolt must be unscrewed while holding it both in the cabin and under the bottom of the car. Well, yes - it needs to be welded, I agree. I'll finish it in the spring.
Next we will remove the gearbox. In the photo we are looking at the gearbox shaft flange, to which the intermediate shaft between the gearbox and the gearbox is screwed. I didn’t film the filming process itself, since I was filming alone and getting my hands dirty, and it was inconvenient to photograph. The gearbox bell is bolted to the engine block with four bolts. Like 17 or 19 - I don’t remember, and it doesn’t really matter. The main thing is that you need heads with extensions; you can’t get to them that easily. It seems difficult the first time, but in reality you just need a ratchet with a good extension cord.
And this is the transfer case removed, placed closer to the rear axle so that it doesn’t get in the way
Having removed the gearbox, I try on a bearing on it.
Clutch disc from original kit. Of course, it would be more correct to install a clutch from a Chevy Niva. The original clutch 21213 is a mutant from classic and eight spare parts. The clutch from 2123 has undeniable advantages - it is two or three times more durable, softer, the disc is larger in diameter and area. But the price is twice as expensive.
And this is a new basket
It's time to install everything on the flywheel. In the photo everything is already screwed on. Those who change the clutch themselves for the first time need to know that to center the disc and basket it is necessary to use the gearbox input shaft. It can be taken from the gearbox by disassembling it and sawing it off with a grinder. The end of the input shaft protrudes from the bell housing, where the bearing fits. Without this device, it is difficult to symmetrically screw the clutch disc inside the basket. But it is possible by using a metal rod or something of a suitable diameter. A crookedly installed clutch will not allow you to screw the box to the engine. A crooked installation will force you to swear with the dirtiest phrases during the process of connecting the gearbox to the engine :). Therefore, a primary shaft for alignment is highly desirable
By the way, my clutch was either stinking or malfunctioning, not at all because of the fatigue of the clutch disc. I got him, and he’s a living bastard! I wish I could. The bearing rustled, but it would also have passed. I could have simply updated the GCS and RCS, pumped up the system, and it would have been completed until the summer, and then there would have been a complete replacement, everything that was required.
Let's return to the checkpoint. I cleaned the fork and bell from dirt and installed a new release bearing. Next, install in reverse order. The most difficult thing is to connect the box with the engine in one place. Here are some tips to tighten the clutch as accurately as possible. Having inserted the input shaft into the center of the flywheel, fix the tail of the box and place some kind of beam. Next, with the help of such and such a mother, slightly rocking the gearbox from side to side, we push it closer to the engine. As soon as the bolts securing the gearbox to the engine begin to loosen a little, victory is near. Attach the gearbox to the engine using bolts. Here you need to watch out for skew. When one bolt is slightly screwed to the block, you need to set the shaky box as level as possible and try to tighten the fastening bolt diagonally. In practice, of course, not everything is so smooth, but it can be done. I actually changed the clutch in the field for the first time in my life, and nothing seemed to work.