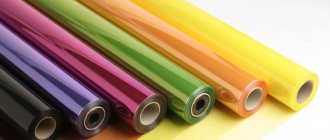
Material selection
First, you need to choose the right film, then tinting will not lead to fines and will not interfere with the process of driving the car.
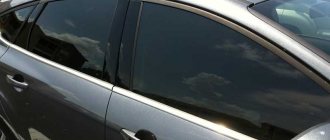
The first thing to consider is the degree of light transmission. According to GOST, the density of rear window tinting is not regulated. But there are nuances. If you don't have side mirrors, you can't use glass in the rear that lets in less than 70% of the light.
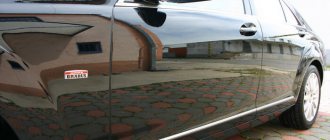
It is prohibited to use mirror tinting; this is regulated by GOST and technical regulations for the approval of cars for operation. Also, color films and chameleons cannot be used.
Let's see what type of film can be used on the rear window.
- Painted. Inexpensive film. Doesn't last long and fades quickly. The rear window is often damaged at the point of contact with the heating elements.
- Metallized. Considered one of the best options for rear window. It is practically not subject to damage from regular heating. The darkening is achieved by metal spraying between the layers of polymer. You should not purchase the option with aluminum coating, this film has a mirror effect.
- Sputters. Metal spraying is done directly onto the polymer. You should not glue such a film to the rear window; there is a risk of short-circuiting the conductive heating element.
- Athermal. The polymer film resists heat well and therefore does not deform. Lasts a long time. Additionally protects the interior from ultraviolet radiation.
- Carbon film. A thin layer of graphite is sprayed onto the polymer. Features a matte finish. Tolerates temperature changes well. The disadvantages include high cost.
- Tinted windows. For some car models, you can find tinted glass. An ideal solution, but it is expensive and it is not always possible to buy it.
In addition to the above, there is also a silicone removable tint. This option does not look very good, and there is a risk of simply losing the film when the heating is turned on.
You should choose a film based on your needs, as well as the characteristics of the car model. Do not take too cheap options; they do not last long and often do not have reliable protection against overheating. It is best to buy athermal or metallized film. Carbon tinting would also be a good option.
Continuing preparation for car tinting
We make a 15-20% solution of shampoo with water, after which we pour this solution into a spray bottle. You should start tinting your car yourself from the side windows, because they are easier to cover than the rear window. After you succeed in tinting the side windows, you can proceed to the front and rear windows.
Do-it-yourself car window tinting can be done in several ways:
- Removing glass. If you remove the glass, the tinting will be of better quality, and the work itself will be more convenient to do. We'll talk about how to remove glass another time. This is a rather time-consuming process, but it is worth it because the result will be better. The glass must be thoroughly cleaned before tinting, and this work must be done in a clean room where there is no dust and dirt; if there is no dust, then there will be no bubbles under the film.
- Without removing the glass. In this case, you need to thoroughly clean the interior of the car from dust. Cloudy weather is best for tinting a car; it is advisable that it rains before, then there will be no insects and dust.
What you need
Before starting work, we need to prepare everything we need, it will be much easier. We described above how to choose a film, now let’s look at the set of tools.
- Spray bottle with soapy water. You can use any spray bottle, even an old bottle of detergent.
- Rubber spatula (forcing). It is better to take one that is not very wide, this will allow you to work more accurately in the curves of the glass.
- Sponge. Preferably soft, it will better remove excess moisture.
- Knife. It should be sharp.
- Stationery knife or blade. The optimal solution would be a stationery knife. It's more convenient for them to work.
- Roulette.
- Powder. Regular talc powder.
- Skin. In some cases it may be necessary to clean the edges of the glass. It’s better to take “zero”.
- Construction hairdryer. Please note that only a model that can provide a not very high temperature is suitable.
This is the basic kit for tinting car windows, in some cases other tools may be required.
Which tint film is better to choose?
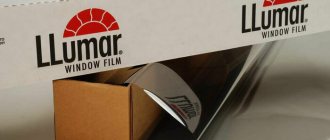
The film for car tinting should be of high quality, from trusted manufacturers, here is a list of several high-quality films:
- SunTek from Commonwealth Laminating & Coating, Inc.;
- Johnson Window Films;
- llumar from Courtaulds Performes Films;
- Sun Control from Garware Polyester Ltd.;
- Films from MSC/Solar Gard;
- Sun-Gard, Glass-Gard and Safe-Gard from Film Technologies International, Inc.;
- Films from the 3M corporation.
In most cases, in a package of 1.5-2 square meters. m. of film, the kit includes a knife and a plastic spatula with which you can smooth the film.
You should avoid single-layer tint films that have a colored adhesive layer - such films will not last long. It is better to choose a multilayer film, neutral in color, coated with metal. When tuning a Moskvich, such a film is perfect.
How to tint glass
When performing work to darken the rear window, two difficulties arise at once.
- Spherical shape. Very few models have a completely straight surface, which makes even placement of the film not the most convenient task.
- Limited space. Because of the sofa it is not so easy to get to the surface. In some cases, it is easier to remove the glass completely.
Before starting work, be sure to assess the condition of the glass. In many cases, swelling and other deformations may be observed where the heating conductors pass. It is not advisable to tint glass that has chips or cracks.
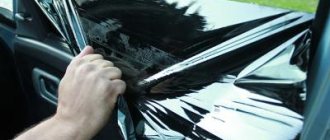
We will look at the method of gluing directly onto the car; it is more difficult to implement.
- We take a piece of film and throw it on the car. Cut along the perimeter of the glass. You can take a few millimeters of reserve. A utility knife or blade will help you here. Just cut carefully, try not to scratch the car's coating and sealing rubber.
- We examine the glass. If there are whitish scratches or plaque around the perimeter, remove it with fine sandpaper.
- Cleaning the glass outside. This should be done carefully, without leaving any contamination. Be sure to scrub off even the smallest bits of dirt. In some cases, you may need to keep the glass wet to let the dirt fall off.
- Remove water with a sponge or a wiper with a rubber tip. It is easier to remove water from top to bottom, using horizontal movements.
- Now we need to shape the film into the shape of the rear window. To do this, place the cut piece on the glass. Let's straighten it out. This will require heating with a hairdryer. We carefully disperse the arrows and wrinkles. We heat problem areas and level them with a spatula. It’s a good idea if an assistant illuminates it with a lamp from inside, so you’ll definitely remove all the shortcomings. This stage must be done as carefully as possible; any mistake can later lead to difficulties when gluing the film.
- Trim off excess film. You can leave a small overlap of 1–2 mm on the seal.
- Let's go to the salon. We thoroughly wash the glass from the inside. If you decide to do the tint yourself, be sure to keep it clean. Even a small speck of dust will result in an unsightly and clearly visible white dot. Therefore, it is worth washing the glass, then walking over it with a special cloth, which, due to electrostatic voltage, will remove all dust. You can buy such a rag at computer or car stores.
- Take the film and peel off the protective layer. At the same time, apply a soap solution to the surface with a spray bottle. This will enhance the adhesive properties of the material. Try not to touch the adhesive side with your hand.
- With an assistant, bring the canvas into the salon and apply it to the glass. Again, be careful not to catch dust or just any object in the cabin. It’s easier to do this on hatchbacks and station wagons, just open the clapper and apply the film to the glass.
- Smooth out with a spatula. Movements should go from the center to the edges. This will remove excess water and most of the remaining air.
- Remove any remaining air bubbles using a spatula. In some cases this may take a long time. But you need to do this carefully; under no circumstances try to puncture the bubbles, as this will only cause white dots to appear.
- If the film does not fit tightly in some places, you will have to pick up a hairdryer again. An assistant from the outside heats the glass, and your task is to smooth out the film. Again, this is done with a plastic spatula; it is used to carefully level the surface.
- Cut off excess film. This must be done carefully, use a sharp stationery knife or blade.
- Next comes the most difficult part - pressing the material along the edges of the glass. Press the tinting along the edges again with a spatula. Usually the film may not fit tightly here, so be sure to go around the entire perimeter. In many sedans it will not be easy to get close; the seat gets in the way.
This is where the work ends. You need to wait a little until the film completely “sets” and you are ready to go.
For many sedans, it is recommended to do this work with the glass removed. Here you need to look at the interior layout. If you can get to the surface without any problems, you can do without removing the rear window. In other cases, it is better to remove it. If you are replacing glass, you can apply the tint before installation.
On the dismantled rear window, the process is similar to that described above. Only the stage of shaping the material is done not on the outside of the glass, but on the inside.
DIY car window tinting and benefits
- Significant cost savings when compared with tinting in the service. The cost of tinting yourself is 10 times less than tinting at a service center.
- In summer, the interior will heat up less if you tint it.
- Tinting does not allow harmful ultraviolet rays to pass through.
- If the glass breaks, the tinting will hold the broken pieces, which will protect the driver or passengers from cuts.
- Tinting protects from the glare of the sun or the headlights of oncoming cars.
- The most important thing is that tinting allows you to hide everything that happens in the cabin from strangers.
- A car with dark windows looks more stylish.
Useful tips
Proper car tinting has a number of nuances and features. The craftsmen have gained extensive experience in tinting the rear windows of cars. Below you will find some useful tips that can make it easier for you to achieve a positive result.
- If you need to straighten folds and wrinkles, you need to do this by moving the spatula along. Be sure to work from the center to the edges. In this case, you will not create a crease in the tint, and you will straighten the problem area quite quickly.
- Do not turn on the heating immediately after gluing the material. Let the film dry. In summer it is enough to wait a day, in winter it may take a week. If you turn on the heating, it will dry unevenly, and you will end up with a lag in the places where the conductive elements pass. You've probably seen at least once a car with tinting on the rear window, where air bubbles are located in even rows. This is the consequence of turning on the heating on a damp film.
- When heating, move the hairdryer along the heating threads. This will reduce the likelihood of wrinkles appearing on the tint.
- Water must be expelled from the central part of the glass along the heating elements. You simply cannot “roll” moisture through the thread. It will serve as a holding element. When expelling air bubbles, you can move in any direction, preferably along the shortest distance to the edge.
- Do not hold the hair dryer over one place for a long time. This can lead to uneven heating of the tint and damage to the film. It shrinks and may burst. Therefore, even if your task is to disperse a wrinkle in one place, be sure to heat the glass at some distance.
- It is better to remove large arrows in parts. First, use a spatula to break one arrow into several small ones, and then remove them one by one. It's faster and more reliable. It is almost impossible to drive out a large arrow completely without breaking it into pieces.
- When trying on the film, make sure that it lies as tightly as possible. Any wrinkles and distortions can lead to problems in further work. Focus on the absence of strong swelling in the center, as well as a tight fit around the edges to the seal. And in any case, first cut off the tint with a small margin.
If you follow all of the above, you will not have any problems with tinting.
Armor film
Armored film has many advantages:
- saves glass from various damages, such as flying pebbles, scratches and others;
- creates a soundproofing effect;
- creates a thermal insulation effect;
- will not allow those who try to break the glass with a hard object to enter the car;
- Retains about 99% of ultraviolet rays.
The armor film is applied in the same way as a regular tinting film, without any technological difference. The most important difference is that the armored film is thicker - its thickness exceeds 300 microns, and its rigidity is also higher. Thanks to its high rigidity, it is a little easier to work with. You can also glue the armor film over a regular tinting film. You can create different color schemes. You can do double tinting or tinting with armor or double armor.