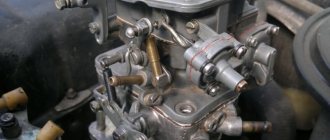
Despite the fact that the VAZ-2121 SUV was developed quite a long time ago, this car is still very popular. In 1994, the model was changed to VAZ-21213. Many people buy these cars because of their high cross-country ability, which can be the envy of some jeeps from famous brands. Others like reliability, unpretentiousness and high maintainability. A simple design and excellent off-road characteristics made this vehicle a vehicle for lovers of travel, hunting, fishing and tourism.
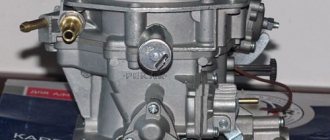
Niva cars 211213 are equipped with a 1.7 liter engine. It is carburetor, and is based on a VAZ-2106 engine. There is also a five-speed manual transmission and a proximity ignition system. The power system is equipped with a Solex 21073 carburetor for the Niva. Many novice car owners are intimidated by carburetors and everything connected with them. But a carburetor is not a death sentence. You just need to understand its basic structure, how to adjust it, and how to repair it.
Float mechanism
The Solex 21073 carburetor, installed on the Niva, has a float chamber of two sections. They are located on both sides of the main cameras of the device. The system consists of two ebonite floats, which are mounted on a lever.
The latter swings on an axis pressed into the bosses of the device cover. There is a tongue on the bracket. The element presses the needle valve needle through a special ball. The float mechanism serves to adjust the level of fuel required for normal operation of the carburetor. The needle valve is a non-separable type. It is not being repaired. The valve body is mounted on a thread in the carburetor cap. The ball protects the needle from shock when the machine moves. If the chamber is empty (for example, if the driver is using LPG), then the floats will knock.
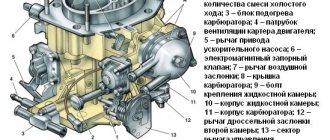
Carburetor DAAZ 21073 - device
The device of the Dimitrovgrad Automotive Aggregate Plant is designed for mixing fuel and air and consists of two main components:
- Frame;
- Top cover.
The device is also based on a float chamber for balancing the level of fuel supplied to the diffuser, an accelerator pump, a forced idle economizer and an econostat. The top cover contains: an emulsion tube or emulsion wells, fittings designed for atomizing fuel in the diffuser, as well as an air damper necessary for cold starting of the power unit. The Solex 21073 carburetor on the Niva is installed and configured from the factory, and its design and calibration data provide good dynamic performance with minimal fuel consumption.
Calibration data
| Name | 21073 stock | 21073 mine | 21053-*** | 21053- | ***-20 | |||
| 1st camera | 2nd camera | 1st camera | 2nd camera | 1st camera | 2nd camera | 1st camera | 2nd camera | |
| Engine capacity | 1700 | 1500 | 1500 | 1600 | ||||
| Main diffuser | 24 | 24 | 24 | 24 | 23 | 24 | 23 | 24 |
| gtzh | 107,5 | 115 | 115 | 115 | 102,5 | 115 | 107,5 | 110 |
| GVZh | 150 | 135 | 150 | 135 | 150 | 135 | 140 | 165 |
| TJ XX and move on. System 1 | 39 | — | 42 | — | 39 | — | 40 | — |
| TJUN | 45 | — | 35 | 40 | 35 | 40 | 45 | 40 |
| Kulachek UN | 4 | 7 | 4 | 5 | ||||
| TJ EMR | 40 | — | 40 | — | 40 | — | 40 | — |
| Choke cam | 6 | — | 6 | — | 7 | — | 3 | — |
| T/W ratio | 0,717 | 0,852 | 0,767 | 0,852 | 0,683 | 0,852 | 0,768 | 0,667 |
| Total t/v ratio | 0,781 | 0,807 | 0,763 | 0,713 |
Carburetor calibration data 21073-1107010 | ||
| Options | first camera | second camera |
| Mixing chamber diameter, mm | 32 | 32 |
| Diffuser diameter, mm | 24 | 24 |
| Main dosing system: fuel jet marking air jet marking | 107,5 117,5 | 150 135 |
| Emulsion tube type | ZD | ZC |
| Idle system and transition system of the first chamber: fuel jet marking air jet marking | 39 140 | |
| Second chamber transition system: fuel jet marking air jet marking | — — | 70 140 |
| Power mode economizer: | — | 70 |
| Econostat: conditional fuel jet flow rate fuel jet marking spring compression force at a length of 9.5 mm, N | — 40 1,5±10% | — |
| Accelerator pump: nozzle marking, fuel supply in 10 cycles. sm3 cam marking | 14 — 4 | — — |
| Starting clearances: air damper, mm throttle, mm | 3,0 | — |
| Marking of the choke control lever | 6 | — |
| Hole diameter for vacuum corrector, mm | 1,2 | 1,2 |
| Needle valve hole diameter, mm | 1,8 | 1,8 |
| Diameter of the fuel bypass hole into the tank, mm | 0,70 | 0,70 |
| Engine crankcase ventilation hole diameter, mm | 1,5 | — |
Main dosing systems
The first and second chambers are equipped with diffusers. There is one large and one small element. Spray devices are also made together with small diffusers. The latter are connected through channels to the emulsion wells, and they communicate through one channel with the float chamber. To ensure that gasoline flows in certain portions, the main fuel jets are located below in the emulsion wells. These same wells have special tubes. Each of them is equipped with an air jet at the top. Air is supplied to them from the neck of the device.
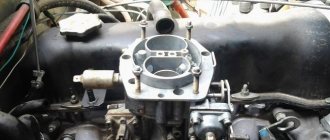
Elements of the carburetor on Niva models
Domestic SUV
The carburetor circuit also includes: a drive lever from the accelerator pump, a diaphragm, an adjusting screw and an air duct from the starter, a shut-off valve (solenoid), an air damper, a needle valve, a fuel supply fitting, an economizer for power modes, a carburetor heating unit, fittings for crankcase ventilation, for supplying vacuum for the vacuum regulator in the ignition, and other elements.
Niva 2121 has the following sequence of passage of fuel elements through the carburetor chamber. First, fuel moves from the fuel tank to the float chamber in a controlled amount. The float rises or falls as the fuel moves.
Further, the fuel path lies through the nozzle into the atomizer, located in the narrow part of the diffuser, with simultaneous air entering the carburetor through the outer pipe. The throttle valves then deliver varying amounts of fuel into the engine cylinder through an intake manifold cast from aluminum alloys. The manifold is attached to the engine with studs through gaskets that have heat-resistant properties.
Return to contents
Operating principle of the main dosing chamber
Under the influence of vacuum that occurs in the engine cylinders, air is drawn through the filter. Next, oxygen is supplied to the first chamber. It passes through diffusers. Due to the fact that the air flow speed has increased, an even greater vacuum is created in the nozzle area.
Under its action, the fuel rises from the emulsion well from the atomizer. At the same time, air passes through the air nozzle into the emulsion tube and is then mixed with fuel. As a result, an emulsion is formed, which is sucked at high speed into the carburetor channels, where it connects with the air flow. The installed Solex 21073 carburetor on the Niva operates on this principle. Its design may vary depending on the modification. But the principle of operation of the systems is approximately the same for all devices.
Solex carburetor: modifications
The basic design of these devices was developed by engineers from the French company Soleks.
The Dimitrovgrad plant later received a production license, and all other modifications were made by specialists here. The popular Solex 21073 was developed at DAAZ. Reviews about it are only positive. The mechanism is easy to customize and is highly reliable. DAAZ-2108 is designed to work with a 1.3-liter engine for VAZ 2108 and 2109. Solex 21083 was modified for 1.5-liter power units. The same mechanisms were equipped with models from the first batches of the VAZ 2110 with a microprocessor-based ignition system. On classic VAZ models, Solex 21053-1107010 was installed. VAZ Niva models were equipped with the Solex mechanism 21073-1107010. Now it has been replaced by an injector.
Idle system
The device is equipped with an idle system. It is designed to allow the engine to operate at low speeds. At this moment, the vacuum in the diffusers is very small. Fuel cannot enter the main metering system. At idle speed of the engine, fuel is supplied under the throttle valve of the first chamber of the carburetor. There the vacuum is strong enough to form a stable combustible mixture.
Air is supplied through the main jet and the emulsion well of the first chamber. The fuel will then flow to the idle fuel jet. After this, it is mixed with air supplied from the XX air jet. Oxygen is supplied to this element through a special channel. This operating scheme allows the engine to ensure a smooth transition from load to idle and prevents fuel from leaking out of the float chamber.
Device and principle of operation
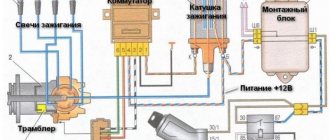
Wiring diagram VAZ 21213 Niva carburetor electronic ignition
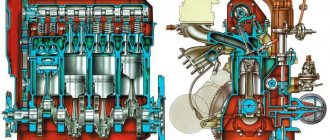
The basic principles of mixing fuel and air using a simplified scheme are demonstrated in the figure.
As the piston moves downward from top dead center, the intake valve opens, allowing the air-fuel mixture to be drawn in from the carburetor. At this moment, in the diffuser 6 of the mixing chamber 8, the fuel coming from the atomizer 4 through the nozzle 9, metering the fuel flow, is mixed with the air sucked in through the air damper 5. The flow of the air-fuel mixture is regulated by the throttle valve 7, connected to the gas pedal.
One of the main parts of the carburetor design is the float chamber 11. The operation of the engine depends on its correct setting. The fuel level in the float chamber is regulated by the position of floats 10 - there are two of them in Solex. When gasoline enters chamber 11 from fuel line 1, the floats float up and block the flow of fuel through needle valve 2. In this case, the air displaced from the float chamber leaves through technological hole 3.
Sprayer 4 is designed in such a way that its upper cut edge is slightly higher than the fuel level in the float chamber. As the air flow passes through the diffuser, gasoline is sucked in and further mixed with air. If there is too much fuel in the float chamber, it may leak out. If the mixture contains too much gasoline, it will lead to the following negative consequences:
- pouring candles;
- incomplete combustion of fuel;
- increased fuel consumption;
- reduction of engine thrust;
- increase in the volume of harmful emissions.
Troubleshooting
Car components do not last forever, and sometimes the installed Solex 21073 carburetor on the Niva fails. Repairing it must begin with diagnostics. It may be possible to get by with a simple adjustment. So, during operation, solid particles can enter the carburetor, which ultimately causes clogging of the jets. Low-quality gasoline leads to the formation of deposits on the walls of the channels in the device. This significantly reduces their cross section. Failure of carburetor systems can be diagnosed by the following symptoms:
- Increased fuel consumption.
- Difficulties in starting the engine. Reduced power and dynamic performance.
- Unstable operation at idle.
In this case, it is necessary to clean the installed Solex 21073 carburetor on the Niva. The adjustments that will be made after this will allow the device to work as it should again.
Basic Solex malfunctions and methods for eliminating them
Before looking for problems with the device, you need to make sure that the ignition system is working flawlessly and is adjusted correctly. You also need to check whether the timing belt is functioning correctly, since malfunctions in the operation of this mechanism can also cause malfunctions in the carburetor.
Table 1. Classification of possible carburetor malfunctions and methods for eliminating them.
| Malfunctions | Causes |
Elimination methods
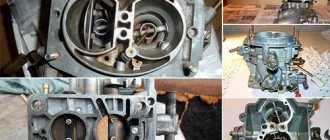
How to restore carburetor operation?
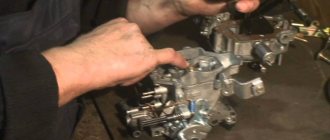
For repairs, most often you have to remove the device from the engine. First, remove the air filter. Then the fuel lines, air pipes, wires and cables are removed. then unscrew the fastening nuts.
It is best to disassemble the carburetor on a table or other convenient surface. The parts should be laid out in some order. This will help you not lose them. The process of adjusting the needle valve is performed using a special template. To wash the device, you must use special liquids. Replacement jets can be purchased at any auto stores. Often, disassembling and flushing the carburetor helps solve a lot of problems.
Results
Of course, it is clear that there is no limit to improvements. Sometimes they can even go to excess: drilling, for example, a throttle valve, polishing an MD, soldering epulsion tubes on a carburetor. But, as they say, what is in excess is unhealthy. But such a procedure, fascinating in its own way, like selecting the types of jets for a Solex 21073 carburetor, for example, is something quite necessary for the correct setup of the unit and its complete compatibility with the engine compartment. As a result, you get an economical car that responds well to gas.
The most common are Solex carburetors modifications 21053, 21083, 21073, 21041. They differ in calibration data, i.e. cross-section of large diffusers (BD), value and type of jets and other giblets, and are designed for a certain engine size and type.
21083 – “basic” modification of the carburetor with the smallest diffuser cross-section 21x23, designed for a transversely mounted “chisel” engine with a volume of 1.5 liters. It is especially popular because it can be used to make a Solex of any modification, as well as a unique one, machined to suit any value of diffusers, and so on. It is undesirable to install it on an engine with a volume of more than 1.5 liters - at high speeds it will choke the engine due to the small cross-section of the OBD. It is worth noting that 21083 prepares a lean mixture (due to the characteristics of the 2108 motor) and to obtain good dynamics on the UZAM engine, it is advisable to change the jets.
Adjustment
If the installed Solex 21073 carburetor on the Niva fails, repairs and adjustments help bring the device back to life. The settings allow you to restore optimal modes in which the motor will operate as efficiently as possible. Fuel consumption is at an average level. First of all, start the engine and warm it up a little. Next, you need to remove the fuel hose and the device cover. It is recommended to remove the latter with extreme caution so as not to damage the float. Next, using a measuring tool, measure the distance in each of the carburetor chambers. Measure from the mating surfaces to the edge of the fuel. This size should be approximately 24 mm. If this distance is less or more, then it is adjusted by bending the float. Then you need to start and warm up the engine again. When the level adjustments are successfully completed, you can proceed to adjusting the idle speed.
The engine is turned off. To set up, you will need a flathead screwdriver and a little time. There is a hole on the base of the device in which there is a screw that regulates the quality of the fuel mixture. It is twisted all the way. Then from the extreme position the same screw is unscrewed by about five turns. Then the engine is started. There is no need to use a suction. If you unscrew the “quality” screw, then the carburetor will change the engine speed. Then it is twisted again. It is required to rotate until the operation of the motor is stable and stable. When the engine starts to run smoothly, then the element is unscrewed no more than one turn. As a result, the idle speed will be set at 900. If the engine starts to stall, it is better to slightly increase the idle speed.
Scheme and principle of operation
The types and modifications of carburetors for a given car can be very different, but the principle of operation remains the same.
When starting the engine cold, the driver closes the choke to limit the flow of air and increase the amount of gasoline. This makes it easier to start and brings the speed necessary for stable operation.
- Checking and adjusting the idle speed of an engine with a 21073 Solex carburetor
Carburetor 21073 DaAZ device and principle of operation: diagram of the design and operation of the carburetor I - first chamber; II - second chamber; 1 — accelerator pump drive lever; 2 — adjusting screw of the starting device: 3 — diaphragm of the starting device; 4 — air channel of the starting device; 5 - solenoid shut-off valve; 6 — idle fuel jet; 7 — main air jet of the first chamber; 8 — idle air jet; 9 — air damper; 10 — sprayer of the main dosing system of the first chamber; 11 — accelerator pump nozzle; 12 — nozzle of the main dosing system of the second chamber: 13 — econostat nozzle: 14 — main air jet of the second chamber; 15 — air jet of the transition system of the second chamber; 16 — channel for balancing the float chamber; 17 - float chamber; 18 — needle valve; 19 — calibrated hole for fuel bypass into the tank; 20 — carburetor fuel filter; 21 — fuel supply fitting; 22 — power mode economizer diaphragm; 23 - fuel jet of the power mode economizer; 24 — ball valve of the power mode economizer; 25 - float; 26 — econostat fuel jet with tube; 27 — fuel nozzle of the transition system of the second chamber with a tube; 28 — emulsion tube of the second chamber: 29 — main fuel jet of the second chamber; 30 - outlet of the transition system of the second chamber; 31, 33 — throttle valves: 32 — slit of the transition system of the first chamber; 34 — outlet of the idle system; 35 — carburetor heating block; 30 - adjusting screw for the composition {quality} of the idle mixture; 37 — engine crankcase ventilation fitting; 38 - fitting for supplying vacuum to the vacuum ignition regulator; 39 — vacuum selection fittings for the recirculation system; 40 — main fuel jet of the first chamber; 41 — emulsion tube of the first chamber; 42 - ball valve of the accelerator pump; 43 — accelerator pump diaphragm.
During the warm-up process, air intake is increased to reduce speed and eliminate interruptions. Thus, the air damper opens completely and the amount of gasoline is reduced. Other methods of warming up are not provided for by the design.
Gasoline is supplied through the fuel filter to the float chamber, and then to the main metering system of the mixing chamber. The scheme for pumping air and mixing it with gasoline in the diffuser occurs due to the vacuum that occurs during the operation of the valve mechanism and pistons, compressing and pushing out the working mixture.
The second chamber system is designed to increase air flow to the nozzle when the engine is running under heavy load, when the speed is high.
To ensure that the engine runs stably at idle, and at low speeds to prevent it from stalling and eliminate interruptions, an idle system is provided. And to maintain the level of fuel used in the Solex 21073 carburetor, there is a whole scheme for the operation of the float system. Let's consider the operation of each system separately.
How to check Solex
To ensure high-quality work on adjusting and tuning the carburetor, you should ensure that sand particles, etc. do not get on the throttle valves. If solid particles get into the carburetor, this can lead to an expensive overhaul of the internal combustion engine (due to some small thing).
After you have adjusted the carburetor correctly, you need to check the accelerator pump. When the throttle valve is opened slightly, the nozzle should spray gasoline. Here is the answer to the question: why does the car jerk when driving? If a stream of gasoline from the sprayer appears late, then this precisely leads to braking when you press on the gas and the car jerking.
To clean the carburetor, it must be disassembled. First, we unscrew the fuel and air jets, as well as the emulsion tubes. If it is difficult to remember what is where in the carburetor device, then it is most convenient to photograph each step.
To determine whether the diaphragm is intact, unscrew the cap of the power mode economizer.
Signs of a broken carburetor diaphragm:
- The internal combustion engine does not stall when the screw is tightened.
- If you turn off the ignition, the engine continues to run for some time, that is, self-ignition occurs.
- Unstable operation of the internal combustion engine.
- Increased gas mileage during normal, moderate driving.
ECTO or EURO? What brand of fuel is best to fill in? ECTO fuel is not recommended for use in cars with high mileage.
After checking the integrity of the diaphragm, we clean the SOLEKS. For cleaning we use air pressure (a compressor or pump is needed). If the dirt is hard and does not fly off with a stream of air, then carefully clean the stuck dirt with copper wire. I use air pressure cleaning without damaging the surfaces of carburetor parts. After this, close the lid and now you need to lubricate all the rubbing surfaces of the carburetor parts. It should be lubricated after washing the outer part.
Adjusting and tuning the Solex carburetor on the VAZ 21099
So, the car again does not drive, stalls, sluggishly picks up speed, does not pull, stalls when releasing the gas or changing gears... Consumes a lot of gasoline and does not have sufficient throttle response... Jerks when accelerating or releasing the gas pedal... Or popping noises are constantly heard in the mufflers at idle …. ? Then this article is for you.
Well, I don’t think that you are a completely unsavvy lover of your carburetor car. And I think that you have already acquired the basic skills for servicing a carburetor, or at least know what it looks like. Some may have already disassembled it, and some have only looked at the device from a book; in any case, you will need a book for servicing this miracle. But here I will tell you what is not in the books, and what is written incorrectly.
I'll tell you a few rules. Rule one: Never buy spare parts without packaging. In this case, the carburetor should be packaged in this colorful package. Like? Me too…
If you buy a carburetor without a box, you run the risk of taking a prototype, assembled from who knows what and who knows where, as I once did.
Rule two: Do not disassemble a new carburetor, especially if you are not yet a master in this matter. It’s better to practice on the old one and on your neighbor’s car. He will thank you again if he starts up after your next experiment.
Rule three: Wash the carburetor inside and out every time you remove it from the car. Usually, dirt from the outside easily gets into the thin channels of the internal compartments of the carburetor.
Rule four: Don't really trust books. I have seen many books on carburetors and they all give different calibration values.
Now that you know the basic rules, we will begin to study the malfunctions of solex carburetors. These are the kind of malfunctions that happen most often.
The picture is this: you start the car and hear constant popping noises in the muffler, while the tachometer bounces rhythmically. The idle speed of course floats, the engine tries to stall. If everything is fine with your ignition, and you can find out about this by reading this article Malfunctions of the ignition system in carburetor engines, then your idle system is clogged. It has a narrow fuel supply channel, which flows through the idle jet.
We turn it out of the carburetor and inspect it. There are 3 holes on the nozzle head, the main thing is that they are round and not elongated ellipsoidal. If everything is fine, then we look further... And there is no need to look further, he removes the shiny head and we see the following picture:
The white pusher stops the flow of gasoline through the valve, so it must be clean. Now we look carefully at the head; there is a small hole in the middle of it. Naturally, it must be clean, and there should be no debris inside the head that gets there either from rubber hoses or from the gasoline itself.
If everything is fine, then we look at the elastic band that is put on the nozzle; it should not have any tears or other signs of violent abuse. We screw the jet into place, but only by hand and all the way. This jet should work optimally, which means if you remove the wire from it at idle, the car should stall. If it doesn't stall, then the jet is running low. That's it. This is the main reason why there is no idle speed. If there are gaps and so on, we dig towards the ignition.
Next, you may have a problem when, when you abruptly release the gas, your engine stalls, but when you release it smoothly, it does not. The EPH system is to blame for this. And either the contacts have oxidized, or the box that is responsible for switching the EPHX system has become obsolete; it is located next to the switch on the bulkhead of the engine compartment. Well, most often there is poor contact between the wire and the idle jet contact; to do this, we clean the contact on the idle jet. We remove the tip on the wire from the chip and press it so that the wire sits tightly on the idle jet. After these manipulations, everything will pass, unless of course you have a brutal overflow of gasoline in the idle system.
In case of overflow, you will have black carbon deposits on the spark plugs and then you will have to adjust the quality and quantity of the mixture at idle. But more on that later.
It often happens that the car jerks when accelerating and braking the engine, usually this happens at certain speeds, and sometimes in a certain range. In this case, you clearly have overfilled or underfilled gasoline. This means that the composition of the mixture in operating mode is not adjusted. How to cure it? Let's half the carb; to do this, unscrew 5 bolts and remove its upper part. We turn it upside down, look at the floats, touch and wobble them, there are marks on the carb gasket to the left and right of the floats. The floats should be parallel to these marks. Like this:
But not like this:
Otherwise, they will touch the walls of the chambers and gasoline will forever flow into this kind of toilet. And now the most interesting thing is that everyone says that the level needs to be set differently. For nines and tens there is a gold level. I checked it more than once and set it completely different, but the value of 37.5 mm is what you need, believe me. Then you can put another one, but with this value the mixture is optimal. Oh, by the way, I hope you set up the ignition before getting into the carburetor? About this here Malfunctions of the ignition system in carburetor engines
How to measure these same 37.5 mm. And like this:
This is the distance from the gasket to the top edge of the floats. With this setting, the lower edge of the floats is 5-6mm away from the gasket. While the book states 1-2mm. Don’t believe it, with this setting the engine mercilessly choke.
So, we set the level by bending the float holders! We don’t move the floats ourselves! Otherwise they will simply fall apart. 2 of mine fell apart, I had to glue them, but they are always covered in gasoline, you yourself understand what kind of glue there is... So, we set the level by bending the float holders and make sure that the floats do not slant to the side and are perpendicular to the gasket. We're done with this, now your car will have unprecedented traction and a complete absence of failures, unless of course there were any before and there was no traction.
If the main metering system, which consists of jets and wells, becomes clogged in the carburetor, then the car either loses its dynamics or jerks. Usually the first chamber is clogged, so when driving at full throttle the car drives without jerking, because the gas chamber of the second chamber usually rarely clogs.
To do this, use a screwdriver to unscrew the air jets. They are usually clean. The fuel underneath them gets clogged. To get them out, take a watch or any flat mini-screwdriver. We insert it into the well and feel for the slot, now press harder on the screwdriver and unscrew the jet. Thus, we place the nozzle on the screwdriver and now we can remove it simply by pulling it up after unscrewing it. We inspect the jet. It happens that it gets clogged and we blow out the channel with a syringe. The channel is directly connected to the float chambers.
Here is the inverted air jet of the second chamber:
Here are the places where gasoline residue accumulates:
There is usually a sediment left in them from gasoline, which is then sucked into all carburetor systems, so I recommend thoroughly cleaning both float chambers, and then blowing out these holes:
Solex carburetors have 2 supply pipes for the crankcase ventilation system. One is routed to the air filter, and the other to the very bottom of the carburetor. Here it is:
And if the crankcase gas channel is as dirty as in the picture, then it’s time to clean the oil separating mesh in the cylinder head cover. Well, if your oil is already flying out of all the cracks, then place a carburetor fuel filter in the cut in the pipe; it fits well into the thin hose. At the same time, the collector will be cleaner.
What's next? If your choke handle works well, then it doesn’t reach the end and, accordingly, the fuel mixture is constantly enriched, do not rush to adjust the cable, the problem is in several things:
This bolt with a large head has a tradition of unscrewing, as a result of which the lever that it holds begins to move in a figure eight, and you yourself understand that it is so warped that in such a situation it is difficult to correctly regulate the level of fuel enrichment when starting the engine.
So, the bolt is tightened….. Just don’t pull with all your might, but so that the lever moves freely and has no backlash….. And still the idle speed is high after removing the choke handle… Then open the air filter housing and if there the air damper is clearly not in a vertical position, do the following...
We remove the spring that is indicated in the figure; why it is needed is written in clever words in the book. In simple terms, it creates additional resistance to closing the air damper. After you remove this spring, you will notice how easily the choke handle begins to move. And besides, there will no longer be a problem when the damper does not close completely when the handle is removed. There will be no negative aspects due to the fact that you removed this spring. There are only advantages everywhere!
And if you did everything correctly, then when you retract the choke handle you will see that the air damper is clearly vertical:
Unlike the technique with a torn out tip in the idle jet. Usually this is done when the idle speed floats and nothing helps. The design of engines is becoming more and more complicated, but here we are simplifying the system with our own hands and what do we get as a result?…. Black candles! Because at idle and in transition modes the mixture is clearly richer than necessary. I’m already silent about the plaque that, after such tuning, will accumulate in the combustion chambers. Therefore, advice: do not remove the sting of the idle speed vein. It is better to check again whether current is supplied to the nozzle and whether it is clean enough. Replace for peace of mind. Once again, I note that the engine should stall when the wire is removed from the XX jet while idling.
You can read about idle speed adjustment here: Idle speed adjustment on a Solex carburetor VAZ 2108 2109 21099 2115
And yet, the accelerator pump has these tubes that very rarely get clogged and generally rarely go in the wrong place, so you shouldn’t be tricky with them by constantly bending them. Personally, I have not seen a single carburetor where these tubes did not pour the mixture into the middle of the chambers. Although they say that it happens...
And the last piece of advice: If you cleaned the float chamber, and after a week there is sediment in them again, then change the gas station or clean the fuel tank.
That's all for now. I talked about the main problems of VAZ 2109 carburetors. I think that soon I will continue this topic, but for now that’s all. Happy setup and adjustment everyone.
Other materials by the author
Added:
Depeche_Mode
2011-05-12 23:00:21
Time has appeared and I decided to write an article about adjusting the idle speed on a solex carburetor, which you can read here Adjusting the idle speed on a solex carburetor VAZ 2108 2109 21099 2115
And here I wrote about where and why the carburetor can become clogged: Cleaning the carburetor
Expanded by: Depeche_Mode
Drawing of a bimetallic spring chamber for Solex carburetors with a semi-automatic starting device.
In the figure: 1) a spring 2) a starter control lever 3) an axis on which all the damper control levers are located 4) a cam 5) a stop that determines the initial opening of the throttle valve 6) a starter lever. The second main part of the mechanism after the spring. 7) a rod, the run-out of which determines the maximum speed when warming up begins. By adjusting the screw of this rod, you can, for example, set the initial speed for warming up to 1600, not 2500. As they say - summer mode.
Expanded by: Depeche_Mode
Calibration data for Solex carburetors is shown in the image below (you can click on the image to enlarge it):
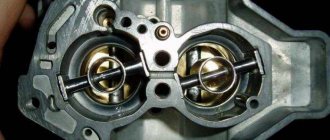
The picture below shows small holes in the carburetor well that are very prone to getting clogged with dirt. It is best to clean them with a small needle. If at least one hole is clogged, then the power system will behave inadequately, because there is a transition hole in the 1st chamber and a hole for collecting vacuum to correct the SOP.
Click on the image to enlarge
Every time you disassemble the carburetor, be sure to check these holes for blockages.
The photographs below show how the shutter of the first chamber should be positioned when adjusted correctly.
Designations:
1. — Transition hole of the first chamber. 2. — Vacuum selection hole for the vacuum corrector UOZ
In the first photo, the damper is completely closed and you can see how part of the first hole is open, but the 2nd hole is completely blocked by the damper, i.e. the damper is level with this hole.
In the second photo the flap is slightly open and both holes are completely open.
Click on the image to enlarge
Click on the image to enlarge
Adjusting the starting gap on a Solex carburetor
For this simple procedure, we will need a flathead screwdriver and a 8mm wrench, as well as something that can be used to measure the following distances: Between the wall and the choke valve: 2.5mm Between the wall and the throttle valve: 1.1mm Data is given for the 21083 carburetor.
First, set the throttle position. This position is adjusted by a screw on which the remote control control lever rests. On the picture:
1 - gap 2 - adjusting screw
Click on the image to enlarge
The photo also shows where you need to insert a screwdriver for adjustment. To do this, turn the carburetor over and set the throttle control lever all the way counterclockwise, i.e. to a position where we have pulled the suction all the way. In this position, the damper should not reach the well wall exactly 1 mm at its midpoint. Here either a probe or a drill will come in handy. We insert the measuring device into the space and turn the adjusting bolt until we set the desired gap. We have set up the remote control.
Now let’s set the distance to which the air damper will close when the engine starts with the choke handle extended, that is, a gap of 2.5 mm between the air damper and the wall of the well of the first chamber. On the picture:
1 - gap 2 - adjusting screw
Click on the image to enlarge
This is the gap we will adjust. To do this, turn the remote control control lever counterclockwise all the way, then press the rod coming out of the starting device (the rod is shaped like the letter L) to press it all the way. There should be a distance of 2.5mm between the air damper and the well of the first chamber. Now let's find a device the size of 2.5mm. We lower it into the distance between the damper and the well and make adjustments. Adjusting this distance is also easy. To do this, loosen the lock nut on the trigger with an 8 key and then use a flat screwdriver to turn the screw, as a result of which the L-shaped rod will change its position and the position of the air damper cover.
The figure below shows in red the rod hidden behind the remote control lever and the shape of the rod itself.
Click on the image to enlarge
And I’ll repeat it again and show you that this spring needs to be removed. It doesn't make any sense. Often it pulls the throttle back and closes it, as a result of which the engine starts poorly when hot, does not develop full power and consumes more fuel.
Click on the image to enlarge
That's it, now all our starting gaps are adjusted. Happy engine starting in the morning everyone!