Every car requires care. Only under this condition will it function normally. In this article we will talk about one of the most important components of a car - the timing mechanism. To be more precise, here we will talk about replacing the timing belt on a Mitsubishi Lancer. The manufacturer of this car claims that the belt should be changed only after 90 kilometers. I must say that this is quite a lot; other cars have a slightly shorter belt drive service life. But it is not at all necessary that it will last exactly that long - the service life can be longer or shorter. This depends on several reasons: first of all, on the quality of the belt itself, on operating conditions and on driving style.
About the car
The Mitsubishi Lancer 9 first rolled off the assembly line in 1973. At first there were 12 modifications with engine capacities from 1.2 to 1.6 liters. In the 70s, Lancer 9 was produced with a coupe body. Then the car began to be produced with four doors and engines of 1.6 and 1.8 liters.
Lancer 9 is the ninth generation and, under an agreement with Mitsubishi, it was produced in our country from 2007 to 2015. Over 8 years, 145 thousand copies of the model were sold in our country at a price starting at 760 thousand rubles.
The car is equipped with two versions of 16 valve engines:
Replacement procedure
Replacing the timing belt of a Mitsubishi Lancer 9 is not an easy procedure, requiring partial disassembly of the engine and certain conditions. In this case, it is necessary to have a garage, specialized tools and a classified selection of replacement parts.
Therefore, it is safer to turn to specialists, to a service station, where everything is adapted for this. However, you can change the timing drive on Lancer 9 yourself; you just need to have basic skills in servicing and repairing the car.
Algorithm of actions
Attention! In order to tear off the pulley fasteners, it is recommended to install a socket wrench with a long lever on the head of the bolt and, by briefly turning on the starter, move it from its place.
Reassemble the engine for Lancer 9 in the reverse order.
Alignment marks
When disassembling and assembling the engine for Lancer 9, special attention should be paid to the crank mechanism (CVM) and timing components, since they are interconnected. Before disconnecting these mechanisms, you must first set marks on the corresponding shafts of these devices.
To set the marks, turn the crankshaft.
For SOHC engine
The camshaft mark must be aligned with the mark on the cylinder head.
The crankshaft mark must be aligned with the mark on the cylinder block on both engine types. To see this mark, you need to remove the generator drive pulley and power steering pump.
For DOHC engine
It is necessary that the two camshaft marks align with the slots on the rear timing cover. The crankshaft mark must be installed in the same way as the SOHC engine mark.
Additional verification method
There is another way to make sure that the piston of the first cylinder is at TDC.
Attention! Disconnected camshafts and crankshafts must not be rotated to avoid disrupting the coordinated operation of the crankshaft and timing gear devices.
Before removing the tension roller, it is recommended to secure the above-mentioned shafts together. To do this, you can tie the gears together with wire or tighten them with clamps and attach them to the pulley mounting bolt.
When assembling the engine for Lancer 9, special attention should be paid to the marks; therefore, it would be more correct to first install the tension roller and belt and only then turn the tensioner. If you pay close attention to this procedure, the Lancer 9 timing marks should coincide with the protruding marks on the motor housing.
To make sure of this, you need to reinstall the piston of the first cylinder to TDC, and then check the alignment of the marks. To do this, you need to put the wheel on the hub and, turning it, make two revolutions of the crankshaft. The marks must match.
Timing belt tension
When assembling the Mitsubishi Lancer 9 engine, before installing the upper timing cover, you need to tension the drive.
To do this you need:
After replacing the drive and tensioning the belt, start the car and check engine operation.
Replacing the timing belt Lancer 9
Lancer 9 for many is the standard of a universal car. The model combines high technical capabilities and low price. No wonder it quickly became popular all over the world, including in the post-Soviet space. However, any car requires repairs from time to time. The basic list of necessary measures includes replacing the timing belt of the Mitsubishi Lancer 9.
The service life of the engine, as well as the operating period as a whole, largely depends on the condition of this component of the car. Observing a certain periodicity, it is extremely important to check the timing belt for serviceability and replace if necessary.
Tools
Replacing the timing belt on a 9th generation Mitsubishi Lancer with a 1.6 liter engine is an operation of average complexity, but it can be done in a garage.
To carry it out, you don’t need any special tools or devices; it’s enough to have:
- A set of open-end wrenches (required - 10, 12, 19);
- Set of heads and cranks with ratchet mechanism;
- Pliers;
- Rags;
- Marker (crayon);
- Jack;
- Time and patience.
To carry out the work, it is not necessary to have an inspection hole; everything can be done by placing the car on a flat area with a hard surface. It is also better to perform the replacement with an assistant.
Step-by-step replacement with marking
Has the Mitsubishi Lancer 9 timing belt expired or did the breakdown occur earlier? The part must be replaced immediately. Fortunately, we can carry out the repairs entirely with our own hands and only require the owner to have certain tools and basic car mechanic skills.
Replacement is carried out using the following devices, that is, their presence is mandatory:
The part replacement algorithm includes the following steps.
All that remains is to assemble the structure to its original state and continue to operate the car.
Set the TDC (top dead center) marks on the crankshaft and camshaft mentioned in steps 5 and 9 of the replacement process.
What else can be changed together with the timing drive?
In the process of replacing the timing belt on a Mitsubishi Lancer 9 1.6, you have access to a number of other consumables and components, which allows you to change them at the same time, rather than dividing the work into two separate stages.
So, while servicing the timing drive, you can simultaneously replace:
- cooling system pump;
- drive belts for engine attachments (generator, power steering);
- crankshaft and camshaft oil seals;
- crankshaft sensor (if necessary).
But these elements can be replaced every second time when replacing the timing belt. That is, we install only a new timing belt and pulley once, and at the next replacement we also install the above-mentioned spare parts, and this is every 140 - 180 thousand km. mileage
The situation with the selection of attachment belts is the same as with the timing drive - there are both original consumables and their analogues.
Original consumables should be looked for by the following indices - Mitsubishi MD375935 (power steering) and MN183019 (generator).
As for analogues, for replacement you can purchase belts from two companies - Mitsuboshi (5PK1065 - power steering, 5PK905 - generator), and Gates (5PK1063 - power steering, 5PK903 - generator).
Which product is better to supply?
In conclusion of the article, we note the most popular and reliable parts of the timing system that may need to be replaced. Only by choosing and purchasing high-quality spare parts for Lancer 9 can you guarantee long and reliable service for the car.
| Product, name | Name, catalog numbers |
| Original timing belts | Mitsubishi MD342154 and Mitsubishi 1145A051 |
| Analogs of belts | Gates 5535XS, Contitech CT1008 and SUN A343YU100 |
| Timing belt tensioner roller, original | Mitsubishi MD356509 |
| Analogs of rollers | NTN JPU 57-008 A-4, NTN NEP57008A6 and SUN A343YU100 |
| Original power steering belt (analogue) | Mitsubishi MD375935 (Gates 5PK 1063) |
| Original alternator belt (analogue) | Mitsubishi MN183019 (Gates 5PK903) |
Mitsubishi Lancer 9 timing kit
All the above parts are of very high quality and are used in almost all official Mitsubishi services in Russia and the CIS countries. They are guaranteed to ensure long and reliable service of the car engine. In general, replacing the timing belt of a Mitsubishi Lancer 9 is a simple task, but it does require some preparation and knowledge.
Source
Mitsubishi Lancer FAQ
The timing belt must be changed every 90,000 km. It is also recommended to replace the timing belt if during inspection the following are found:
- Traces of oil on any surface of the belt. Be sure to replace such a belt, as oil quickly destroys rubber. The reason for oil ingress is usually a leak in the crankshaft and camshaft seals.
- Signs of wear on the toothed surface.
- Cracks, folds, indentations or bulges on the outer surface of the belt.
- Fraying or delamination on the end surfaces of the belt.
The report on replacing the timing belt on the Mitsubishi Lancer 9 2.0 is here.
To replace the timing belt you will need: 10, 12, 19 sockets. A 12 wrench and pliers.
Timing belt catalog numbers:
- Mitsubishi MD342154 — timing belt, original
- Mitsubishi 1145A051 — timing belt, original
- Gates 5535XS - timing belt, analogue
- Contitech CT1008 - timing belt, analogue (used by rally drivers on Evo, not inferior to the original and in many ways superior in strength)
- SUN A343YU100 — timing belt, analogue (SUN is the official packager of the original from the Japanese UNITTA plant owned by Gates)
Catalog numbers of the tensioner pulley:
- Mitsubishi MD356509 — timing belt tensioner pulley, original
- NTN JPU57-008A-4 — timing belt tensioner pulley, analogue (NTN is original from the factory). If you order this video, NEP57008A6 still arrives. Both articles appear on the label, both old and new.
- NTN NEP57008A6 — timing belt tensioner pulley, analogue (NTN is original from the factory)
Mitsubishi does not make either a belt or pulley. Therefore, there is no point in buying an original belt with a roller under the Mitsubishi label; the box will still contain original replacements: SUN A343YU100 and NTN JPU57-008A-4.
Replacing the timing belt Mitsubishi Lancer 1.6 9th generation
Every car requires care. Only under this condition will it function normally. In this article we will talk about one of the most important components of a car - the timing mechanism. To be more precise, here we will talk about replacing the timing belt on a Mitsubishi Lancer. The manufacturer of this car claims that the belt should be changed only after 90 kilometers. I must say that this is quite a lot; other cars have a slightly shorter belt drive service life. But it is not at all necessary that it will last exactly that long - the service life can be longer or shorter. This depends on several reasons: first of all, on the quality of the belt itself, on operating conditions and on driving style.
How to determine timing belt wear and when to change it?
Every driver should know that under no circumstances should the belt break. In this case, there will definitely be a meeting of the valves with the pistons, and this is a major overhaul, and therefore capital expenditure. Once a year it is necessary to carry out diagnostics of the timing belt assembly in general and the belt drive itself in particular. Periodic inspection will help identify defects at an early stage. The belt simply needs to be replaced if the following defects are present:
In these cases, replacing the belt becomes a necessity. I would like to draw your attention to the presence of oil stains on the surface. This indicates that the seals also need to be replaced, since if this is not done, they will leak oil and it will begin to drip onto the new drive. And this will certainly lead to its premature destruction, since rubber is afraid of oil.
Someone turns to specialists to replace a belt, and they carry out professional repairs for a fee. Here we will talk about replacing the belt drive yourself. This option is most suitable for those who want to learn how to understand their car and not overpay for its repair. During the repair process, we will be required to disassemble the unit and then reassemble everything exactly. Some car enthusiasts install the crankshaft relative to the camshaft. If during the repair process they stand firm and do not move, this will mean that everything was done correctly. Many people do exactly this, but professionals do it differently: they install the shafts according to the marks they make. This way you can more accurately ensure that the crankshaft is installed correctly in relation to the camshaft.
If you install a belt with a slight misalignment of a couple of teeth, this will cause the engine to run unstably. A large displacement is not allowed at all, as this will lead to the pistons meeting the valves, and this will cause a major overhaul. Experts recommend replacing both the pump and the tension roller along with the belt. It is impossible to say for sure that the pump will have to be changed. The fact is that it is designed for 180,000 kilometers, that is, it can last twice as long as a belt drive. You don't need any special skills to do this job. You will only need to follow the instructions exactly and dismantle and install the parts in a certain sequence.
Replacement process
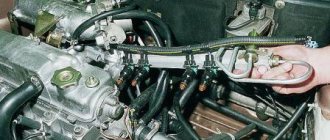
1) Raise the top of the car with a jack and remove the right wheel. You can jack up the engine as shown in the photo:
The rear wheels of the car must be blocked.
2) In order for the engine to turn over easily, all spark plugs should be removed. Now we need to slightly unscrew the crankshaft pulley nut. Sometimes it’s impossible to do this because it sours very much. In this case, you will have to go to a car dealership. But this is not always the case, and more often than not you still manage to move the nut out of place on your own.
3) Now we combine all the marks, and set the piston of the first cylinder to the TDC position.
4) After this you will have to remove the right engine mount. This will have to be done, as it will block access to the timing belt assembly.
5) It's time to remove the power steering belt. To do this you need to unscrew several bolts. The adjusting bolt will also have to be unscrewed, but not completely. If you then press on the belt, it will loosen. After this it will be easy to remove.
6) Do not completely unscrew the adjusting bolt to remove the alternator belt. The generator should then be moved towards the engine. We remove the belt.
7) By removing the bracket and fasteners for the power steering hose, you can dismantle the upper timing case. To do this you will have to unscrew several nuts.
 We block the pulley, unscrew all the necessary bolts and remove the power steering mount.
9) Remember that these works can only be carried out with a cold engine. So, now you can drain the coolant by first substituting a previously prepared container.
10) Unscrew the crankshaft pulley bolt, after which you can remove the lower timing belt protection.
11) Now the next step is a very important thing - setting tags. We combine them as shown in the photo below:
12) Now it’s time to remove the tension roller.
13) Now you can remove the timing belt, but you need to try not to move the camshaft, because it is installed in accordance with the marks. When removing the pump, pay attention to the fact that it is secured with bolts of different lengths. Do not mix them up during installation.
14) We begin to put on the new belt. We start from the right side, and then switch to the left. After this, you can return the tension roller to its place.
That's all, now we begin to assemble the remaining parts in reverse order. If you removed the pump, you should place a new gasket under it when installing it. Some people use sealant instead, but we do not recommend this. Before doing this, the seat should be cleaned of dirt and rust. After installing all the parts, start the car and check the operation of the engine. If you hear any extraneous noise, you most likely did something wrong and will have to repeat the procedure.
Work technology
- Remove the power steering drive belt. To do this, loosen 3 fastening bolts (you can get to two of them through the technological holes in the pulley), and then unscrew the adjusting bolt, after which the power steering pump will move, which will allow you to remove the belt;
- Jack up the front of the car on the right side (in the direction of travel), remove the wheel;
- Remove the protective cover on the fender liner to gain access to the crankshaft pulley;
- We dismantle the generator drive. Loosen the bolt securing the unit to the engine (located at the bottom of the generator) and the adjusting bolt lock. Then unscrew the adjusting bolt a little and remove it from the bracket. We feed the generator towards the engine and remove the belt;
- Unscrew the bolt securing the pulley to the pump and remove it;
- We dismantle the crankshaft pulley. To do this, ask the assistant to turn on the 5th gear at the gearbox and hold down the brake pedal, thus stopping the engine, which will allow you to tear off the pulley mounting bolt;
- Unscrew the 3 mounting bolts of the upper protective cover of the timing drive and remove it;
- We dismantle the lower timing cover by unscrewing its 5 fasteners;
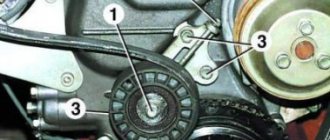
- We set marks on the crankshaft and timing belt. To do this, turn on the 5th speed at the gearbox, put the wheel on the hub, and turning it, align the marks with the special ridges on the engine. We make sure that the marks on the knees and camshafts coincide with the sagging marks;
- Using pliers, remove the end of the roller tension spring from the groove and remove it. We unscrew the bolt securing the roller and dismantle it. After this, turning the crankshafts and timing gear is strictly prohibited, so as not to displace the marks;
- We install a stop (a wooden beam of suitable height) under the power unit;
- Unscrew the motor mount (mount). Moreover, you should unscrew its fasteners both to the body and to the engine. Remove the support;
- We unscrew the bolts of the jumper installed between the landing pad of the engine support and the power steering pump. Don’t forget to lubricate the contacts with graphite grease;
- Remove the timing belt;
- Install a new roller and secure it with a bolt;
- We put on a new belt, correctly placing it behind the roller;
- Install the tension spring.
After this, we check that the marks match correctly. To do this, after installing the new belt and tensioning it with a roller, turn on 5th gear again and install the wheel.
When turning the wheel, we make two revolutions of the crankshaft, align it with the mark and see if it coincides with the influx on the camshaft.
You can turn the gear off with the key.
If the location of the marks is not violated, we assemble the power unit in the reverse order. For convenience and correct assembly, it is advisable to mark some elements and parts with a marker or chalk during disassembly.