The device of block headlights VAZ 2107
The headlights on the VAZ 2107 are plastic boxes with a front side made of glass or durable transparent plastic.
Glass headlights are scratch-resistant and provide better, more focused light output. But glass breaks easily when hit by stones and physical impact. Plastic has less focusing properties and is scratched. But it has greater fracture strength and small stones are unable to damage it. This is why many car owners prefer plastic headlights.
Inside the headlight unit there is a 12-volt lighting lamp with two filaments for low and high beam, a side (parking) lamp and a turn signal lamp. The latter is also intended for emergency signaling.
The lamps are inserted into sockets, and behind them there is a reflector that focuses the light and directs the beam onto the road surface.
The VAZ 2107 headlight has an important detail - a hydraulic corrector. When heavily loaded, the front of the car, and with it the headlight beam, lifts up. The hydraulic corrector changes the vertical angle of the headlight, which allows you to adjust the angle of the light flux and direct it down onto the canvas.
The back side of the headlamp has a cover, which is used to replace burnt out lamps.
Adjusting the headlights of a VAZ 2105 Zhiguli
- Repair manuals
- Repair manual for VAZ 2105 (Zhiguli) 1980-1992.
- Adjusting the headlights
View of the headlight from the engine compartment
| 1 – screw for adjusting the light beam in the horizontal direction; 2 – headlight casing; 3 – plug block; | 4 – setscrew; 5 – screw for adjusting the light beam in the vertical direction |
Headlight adjustment diagram
The direction of the light beams of the headlights should be such that the road in front of the car is well illuminated, and oncoming drivers are not blinded when the low beam is turned on.
EXECUTION ORDER ↓ Comments ↓ 1. Vehicle operation 1.0 Vehicle operation 1.1
Starting the engine 1.2 Controlling the gearbox 1.3 Driving the vehicle 1.4 Braking and parking 1.5 Operating a new vehicle 1.6 Adjusting the ignition timing 1.7 Precautions when operating the vehicle 1.8 Caring for the body 1.9 Storing the vehicle 2. Vehicle maintenance 2.0 Vehicle maintenance 2.1 Maintenance operations 3
General data 3.0 General data 3.1 Technical characteristics of vehicles 3.2. Controls 3.3. Control of interior ventilation and heating 3.4 Tightening torques for threaded connections 3.5 Tools for repair and maintenance 3.6 Used fuels, lubricants and operating fluids 3.7 Basic data for adjustments and control 4. Engine 4.0 Engine 4.1 Possible malfunctions, their causes and methods of elimination 4.2 Removal and engine installation 4.3 Engine disassembly 4.4 Engine assembly 4.5 Engine bench testing 4.6 Checking the engine on a car 4.7. Cylinder block 4.8. Pistons and connecting rods 4.9. Crankshaft and flywheel 4.10. Cylinder head and valve mechanism 4.11. Camshaft and its drive 4.12. Cooling system 4.13. Lubrication system 4.14. Power system 4.15. Carburetor 2105-1107010 4.16. Carburetor 21051-1107010
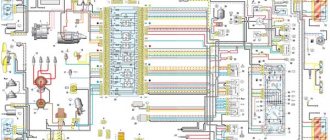
5. Transmission 5.0 Transmission 5.1. Clutch 5.2. Gearbox 5.3. Cardan transmission 5.4. Rear axle 6. Chassis 6.0 Chassis 6.1. Front suspension 6.2. Rear suspension 6.3. Shock absorbers 7. Steering 7.0 Steering 7.1 Possible malfunctions, their causes and methods of elimination 7.2. Inspection, check and adjustment of the steering 7.3. Steering mechanism 7.4 Rods and ball joints of the steering mechanism 7.5 Bracket for the pendulum arm 8. Brakes 8.0 Brakes 8.1 Possible malfunctions, their causes and methods of elimination 8.2. Checking and adjusting the brakes 8.3 Clutch and brake pedal bracket 8.4 Vacuum booster 8.5. Main cylinder 8.6. Front brakes 8.7. Rear brakes 8.8. Rear brake pressure regulator 8.9. Parking brake 9. Electrical equipment 9.0 Electrical equipment 9.1 Possible malfunctions, their causes and methods of elimination 9.2 Circuits protected by fuses 9.3. Battery 9.4. Generator 9.5. Starter 9.6. Ignition system 9.7. Lighting and light signaling 9.8. Sound signals 9.9. Windshield cleaner 9.11. Heater fan electric motor 9.12. Control devices 9.13. Carburetor pneumatic valve control system 10. Body 10.0 Body 10.1 Possible malfunctions, their causes and methods of elimination 10.2. Doors 10.3. Hood, trunk lid, bumpers 10.4. Body glazing, windshield and headlight glass washers 10.5 Instrument panel 10.6. Seats 10.7. Heater 10.8. Body frame repair 10.9. Paint coatings 10.10. Anti-corrosion protection of the body 11. Vehicle modifications 11.0 Vehicle modifications 11.1. Features of repair of VAZ-21051 and VAZ-21053 cars 11.2. Features of repair of VAZ-2104 and VAZ-21043 cars 11.3 VAZ-21044 cars with a fuel injection system 11.4. Design of the central fuel injection system 12. Electrical diagrams 12.0 Electrical diagrams 12.1 Interactive electrical diagram of the VAZ-2105 car 12.2 Electrical diagram of the VAZ-2104 car 12.3 Electrical connection diagram of the injection system 12.4 Connection diagram of the instrument cluster 12.5 Connection diagram of the brake system warning lamps 12.6 Connection diagram of the headlight cleaners and washers 12. 7 Connection diagram for the electric motor of the heater fan 12.8 Connection diagram for the windshield wiper and washer 12.9 Connection diagram for the turn indicators and hazard warning lights
Replacing headlight bulbs
No tools are required to replace burnt out lamps. Removal and installation of lamps is done manually. To do this, you need to open the headlight cover by turning it 10 degrees to the left. To prevent a short circuit, the ground wire should be disconnected from the battery before replacing lamps. The procedure for replacing a low/high beam lamp is as follows:
- disconnect the terminal block;
- unscrew the plastic boot;
- release the locking spring;
- get an old lamp;
- snap the spring;
- connect the terminal.
Important: when replacing halogen or xenon lamps, do not allow the lamp shell to come into contact with your fingers.
Grease marks on the glass will shorten the life of the lamp. The lamps responsible for the side lights and turn signals/hazard warning lights are changed in the same way as the headlight lamps. The only difference is that they do not have a fixation spring and are not afraid of finger touches.
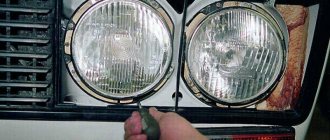
Replacing headlights VAZ 2107
In some cases (if the glass is damaged or you want to tune the car), you have to replace the headlight assembly. To replace, you need a Phillips screwdriver and an 8mm wrench.
The removal procedure is as follows:
- disconnect the ground wire;
- disconnect the lamp power terminals;
- remove the hydraulic corrector by pressing the lock;
- Unscrew the three fastening screws with a Phillips screwdriver (one of the screws is secured with a nut, which must be held in place with a key);
- remove the headlight by pulling it towards you.
To install the headlight, you need to do the operations in reverse order.
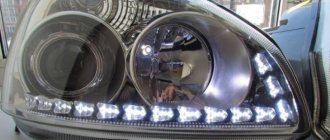
Do-it-yourself LED tuning of VAZ 2107 headlights
For the “Seven” you can easily find, buy and install non-standard headlights or individual lighting elements. The cheapest solution is to install LEDs instead of standard lamps or in addition to them. This allows you to transform the appearance of your car at a minimum cost.
Tuning the rear lights of a VAZ 2107 is also often done by changing lamp lighting to LED.
For tuning with LEDs you will need:
- resistors;
- panel or box for mounting lighting elements (LEDs);
- drill;
- drill;
- sealant;
- wires;
- LEDs.
The box or panel must be adjusted to the size of the headlight and installation holes for the LEDs must be drilled.
Depending on the number and parameters of the LEDs used, resistors are connected in series to provide the required circuit resistance. The resistor values are selected individually. The sealant is used to secure the LEDs in the holes. Important: when connecting LEDs, polarity must be taken into account.
In addition to the original appearance, tuning with LEDs has other advantages:
- low power and, as a result, low load on the on-board network;
- durability and reliability;
- diffused light that does not blind other road users.
If your budget allows, you can tune VAZ 2107 headlights by replacing standard units with ready-made tuning products. The advantage of this solution: beautiful design and excellent quality with minimal time investment.
Glass dismantling
To replace your windshield, you need to get rid of the old one. However, it is advisable to purchase a new one in advance and make sure that its dimensions fully correspond to your car.
For removal you only need a medium-wide flathead screwdriver. The latter is rested from the inside against the rubber seal of the VAZ-2107. The optimal place is the top edge of the glass (five millimeters below the edge of the elastic band, counting from the metal frame).
Push the seal out, and then move the screwdriver to the side another 4-6 cm and repeat the action.
When the entire upper edge of the lobovushka is freed, it is simply squeezed out. For this:
- cover the hood with a thick blanket;
- lower the seat back;
- kneel on it;
- press your palms against the glass;
- press firmly.
Next, the frame of the VAZ-2107 is studied. Make sure there is no rust or deformation. Otherwise, all defects will have to be eliminated.
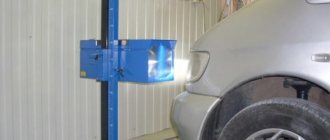
Installation of xenon headlights on a VAZ 2107
Xenon headlights are characterized by a particularly powerful luminous flux, which requires additional focusing using lenses. Full-fledged xenon headlights are expensive and include, in addition to the power supply and lamps, an automatic beam height adjustment system and a headlight glass washer. Each of the elements is extremely important for safety:
- correct focusing and adjustment of the light flux is necessary so that oncoming drivers are not blinded by bright light;
- Without a washer, dirty headlight glass overheats and may burst.
If you do not have the funds to install xenon headlights of appropriate quality, it is better not to install fakes, endangering yourself and other road users, so we do not recommend installing this type of lighting and did not describe the connection
Tinting of headlights and taillights of VAZ 2107
Another common do-it-yourself tuning of VAZ 2107 headlights is tinting. It is used when upgrading both taillights and headlights. It is necessary to carefully choose the method of dimming the headlights - the quality of road lighting is a determining criterion for safety when driving at night.
Important: before tinting your headlights, you should take into account that tinted headlights may be grounds for imposing an administrative fine. You also need to understand that any tint reduces the brightness of the headlights, making night driving more dangerous.
In order for tinting to have a minimal effect on the quality of the car's headlights, it is worth tinting the glass surface only partially. This solution is safe and quite effective: narrowed headlights make the appearance more stylish. Partial tinting can also help avoid a fine - not the entire headlight is shaded, but a small sector.
To tint headlights, you must use only high-quality film. The order of work is as follows:
- remove the VAZ 2107 headlights;
- take out the glass;
- wash and degrease the surface;
- stick the film.
You can partially tint the headlights without removing and disassembling them - just wash the glass and stick on a strip of film. But this method does not provide adequate quality, and it is almost impossible to perfectly accurately cut and paste the film without removing the headlight unit.
When tinting the taillights, you should install brighter lamps in them so that the brake lights and side lights are clearly visible to other road users. To apply the film, it is also better to remove the rear lights from the car first.
This video shows a different car, but the principle of tinting is the same
After you have assembled the circuit, connect it to the power supply of the headlight or flashlight.
What advantages will headlights and flashlights with LED lamps have? First of all, the load on the network of the entire vehicle is reduced. This is achieved at the expense of reduced power. Secondly, as a result of such tuning of VAZ 2107 headlights, you will receive an even and diffused light, thereby increasing the efficiency of the headlights. At the same time, while driving, you will not blind drivers of vehicles on the road.
Finally, such headlights will be more durable and allow you to create a unique look for your car. As we noted above, if you have an unlimited budget, you don’t have to do tuning the VAZ 2107 headlights yourself. In various online stores you can always find a lot of interesting options that you can replace your standard optics with. In addition to headlights and lanterns, LEDs can also be installed in direction indicators, as well as fog lights. In this case, you carry out the same work on dismantling, preparing the LED block, connecting and installing. Why LEDs? The fact is that today they are used everywhere, not only in the automotive industry, but also in everyday life. Their distinctive feature is a high degree of reliability and long service life. With their help, you can easily tune VAZ 2107 headlights yourself. Moreover, you will not incur significant material costs.
If the option with LEDs does not suit you, you can install xenon headlights. What benefits will you get in this case? Firstly, more powerful light (unlike LEDs and halogen lamps). Xenon was widely used in headlights a few years ago. But its downside was that it created certain problems for drivers coming towards you. With the advent of LED technology, xenon began to be abandoned.
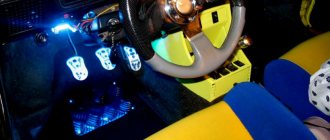
In addition to tuning the exterior, using LEDs you can also change the lighting and backlighting of devices in the cabin. All this can be done with your own hands without any difficulty. But if you are not ready to pick up a wrench and a screwdriver, you can contact specialized workshops. Specialists will develop for you an individual project for tuning VAZ 2107 headlights.