Body reinforcement
If the car has a rigid body, it will handle well. If you set out to seriously improve your VAZ, then by strengthening the front end alone.
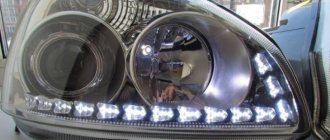
This section presents standard and tuned headlights for cars of the tenth family VAZ 2110,2111,2112. Standard optics are presented from official manufacturers. Tuned headlights significantly improve the appearance of the car, making it individual and stylish; in addition to their appearance, tuned headlights improve the quality of lighting on the road due to the lenses installed in the headlights; when xenon lamps are installed in the tuned headlights, chaotic scattering does not occur.
This section also presents rear optics for cars of the VAZ 2110,2111,2112 family. Rear lights are a very bright element in the exterior interior of a car, and alternative rear optics are a great way to add zest to the exterior interior of your car. This section presents rear lights for the VAZ 2110-2112 in various external designs, also tinted and chrome-plated with the addition of LEDs, like many modern European cars, while the use of LEDs reduces energy consumption. The tail lights will create a stylish design. The lights are installed in their standard places and connected to the “original” connectors.
Improved performance and appearance
It is fair to say that such events will require a fairly large amount of money and effort. They improve the engine, chassis, body part, interior, and dashboard. But today we’ll talk about tuning VAZ 2110 headlights with our own hands.
To carry out similar work on the headlights located at the front and rear, you can use the services of a car service. But if you have the appropriate desire and free time, then the work can be completely done on your own.
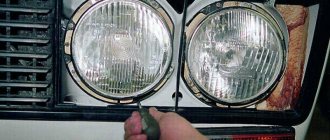
Removal and disassembly of headlights
The VAZ 2110 optics can be of two types - Russian Kirzhach or foreign Bosch. We take a 10mm key and disconnect the pads and wires, remove the plastic top from the radiator grille. After this, the blocks with wires connected to the turn signals are also disconnected and the headlight hydraulic corrector is removed. The bolts that secure the headlight are unscrewed, but not all at once: for now there is only one, the last one left. is removed from the place where it connects to the wing, only after this can the last remaining mounting bolt be unscrewed. Now you can carefully remove the headlight.
Tuning steering wheel VAZ 2110
And, of course, the steering wheel requires, if not replacement, then at least re-upholstery. It is better to use a special material for covering the steering wheel, since traditional materials for upholstering the interior will float on your palms, as a result it will become even worse than it was, although it is quite difficult to find something worse than factory hard plastic. Many people try to simply install steering wheels from foreign cars or use a purchased tuned steering wheel.
And this is only part of the changes that can be made to the aesthetics and practicality of the salon by doing everything yourself. The only thing you need to consider when choosing a method and material for interior tuning is not to skimp on good material. Then the salon will become bright, cozy and original. Good luck to everyone!
Tuning the rear lights
Such work will give the car style and elegance. If you want to save money, you can do everything yourself. There are two options for finishing the rear lights:
- varnish composition for tinting;
- tint film.
Having purchased a special varnish, the lanterns should be thoroughly washed and dried. After this, their surface is degreased with an alcohol-containing composition. The varnish is sprayed from a distance of thirty centimeters; after each applied layer, time is allowed for it to dry completely. The tuning effect will depend on the number of layers. At the end, some drivers polish to achieve a matte effect.
But after a certain time, the varnish is washed off, and the work has to be repeated, having first removed the residue with an acetone solution. Film that can be removed at any time is considered more convenient. When using it, the headlight is washed, dried, and degreased. Having cut the material, the surface of the lantern is moistened with water and soap diluted in it. Having removed the film backing, apply the tint to the lamp, press it with a rubber spatula, and smooth it to remove water and air bubbles. When tinting headlights, you should remember that there may be problematic issues with the police. So it is recommended to observe moderation in these actions.
Website about joints
VAZ 2110 clutch: self-replacement of the clutch on a VAZ 2110
Everyone knows that Bosch headlights do not illuminate the road well at night. When driving in the near one, it’s hard to see - the road runs away, but when driving in the far one, you interfere with oncoming cars. I invite you to go with me on an unforgettable journey of tuning Bosch VAZ 2110 headlights. Let's start with the fact that we need to remove and disassemble the headlight. I won’t tell you how to remove and disassemble the headlight. There are many posts on this topic on the Internet, step by step. We need to slightly change the design of the headlights, namely, replace the H1 lamps with H7 ones. In my opinion, the H7 lamp fits perfectly into this headlight. The dimensions of the lamp H1 and H7 are the same both in height and in the location of the chrome filament. Look at the photo:
You can drill the required hole with a circular saw like this.
We disassemble and remove all the saws we don’t need. The one closest to the center is our saw, which will drill a hole in the headlight reflector. You need to drill a hole so that the H7 lamp is completely immersed in the hole and rests only on the collar. Taking my son as an assistant (he held the reflector), armed with a drill and loading our saw into the chuck, I drilled a hole. The smell from drilling is not very pleasant, so it is better to drill outside. This is what happened.
By the way, you can drill with another tool. For example, I have this thing. In our store it costs 30 rubles!
Let's try on our H7 Lamps. They fit perfectly and are locked with the same clamps that held the H1 lamps. That's basically all there is to drilling. Now we take a soldering iron and plug it into a socket, and in the meantime we cut off the “+” and “–” terminals that supply the H1 lamp with electricity. We strip the wires, solder other terminals (mothers). We will need 4 of them per headlight. We also need heat shrink casing. Taking advantage of the moment, I inserted LEDs into the dimensions in place of the lamps. This is what happened.
I don’t know about others, but my reflector kept falling off. Here's how I solved this problem:
I simply drilled a hole in advance and screwed in the screw and washer without fully tightening it. Now it's not going anywhere. As for the lamps, I took “Novator” and “Narva” at 55 w each.
Having installed the headlights on the car and adjusted them (by the way, I installed the lamp with the beads facing up), I drove out into the dark on an unlit section of the road. I was very surprised by my result. Now everything is very clearly visible at close-up - not only the road itself, but also the edges of the side of the road. The headlights do not shine 10 meters from the bumper, but further and better. Here's a photo from the car. This is the neighbor.
In the photo the high beam is on, about 35 steps from the car.
I called a friend - he also has a “ten” with Bosch headlights. We compared my headlights and his on the same section of the road. This is what happened. This is the low beam on a friend's car.
I took this photo standing between the cars. There is a difference and what a difference!
This photo is also from about 35 steps closer. On the right is a friend's car, on the left is mine!
Maybe many will start to judge me for ruining the headlights, etc. I'll tell you honestly: before tuning, I tried to install lamps from Osram, Philips, and many others - the result did not suit me. If you find the same article on the Internet, you should know that I wrote it. I received a fee for it, but it was small. And I’m just posting it here because it’s not here. And finally, I want to say (well, just food for thought): now you can insert H4 instead of H7 lamps. But that's a completely different story! Good luck to everyone on the roads! Not a nail or a rod!
Types of lighting devices
Depending on the year of manufacture, the VAZ 2110 can be equipped with either Kirzhach or Bosch headlights. Both of them are a block that includes high and low beam headlights, side lights, and direction indicators.
No matter how much difference there is, there are some nuances:
- In Kirzhach, the glass is sealed, so both removing it and replacing it with a new one is more difficult. In addition, the low beam glass has a lens that makes the light output more focused, although limited; Left headlight block Kirzhach
- Bosch glass is secured with latches. They are sealed with rubber gaskets. Their low beam boundary is more blurred, since there is no lens in the glass. Right headlight block Bosch
It’s difficult to say unequivocally which headlight unit is better. But disassembling Boshevskys is definitely easier. In any case, it doesn't hurt to know how to do it in both cases.
To remove the headlight unit, you need to open the hood:
- De-energize the VAZ 2110 (this must always be done during repairs, especially anything related to electricity) by disconnecting the negative terminal from the battery;
- Remove the lining from the radiator;
- Disconnect the block with wires from the headlight;
- Press the latch of the hydraulic corrector cylinder and, turning it 90° to the right, remove it from the socket. There is no need to disconnect the hoses;
- Unscrew the three bolts securing the headlight unit, then move it back;
- After which, move the device to the side, towards the center of the car, until it disengages with the wing hook;
- Loosen the upper bumper bolts;
- Press the pad from below until its flange disengages from the buffer, then remove the pad;
- Unscrew the nut securing the headlight from below;
- By pulling the headlight unit towards you and disconnecting the block from the turn signal, you can remove it.
Having carried out the correct removal without breaking anything, you can replace it with new equipment. Or you can disassemble and perform tuning or independent repairs.
The disassembly goes like this:
- Unscrew the fastening screws (there are two of them);
- Disengage the two hooks on the turn signal from the headlight. Now you can disassemble it into two parts.
Tuning
You happen to have LED rings in stock. Therefore, it’s time to start tuning directly, that is, installing LED rings in the headlights. If you have tinted optics, paint the rings black. But don't touch the LEDs themselves. The effect of such modernization will be more impressive.
Taping with film
The installation procedure is as follows.
- Remove the Kirzhach headlights. You will need to remove the glass. To do this, insert a flat screwdriver into the corner of the glass, and insert a sharp stationery knife into this gap with your other hand. This will remove the layer of sealant, allowing the glass to be removed. If you can't, just break the glass and buy a new one. It's quite cheap.
- Handle the optics carefully, do not touch the reflectors, and remove any remaining debris. If this is not done, you will soon have to completely change your headlights. And these are already significant expenses.
- Let's try out the tuning option. To do this, attach an LED ring to the lens.
- We correct inaccuracies. Decorative inserts can interfere with, or rather partially block, the glow from the LEDs. They can be trimmed and filed a little. A completely natural procedure for such tuning.
- Installing angel eyes. They are usually glued to the lens. Use super glue or high quality silicone caulk.
- Connect the power. Power to the LEDs must come from the side lights. Another option is to use a fuse and a separate switch.
- Reinstall the headlights. We put the glass back, just use a simple silicone sealant or liquid nails. The main thing here is to prevent the presence of cracks, due to which the inside of the glass will begin to fog up and condensation will be deposited on it. Over time, this leads to a short circuit.
- There is another option for mounting LEDs - not around the lens, but on the mask using silicone. Then the tape needs to provide the shape of a ring. For this, available means are suitable - a bottle, a glass. You just need to fill it with silicone in the selected place on the mask. The connection is similar to the previous installation option.
Interior tuning
Interior tuning begins with improving sound insulation and interior.
The lifespan of factory seat fabric is limited - it wears out quickly and requires reupholstery. To carry out the operation, it is necessary to dismantle the factory seats - this will allow the fragments of material to be correctly positioned.
When reupholstering, 5 mm foam rubber is used to reinforce the seats. The cut out seat parts are glued to the foam rubber with aerosol glue.
Photo of the interior of the tuning versions of the VAZ 2110.
You can choose a more expensive option and reupholster the seats in leather.
Available offers
LED
Just remember that the inner diameter of the ring is 54 millimeters, and the diameter of the outer ring is 70 millimeters. These parameters are suitable specifically for installation in Kirzhach.
Although you may well go the other way - make your own rings from LEDs. You will need a transparent rod filled with LEDs. You will find similar components...in a building materials store. Just keep in mind that they need to be bent into a ring. To do this, use a hair dryer. It will soften the rod. The procedure requires precision handling, but it is quite possible to do it yourself.
The third option is to purchase at least 8 LEDs for each headlight and buy a plastic rod separately. This is the most complex approach and will require bending the rod, connecting the LEDs evenly and getting them to work.
The choice is yours. Go for it! And if you don’t want to take risks or waste time making your own LED rings a la angel eyes, then order them online. There are more than enough offers there now.
Independent design modernization
You should pay attention to the fact that you can independently change the original optics, make it more effective and beautiful. Headlights on VAZ 2110 tuning are quite often painted or covered with a special film
Let's look at the features of optics coloring:
1. You can use paint that does not react to environmental influences.2. Work should be carried out at positive temperatures.3. First you need to decide on the color of the paint - as a rule, it is selected according to the color of the car body.4. The protective glass can only be painted when the optics are dismantled. Dismantling work can be carried out quite quickly: the design of the 2110 car is quite simple; to remove the optics, minor dismantling must be performed.5. After the optics have been removed, they should be disassembled. First you need to remove the protective glass, which will be painted.6. The next step can be called covering with masking tape those elements that should not be painted.7. When applying paint, you should remember that the protective glass must transmit quite a lot of light. Therefore, paint is usually applied in a small layer.8. After completing the painting work, you can assemble the optics and install them.
The above points should be taken into account in order to carry out the work efficiently and quickly.
Procedure for replacing bulbs in Bosch headlights
Drivers often encounter a problem when headlights do not illuminate the road very well at night. This is due to the fact that the manufacturer installs H1 lamps. Experienced craftsmen assure that after replacing the standard lamp with an H 7 analogue, the situation improves significantly.
Such work is performed quite simply:
- all switching is disconnected from the headlights;
- the radiator grille is dismantled, for which you only need to unscrew the mounting bolts;
- the wiring blocks are disconnected from the rotating elements;
- the hydraulic correction device is removed. You just need to press on the locking element and turn it ninety degrees;
- the headlight bolts are unscrewed, the headlight moves back, the eyelash moves to the center to free it from the hook with the wing;
- the buffer bolts are released, the eyelash is dismantled;
- Now, by unscrewing one more of the nuts, you can remove the light source;
- After heating the sealant, open the headlight with a knife;
- the hole for the lamp will have to be slightly expanded with a drill, since the diameter of H 7 is slightly larger than that of H 1;
- The terminals are changed for the lamp; four of them will be required;
- a new lamp is inserted and secured with a fastener;
- the reflector will have to be slightly adjusted to better stay in place;
- some drivers install LEDs;
- The headlight is assembled in reverse order and then adjusted.
Now the road will be illuminated better.