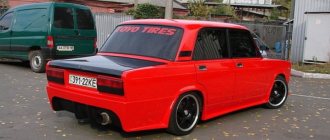
The VAZ 2107 is distinguished by a rather modest and simple, by today's standards, interior design. Therefore, car owners do their own tuning, making the appearance bright and individual. Tuning the instrument panel is probably the first way to improve its discreet and simple appearance.
Why is the VAZ 2107 dashboard given special attention when tuning? Precisely because passengers, including the driver himself, pay attention to the dashboard during the trip. Therefore, tuning the interior should begin with refining the instrument panel.
The easiest and most reliable way
For those who do not want to seriously engage in alterations and are ready to make some investments, ready-made kits are offered. They have everything you need to do your own tuning of the VAZ 2107 instrument panel. Each kit comes with detailed instructions. The only tool you need is a screwdriver. Also, you need to be familiar with the connector configuration.
In specialized stores you can also find ready-made dashboards for every taste, including those with electronic sensors. This is also a pretty good option for those who want to change something and not spend a lot of time on it. You can carry out the replacement yourself, since the finished panels fully comply with all the characteristics of the standard ones. The only thing is that before carrying out such an operation, you need to thoroughly study the connection process.
Now let's tune the instrument panel
Tip: before starting work, you need to align the speedometer arrow and the limiter, and make a mark on the side to recognize the position after removal.
First, let's remove the old VAZ dials and install new ones. After this, we install the speedometer needles, but you need to remember that the pins bend. But you need to remember that we have drawn where the speedometer needles should be installed. After all this, carefully glue the sticker you have chosen, and before gluing it is necessary to degrease the surface. And don’t forget to glue the film correctly so that there are no distortions or balloons.
To install the LED pendant, I use two methods for installing the backlight. The first is behind the scale, the second is the illumination of the entire panel. Each driver chooses his own method, but you need to know that in the first case the backlight will be brighter than in the second, but you will have to spend more effort on soldering the LEDs.
The power supply for these LEDs must be designed for an operating voltage of 12 Volts. For the first option, you need to remove all standard light bulbs and install LEDs instead. Then we check them, for this we supply power.
We make a unique design with our own hands
Everything is much more complicated here, but you can save money. In this case, no sets are purchased. Everything is created independently and exclusively to your taste. True, you can first look at photographs of ready-made solutions. They will help you move in the right direction.
This option is preferable not only because of saving money. You can create something truly individual and unique. First, you should replace the arrows and stickers. Here you can again go to the store or create something of your own. You can also order arrows and stickers from a studio specializing in tuning. It will cost you a little more, but the effect will be much stronger.
Panel or torpedo?
Which torpedo is suitable for the VAZ 2107? The issue is complex, but completely solvable. Just to begin with, you should determine how radical the alterations will need to be made. Such tuning can be done in two ways:
- Replacing the dashboard;
- Replacement of the entire torpedo.
The first option will allow you to get by with little expense and replace the panel with another one that suits you more. You just have to adjust the socket a little in size. It is somewhat more difficult to install a new panel. At the same time, it must be suitable in size and provide the ability to connect all vehicle systems. The final choice depends on your ultimate goals and capabilities.
How to properly remove the dashboard
To remove the dashboard, it is recommended to carefully study the manual. After this, disconnect the wire from the negative wire on the battery. Then, remove the handles from the stove control levers. Important information! Be extremely careful when removing the instrument panel. There are a lot of brittle and fragile parts that can easily be damaged.
The next step is to unscrew the nut that secures the reset handle. After this, the handle is pushed into the space behind the dashboard. Then the plug of the screw that secures the instrument panel is removed and the self-tapping screw is removed. The instrument panel can then be removed and redesigned or replaced.
Instruments and indicators of the VAZ 2107 panel
The VAZ 2107 dashboard includes the following many elements that provide visual perception of information about the operation of the car. VAZ panel instruments:
- Voltmeter showing the current voltage of the on-board network.
- Speedometer indicating the speed of movement.
- Odometer is a counter for the distance traveled by a car.
- A tachometer is a device that shows the crankshaft speed. The yellow zone of the device indicates high speeds, the red zone indicates unacceptable speeds.
- Coolant temperature indicator. The green zone is normal temperature, the red zone is engine overheating.
- An econometer is a device that shows how optimal the engine operating mode is in terms of fuel economy.
- Warning Indicators
- Indicator of the “daily” car mileage.
- Fuel level warning light
- Gasoline level indicator in the tank.
Warning lamp block:
- Turn signal indicator (flashes green when turned on).
- Injection engine control malfunction lamp (not available on carburetor “sevens”). When the ignition is turned on, the lamp glows orange and should go out after starting. A burning or flashing lamp on a running engine indicates a malfunction.
- Battery charge lamp. It lights up red when the ignition is turned on and should go out as soon as the engine starts. If it continues to light, the battery is not charged. In this case, it is necessary to determine the source of the problem and fix the breakdown.
- Dimensions indicator. Lights up green when the side lights are on.
- Lamp signaling the inclusion of high beam headlights (lights blue).
- Brake fluid level lamp for the hydraulic brake system.
- Low oil pressure indicator. Lights up red when the ignition is turned on. It should go out after the engine starts. It is unacceptable to operate the machine if the oil pressure light is on.
- Parking brake light that illuminates red when the brake lever is raised.
- Yellow fuel reserve lamp. Lights up when there is less than 5 liters of gasoline left in the tank.
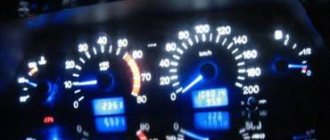
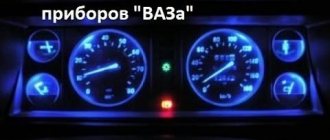
Let's start with the backlight
In principle, where exactly you start tuning the VAZ 2107 instrument panel does not matter. You can first replace the arrows or scales, and only then deal with the backlight. But we will start the description with the backlight, since it really leaves much to be desired.
Important information! The main stages of tuning the VAZ 2107 instrument panel:
- removing the instrument panel;
- replacement (refinement of scales and hands);
- installation of LED lighting;
- installation of a finished dashboard.
Most often, when tuning, car enthusiasts choose LED lighting for instruments and panels. It gives the interior a more modern look. To modernize the dashboard, you can use 10 LEDs and connect them with special cables. Next, you need to cut off the LED heads and treat their surface with sandpaper for a softer glow. You can place the LEDs as you wish.
Alternatively, there are 4 LEDs around the largest scale in the corners, one between two small sensors. The rest are located at your discretion. Once you've completed this job, it's a good idea to be sure to connect the entire system and look at the results before you put the panel back on. As for the illumination of the arrow on the instrument panel, LEDs can also be used here. By the way, you can also replace the arrows themselves. To do this, use a ready-made set or make them from plexiglass on a machine. The second option is much more labor-intensive. But you can make them unique.
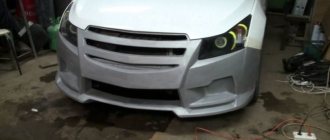
Console tuning
Tuning the VAZ-2107 console is an optimization of the front panel, as a result of which many useful features and advantages can appear in the car, such as a new tape recorder, clock or cigarette lighter. Refinement of the beard of the VAZ-2107 allows you to make the vehicle more original and functional. Anyone can, through simple improvements, install a player, a modern clock, a USB socket, devices for monitoring the electrical network and small “pockets” for small items in the car.
Among the main tools, without which tuning the standard beard of a VAZ-2107 is impossible, it is worth noting: an electric jigsaw and drill; "grinder"; locksmith corner; a simple pencil; ruler; glue and stapler for furniture.
Do-it-yourself tuning of the VAZ-2107 beard may involve the manufacture of a new panel, which will initially have special areas for the location of switches and indicators. The easiest way to tune the console is with ordinary plywood with a thickness of about 6 mm. It is advisable to use artificial leather as finishing materials, which perfectly matches the color with the rest of the interior elements. Recently, car owners have even adapted to introducing carbon fiber.
Tuning the VAZ-2107 beard can be done with the help of a comprehensive modernization, which will “radically” change the interior of the car. Replacement on doors and other interior elements can be made using carbon fiber and leatherette. The new console will need to be positioned in place of the factory fixture, which must first be dismantled. By removing a standard beard, the motorist can quickly take measurements to further create drawings.
We recommend: How to Remove Heater Radiator Opel Astra F
Replacing scales
The standard dials on the instrument panel are black, and the numbers on them are faded. This design, in principle, looked good twenty years ago. But the instrument panel clearly does not correspond to modern trends. There are quite a lot of photographs on the Internet of options that car enthusiasts made with their own hands. In most cases, owners prefer white circles with black numbers. This option looks more “sporty”. In addition, it is easier to highlight.
The only thing to remember is that when working with dashboard parts, you must be extremely careful. All spare parts are quite fragile and very easy to break. Recovery will take a lot of time.
Installation highlights
Before deciding which panel you can install, you should take into account that the original VAZ 2107 torpedo can be returned at any time. If such a procedure is carried out independently, it is recommended to use a book on repairing classics. It will take a lot of time to complete the work.
When connecting the wires, you need to remember that one goes to ground, and the second goes to the panel to the corresponding contact. It is recommended to label which connector goes where. To operate the speedometer, a speed sensor from model 2110 with 6 pulses is installed. If the “seven” is equipped with an econometer, it is recommended to install a tee from 2106 on 2 sensors, including a pressure sensor from engine 402.
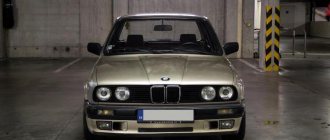
The panel from the BVM is also suitable for the VAZ 2107 torpedo. But not all car enthusiasts know which model. It is recommended to use a BMW E30 torpedo with some modifications. You will need to install front electric windows. This is due to the fact that with this panel the handles will interfere with closing the doors. Since the gear knob in the standard position is not suitable for use with this torpedo, you will have to bend the gear lever. The stove also requires some changes.
Auto mechanics know everything about the specifics of the work ahead. For example, the torpedo from this BMW model is slightly wider, but when installing it there is no need to make major changes.
The advantages of the new panel include:
- larger parameters - the length of the hood has increased by 10 cm,
- the height of the car increased by 5 cm,
- about 20 liters added. With. of which 5 l. With. within 2 days it takes new caps on the disks.
Particular attention should be paid to fastening. Small screws are used for this.
The nuances of the work also include installing the steering column cover - it will need to be trimmed. Some VAZ 2107 car owners trim the dashboard itself, but adjusting the casing to the required dimensions is much easier. This must be done carefully.
Adding new devices
Another important point when tuning the VAZ 2107 instrument panel is the installation of additional indicators. This could be, for example, indicators of fuel consumption per unit of time, on-board computer, temperature and light sensors, and so on. In fact, there are many options. The most important thing is that all this fits organically into your overall design. If you don’t want to do all this work yourself, you can contact a tuning studio. Here you will be offered a lot of interesting options. But of course, in this case there can be no talk of any savings.
On the other hand, if you doubt your abilities, then this is the only option to transform the dashboard of your car. Experts will help you realize your fantasies, or offer one of the options that, in their opinion, is best suited for your VAZ 2107.
What does the panel consist of?
The panel consists of a large number of elements that are responsible for the operation of certain components of the VAZ 2107 car. The instrument panel is located in the car interior and is directly embedded in the dashboard on the driver’s side. The main elements are located under a special plastic transparent glass, which protects them from mechanical damage. The elements of the instrument panel include the following elements:
- Accumulator charging;
- speedometer;
- odometer;
- tachometer;
- motor temperature sensor;
- ECON – instantaneous fuel consumption indicator;
- additional signaling elements;
- resettable odometer;
- and 10 – fuel level in the gas tank and warning light.
Let's briefly look at the purposes of each of these elements.
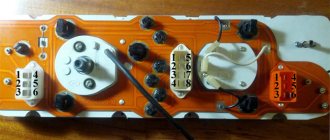
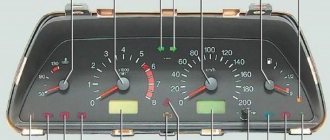
Instrument distribution diagram on the control panel of a VAZ 2107 car
- Speedometer. The device located on the right side of the panel is called a speedometer. Serves as an informant for the driver about the speed of the vehicle. The scale has values from 0 to 180, which indicates the speed of the vehicle. There are two dials on the device that keep track of the distance traveled by the “seven”. One of them has the ability to adjust, but the bottom one does not.
- Tachometer. The device located on the left side serves to inform the owner about the crankshaft rotation speed in relation to a unit of time. Most drivers do not really understand the purpose of this element and rarely pay attention to it. But this element is very important, since it is a direct indicator of the quality of engine operation. The closer the arrow gets to the red mark, the more the motor is overloaded. And when it crosses the red line, the car’s movement should be stopped immediately, since the engine is operating in critical mode.
- ECON flow indicator. The indicator, located in the upper left corner of the instrument panel, performs the function of indicating the consumption of the fuel mixture in instantaneous time while the engine is running. When driving at speeds above 90 km/h, fuel consumption increases and the arrow moves to a yellow position. A very useful feature for the driver to be able to save fuel.
- Temperature indicator. Designed to indicate the motor temperature value. Above 100 degrees Celsius, the needle moves to the red mark, which indicates overheating.
- Fuel indicator. Using this indicator, drivers determine the amount of fuel in the tank, which is transmitted through an electronic sensor and level.
- Battery charge. Indicates how good the battery is; position on the red mark indicates the need to recharge.
We recommend: Replacing the fuel pump mesh on Kalina
How expensive is it
The cost of modifying a car entirely depends on what exactly needs to be improved, what spare parts you will have to buy for this, whether you buy the service at the appropriate car service center or do the tuning yourself. The price of the same change may vary several times depending on your requests. For example, a simple installation of fog lights can cost no more than a thousand rubles if you take inexpensive lamps and do everything yourself. If you want to install it yourself, and even entrust this task to specialists, then be prepared to spend several thousand on it. On the other hand, tuning is not repair. The car can easily survive without these optional modifications. Therefore, you need to take a simpler approach to cost: if you have a desire to improve something and have enough money for it, that’s great; there is no desire or money - well, let it remain as it is.
Introduction
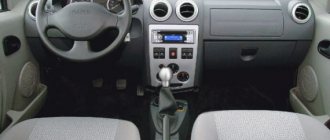
The domestic VAZ-2107 is in many ways inferior to its foreign counterparts; many car enthusiasts complain about the too simple interior decoration, which does not have original features. However, competent tuning of the VAZ-2107 torpedo allows you to transform the vehicle beyond recognition, raising the level of previous parts to standard elements of expensive foreign cars. Due to its simplicity and classic design, the dashboard can be modified by the owner as much and as desired. Let's consider the main points of improvements to the torpedo and beard of the domestic VAZ-2107.
How to create a beard: step-by-step instructions
Creating a beard with your own hands is a rather difficult task that must be performed with extreme precision. After making the frame, you can create bars and then insert them into the designated place. Once their installation is completed, you can begin tightening the frame using self-tapping screws. Since we are creating a VAZ beard with an armrest, it is recommended to steam the plywood in hot boiled water before starting work. This will allow you to achieve better ductility of the material during processing. Steaming the plywood will also make it possible to solve the problem associated with the transition to a narrower part between the front seats and a wider one where the radio is located. As soon as the entire tuning structure is ready, it must be dried. This process usually takes about two days.
Next, the owner must create a bent plywood insert with his own hands, in which there is a small hole. It is used to create free space for placing a lever. The workpiece will have to be boiled to give it the desired shape. Some VAZ owners use a simple kitchen sink wall. Once the part is processed, the element will have to be completely dried.