VAZ 2106 tuning is a change in the characteristics of the car by improving factory components and assemblies, as well as changing the appearance of the car itself. As can be seen from the definition, tuning can be external, and tuning, so to speak, “internal”, which implies improving engine performance, improving the transmission and chassis of the car. Every car owner planning to tune a VAZ 2106 should understand that this will require a large amount of investment, both material and technical costs. First of all, you need to answer two basic questions:
- What result does a car owner need?
- How will he achieve it?
Now each type of tuning should be analyzed separately.
How to increase engine power on “classic” VAZ models
The VAZ 2101, 2103-06 or Niva models, well known in the CIS, are usually called “classics”. The power units on these machines are carburetor and today are very outdated, however, given their prevalence, there are many who want to modify these internal combustion engines.
The result may be boosting the engine to 110-120 horsepower. There are even examples with a power of about 150 hp. (depending on the quality and depth of modifications). In this article we will look at how to increase the engine power of a VAZ classic.
Mudguards
Lada 2107 is equipped with rubber rear mudguards as standard. Their purpose is to protect against dirt getting on the windshields of cars behind them, and the absence of elements is punishable by a fine. However, rubber mud flaps quickly tear and require replacement. Therefore, when tuning a car, they are replaced with polyurethane models. They are stronger and more durable. Mud flaps are also installed in front, they protect the power unit from moisture and dirt, and engine mud flaps are installed, which perform similar functions.
Increasing the displacement of the VAZ engine
As you know, one of the most important parameters in relation to internal combustion engines is the working volume. The engine’s power, throttle response, etc. depend on the volume of the engine.
It is more comfortable to operate a more powerful car, since the reserve of torque and power allows you to not “turn” the engine too much, since acceptable traction appears at lower speeds.
When it comes to increasing working volume, there are two main ways:
- change the diameter of the cylinders;
- increase the piston stroke by replacing the crankshaft;
These methods are actively practiced for tuning AvtoVAZ serial engines, which are found under the hoods of different models. More precisely, we are talking about the very first engine on the “penny” 2101 with a power of 60 hp. or the “eleventh” engine 21011, and the VAZ 2103-06 power unit with a power of 71-75 hp. Also, do not forget about the carburetor 80-horsepower 1.7 liter engine on the Niva model and other modifications of the above-mentioned internal combustion engines.
So, let's look at a specific example. If you have a VAZ 2101 engine, you can bore the cylinders to 79 mm, and then install pistons from the 21011 engine. The working volume will be 1294 cm3. To increase the piston stroke, you need to have a crankshaft from 2103 so that the stroke is 80 mm. Then you will need to purchase shortened connecting rods (by 7mm). As a result, the volume will be 1452 cm3.
It is quite obvious that if you bore the cylinders and at the same time increase the piston stroke, the end result will be a “penny” engine volume, which will be 1569 cm3. Note that similar operations are carried out with other motors on “classic” models.
It is also important to consider that after installing a different crankshaft and increasing the piston stroke, the compression ratio increases, which will require the use of gasoline with a higher octane number. Additional adjustments to the compression ratio may also be necessary. The main thing is to choose the right shortened pistons, connecting rods, etc.
We also add that the simplest and cheapest method can be considered boring for repair pistons. However, even if the block is bored to the last repair size, the volume increases by no more than 30 “cubes”. In other words, you shouldn’t count on a significant increase in power in this case.
Improved suspension and chassis
For a powerful engine, the car's suspension must also match. The factory suspension will not provide the required stability, unlike a rigid one, and besides, the factory rear suspension contributes to strong skidding at speed, especially in the cold season. Suspension rigidity is achieved by placing rubber cushions under the springs, installing springs from a VAZ 2121 Niva car and replacing standard oil shock absorbers with gas ones. Stability will also be facilitated by replacing the reaction rods with an A-arm, which provides clear vertical suspension travel without lateral displacement.
Car skidding at speed and in turns can be eliminated by improving the rear suspension, namely:
- replacing the lateral stability rod (Panhard rod) with a Watt mechanism;
- installation of a stabilizer on the rear axle with fastening of its ends to the car body;
- complete replacement of the suspension with another: semi-independent or independent.
As a result of replacing the suspension, you will have to change the drive, since the standard rear axle will not provide torque transmission during suspension operation. In this case, either the rear axle is installed under an independent suspension of the rear wheels, for example, a very common case when the rear axle of an Opel Omega A is installed.
Another option involves changing the drive from rear to front. In this case, you need to either change the engine and install the engine of any other front-wheel drive car, for example with a VAZ 2109, or install a gearbox with CV joints Moskvich 2141, since the first cars of this model were produced with the main engine from the VAZ 2106 with a volume of 1.6 liters, only with gearbox assembly and differential for front-wheel drive. This option will be the cheapest, unlike a complete engine replacement.
To ensure the safe operation of a vehicle, a powerful engine also requires good brakes to quickly reduce speed or stop. Absolutely every owner of a classic Lada model knows that the brakes on this car are a sore subject. The rear drum brakes are not that frustrating, but the front disc brakes leave much to be desired. A disease of a two-piston caliper is the frequent souring of one of the working pistons, as a result of which, in addition to uneven wear of the brake pads and disc, the braking of the car itself is not effective and it can be carried to the side.
Without solving the problem, the piston boot breaks, and replacing it will take a lot of precious time and money from the owner. If you take good care of the braking mechanisms of the front wheels, then the correct operation of the two-piston calipers provides very good braking, but most owners replace them with the calipers of VAZ cars of the Samara family. They are easy to maintain and also provide good braking of the car. It is also possible to replace the calipers and discs with sports ones, since sports calipers allow you to quickly reduce speed or stop the car, and ventilated discs will increase the service life of the brake pads and thereby increase braking efficiency.
Other engine modifications: intake and exhaust
If you take into account the recommendations of experts, in order for the engine to turn out to be resourceful, you should not strive to increase its volume beyond the 1.6 liter mark. An increase in volume above this figure will mean that the engine becomes “heavier” and spins less intensively.
The next step will be to upgrade the exhaust ports and valves. The channels are polished and the valves can even be replaced. For example, a suitable option is selected (it can also be from a foreign car), after which the valve stems are processed to the dimensions for a VAZ engine.
The valve plates should also be processed at the same time. It is important to adjust all valves according to weight. Separately, it is worth approaching the issue of installing the camshaft. In order for the engine to pull well from the bottom and at high speeds, it is optimal to select a camshaft that provides high valve lift. At the same time, a split gear is also required for precise adjustment of the valve timing.
What's the result?
As you can see, engine tuning, including classics, in terms of the scope of work largely affects the BC and cylinder head. However, we should not forget that the carburetor will also need tuning. It is not surprising that a forced engine requires more gasoline and air, that is, the carburetor also needs to be upgraded and tuned.
As for the parts for the internal combustion engine, everything will depend on the specific tasks. If the budget allows, it is best to install special connecting rods, replace cast pistons with forged ones, replacing bearings, etc. is also recommended.
Finally, I would like to add that if all the work is done correctly, then even a significant increase in engine volume does not greatly affect fuel consumption. Moreover, consumption may drop. The fact is that better traction, elasticity and throttle response of the engine after modifications allow you to spin the power unit less in lower gears for acceleration and maintaining the usual driving pace.
The main thing is to correctly configure the carburetor and ignition system, taking into account the changed working volume of the internal combustion engine. As a result, a forced engine increases the operating comfort of the vehicle, and the procedure itself is often cheaper than swapping an engine or, moreover, installing a turbocharger on a carburetor with minimal modifications to an existing power unit.
Possibility of installing a turbocharger on an engine with a carburetor. The main advantages and disadvantages of turbocharging on a carburetor car.
Refinement and modernization of the carburetor. The main disadvantages of the carburetor injection system and how to eliminate them, settings. Intake manifold tuning.
Boosting the engine. Pros and cons of modifying an engine without a turbine. The main methods of boosting: tuning the cylinder head, crankshaft, compression ratio, intake and exhaust.
Selecting a mechanical supercharger or turbocharger. Design, main advantages and disadvantages of solutions, installation on an atmospheric tuning engine.
Features of installing gas equipment on a turbocharged engine. What gas equipment is best installed on engines with a turbine. Tips and tricks.
Tuning the fuel system of atmospheric and turbo engines. Performance and energy consumption of the fuel pump, choice of fuel injectors, pressure regulators.
Source
The VAZ 2107 is a domestic classic; it is, in fact, an obsolete car that continues not only to be produced, but, most surprisingly, to be bought. The reason for this is most likely the simplicity of the car’s design and its low cost, because although the VAZ 2107 is not the cheapest car on the world market, in Russia it has no competitors other than other “classics” from VAZ.Having bought such a car, a poor car owner can easily carry out repairs and tuning himself. Probably the most popular car from the domestic classics is the so-called “seven”. These cars are the most tuned in Russia. Thus, the owner, who doesn’t really care what he drives, starts tuning.
Tuning work can be divided into:
• Tuning the VAZ 2107 engine
• Tuning the interior of the VAZ 2107
• External tuning of VAZ 2107
What is hidden behind this mysterious word and why do domestic cars so often undergo this procedure?
Tuning is, one might say, tailoring it to suit yourself, to suit your personal needs. Domestic cars at the time of sale can be compared to a new apartment being sold without renovation: everything seems to be there, theoretically you can use it, but only theoretically.
Typically, tuning a VAZ 2107 begins with working on the engine. Improvement of the carburetor, replacement of valves with foreign ones, improvement of spark plugs, installation of a lambda probe and zero-resistance filter and increase in cylinder volume.
The interior of the VAZ 2107 upon release is so unattractive that you can redo literally everything without regret. Reupholstering the interior, installing electric windows, improving the stove, or rather its left pipe, sound insulation - only the most common and simple works.
You can also install a steering wheel with a smaller diameter, install a decent sound system and make many small improvements that make the driver’s life easier and more beautiful.
External tuning is mainly repainting, installing alloy wheels and a body kit. Is it worth doing all this? The solution is individual for everyone. Tuning a VAZ2107 does not require large investments, but it turns out to be quite a hassle. That is, such a hobby can be classified as a hobby...
Video: do-it-yourself VAZ 2107 tuning
VAZ 2107: do-it-yourself interior tuning
Classic Zhiguli models are so ascetic that you immediately feel the desire to carry out some modifications to the car. And that’s why our next priority is now tuning the interior of the VAZ 2107.
Many car owners pay most attention to the appearance of the car when performing external tuning (exterior) of the VAZ 2107. And they completely forget about the interior of the car. But the quality of the interior and its materials also depends on the comfort of driving the car.
To begin with, I recommended replacing the car's steering wheel. Even the last option, for models released over the last two years, does not allow you to drive the car comfortably. Then, having replaced the steering wheel, you can move on to the interior itself.
To begin with, you can buy kits consisting of additional stands and additions to the dashboard that improve the functionality of the interior elements. Sometimes, there is simply nowhere to put the simplest little thing in a VAZ 2107. These simple stands and pockets will allow you to distribute the free space in the cabin quite effectively.
The next step is to replace the sun visors and rearview mirror. If with the mirror everything is quite simple - I bought a large mirror and attached it to a standard one, then with the visors everything is a little more complicated.
There are two options - reupholster the standard ones with carpet, or install tuning visors. The second option is more preferable, especially since they cope with their functions better.
Let's continue tuning the interior of the VAZ 2107, next up are the front seats of the car. I would advise replacing them. Reupholstering the seats will only improve their appearance, but the level of comfort will remain low.
There are tuning seats for classics on sale, and quite a few models. But if you want to save money, you can buy a used kit. seats from Japanese foreign cars from the Japanese domestic market. A Toyota Corolla, produced in 1993, for example, can act as a donor. Most importantly, you will not be required to make any modifications to the seat mounting system.
If necessary, you can use carpet material and a special spray adhesive to replace the material covering the interior elements. With this you can complete the tuning of the VAZ 2107 interior. But if you want individuality, you can choose a set of plastic linings, for example wood, for the dashboard elements, interior and gear knobs.
As you can see, everything is simple and convenient. And most importantly, it is accessible to anyone. The tuning of the VAZ 2106 interior was built on the same principles.
Video: do-it-yourself tuning of the VAZ 2107 interior
VAZ 2107: do-it-yourself carburetor tuning
We are improving the dynamics of the VAZ 2107. So we are given a 1500 or 1600 engine with a contact ignition system and an “Ozone” carburetor. Well, let's start from simple to complex, we'll mock the carburetor, anyone with at least a little knowledge of cars can do this kind of tuning of a VAZ 2107 with their own hands. 1. We pull out and then throw out the spring from the vacuum drive of the throttle valve from the primary chamber, in total it takes 5 minutes. With improved dynamics, fuel consumption will increase by about half a liter per 100 km.
2. We rework the throttle valve drive from the secondary chamber. This is done as follows: take a small piece of wire, bend the ring on one ring, and in this form we slip it under the nut that secures the throttle drive levers. After this, the nut must be tightened as much as possible. Thanks to this, we get improved dynamics at high speeds; this does not affect fuel consumption.
3. Now we take the small diffuser from the primary chamber, which is marked 3.5, and throw it away. Now in its place we insert a small diffuser marked 4.5. Along with these actions, if necessary, change the accelerator pump nozzle, the standard “30” to the enlarged “40”. Acceleration at the beginning of movement is improved.
4. We proceed to increase the jets. In the primary chamber there is a main fuel jet, and the main air jet is 150. We are not touching the secondary chamber yet, acceleration has improved, but we need more.
Now in the secondary chamber we put a fuel jet of 162, and an air jet of 190! These are the largest jets ever produced on a Weber. But the diffuser diameter of the Ozone secondary chamber is the same as that of the Weber. But we don’t open the damper from the primary chamber very often, even if we’ve worked some magic with the carburetor before.
After all, when driving around the city we rarely press the gas more than halfway. But if you need to accelerate sharply and overtake someone at the end of a climb, then this will already be very useful. The result is that the pedal is pressed only until the secondary chamber opens, and it turns out that “turbocharging” is turned on and the engine at this time picks up speed of about 6500.
If you need something more powerful, then go to the primary chamber and insert the main fuel jet 130 for an engine from 1500, or jet 135 for an engine 1600, but the main air jet is set to 170. There is no point in further increasing the jets, because with a sharp When you press the gas pedal, the carburetor will begin to overflow and choke. Now let's move on to fuel consumption. The fact is that when installing such a combination of jets, when driving in urban dynamics mode, there is simply no need to press to the floor at every traffic light, and our dynamics are already at chisel level. Therefore, fuel consumption will be kept at 11 liters per 100 km. around town. But XX flow rate will be the same, since we did not touch its adjustment. But on Ozone, the XX system is autonomous, and the adjustments practically do not change. But if you need to accelerate or pull out while overtaking, or drive through a patch of unsteady mud, then our larger jets will help. With a combination of jets 135-170 and 162-190, as well as with a normally adjusted ignition and distributor with a vacuum automatic (the hose is attached to the manifold where the EPHH system once stood), my 2107 became just an airplane. In my opinion, “Weber”, especially the first editions, is the most reliable, practical and simple carburetor that can provide excellent dynamics. Its only drawback is that it contains CO at rpms above 2000. Another circumstance. Jets should be selected individually for each engine. The diagram described above is general; however, a lot depends on the engine size, its condition and the specific type of carburetor, as well as on the jets themselves. They are all individual. Even with the same markings, even standard DAAZ jets may have a slight difference in throughput; you should not mention cooperative ones. I’ll answer one more question, why we don’t install Solex. After all, Solex provides much better dynamics compared to ozone. There’s no arguing here, but with a converted Ozone or Weber, the car will drive much better, and you won’t have to invest money, and most importantly, they’ll be more reliable. After all, Solex has many disadvantages, such as dips or jerks, and getting rid of them is not so easy. And also a constantly unscrewing lid, along with a malfunctioning solenoid valve. And Ozone or Weber needs to be tuned only once a year. Of course, it was possible to modify the engine itself, install lightweight pistons and connecting rods, as well as a lightweight crankshaft, install polished and perfectly fitted manifolds (intake and exhaust), and carefully balance everything. Or improve the engine power supply system.
You can also change the transmission gear ratio and fine-tune the chassis. Maybe I forgot something, but it doesn't matter. The fact is that all these modifications require special equipment, high qualifications of either yours or your employees, a lot of time and, most importantly, a lot of money. But not every one of us can afford it, so we experimented with a carburetor, and the end result is quite good.
Video: DIY carburetor tuning for VAZ 2107
VAZ 2107: do-it-yourself engine tuning
Tuning a VAZ 2107 engine is a relatively inexpensive activity, but the increase in power can be significant due to the fact that factory engines are made without much precision, with numerous technological deviations, which is already included in the nameplate power of the engine.
If you eliminate these flaws and inaccuracies, add your own or someone else’s developments, you can get an engine that significantly exceeds the factory one in power and with a significantly longer service life and characteristics.
In general, tuning the 2107 engine is not always aimed at increasing power. Essentially, tuning is fine-tuning, adjusting to yourself, so before starting work you need to decide exactly what you want to get at the finish line, there are two stages:
— The first is increasing the overall power - the first stage. The increase is achieved by tuning the intake (refinement of the cylinder head, carburetor, intake manifold, installation of a zero filter), exhaust (increasing the diameter and cross-country ability), installing a turbocharger (turbine, compressor), increasing the volume of the cylinders (boring, balancing the pistons, selecting the crankshaft).
— The second stage is the selection of a camshaft, selection and adjustment of valve timing, tuning of the entire engine. This stage can rather be called tuning the VAZ 2107, the first stage is rather its repair.
Here we come to the choice point - power at the bottom or top (lower or upper revs). This is essentially the tip of the VAZ 2107 tuning iceberg.
Also, in addition to modifying the existing engine, you can replace it with a more powerful one, we will consider the option that we implemented.
To increase power, instead of the standard VAZ 2107 engine, a new 21213t engine with a displacement of 1800 cc was purchased, which acted as a “donor”.
In this engine, we were interested in the basics: the cylinder block, crankshaft, connecting rods and cylinder head.
The working volume was left at 1800 cc, more reliable pistons, rings, and liners were installed. The cylinder block was honed again. The pistons were coated with molybdenum enamel. The crankshaft and clutch assembly were additionally balanced.
The cylinder head has also undergone modifications. Here's what they did to her:
— the combustion chambers, intake and exhaust channels were modified, bronze valve guides and lightweight T-shaped valves were installed.
— The STI sports camshaft is located in the cylinder head.
— Of course, we couldn’t do without the DAAZ 24/26 carburetor.
— We also installed a contactless ignition system.
Video: DIY VAZ 2107 engine tuning
VAZ 2107: do-it-yourself dashboard tuning
Various kinds of lighting, devices, etc. look good here. , so I always looked with envy at the dashboards of different foreign cars. At night they are always easy to read, agree, it’s convenient to see your speed at night, and not consider how you have to do it on the classics. Therefore, it was decided to make the classic tidy worthy of respect. After sitting with my sidekick over a bottle of beer, thinking about the options, through trial and error, we finally found what we thought was the right way to do it.
So, let's begin. What do we need for this?
1. LEDs. Red, white, and different sizes.
2. Instrument covers (scales). In our case, these are scales purchased at the car market for 60g. They are installed to replace the old ones.
3. Arrows. We used arrows from a Peugeot 405. It has two long and three short ones on the dash, so you will need to disassemble two tidies.
4. Soldering iron, solder, in general, various small tools for a beginner radio engineer
As the story progresses, I may remember something else.
In short, let's go.
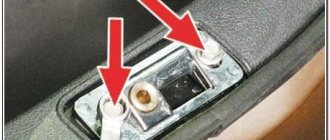
1.Remove the tidy. I think everyone knows how to do this.
2.Remove the arrows. It's not as simple as it seems. On large devices they are, in principle, easy to remove, but on small ones you have to be careful. We filmed it like this: we squeeze the arrow with pliers so that it doesn’t slip out, and with quite a lot of effort we pull it vertically upward (the device lies face up on the table).
The main thing is not to bend the rod on which the arrow sits, so you need to pull strictly vertically. Don't be afraid to bend the arrows, they are no longer needed. And don’t be afraid to pull out the rod, it sits seriously. The devices were Soviet, and then they made them so that the enemies could not disassemble them, or they could only disassemble them with a hammer.
Important!!! There is a limiter on the speedometer scale. It stands between zero and 20 km. This means that the needle has a downward movement, in my opinion even below zero (I don’t remember exactly). In order for it to show correctly after replacing the arrows, you need to do the following: remove the complete device.
From the back, rotating the arrow, we find that a metal disk is rotating inside. It is practically adjacent to the stationary part of the device.
You need to put a mark when the arrow is on the limiter. We took a marker and simply drew a line on the disk and on the stationary part in one sliding motion. Now, when putting on the arrow, you just need to align these marks and the device will work correctly.
3.Unscrew the scales. It's simple.
4. Take diodes. We solder the resistors, not forgetting that they are soldered to the positive, and asking the seller when purchasing where exactly the positive is. As a rule, this is a long leg of the diode, but there are also options with a short plus, so be careful. You can take diodes with a built-in resistor, they are more expensive (although they say they are less reliable), but they will be easier to install, because There is not much space in the tidy, then it is worth its weight in gold.
Next, I will describe everything that we did with magic scales purchased on the market.
They look like this:
This is how they look in standard lighting:
So on the backlight with added bulbs and removed filters:
But it was all trial and error, so to speak. At some point, I decided that only the numbers should glow. And arrows.
We took the scale and taped it on the inside with black pieces of tape so that only the numbers could be seen through.
We did this with all the scales, but on small instruments I left the red zones exposed to light too. I think it's more interesting this way.
We make a limiter on the speedometer scale. We used a small nail for the window skirting boards. They attached scales, marked them, and made holes.
We drill holes for the arrows on the speedometer and tachometer scales. It should be no larger than the diameter of the base of the arrow, but almost flush.
We do the same on small devices.
Then we removed the original green filters from the dashboard. And light bulbs too. We will solder our LED bridges to their contacts. Since polarity is important for diodes, find the plus and minus on the contacts of the light bulb.
Number of diodes. Here we have it: one for each number; for icons (kmch, x1000, etc.) where there are two, where one is enough, for example for the temperature icon; for the arrows - 4 pcs for the large ones, 2 pcs for the small ones, and one diode instead of the old fuel level lamp, aimed at the red zone on the scale.
We used 5mm diodes for the two-digit speedometer numbers. For three-digit ones - centimeter ones, due to the larger width of the light spot. On the hands - 3mm, red glow (take ones that shine brighter).
Next, we soldered, so to speak, “LED bridges.” Those. Two or three diodes were soldered to the wires in parallel (not in series!). We placed the diodes where needed. We secured them to the dashboard using hot glue. The wires were soldered to the places where the light bulbs used to be.
Small red diodes were placed near the stem. At the very base. You can sharpen the diodes a little so that they are flatter, because when installing the scale itself, they can interfere. We used a soldering iron to make light indentations in the plastic at the base of the rod in order to recess the diode a little.
Otherwise, they will rest against the scale, and that, in turn, will not allow the needle to fit tightly to the scale, and the light of the red diodes will be visible.
The arrows of small instruments are easier to illuminate. There is plenty of space behind the scales to place diodes, so simply place the diode(s) behind the scale and point them at the needle.
We place the arrows on the rods. If you find arrows from some other car, think for yourself how to adapt it. The main thing is that it is not too heavy and not too long.
I repeat, our hands are from Peugeot 405.
The arrow consists of two parts: the arrow itself and a plastic insert. I showed them in the photo.
This is done so that when disassembling the Pyzhov panel, the readings do not go astray. That is, I removed the arrow, but the guide insert remains on the rod. Then I just put the arrow on, and everything shows exactly.
We just need to adapt this guide to our rod. It is thinner than Pyzhov’s, but not by much. How to adapt it is difficult to describe. Take it in your hands and everything will become more or less clear. On large instruments, the needles became like family ones. Only the length of the guide needs to be shortened. It's a little more difficult for small ones. The stem is thinner. We compensated for the thickness simply by applying a little solder to the rod. We also shortened the guide, installed it, put on the arrow, and that’s it.
When all this is done, we put on the scales, put on the arrows, and artificially turn on the dimensions. Using tweezers, we direct the diodes to the numbers. We look, we direct, we correct, we look again, and so on until you see what you need.
The matter remains small. We need to get rid of the background light at the edges of the scales. As you know, the scales do not fit tightly to the plastic stencil, because they are designed for external illumination.
We made podiums from plasticine. They just sculpted it with their hands and that’s it. They applied it, turned it on, saw a gap - corrected it, and so on until everything was perfectly dark. The main thing is not to overdo it with the height of the podiums, so that it does not bend the scale by pushing it.
When all this is done, you can install the tidy and enjoy the results of the work done. The elongated faces of neighbors in traffic are especially pleasing.
Since we have at least some choice of these scales on the market, we can easily change them to another option. They are the same in design, but when held up to light they are green, for example. Leaving numbers and one row of stripes exposed to light, for example, we have a completely different view.
By the way, the additional AutoGauge tachometer was illuminated in the same way. With its original lighting it looked very sad. There was one small bulb of a nasty yellow light. It glowed about the same as this device. Yes, yes, he has the backlight on.
To the question about resistors and all that, I’ll say right away - I don’t know what the resistance of the resistors is, the type of diodes, etc. I'm not a radio technician. I asked at the radio market for 12V diodes and that’s it. A normal seller will give you what you need. I haven’t had one burn out yet in 4 months.
After riding for a couple of months, having recovered from the attacks of euphoria, I noticed that the diodes aimed at the numbers were still too bright. The backlight should have been softer. Therefore, we removed the light spot of the diode from the numbers, and directed it as if between the numbers. The light became softer. It’s more pleasant for us, but it depends on who you like.
Somehow we’ll make lighting using matte diodes. Regarding these diodes, I want to warn you so that you don’t flatter yourself with the thought that you can coat an ordinary diode with sandpaper, and it will shine like a matte one. No. It's a bullshit. In a frosted diode, the lens is completely frosted, from the inside, and not just from the top.
Many will say that this is all an expensive pleasure. Yes, I won’t say it’s cheap (for some, of course). Let's estimate that there are about 60 Scales + Diodes - this will come out to about 50 USD.
I don't think this is too high a price to pay for beautiful instrument lighting.
Yes, this may not be the best or easiest way to redo the panel. Perhaps not all of our decisions are correct. I don't argue with that. I can even say that I am sure that there is probably an easier way to accomplish all this. Maybe. This is what we have done so far. We'll see later.
Video: do-it-yourself tuning of the VAZ 2107 dashboard (instruments)
VAZ 2107: DIY stove tuning
By and large, the stove of the classic is not bad at all. Not bad, or rather even heats very well, but there is one point that everyone should still take into account. As always, when our designer takes up development, expect trouble.
And the point here is precisely that the left pipe, which, according to all the laws of logic and rationality, should blow onto the driver’s window, magically does not blow there. A distinctive feature of the design, you know, but in winter this small flaw turns into a real disaster.
Constantly wiping the glass with strange rags or, even worse, being forced to open the window, which, given our frosty weather, is not the most pleasant prospect. This is the solution to this small problem that we will talk about. So, tuning the VAZ 2107 stove: modification of the left pipe.
The idea of refining the VAZ 2107 stove
If you want something to work the way you want, do it yourself. Doesn't want air to blow out? No problem, we’ll make you do it. And we will do this not with the help of a magic kick to the mechanism, but with the help of an ordinary fan.
First, you and I must remove the deflector from the pipe. There's nothing complicated about it. We carefully pry the deflector on one side with a screwdriver and pull it slightly forward. We do the same on the other side, and it ends up in our hands.
The body of the deflector itself is held in the torpedo by such small tendrils on top, so feel free to stick your hand into it and take it out of the torpedo without much effort. Next we will need a 50 mm computer fan, don’t be alarmed that it is slightly larger than the deflector, it fits perfectly under the landing pad of the nozzle.
We aim it approximately at the center of the deflector body and use a pencil to make small notes of its dimensions. Now we need a hacksaw or a stationery knife (which is more preferable) and slowly make cuts directly in the plastic.
We connect them using lines using a knife and pliers, and break off a piece of plastic. On the other hand, everything is the same. We don’t throw away the broken plastic; it will still be useful for household use.
We try to insert the fan into the resulting opening. Make sure that it fits very tightly, otherwise it will turn out to be humpty dumpty. We return the inner part of the deflector with the blades to its place and notice that when turning they will interfere with the fan, or rather, it will not allow them to turn to the maximum angle.
We mark the part that needs to be cut off so that nothing gets in the way. We disassemble the blades and cut off all excess both from the holder and from the blades themselves. The main thing is to be careful, the blades are very fragile and we don’t want to damage them.
We put the entire structure back together and install the fan. We check whether the blades move normally. And now about the fan. We had 2 of them. One from the hard drive cooling device at 0.18A and from the Pentium III cooler at 0.25A.
The second one, of course, blows stronger, but the first one is also perfect for our task. We try first one, then the other. Now our task is to make sure that the fan draws air from the stove and not, on the contrary, through the deflector.
To do this, we need to make it as airtight as possible. We just take the pieces of plastic that we have left and seal all the unnecessary rear openings with them, placing them on the sealant.
Tuning the VAZ 2107 stove: the most interesting things
Let's go to the car. First, we insert the fan into the nozzle platform. Then the deflector body, parallel to directing the fan into the hole that we cut. Well, don’t forget, return the blades to their place.
Regarding the electrical connection, everything is elementary. It is best to connect the cooler to the heater wire. And if there is nowhere to put a separate button for the cooler, then it is possible to attach it to the same wire as the stove fan. The diodes in the circuit are vital, otherwise the stove will have one speed instead of two. Choose 12 volts or more.
Video: tuning the VAZ 2107 stove with your own hands
VAZ 2107: do-it-yourself bumper tuning
Probably every car enthusiast has noticed that the standard bumper of this car looks somewhat fake and even outwardly is not particularly reliable.
They have a plastic base, which is reinforced with a chrome plate on top. In essence, it cannot effectively protect the car in a collision, and there is nothing to say about the visual effect; it does not look very elegant.
So we will try to make a more reliable structure out of this weak element, so that at least in case of a weak impact we will not have to repair or change the bumper of our car.
The essence of the idea is to strengthen the bumper with an L-shaped profile made of metal, plus we will slightly move the protective part from the body. So, we dismantle the front and rear bumpers of the VAZ 2107. During the tuning process, we will use the existing technological holes, in addition to this we will make holes in the profile.
As for the connectors, this will be done as follows: bend the lower plate of the future fastening forward. It turns out that we made a mount for the lower bumper bolt.
The plates on the connector are bent very simply, it will not be difficult. however, this does not mean that we need to act haphazardly, we work carefully. Next, we mount the reinforcing profile and place the bumper on it. As a result, we get a fairly massive bumper that will not deform in the event of a light impact.
In addition, it has a gap between the body - 5 cm. The appearance of the car has completely changed, it has become more impressive. If you are not satisfied with the standard model, then you can make your own bumper.
First you need to design its appearance. At this stage, it is worth considering all the details so that unexpected difficulties do not arise during the installation process. After removing the VAZ 2107 bumper, it must be thoroughly washed with detergent and dried.
Next, we install it, taking into account the angle of position in its normal position and ground clearance. The contours of the future bumper are filled with polyurethane foam; about large cans go there. For reliability, we reinforce the foam with wire or strips of metal.
The foam takes about 3 days to dry. As soon as the foam has dried, you can move on to the next stage. We transfer the sketch to the resulting structure and make markings in advance using prepared templates. Then cut out the excess foam using a sharp knife.
We apply a thin layer of epoxy resin and fiberglass to the surface. To make the substance absorb better, you can dilute the resin with a solvent. We wait for it to dry and move on to putty. Putty in one layer.
If necessary, we leave cutouts for fog lights, etc. We sand the surface of the bumper with sandpaper, which has a grain size of no more than 80. Next, we cover 2-3 layers of primer and proceed to painting.
Installing the bumper on the car occurs when the paint is completely dry, this will take a couple of days.
Video: do-it-yourself VAZ 2107 bumper tuning
VAZ 2107: do-it-yourself headlight tuning
One of the most prominent and effective types of external tuning of a VAZ 2107 car is tuning the car’s head optics (headlights). It can be accomplished in different ways. In addition, such tuning is often done by hand.
The first option and the most radical is to replace the standard optics with completely new ones (mainly from other car brands) and adapted for the VAZ 2107. Such tuning, of course, radically changes the appearance of the car, but in terms of monetary costs it is the most expensive. In addition to installing new headlights, you can also install fog lights.
The second option for tuning headlights is to replace some elements of standard headlights with other more advanced ones. The first thing that undergoes such tuning is the light bulbs (incandescent lamps are replaced with xenon ones, etc.), and you can also replace the headlight reflector in order to have a more effective reflective surface, and as an option, you can choose new glass, which has higher light transmittance and focusing (scattering).
Tuning VAZ 2107 headlights. And the last type of tuning VAZ 2107 headlights is the addition of standard optics with some decorative elements. Various types of special sticker films, various eyelashes, and rims can be used as such elements. This tuning is cheaper but just as effective.
As an option and example in practice for a VAZ 2107 car, you can apply this type of tuning. First, you need to remove the headlight glass. Next, using a file, drill and self-tapping screws, install the lens from the additional reversing light of the OKA car (instead of the standard orange one). The glass is subsequently seated on a sealant.
After carrying out such a minimum volume and cost tuning of VAZ 2107 headlights, the appearance of the front of the car will change significantly. Using similar methods, you can also perform tuning of VAZ 2106 headlights.
Video: DIY LED headlight tuning for VAZ 2107
VAZ 2107: tuning the radiator grill with your own hands
We will need: two stock grilles, a soldering iron, a grinder (or a Dremel, if anyone has one), straight hands and 4 hours of time) we may also need black paint, but not necessarily... If you do everything correctly and carefully, you will get such beauty! And you don’t need to paint, it’s just the right color for me)
This time I decided to solder the grille, and not glue it with super glue as last time, it’s more reliable. So, we cut out the fret icon that we don’t need from the grille... and vertical strips every other, that is, we leave only 4 out of 9, the rigidity of the grille will not suffer from this.
From the second lattice we cut out five horizontal whole strips (there are only 6 of them) and four small pieces to seal the area from the badge. First we solder them and sand down the unevenness from soldering, paint the sanded part and... we get a stock grille without a badge)
But we have a different task. Now we solder the large strips we cut into large gaps in the original lattice, making the necessary cuts in advance and our new beautiful lattice is ready.
Video: do-it-yourself tuning of the VAZ 2107 radiator grill
VAZ 2107: do-it-yourself suspension tuning (sports suspension)
Here I offer my version of the VAZ 2107 suspension, which I have and am incredibly happy with. The suspension is without lowering - for comfortable and confident everyday driving. Stiffer than standard, handling has increased noticeably, without sacrificing comfort.
Front suspension springs
The front suspension springs can be left stock, or Sirius can have variable pitch springs without lowering them. The relatively soft front (springs) compensates for the overall stiffness of the suspension.
Rear suspension springs
The standard springs of the VAZ 2107 are not stiff enough. As soon as you put several people in the back seat, the car runs the risk of hitting the nearest bump with its belly, and the rear wheels begin to touch the wheel arch liners. Consequently, we increase the stiffness of the rear springs.
Once at a car market they recommended Nivov’s to me - I believed it and installed it. Now I don’t regret anything, a year has already passed. The stiffness is just right. On the highway the car handles confidently, fully loaded - no problems, even off-road. In general, we put standard Nivov springs back.
Front shock absorbers
I installed Plaza Sports (yellow) in a circle. Everything suits me. At a speed of 160, it handles confidently on the highway. If you live in the northern part (the temperature is low, you can install Plaza Arctic).
Rear shock absorbers
Also Plaza Sports. The suspension is moderately stiff and elastic. It is advisable not to install cheap Soviet tires. Due to its oakiness, it can turn out quite harsh (comfort will disappear).
Video: do-it-yourself VAZ 2107 suspension tuning
VAZ 2107: do-it-yourself dashboard (torpedo) tuning
It is worth immediately noting that, along with tuning the dashboard in a VAZ 2107, an effective means for tuning the interior is reupholstering the seats. But we will still focus on tuning the dashboard.
In many phrases, tuning the VAZ 2107 topedo immediately evokes associations with replacing the scales on the instrument panel or their backlight colors. You won’t surprise anyone with such a simple tuning. Although in reality it is quite effective and does not require high costs.
Now, if you, in addition to replacing the backlight, also brought the scales from the instrument well as close as possible to the glass so that they could be read more clearly, then this can be called a serious step in tuning the dashboard.
Options for tuning the dashboard on the VAZ 2107. But recently, many people prefer not to limit themselves to the instrument panel and focus on the right side of the tidy where additional instruments and sensors are located.
Due to the wide space there, you can easily install a display of a radio or car TV tuner there. Although it can be done a little simpler. Instead of a monitor, place there the electronic circuit of a VAZ 2107 car, by analogy with foreign cars, on which information on closing (opening) doors, fastening seat belts, etc. will be displayed.
But in both the first and second cases, it is very likely that you will have to replace the standard dashboard with another, and this significantly increases the cost of such an operation.
Although, in fact, if you have enough money on hand, you can shove a Mercedes dashboard into the interior of a VAZ 2107. The main thing, as they say, is to pay everything on time, and there will always be craftsmen who will do this.
Video: tuning a VAZ 2107 torpedo with your own hands
Instead of a conclusion
It’s safe to say that tuning a VAZ 2107 is practically no different from tuning the rest of the VAZ “classic” line, for example, from tuning a VAZ 2106. Its characteristic features include relatively low monetary costs and very significant results (both external and internal). technical specifications)
In addition, as a small bonus, I would like to note that if you increase the engine size, you will not have to pay increased transport tax, because according to the PTS you will have the same standard engine from the 7.
All the methods described in this article are not a panacea or the only correct solution; in fact, there is an almost infinite number of options, limited only by your imagination.
So think, create and everything will work out for you, good luck with your tuning!
Tuning the VAZ 2106 engine
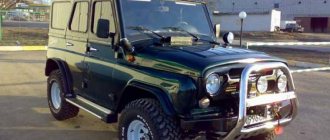
The VAZ “six” began to be produced back in 1976. This model is long outdated both in appearance and technical characteristics. However, to this day there are still many adherents of using such cars. Some owners try to keep the car in its original form, others equip it with modern components and mechanisms. One of the primary units that undergoes tuning is the engine. Let's look at its modifications in more detail.
Cylinder block boring
The VAZ 2106 engine does not stand out for its power, because it ranges from 64 to 75 hp. With. with a volume of 1.3 to 1.6 liters, depending on the installed power unit. One of the common engine modifications is boring the cylinder block, which allows you to increase the internal diameter of the cylinders and power. The boring process involves removing a layer of metal from the inner surface of the cylinders. However, you need to understand that excessive boring will lead to thinning of the walls and a decrease in the reliability and service life of the motor. Thus, the stock power unit with a volume of 1.6 liters and a cylinder diameter of 79 mm can be bored to 82 mm, giving a volume of 1.7 liters. With such changes, reliability indicators will practically not deteriorate.
Extreme enthusiasts can increase the cylinders to 84 mm at their own peril and risk, because no one knows how long such an engine will last.
The boring process is carried out on special equipment (boring machine), although there are craftsmen who carry out this procedure almost in a garage, and the accuracy remains questionable.
Tuning the appearance of the car
In addition to a powerful engine and a rigid suspension, every driver agrees that it is necessary to carry out external tuning of the VAZ 2106, since his car should look the part: menacing and assertive.
External tuning 2106 implies the following:
- adding sports spoilers;
- installation of car body kits;
- replacement of factory headlights and rear lights;
- alteration of the car interior;
- use of small accessories.
Spoilers and body kits will reflect the sporty nature of the car and the character of the owner. Installing expensive front and rear lights will also prevent the car from being immediately recognizable and at the same time provide good illumination and visibility in the dark. It is worth noting that when replacing headlights, body work may be required to adjust the seats to the new headlight sizes.
Inside the car, the seats are replaced, covered with high-quality fabric or leather, and the instrument panel is changed. Most often, a panel is installed from a VAZ 2107 car. The steering wheel is also replaced, and the steering wheel is covered with leather or a steering wheel cover is installed. Stainless steel linings are attached to the thresholds, preventing the metal from wearing off during loading and unloading of passengers.
Small accessories include LED strips, additional reflectors, brake lights, other door handles and the like that are mounted on the car body, also helping to distinguish the car from others.
Compressor or turbine for the “six”
You can increase engine power by installing a compressor or turbine, but first you need to figure out what is required for this. First of all, you need to understand that, due to its design features, it is possible to install a turbine on a carburetor engine, but it is quite problematic. The nuances include both large material and time costs. The most important points to think about when equipping a car with a turbine are:
- Mandatory installation of an intercooler. This part is a kind of radiator, only the air is cooled in it. Since the turbine creates high pressure and the air is heated, it must be cooled to obtain the effect of the installation. If you don't use an intercooler, there will be an effect, but much less.
If you are not such an avid racing driver, then you should look towards the compressor, which has the following differences from the turbine:
- Does not develop high blood pressure.
- There is no need to install an intercooler.
- You can equip a VAZ carburetor engine.
To equip a VAZ 2106 with the unit in question, you will need a compressor kit - a kit that includes everything necessary for converting the engine (pipes, fasteners, supercharger, etc.).
The product is installed according to the manufacturer's instructions.
Video: installing a compressor using the “five” as an example
16-valve engine on VAZ 2106
One of the options for tuning the “six” is replacing the 8-valve engine with a 16-valve engine, for example, from a VAZ 2112. However, the whole process does not end with a banal replacement of engines. Quite serious, painstaking and expensive work lies ahead. The main stages of this type of modification are:
- For a 16-valve engine we install an injection power system.
- We adjust the mount on the engine mounts (classic mounts are used).
- We change the crown on the flywheel, for which we knock down the old one, and in its place we put a part from a VAZ 2101 with preheating. Then we grind off the collar on the engine side of the flywheel (you will have to turn to a lathe). This is necessary for the starter to fall into place. After finishing work on the flywheel, we balance it.
From the listed points for installing a 16-valve unit, you can understand and preliminary assess your capabilities both financially and technically. If you do not have the necessary components and knowledge, you will have to seek outside help and “pour” additional funds into this type of hobby.
Chassis
On the VAZ 2107, tuning continues by reworking the car's chassis. To tune the engine, transmission, change the properties of the car’s suspension and improve the braking system of the model, you must have specialized equipment and have certain knowledge and skills. Otherwise, using parts that are incompatible with each other will make using the car dangerous.
Instead of rear drum brakes, disc brakes are installed. They are more effective when braking a car. When tuning, they independently determine the number of gears and reduce the travel of the gear shift control handle. This is done by replacing the long-stroke drawstring with a short-stroke one. As a result, gear shifting will be performed much faster than on a standard equipped VAZ 2107.
When tuning a VAZ 2107, instead of a manual gearbox, an automatic transmission is installed. However, such alterations require large financial investments.