Where is the fuel check valve located?
Let's find out where the fuel system valve of various cars is located.
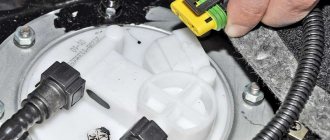
- In power plants with an injector, it can be installed in the gasoline pump housing.
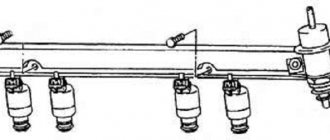
- Mounted on the fuel frame or installed directly in the fuel line. This is the space between the gas tank and the fuel injectors.
On diesel power plants, the mechanical structure is hidden between the fuel injection pump and the low-pressure pump. This arrangement of the product allows you to create a stable pressure at the outlet of the high-pressure pump.
The system has proven itself well:
- on a domestic truck: KAMAZ 740;
- Czech clubfoot Tatra;
- on Mana;
- and Renault Magnum.
In diesel installations where a pre-start heating system is provided, the fuel check valve is located in front of the heating system. A typical example is the same KamAZ or Magirus trucks operating in the Far North.
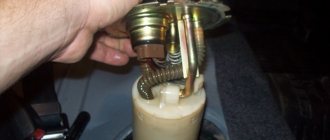
On domestic passenger cars, such as the VAZ 2110 and 2114 with sixteen valves, the mechanical structure is located in the gasoline pump and on the fuel frame. This is analogous to installing a diesel engine.
Today, old carburetor cars with rear-wheel drive still run on our roads: eights and nines (VAZ 2108 and VAZ 2109). On them, the role of the return device is assigned directly to the gasoline pump.
It stands on the cylinder block and prevents the passage of fuel in the opposite direction: into the fuel tank.
The fuel supply system of automobile gasoline and diesel power units is a technically complex device that should not be approached without knowledge. And even more so, try to carry out technical treatment on your own.
The check valve plays an important role in the regular supply of fuel. Let's focus our attention on its design and installation in the car. Let's look at the problems and characteristic signs of a malfunction. We will also decide on ways to check it.
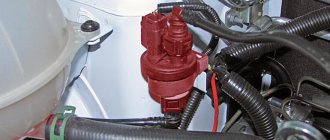
Electric fuel pump diagnostics
There are different methods for determining the serviceability of a gasoline pump. A complete check of this fuel transfer device can be done in 7 steps.
Let's look at the signs of a fuel pump malfunction that requires you to check it:
- The car jerks and drives jerkily.
- The engine often stalls.
- The engine sometimes does not start.
- A whistling noise is heard when the car is moving.
- The revolutions are floating.
How to check the fuel pump on an injector
Owners of fuel-injected cars know that when the ignition is turned on, the fuel pump motor turns on, pumping fuel from the gas tank to the engine begins, and a peculiar sound similar to a buzzing is heard.
If you suddenly notice that when you turn the ignition key, the fuel pump does not activate, then you will have to look for the causes of the malfunction. This could be electrical wiring, the pump itself, a relay, or a motor. It is better to look for the cause of problems in a certain sequence. First, check whether power is supplied to the fuel pump and so on, along the chain.
Step #1. Check the functionality of the fuel pump fuse.
To check the fuse, you need to find the fuse box (depending on the make and model of the car, they are located either in the passenger compartment or under the hood). Determine from the diagram which fuse is responsible for the fuel pump, find it and inspect whether it has burned out. If it burns out, we change it to one so that the inscription is the same (10, 15, 20, 25, 30 Amperes, etc.). If there is no new fuse, you can finish it with aluminum or copper wire. But upon arrival, you must immediately replace the fuse. After all, it serves as a device protector from combustion. If the new fuse burns out, then there is a short circuit.
Step #2. Checking the fuel pump relay.
To diagnose the fuel pump relay, you will need to remove the relay itself. A 12 Volt light bulb must be connected to the relay sockets. If the light is on, then the relay is working; if not, then it is not.
You can also, if there is no light bulb, check with a multimeter in resistance mode. One probe must be connected to terminal 1, the second to terminal 2 (see diagram).
It is important to check the terminals for oxidation. Oxidized terminals lead to partial loss of energy for the fuel pump.
Step #3. Checking the pump motor for serviceability.
The motor can be checked with a voltmeter or multimeter in the “voltage” mode ranging from 0 to 20 Volts. Both probes of the measuring device must be connected to the power terminals of the fuel pump. Then, turn on the ignition and see what value the device shows.
If the device shows voltage in the range from 12 to 12.5 V, then the device is working properly.
If voltage is supplied, but the pump does not pump, then you need to check the pump motor.
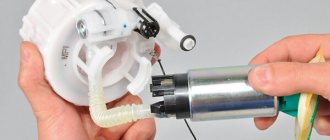
Step #4. Checking the fuel pump motor
In this diagnostic step, the main thing is not to break the electric motor. To do this, we supply voltage directly from the battery to the terminals of the 12 Volt fuel pump. If the motor is running, then check the check valve and measure the pressure.
If voltage is supplied to the motor terminals, but it does not work, then you need to check the stator winding. To do this, you will need an Ohmmeter or tester in “resistance” mode. Resistance must be shown, otherwise the winding will burn out.
If there is resistance in the stator winding, then there may be contact with the housing and a short circuit (short circuit) occurs. We put the multimeter in the “continuity” mode and connect the probes, one to the stator housing, the second to the winding. If it beeps, it means it is shorting.
Step #5. Diagnostics of the coarse filter.
To check the fuel pump coarse filter, it must be removed. After dismantling the filter, you need to inspect it; a dirty filter is visible to the naked eye. You can clean it with a brush and gasoline, or you can just buy a new one.
To ensure high-quality engine operation and increase its overhaul period, it is necessary to periodically clean the gas tank, fuel pump filter, and injectors. A lot of sediment usually collects at the bottom of the gas tank.
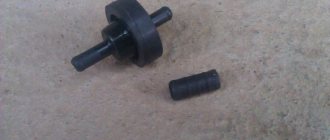
Step #6. Checking the fuel pump check valve.
The check valve serves as an obstacle to the reverse movement of liquid in the system. The check valve can be checked in 3 ways:
- You need to measure the pressure using a pressure gauge. The pressure should be no more than 0.3 MPa (MegaPascal). Measure the pressure in the area on which the operation of the internal combustion engine directly depends. If you turn off the engine, the pressure should not drop sharply.
- Manual method of checking, that is, without a pressure gauge. To do this, you need to turn off the return line while the engine is running and observe the operation of the engine.
- The third method is to clean and check the functionality of the check valve. You can blow out the valve with a compressor, or with water pressure.
Step #7. Checking the pressure in the fuel system.
To correctly and more accurately determine the pressure, you need to disconnect the fuel pump fuse, thereby resetting the pressure value to zero.
Checking the pressure with a pressure gauge:
- We connect the pressure gauge to the fuel rail. We take the hose with the pressure gauge through the hood to the windshield.
- We take measurements statically, that is, when the car is stationary. Turn on the ignition and observe the pressure gauge readings. The pressure in the fuel system should be no more than 3.7 atm (Atmospheres).
- We take measurements in motion. We put it in third speed, the speedometer should show approximately 50 km/h. If the pressure is not normal and this causes problems, then the pressure gauge will show either low pressure up to 3 atm, or too high - above 3.7 atm. If the pressure is lower than specified, then there is a leak (injectors or fuel regulator).
Reference
Many people know that the fuel system valve aggregates:
- With carburetor power units running on gasoline.
- With engines equipped with an injector.
- With power supply systems for power plants, where diesel fuel is used as fuel.
There is nothing complicated about the mechanical design. This is a ball-type device with a seat, which is made of soft metal, with the most accurate balancing. Fuel flows freely through the fuel valve in one direction. The pressure that is created prevents gasoline or diesel fuel from flowing back into the fuel tank, since the non-demountable structure is locked.
Despite its simplicity, the device can cause a lot of trouble for a novice and an experienced driver. Therefore, it is necessary to know its possible vagaries and ways to eliminate breakdowns. But first of all, understand where the mechanical structure is installed.
“The concept of a fuel system check valve should not be confused with a pressure reducing device.”
Messages 12
1 Topic by Ser_vas_xxx 2014-03-13 18:28:45
- Ser_vas_xxx
- New member
- Inactive
- Registration: 2014-03-07
- Messages: 30 Thanks : 1
- Auto: 21124
Topic: Where is the check valve in the fuel pump
After diagnostics, the control valve in the fuel pump was said to be clogged
The pressure is already 4.5 they told me to clean it, where and how to clean it?! Machine 21124 1.6
2 Reply from chev-viktor 2014-03-13 20:04:39
- chev-victor
- New member
- Inactive
- From: Rostov-on-Don
- Registration: 2014-02-17
- Messages: 96 Thanks : 7
- Car: VAZ2112
Re: Where is the check valve in the fuel pump
The check valve is not cleaned in the fuel pump but in the fuel system
3 Reply from kapelkaK 2014-03-13 21:09:12 (2014-03-13 21:10:03 edited by kapelkaK)
- kapelkaK
- Experienced
- Inactive
- From: Ramenskoye, Moscow.
- Registration: 2013-12-16
- Messages: 313 Thanks : 94
- Car: VAZ 2111, 2001, 1.5; 8V; January 5.1; BK ShtatKh4m.
Re: Where is the check valve in the fuel pump
In what place exactly?
4 Reply from sergo9531 2014-03-13 21:15:38
- sergo9531
- Local
- Inactive
- From: Domodedovo
- Registration: 2014-01-12
- Messages: 578 Thanks : 208
- Auto: 21114
Re: Where is the check valve in the fuel pump
5 Reply from kapelkaK 2014-03-13 21:34:23
- kapelkaK
- Experienced
- Inactive
- From: Ramenskoye, Moscow.
- Registration: 2013-12-16
- Messages: 313 Thanks : 94
- Car: VAZ 2111, 2001, 1.5; 8V; January 5.1; BK ShtatKh4m.
Re: Where is the check valve in the fuel pump
Added: 2014-03-13 22:34:23
6 Reply from sergo9531 2014-03-13 21:36:14
- sergo9531
- Local
- Inactive
- From: Domodedovo
- Registration: 2014-01-12
- Messages: 578 Thanks : 208
- Auto: 21114
Re: Where is the check valve in the fuel pump
kapelkaK , it is the opposite. through it, excess fuel is drained into the tank. This way the pressure is regulated))
7 Reply from kapelkaK 2014-03-13 21:39:10 (2014-03-13 21:39:45 edited by kapelkaK)
- kapelkaK
- Experienced
- Inactive
- From: Ramenskoye, Moscow.
- Registration: 2013-12-16
- Messages: 313 Thanks : 94
- Car: VAZ 2111, 2001, 1.5; 8V; January 5.1; BK ShtatKh4m.
Re: Where is the check valve in the fuel pump
sergo9531 , this is not a check valve, but a return valve (so to speak). The operating principle is different.
8 Reply from sergo9531 2014-03-13 21:52:53 (2014-03-13 21:55:40 edited by sergo9531)
- sergo9531
- Local
- Inactive
- From: Domodedovo
- Registration: 2014-01-12
- Messages: 578 Thanks : 208
- Auto: 21114
Re: Where is the check valve in the fuel pump
kapelkaK , yes, you are right))) let's approach this issue from the other side) Ser_vas_xxx , the pressure in the system is 4.5 atm. pressure is regulated by a pressure regulator (right obvious
) . therefore, it is faulty))) as far as I know, the pump has a check valve (so that gasoline does not escape), but if it were faulty, the car would not start (stuck in the closed position), perhaps the opposite is true - it does not close, but in a running car it not needed
Draw your attention to.
If the fuel check valve loses its seal, gasoline flows back into the tank without permission. In this case, starting the power unit is possible with manual pumping.
If starting the engine was difficult, craftsmen installed (embedded) a mechanical structure into the power system, closer to the carburetor.
This made it possible to easily start the engine even at negative t0. An example is the old Opel (Cadet) and 323 Mazda, which have seen time in their lives.
Car won't start after DIY replacement
This is a fairly common problem. It must be said that the car should not start immediately after replacing the pump. The pump first needs to create operating pressure in the system. To do this, you need to turn on the ignition for a short time (a few seconds). The key must be inserted into the lock, but not turned. The lights on the dashboard should light up. Then you can rotate the engine with the starter for five to ten seconds. If nothing works out, then you should take a break for half a minute and repeat your actions.
Check valve problems
For what reason does the fuel system valve fail? Let's figure it out together. Today there are three obvious reasons for refusal to work.
- Installation of low-quality Chinese goods that quickly fail. Basically, these are fakes for a certain brand.
- The second reason is the natural wear and tear of the product. In this case, either the spring or the membrane fails. Note that the valve itself rarely fails.
- Another problem for a non-removable mechanical structure is low-quality fuel.
Having decided on possible problems, let's move on to the signs indicating a problem.
Diagnostics of a mechanical fuel pump
A mechanical type fuel pump is found in a car with a carburetor engine. To check a mechanical fuel pump, you need to:
- Disconnect the fuel hose from the carburetor inlet fitting.
- We lower the disconnected hose into a transparent bottle or jar. We pump up the fuel with the lever and see what the fuel flow is like. There should be no air bubbles.
If the stream does not appear immediately, this does not indicate a malfunction of the fuel pump. Diaphragms usually rupture.
You also need to look at the strainer, inlet and outlet valve.
On foreign cars, mechanical fuel pumps are usually not dismountable. Therefore, they only have to be changed.
In general, we look for the cause of problems in the operation of the fuel pump by checking the voltage supply to the device. If it is a mechanical pump, then most likely the diaphragm is worn out.
0
Author of the publication
offline for 3 months
Characteristic symptoms of a check valve malfunction
It could be:
- unexpected change in speed of the power unit at startup or while driving;
- The engine can be started by pressing the accelerator pedal. Although before this the power unit was driven by a starter;
- Unstable engine operation at low or idle speeds;
- loss of fuel that escapes through the supply or return pipes. In this case, the sealing of the fuel hoses is not broken.
In our case, the non-removable mechanical structure can be easily repaired. This is on the one hand. On the other hand, the problem cannot be determined by scanning. Next, let's look at options for checking the device.
Model selection
It is best to install an imported fuel pump on the VAZ 2110 injector, capable of delivering a performance of up to 7 atm. It will not only last much longer, but will also ensure better and longer operation of the injector and improve the quality of the mixture at the outlet of the nozzle.
You should know that Bosch fuel pumps usually differ only in length, location of terminal connectors, and sometimes in the diameter of the housing. Therefore, it is advisable to either go shopping with an old device, or make some minor modifications at home.
To avoid buying a fake, keep in mind that any Bosch gas pump is packaged in very durable packaging. The bag contains purified gasoline in which the device is immersed. If you smell it, it means the seal is broken, corrosion may begin inside the pump, it’s better not to buy one.
How can you check a check valve?
You can find out what condition the fuel valve is in as follows.
Using a pressure gauge, check the pressure. It should be within 3 kg per cm2. These are figures for passenger cars.
You can find out how the device works by pinching the “return” fuel hoses. If the permanent mechanical structure is in order, the pressure should increase.
For your information.
This method is only for cars that have rubber hoses installed.
Self-diagnosis can be carried out without using a pressure gauge. This concerns the problem of unstable operation of the internal combustion engine (ICE) and poor acceleration. Having pinched the rubber hose that moves the fuel in the opposite direction, you need to pay attention to the operation of the engine. If the speed increases and the engine cylinders operate as planned, then the check valve is faulty.
Table of fuel pressure values by car brand
| car model | Pressure, atm |
| fiat albea | 3,8 |
| Lifan Solano | 3,8 |
| Chevrolet Lanos | 3,8 |
| Chevrolet Cruze | 4 |
| Hyundai Solaris | 4 |
| Hyundai accent | 4 |
| ford focus 2 | 4 |
| UAZ Patriot | 4 |
| UAZ 409 engine | 3,8 |
| subaru legacy | 3,8 |
| Subaru | 3,8 |
| Renault Logan | 3,5 |
| Priora | 3,8 |
| Peugeot 308 | 3,8 |
| Niva Chevrolet | 3,8 |
| Matiz | 3 |
| m57 bmw | 3,8 |
| Lacetti | 3,8 |
| Kia Spectra | 3,8 |
| viburnum | 3,8 |
| infiniti qx56 | 4 |
| ZMZ 406 | 3 |
| ZMZ 405 euro 2 | 3 |
| gazelle 405 euro 3 | 4 |
| gas 3110 | 3 |
| VAZ 2115 | 3 — 3,8 |
| VAZ 2114 | |
| VAZ 2112 | |
| VAZ 2110 | |
| VAZ 2107 injector | 2,5 — 3 |
| gazelle 4216 | 3,8 |
| z18xe | 3,8 |
| nissan primera | 3,8 |
| lexus is 250 | 3,8 |
| ix35 | 3,8 |
| Daewoo Nexia | 3,2-3,8 |