Checking the emergency oil pressure sensor
To check the device you will need:
- slotted screwdriver;
- key to 22;
- ohmmeter (multimeter);
- tire pump with pressure gauge;
- a piece of hose with clamps of the appropriate diameter.
- Using a screwdriver, disconnect the power wire from the emergency sensor.
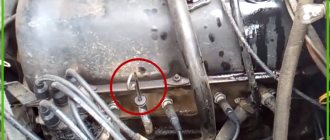
- Using a 22mm wrench, unscrew it from the fitting (tee).
- We connect the pressure gauge fitting to one end of the hose. We fix the connection with a clamp.
- We put the other end of the hose on the sensor fitting. We clamp the connection with a clamp.
- We connect the probes of an ohmmeter or multimeter turned on in ohmmeter mode to the sensor terminal and its body (ground). The resistance should be zero (contacts closed).
- We begin pumping, controlling the pressure and resistance of the sensor. When the pressure reaches 0.4–0.8 atmospheres, the sensor contacts should open and the ohmmeter should show infinite resistance. This means that the sensor is working. Otherwise, it must be replaced. The principle of testing is to create the pressure inside the sensor necessary to open the contacts
Mechanical sensor check
Checking an old mechanical sensor (for example, installed on some VAZ “classic” models and old foreign cars, for example, “Volvo 240”), with the help of which it is possible to directly find out what pressure is currently available in the car’s oil system, can be done even without multimeter, but using additional devices (air pump and electric car pressure gauge). The sensor similarly must be removed from the car, since it will not be possible to test it directly on the engine.
Checking the sensor with a pressure gauge
The test is a little more complicated than with electronic ones, but this lies, first of all, in some difficulty in assembling the electrical circuit. You need to act according to the following algorithm:
How to check a mechanical sensor, connection diagram
- On the sensor you need to find a contact that produces a signal for the oil pressure warning light on the car's dashboard, as well as another contact from which a signal is sent to indicate oil pressure. For further measurements, you will simply need to take the “ground” from the sensor housing (under normal conditions, all sensors simply take “mass” from the engine housing).
- Similarly, on an electronic pressure gauge, you need to figure out where to connect the plus and minus of its power supply, as well as the signal directly from the sensor (that is, there are three contacts).
- Connect the electrical circuit and tightly connect the air hose connecting the pump and the sensor sensing element.
- Next, you need to use a pump to apply 1…2 atmospheres to the sensitive element of the sensor. If it is working properly, then the dial pressure gauge will clearly show the incoming pressure. If this does not happen, it means the oil pressure sensor is faulty.
As a rule, oil pressure sensors cannot be repaired, so if they are found to be faulty, the unit must be replaced. Fortunately, these elements are inexpensive and are available everywhere in almost any auto store.
Decoding error code P0106
All new models of Ulyanovsk-made Patriot cars are equipped with an electronic control unit (ECU). This allows the machine systems to diagnose components using standard tools, find breakdowns and display error codes on the display.
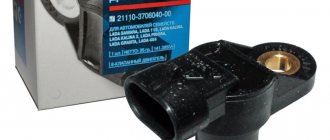
Code P0106 means "the MAP sensor signal is out of range." The MAPS sensor (converter) itself (Manifold Absolute Pressure sensor (MAP-sensor)) breaks down extremely rarely.
If the supplied air volume differs from the nominal value, error P0106 appears.
Instructions for replacing the pointer
If diagnostics show that the device needs to be replaced, you have two options - either change it with the help of specialists, or do it yourself. The second option is more preferable, since in general there is nothing complicated in replacing the sensor; you can perform this procedure yourself in literally five minutes. To replace the device, you will need a standard locksmith kit, which includes a set of wrenches (you will need wrenches 17 and 22), as well as a screwdriver.
So, to do this, to make a replacement, follow these steps:
- First, open the hood and find the controller itself. We have already said above where it is located.
- Once the device is found, you will need to loosen the bolts that secure the wire connector to the device itself. Having done this, the cable can be moved to the side so that it does not interfere.
- Then the controller itself is unscrewed from its seat.
- When the device is dismantled, you need to install a new pressure sensor, while following a similar procedure, only in reverse order.
At this point, the replacement procedure can be considered complete. As you can see, it is carried out in just a few stages and there is nothing difficult about it. Perhaps the most crucial moment in this process is to determine exactly when the device has broken down and needs to be replaced.
Photo gallery “Independent replacement of DDM”
1. Loosen the bolt securing the wire and disconnect it from the DDM.
2. Unscrew the regulator from its seat using a wrench.
Replacing the sensor yourself
To replace the DDM with a UAZ Patriot, you will need a simple set of tools: keys “17”, “22” and a screwdriver with a flat blade.
- Open the hood, disconnect the negative terminal on the battery. Then use a screwdriver to unscrew the wiring on the sensor terminal and the regulator (the wires should be marked in different colors so as not to be confused when connecting).
- The DDM is attached to a fitting in the oil line of the cylinder head cover. Next, unscrew the top mounting screw.
- Then disconnect the contact terminals on the regulator.
- Using a key set to “17”, unscrew the sensor from the fitting, making sure that the fitting does not rotate in the socket of the block cover.
- Use the key “22” to remove the signaling device from the mount.
- Install the new sensor in reverse order, replacing the O-ring. Treat the joints with sealant, and the terminals of the electrical contacts with an anti-corrosion compound, having previously cleaned them. After this, inspect the engine components for oil leaks, check the oil level and start the engine idling for 5-7 minutes at 2000 rpm. If everything in the system is normal and the DDM is installed correctly, the control light will stop lighting.
The choice of a new DDM for the UAZ Patriot depends on the engine configuration. You can select it by VIN or type of power unit. The original emergency pressure sensor is small for ZMZ-409 and various modifications, produced in Russia for the Ulyanovsk plant, has article number 23.3829 and costs on average about 500 rubles. After installing a new sensor, it is recommended to have a professional measure the oil pressure in the system. This will help prevent or identify potential malfunctions that could lead to malfunction of valves and timing mechanisms.
Lubrication system oil pressure sensors ZMZ-40905, 40911, diagnostics
The oil pressure in the lubrication system of the ZMZ-40905 and ZMZ-40911 engines is monitored by a pressure sensor, the readings of which are displayed on a dial gauge or indicator located on the dashboard.
In addition, the lubrication system is equipped with an emergency oil pressure sensor and an emergency oil pressure indicator on the dashboard.
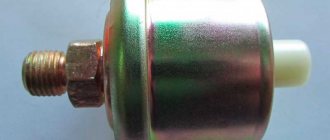
Oil pressure indicator sensor 23.3829000.
Sensor 23.3829 is a rheostat that changes its resistance depending on the pressure in the engine lubrication system and is a non-repairable product. Possible malfunctions of the engine oil pressure indicator sensor, and how to check them, are listed below.
When the engine is not running, the gauge needle is at the end of the scale or shows a pressure greater than zero.
If, with the ignition on and the engine not running, the emergency oil pressure warning lamp should be on, the indicator needle is at the end of the scale or shows a pressure greater than 0 kgf/cm2, then the sensor may have failed or there has been a short to ground in the circuit from it to the indicator . To determine the cause, disconnect the wire from the sensor. If the sensor is faulty and there is no short to ground, the arrow should return to the beginning of the scale.
When the engine is running, the gauge needle is at the beginning of the scale.
If the gauge needle is constantly at the beginning of the scale after starting and while the engine is running, and the emergency oil pressure indicator lamp does not light up, then the sensor may have failed or there has been an open circuit in the circuit from it to the gauge. To check, disconnect the wire from the sensor and short it to ground. If the sensor is faulty, the needle should move to the right end of the scale.
For the liquid crystal display of the UAZ Patriot dashboard with the ZMZ-40905 engine.
The diagnostic technique for control devices, including the oil pressure indicator and instrument cluster of the UAZ Patriot, is described in detail in this material.
The resistance of a properly functioning sensor 23.3829000 must correspond to the following values:
1. At an oil pressure of 0 kgf/cm2, the resistance of the sensor: serviceable - 290-330 Ohms, extremely worn - 270-350 Ohms. 2. At an oil pressure of 1.5 kgf/cm2, the resistance of the sensor: serviceable - 171-200 Ohms, extremely worn - 156-215 Ohms. 3. At an oil pressure of 4.5 kgf/cm2, the resistance of the sensor: serviceable - 51-79 Ohms, extremely worn - 37-93 Ohms.
If the sensor resistance exceeds the limit values, it must be replaced. It should be taken into account that the correctness of the oil pressure indicator readings is also affected by the increased resistance of the contacts due to their oxidation, in this case the indicator readings decrease.
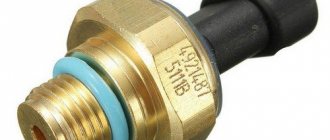
Emergency oil pressure sensor 6002.3829.
The contact type sensor is a non-repairable product. When the oil pressure in the lubrication system decreases to the level at which the sensor is triggered, the contacts inside it are closed and voltage is supplied to the warning lamp of the emergency oil pressure indicator on the instrument panel.
If the emergency oil pressure lamp does not light up when the ignition is turned on.
The emergency oil pressure lamp should light up every time the ignition is turned on and the engine is not running. If the lamp does not light up, and the pressure indicator should show 0 kgf/cm2, then the sensor may have failed or there has been an open circuit in the circuit from it to the signaling device. To check, you need to disconnect the wire from the sensor and short it to ground. If the circuit is good and the sensor is faulty, the warning light on the instrument panel should light up.
If the oil pressure warning lamp is constantly on when the engine is running.
The constant lighting of the indicator lamp when the engine is running, the pressure indicator arrow or the control pressure gauge indicate oil pressure above 1 kgf/cm2, may be a consequence of a malfunction of the sensor and a short to ground in the circuit from it to the indicator lamp. In this case, you should disconnect the wire from the sensor. If there is no short to ground and the sensor itself is faulty, then the warning lamp on the instrument panel should go out.
A properly functioning sensor should be triggered when the pressure in the lubrication system drops to 0.4-0.8 kgf/cm2. If the response pressure decreases below 0.32 kgf/cm2 or increases above 0.96 kgf/cm2, the sensor must be replaced.
auto.kombat.com.ua
Sensor performance assessment
A detailed inspection of pressure sensors of UAZ vehicles is impossible without special equipment. But if there are doubts about serviceability, a rough assessment of the performance of the devices does not cause difficulties.
At the beginning of 1976, for a month and a half in the far northern region, tests were carried out on a prototype UAZ-452 AS with the aim of creating a car for the Far North. The main difference between the prototype is the improved thermal insulation of the body. During the tests, the UAZs traveled around Yakutia about 12,000 km.
UAZ
https://www.uaz.ru/company/75/yakutiya
Alarm Sensor Evaluation
The emergency sensor housing contains a membrane that, under the influence of pressure, breaks the normally closed contacts in the signal lamp power circuit. It goes out when the pressure exceeds 0.4–0.8 kgf/cm2.
The emergency sensor membrane turns on the power to the warning lamp if the pressure drops below the permissible norm
Typical device malfunctions:
- the lamp does not light up at low pressure;
- the lamp lights up at normal pressure;
- seal failure (oil leak).
Performance assessment without removal from the engine
When the warning light does not light up simultaneously with the ignition being turned on, the functionality of the sensor without dismantling is checked as follows:
- Turn off the car's ignition.
- Disconnect the sensor from the wiring.
- Use a tester to check the resistance between the sensor contact and the motor housing. A working sensor has resistance close to zero. If the tester shows an open or high resistance, the sensor must be replaced.
- If you do not have a tester, check the functionality of the sensor using a light bulb with wires. Connect one wire to the positive terminal of the battery, and touch the sensor contact with the other. If the light comes on, it means that the sensor is conditionally serviceable. The cause of the malfunction is different.
- As a last resort, the performance of the sensor can be assessed using the standard warning light on the instrument panel.
Remove the wire from the sensor contact and short it to the body. To check the operation of the emergency sensor using a signal lamp, short the wire to the housing - Turn on the ignition. If the pressure lamp on the panel is on, the sensor is faulty and must be replaced.
When the lamp on the panel lights up when the ignition is turned on, but does not go out after starting the engine, and the indicator device demonstrates the presence of pressure, the functionality of the sensor, without dismantling, is checked as follows:
- Stop the engine and turn off the ignition.
- Disconnect the wire from the sensor.
- Turn on the ignition. The glow of the oil pressure warning light on the panel indicates that the sensor is most likely working. The probable cause of the alarm malfunction is a short circuit in the wiring.
Assessing the performance of a dismantled sensor
The performance of the dismantled sensor is assessed using a tester and a pump. When there is no tester, use a lamp with a wire or an electronic contact (short circuit) indicator.
- Check the resistance between the contact and the sensor body with a tester.
If there is no circuit - no readings from the measuring device - the sensor is faulty and must definitely be replaced. The resistance of a working pressure sensor is zero - If the tester indicates a short or slight resistance, secure the meter leads to the sensor using clamps.
- Place a rubber hose from a car pump onto the sensor fitting.
- Do some vigorous pumping exercises. If the sensor is working, the tester will show an open circuit.
A leak in a working sensor can be determined by oil leaks underneath it. To check a device removed from a car, it is coated with soap foam and pressure is created using a pump. Air leakage will be noticeable by abundant bubbles.
Video: checking the functionality of the pressure sensor
It should be noted that the emergency sensor is a control device with regulated parameters. Using the above tips, you can roughly assess its performance, but not its full serviceability and compliance with the specified technical characteristics.
Evaluation of the oil pressure control sensor for UAZ cars
The control sensor is designed in such a way that its resistance to electric current varies depending on the measured pressure. The lower it is, the higher the sensor resistance.
The lower the oil pressure, the higher the resistance of the control sensor
Among the malfunctions of the vehicle lubrication system, which may be caused by improper operation or breakdown of the oil pressure control sensor, are the following:
- unstable or unreliable readings of the control device;
- lack of evidence;
- clearly inflated readings (the arrow goes off scale).
Checking Signal Circuits
Before you “sin” the sensor, you should make sure that the control panel indicator circuits are working properly.
- Stop the engine and turn off the ignition.
- Disconnect the wire from the pressure sensor.
- Turn on the ignition. The absence of indicator readings indicates that there is no short circuit in the wiring of the housing.
- “Short-circuit” the control sensor wire to the housing. The device on the panel should go off scale, which demonstrates the serviceability of the circuit.
Evaluation of the control sensor without dismantling
A tester will help evaluate performance.
- Stop the engine, turn off the ignition.
- Free the sensor from the wiring.
- Measure the resistance between the sensor contact and the housing. For a working device it is about 150–300 Ohms. The exact value can be found in the sensor model description.
- Attach the tester wires to the sensor terminal and housing.
- Turn on the ignition, start the engine.
- The resistance should decrease with increasing engine speed from the value measured in a static state to a minimum value, which depends both on the characteristics of the sensor and on the oil pressure in the engine.
The reliability of the readings of a working sensor is checked by connecting a mechanical pressure gauge instead.
The accuracy of the oil pressure control sensor readings is controlled with a mechanical pressure gauge
Video: checking oil pressure with a mechanical pressure gauge
Checking the pressure control sensor removed from the vehicle
In garage conditions, you can roughly assess the performance of the oil pressure control sensor removed from the car by measuring the tire pressure with it. For this you will need:
- car pump or compressor;
- pressure gauge;
- tester;
- homemade adapter hose with pumping fitting;
- technical characteristics of the sensor with a graph of resistance versus pressure.
Sequencing:
- Use a suitable hose to make an adapter with an inflator fitting at one end. Place the free end of the hose onto the thread of the sensor and secure it with wire or a clamp.
- Inflate the tire to a pressure of 2–4 kgf/cm2.
- Measure with a tester and record the resistance between the contact and the sensor body.
- Connect the sensor to the tire using a hose.
- Remeasure the resistance.
- Compare the data obtained with the table (graph) from the sensor characteristics.
If there are large discrepancies, the sensor should not be used. The characteristics of oil pressure control sensors of different models differ - Coat the sensor with soap foam and evaluate its tightness by the absence of bubbles.
The test methods given are approximate and do not guarantee full serviceability of the oil pressure sensor.
Causes and DIY diagnosis
Error P0106 may appear in the following situations:
- Oxidation of MAPS sensor contacts.
- Malfunction of the converter itself.
- Dirty air filter.
- Air supply pipe is clogged.
- Loss of tightness of connections or hoses.
- Throttle contamination.
- Low battery charge.
To find the cause of the error without contacting a car service, you need to sequentially check the condition of the battery, air filter, converter and throttle valve.
Clogged air filter
In order for the engine to operate efficiently, the air entering the combustion chamber must be cleaned. A dirty filter will not be able to supply enough air to the system. As a result, the engine will run on a rich mixture, its power will decrease, gasoline consumption will increase, difficulties will appear when starting and jerks when accelerating.
Under the hood, the filter is located in a plastic case, which is closed with a lid. It must be pulled out and the degree of contamination determined visually by color. Manufacturers specifically make filter elements light. If the device is clogged, it needs to be replaced with a new one and the air duct cleaned. If the filter is clean, you can install it back and continue using it.
Checking the MAPS sensor
The occurrence of malfunctions in the pressure converter can lead to the fact that the electronic control unit switches to emergency mode or the car may not start or drive. The designs of these devices are reliable, so their malfunction is most often not caused by the device itself, but by its incorrect connection. The MAPS absolute pressure sensor is located behind the throttle valve in the intake manifold. To check its performance with a tester, you need to measure the voltage at the sensor contacts by changing the number of engine revolutions.
As the number of revolutions increases, the fuel supply and, accordingly, the pressure also increase. The readings of the device when measuring at low speeds and with the throttle fully open should be in the range from 0.7 to 4 V. If the values are outside these limits or there is no signal, it is necessary to check the integrity of the wiring and contacts. Perhaps they have oxidized. If everything is in order, you will have to change the device.
There are times when MAPS has to be changed due to a faulty temperature sensor, because... in some models their designs are combined.
Battery
MAPS is sensitive to supply voltage. Therefore, a low battery charge can cause error P0106 to appear. In this case, it is enough to recharge the battery and reset the error.
Throttle condition
The throttle valve is located between the air purifier and the intake manifold. It is an air valve. When it is open, air is supplied to the combustion system. There it is mixed with gasoline and distributed among the cylinders. The pressure in the intake system when the throttle is open is equal to atmospheric pressure, and when the throttle is closed it corresponds to vacuum.
The reason that the engine stalls at idle may be contamination of the throttle valve. Due to dirt particles adhering to the walls of the device, the device begins to close poorly and jams. It is recommended to wash the throttle mechanism every 10-15 thousand kilometers. The procedure is combined with changing oil and filters during scheduled maintenance. For cleaning, use a special aerosol for washing the carburetor. The product removes dirt well, but it corrodes your hands. Don't forget the gloves.
After eliminating the problem, you need to reset the P0106 code on the computer, start the engine and see if the error appears again. If after this the car works properly, then you did everything right.
Source
UAZ 31514 › Logbook › Oil pressure
I was puzzled by the loss of oil pressure in the engine. According to the instrument, at idling and pulling in, the needle was at zero; at good gas, it reached two points. Bad doubts were creeping in. The oil pump was rebuilt a year ago, in principle it was in very good condition, the clearances were within acceptable limits. However, the pressure is getting lower and lower... The action plan was as follows: 1. Measure real pressure2. Change the oil pump (the asking price is 1.5k, but again drain the oil, remove the pan, change the pump, put the pan back... and these 18 studs...)3. If replacing the pump does not help, switch to a more viscous oil.
We start with a mechanical pressure gauge. The idea was honestly stolen from the patriots (judging by the conversations, those have a pressure sensor above the exhaust manifold, which overheats and often fails. We have a sensor below, but, as it turned out, this does not save it). So, purchased: a pressure gauge from Kamaz - something about 640 r. hose to the pressure gauge from Kamaz - 180 r.
we throw it to the engine, look:
and my soul is so warm... :))) It was decided to change it.
We remove the tidy and put the wires in order. We move the voltmeter from 4 to the third place, the pressure gauge will go to the vacated right place.
In the process of reassembling the wires, there were also some troubles - the thread of the exhaust light switch was broken off at the root. It’s lazy to go and look for a new switch, and this is not our approach, so we’re looking from what we have. The threaded nut fits the wheel bolt from the Lada. We cut it, drill it out (the cobalt drill from DeloTekhnika is a super thing, the shavings are actually shavings, not sawdust), and weld the head.
Well, that’s it, let’s assemble it, and then we need to carefully bend the tube:
to the tap to the oil radiator (there was and is not a radiator):
Source
Oil pressure ZMZ 406, life
Why did I have the desire and need to make this device? There seems to be enough devices in beautiful boxes around.
- Pricing for a more or less decent set starts at 4,000 rubles. Moreover, we are talking about tools suitable only for semi-professional use. The devices are not filled with silicone, and the needle jumps like crazy during measurements.
- Accuracy of measurements. Looking ahead a little, I’ll say that oil meters from not the worst manufacturers and brands lied plus or minus 0.2-0.3 kg. I think that this is a hell of a lot for a measuring device, considering that the emergency oil pressure light is set to 0.8 kg, and the normal pressure at idle is from 1.0 kg. That is, the error is about 20-30%.
- Working with client engines. One of the most popular operations at the moment is replacing factory hydraulics with German INA ones . I'm tired of explaining every time why they are louder at idle than when accelerating. For normal operation of hydraulics you need at least 1.3-1.5 kg. I often hear from a client: but my dashboard shows normal pressure*. And then you need to connect a high-quality oil gauge and show that the dashboard shows anything other than the true oil pressure in the system.
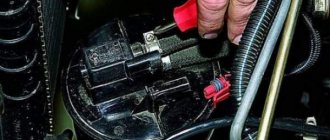
UAZ Patriot TDi Karakatizza › Logbook › Oil pressure sensor
As you know, in the latest releases of the ZMZ 51432 engine, the oil pressure indicator sensor was removed and only the emergency one was left. At the same time, the wire hanging on the engine braid hinted that the sensor wiring was in place and the tidy could display pressure. But in fact, there is a wire under the hood, but there is no pin in the connector that connects to the dash. But I wanted to make an oil indicator, so sensor 2312.3829 was purchased.
I connected it to the device using wires and the second time I pressed the button, zero pressure readings appeared. This means that the functionality in the instrument panel is preserved and you can install the sensor on the engine. Questions arise here - the sensor is normally installed on the right side of the engine behind the fuel injection pump, and it is not screwed in directly, but is installed through the corner fitting. A quick search for the fitting and its bolt led to the understanding that the price for a small piece of brass and a bolt is around 1000 rubles, which is somehow beyond the budget for this modification.
The tee, from the 409th engine, costs 3-4 times cheaper.
But on 51432 the space is sharply limited and it may be necessary to remove the air conditioning compressor for installation. I decide to go this route, installing a tee from the 409th engine.
It was possible to screw in the tee without removing the compressor. To screw in the emergency sensor, I turned the tee a little further, so as to screw in the sensor, inserting the 22nd head between the engine and the thermostat hose.
I ran a separate wire, or rather, I ran it earlier when I was laying a backup wire for the emergency sensor (it frayed somewhere about a year and a half ago, and the light bulb was smoldering). When turned off, the readings were 0.5, so I started checking the resistance of the sensor. It turned out to be 260-270, although it should be about 300 Ohms. Therefore, I added a resistor of approximately 40 ohms (I picked one from those that were available), it is in black heat shrinkage above the sensor. It started showing 0 when switched off, and 1.3 when fully warmed up.
This coincides with the readings of the mechanical pressure gauge; I went specifically to the UAZ 61 to measure it. I also bought a used tee from them. When driving it rises to almost 3x, but when I let off the gas it sometimes drops to 0.9. Today tomorrow I’ll drive it back to the UAZ 61, they’ll drop the pan, look at the crankshaft plugs and liners. Well, there’s also the problem of the oil pressure lamp taking a long time to go out - according to the instrument readings, that’s all coincides, the pressure builds up a few seconds after the start. And this situation has been like this for quite some time, I change the oil, change the filter, the first couple of starts it goes out immediately, then for a few seconds. Do all the filters suck or is there a problem with the motor?
UPD. I didn’t immediately write where the signal goes from the sensor to the tidy. I'm correcting myself. Connector XP1, pin 9. And one more thing - the readings very much depend on the voltage of the on-board network and vary by 0.3-0.4 bar depending on it.
Source
One head it's good, but two better
On numerous forums on the Internet, you can often find stories from experienced car enthusiasts that, along with an electronic oil pressure sensor, they installed a mechanical one in parallel with it. In particular, this is expressed in the fact that in the event of a drop in oil pressure, not only the corresponding warning lamp on the instrument panel will light up, but the absolute value of the pressure will also be visible on a pressure gauge installed somewhere in the area of the instrument panel.
This is done for the reason that sometimes, for example, after a major overhaul on the engine or when using low-quality (or outdated) engine oil that has become clumped, the sensor’s sensitive element does not work properly, respectively. Accordingly, when the pressure drops, the warning lamp does not light up, which is a critical fact, since the engine in such conditions runs “dry”, that is, without proper lubrication. This significantly reduces its resource and can completely damage the motor in the shortest possible time.
Thus, car enthusiasts install a so-called tee at the connection point of the pressure sensor, at one output end of which a traditional electronic sensor is connected, and at the other - a mechanical one. The hose with wires is mounted in the engine compartment in accordance with the engine design. The main thing is that it does not interfere with other elements of the motor, and is not subject to mechanical or significant thermal effects. A pressure gauge is installed at its end, for example, from a VAZ classic, UAZ or another similar device. In fact, its model is not important, the main thing is that it is convenient to navigate the scale, that is, it must have detailed graduations.
Conclusion
The pressure sensor is a fairly reliable unit and rarely fails. Therefore, if problems arise with the oil system indication system, it is necessary to check other parameters - oil pressure, the presence of leaks, the condition of the oil itself, its level and the oil filter, and only after that check the condition of the oil pressure sensor. In general, checking the serviceability of this unit is not very difficult, and even novice car enthusiasts can do it, literally using a car compressor and a multimeter. If the sensor fails, it is hardly possible to repair it, so it is better to buy a new DDM at a car dealership, since it is inexpensive.
UAZ 2206 “Assistant” › Logbook › About oil pressure.
I’m tired of watching the blinking oil pressure light at traffic lights, I need to do something, otherwise I’ll soon skate away. There should be pressure, and I had it, although when it was cold, until the oil warmed up, and it warmed up after about twenty minutes of driving, then the color music began. Replacing the oil and the main and connecting rod bearings did not significantly change the situation, and since the pressure lamp only blinked when hot, it was logical to return the oil cooler to the engine. Since purchasing the UAZ, I have not had an oil cooler, or rather, I once had one, and the connections for it were but there was no radiator itself, and its output and input were plugged. To begin with, I decided to restore the standard system; I needed to buy an oil radiator. Where to buy, of course on a well-known classifieds website. I didn’t search for very long, it cost me 20 thousand, a little expensive of course, but the kit included a hose from the radiator to the engine sump, a 409 engine with a sump, two Spicer-type axles, and what, no body on a frame from a UAZ 31602. In general I decided to take the radiator...
What do we have according to the scenario... And we rearrange the radiator. In short, I took it off and screwed it to my loaf, I only had one hose, but it was intact, I screwed that too, it fit without problems.
With the top one it was a little more difficult, firstly I didn’t have it, and secondly I had already spent the entire budget for the oil radiator, so I had to assemble it from what was at hand. The recipe is simple, we take some kind of hose that is available, on the one hand, where the oil cooler itself is, it is simply put on and secured with a clamp, on the engine side, in theory, there should be a threaded fitting, of course there was none on my hose, but in my supplies I managed to find a pneumatic fitting with a ¼-inch thread and an 8 mm herringbone outlet.
Next, we connect everything, fix it with clamps, start the engine…………It’s bullshit, the cold pressure is less than one, the pump’s performance is clearly not enough. In this situation, everything sucks; when it’s hot and idling, it’ll be a total disaster. What options are there, remove everything from the figs, or increase the pump performance. There is almost no other pump, I don’t want to pull off the 409 engine, so I decided to reduce the oil flow through the radiator. We take an 8mm hose feedthrough, cut the thread inside, take an 8mm bolt, drill a hole in it, I chose a 2mm diameter, cut off the thread from the bolt and screw it into the fitting. As a result, we get a reduction in the oil flow through the oil cooler, but the radiator should still be useful.
We cut our fitting into the hose, I chose the top one, by the way, it seems like the supply cuts into the top mount of the radiator, drains into the bottom, so the oil itself should drain into the sump and, for example, when replacing, you don’t have to worry about the remaining oil in the radiator. Let’s start it up, just a little bit We are happy, the cold pressure has returned to value 2, now we need to drive and see the result......I drove for several days, covered 500 kilometers, in general it probably works, although there is no particular sense, the oil still heats up and the light starts to blink. On the highway it’s about the same as it was, maybe a little better, at 60 km/h the pressure is about 2.5; at 100 about 3, it didn’t accelerate faster. Around the city, especially in traffic jams, color music. In the end, I decided to remove the entire system, since there was no noticeable sense, and there were more places for possible oil leaks. As an option, I decided to install a larger oil filter, according to theory, the resistance to pumping oil through a large filter should decrease, the pressure grow up a little.
Source
Oil pressure values in UAZ cars
The power plants of UAZ vehicles are equipped with two pressure sensors: a control one that controls a dial or digital indicator, and an emergency one. The latter gives a light signal (turns on the light on the panel) if the lubricant pressure decreases to 0.4–0.8 kgf/cm 2 .
Even if the motor is fully operational, the pressure value depends on the operating conditions:
- on the degree of viscosity of the oil;
- on engine temperature;
- on ambient temperature;
- on the crankshaft rotation speed (rpm);
- from load;
- from using an oil cooler.
The oil pressure indicator readings are usually in the range of 1–5 kgf/cm2 and differ slightly for different models of UAZ power plants.
UAZ
Description of the instrument
Every car is equipped with an oil pressure sensor. However, not every car enthusiast knows what this device is and for what purposes it is used. Before we talk about replacement and malfunctions, we suggest that you familiarize yourself with basic information regarding the purpose, operating principle, and location of the controller.
Purpose and principle of operation
Arrow indicator of fluid pressure in the engine
The purpose of this controller is to warn the driver that the pressure in the lubrication system has decreased, and this, in turn, can lead to serious consequences. The emergency oil pressure sensor in the UAZ Patriot 2 car is made of a metal case, inside of which there is a special float that moves through special pipes. This float is also equipped with a magnet, and in the pipe there is an electrical output that is controlled by it. When the pressure level in the system decreases, the magnet closes the contact, thereby closing the contact, thus supplying voltage to the control panel.
Due to the closure of the contacts, the corresponding light on the shield lights up, as well as the Check indicator, indicating the need to check the motor. Patriot models use two controllers, the second is used to transmit impulse to the control unit. It is made in the form of a barrel with a resistor element of variable resistance. The purpose of this device is to transmit data to the control unit about the pressure level in the power unit. That is, the first regulator refers to emergency devices, and the second – to information ones.
Location
The device is located on the top of the cylinder block, on the right side. A wire is connected to the regulator, which is used to transmit an impulse about the operation of the device.
DDM location
Typical malfunctions and methods for their elimination
If a fault occurs in UAZ Patriot 2 and other models, a corresponding indicator will appear on the dashboard.
The reasons may be the following:
- The fluid level in the engine has decreased. The problem of consumables leakage is known to many car enthusiasts. If the appearance of an indicator on the dashboard is associated specifically with an oil leak, then the car owner must first find out the reason why this happened, and then add fluid to the system. It happens that oil presses through worn seals, then the sealing elements are replaced.
- The reason may also be a malfunction in the electrical circuit. If this is the case, then the wiring should be diagnosed, since there is a possibility that the contacts have broken or shorted. You can also try to install a new controller, and then check whether the indicator on the device continues to light or not.
- If the device beeps, then you need to diagnose the oil filter element for back pressure. Such a malfunction occurs quite rarely, but sometimes the reason lies precisely in the filter itself.
- The sensor has failed. If the controller has reached the end of its service life, this may lead to its failure. A failed device cannot be repaired; it only needs to be replaced.
- Oxidation of contacts at DDM outputs. This problem is relevant for many car owners, and people often thoughtlessly change working sensors without checking their contacts. And then, having installed a new controller, they wonder why it doesn’t work. Due to oxidation of the contacts, the device cannot be fully connected to the network, and accordingly, its operation will also be defective. Contacts must be cleaned or replaced (video author - Sasha Mikhalych).
Sensor diagnostics
As mentioned above, there are two types of pressure sensors - mechanical and electronic. Accordingly, the procedures for checking the emergency oil pressure sensor in both cases will differ, albeit slightly (only the design features of these sensors apply). First of all, you need to make sure that the oil pressure sensor is faulty. To do this, you will need to perform additional diagnostics of the oil system - check the oil level in it, the condition of the filter, pump, and so on. If suspicions fall specifically on the serviceability of the oil pressure sensor, then first of all it is necessary to remove it from its seat with the engine turned off (as a rule, it is located in the area of the oil filter).
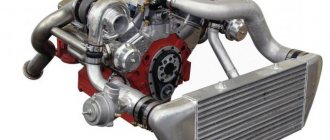
Engine UMZ 421 - Technical characteristics
This power unit is considered the basic design, installed on UAZ-Hunter, UAZ-3303, 2206 vehicles. The 421 UAZ engine runs on A 76 gasoline, has a displacement of 2.89 liters, and a compression ratio of 7.0. Fuel supply type – carburetor. The permissible temperature range of motor operation is from – 50 to + 50 ° C.
A distinctive feature of the new modifications of ZMZ engines is the original design of the cylinder block made of aluminum alloy, in which thin-walled cast iron liners are cast. The new design block contains cylinders with an increased diameter (100 instead of the usual 92 mm), while the distance between them has not changed. The service life of the updated piston group has been significantly increased against the backdrop of reduced lubricant consumption. Thanks to maintaining the inter-cylinder distance, a large number of working units and parts are interchangeable with engines from previous batches.
Technical characteristics of the UAZ 421 engine:
- Number of cylinders – 4 pcs.
- Type of arrangement – in-line.
- The working volume of the cylinders is 2.89 liters.
- The number of crankshaft revolutions is 4000 rpm.
- Power 84.4 - 98 l. With.
- Engine weight – 170 kg.
- Recommended motor oil by viscosity coefficient is 15W40, 5W40, 10W30, 10W40, 20W40.
- By brand - Rosneft, LukOil, Liqui Moly.
- In terms of chemical composition - semi-synthetic - in the summer months, synthetic - in cold weather.
- The declared service life of the UMZ 421 engine is 250,000 km.
UAZ 409 engine oil pressure light came on
Hello. There is a loaf with ZMZ 40911.10. 2014, mileage three thousand km. The run-in was amazing (except for the clutch), no one forced it, it drove on asphalt. I changed the break-in oil at 2.5 thousand and filled it with Lukoil 5v-40 Genesis. And a shower filter. Everything was fine, but 100 km ago the oil pressure light started to light up at XX. It will light up and then go out. When driving everything is ok, it doesn't light up when turning. The oil is a couple of mm above the top mark. When cold the pressure is 4, when fully warmed up (coolant temperature 90-95) the pressure is 1, sometimes a little less. I changed the pressure sensor just in case, it had no effect.. The oil radiator is not plugged. Tokasan tidy.
What to do, how to treat? Maybe someone has encountered something similar? I used to have UMZ-417, everything somehow went smoothly there, I haven’t gotten to know ZMZ yet.
Ps where is the oil pressure lamp sensor on this engine? I found it on the diagram, but not on the engine itself. Pps filter may be useful? Ppps throw out the rotten ZMZ and stick in a carb UMZ-421?
Maybe add a different oil first?
Maybe add a different oil first?
Hm. New oil is good, why change it right away? Runs great on other cars. Okay, I'll add another one. But this won't change anything. Something different here.
Source
At xx the oil pressure light blinks and the chain rattles.
At xx the oil pressure light blinks and the chain rattles.
Post 219 » Mon Jan 14, 2013 09:28
Post by ZamPoteh » Tue Jan 15, 2013 18:50
Well done. Did you check the tightness of the cap on the new one before installing it?
I bought new ones from GON, but the lids on both were not tightened.
Post by Gorunuch » Tue Jan 15, 2013 18:55
Post by alexxB02 » Tue Jan 15, 2013 19:03
Post by Stason232 » Tue Jan 15, 2013 07:14 pm
Post 219 » Wed Jan 16, 2013 09:19
Oil pressure sensor design
From the point of view of the design feature of the UAZ Patriot engine sensor, we can safely say that the element is a fairly simple device. The product is made in the form of a metal case, in the inner part of which the manufacturer placed a float. It moves along the tube. The float has a magnet, and the tube is equipped with a special electrical contact, which is controlled by this same magnet.
When a decrease in pressure is observed in the circuit, then the magnet closes the contact, as a result of which the resulting voltage is transmitted to the instrument panel. As we know, there is a special indicator on it. It is he who is the receiver of the specified signal, which the driver learns about thanks to the highlighting of the symbol.
Parallel to the indicator, the “Check Engine” icon lights up, which often frightens a timid driver. The inscription recommends stopping movement until the reasons are clarified.
On UAZ Patriot equipped with the Euro 3 system, there are two sensors, one of which is the component we are considering. The second sensor is entrusted with the mission of transmitting a signal pulse to the on-board controller. The element has the shape of a barrel, into which a resistor is integrated that can change the resistance value. The sensor sends information to the on-board computer about the amount of pressure in the engine lubrication system. So, to summarize, the first sensor performs the function of an alarm, and the second is endowed with the mission of transmitting information. Next, let's figure out where it is.
During normal engine operation, few owners pay close attention to the sensor. When an element begins to alarmly signal about problems in the engine, the owners of “Patriots” frantically scurry around in search of the causes and methods of eradicating them