January 23, 2017 Lada.Online 84 605 9
The adsorber is designed to capture fuel vapors and prevent them from entering the atmosphere. One of the elements of this system is the adsorber purge valve. Let's consider the main malfunctions of this part, as well as ways to eliminate them.
Malfunctions and how to check the Lada Priora canister purge valve
Each subsequent release of the Priora injection car model has some innovation or improvement in engine parts or interior design.
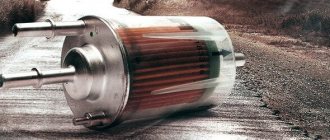
So the 2112 series was supplemented with an adsorber. “Ecological post” – collector of waste fuel vapors. Their number varies depending on the brand of gasoline. Timely cleaning also helps reduce fuel consumption. The process itself occurs when the engine is not running. The adsorber is a small plastic box filled with activated carbon, which is why its color is black. You can see it near the gas tank, to which it is connected by tubes.
The spent gaseous substances pass through this filter and then return to the gas tank after purging with a valve, which, by condensation, precipitates dirty vapors, and part of the already purified fuel is returned to the gas tank through the pipes. Here's your benefit, albeit small, but 1% is also money! Cleaner gas is already released into the atmosphere. The operation of the main organ of the machine, the engine, depends on the small valve. It will save the motor from contamination.
Purge valve failure
The valve operates on the principle of electromagnetic induction.
A faulty shut-off valve, as it can also be called, makes clicking and hissing sounds when it releases unrefined vapors from the gas tank. The machine panel display includes a breakdown signal; the diagnostics carried out will accurately show the fault. Reasons for malfunction:
- the winding is short-circuited;
- wires are broken;
- mechanical damage.
A faulty adsorber part cannot be repaired; it only needs to be replaced. You can do this simple procedure yourself. In the latest Priora models it is located under the engine cover, and removing it is not difficult.
- disconnect the wiring;
- soften the pipe with hot water;
- remove and replace the valve;
- again use boiling water and clamp the soft tube, you can use a clamp.
- cut the hose along the edge of the part;
- install a new lock;
- heat the pipe and put it in place.
Don’t forget to attach the adsorber to its original position and flash the electronic control unit.
Canister purge valve
I decided to call this article exactly that, although the adsorber valve is not the main character here. It all started when my engine fault light came on ( the check engine light came on ). I waited for the next maintenance (fortunately it happened shortly before the scheduled maintenance) and informed the car service employees about it. They carried out diagnostics and said that the culprit was the canister purge valve, but they did not have this valve in stock, and for now it was possible to drive as is. I must say that at that time there were two weeks left before the end of the warranty, but they swore that they would replace the valve free of charge, even if the warranty had already expired by the time the valve arrived at the warehouse.
I was happy (despite everything, I never stop believing people)))), and in the article Three years on Priora I hastened to write that the adsorber valve was replaced under warranty. However, I was in a hurry...
As you may have guessed, no one was going to change anything for me for free. After several dozen phone calls to the car service center, I came to the disappointing conclusion that I had been duped once again. There was neither time nor desire to go to court over such a trifle. And I decided to change the canister purge valve on the Priora myself. But the experience of dealing with car services still taught me something, and I decided to check whether this ill-fated valve was really the problem.
Replacing the adsorber sensor and checking it
To check and replace the adsorber sensor on a Priora, you will need a multimeter and pieces of wire.
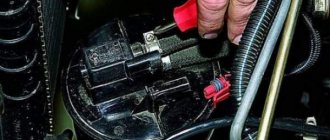
First, we remove and check the adsorber; to do this, prepare the car for work and, having released the latch, disconnect the wiring harness block from the purge valve. We connect the multimeter probe with the “-” sign to the car body (“ground”).
Finally, turn on the ignition and measure the voltage readings at terminal A of the wire bundle block. Each pin has its own designation, which is indicated on the block.
Please note that the voltage at the terminal must be below 12 V. If the voltage is not supplied to the block or it does not reach 12 V, therefore, the battery is discharged or the entire electronic control unit of the car is faulty.
To replace the adsorber valve on a Priora, turn off the ignition and move the valve up, thereby releasing the retainer. Then remove it from the bracket. To simplify assembly, mark the order of connecting the hoses to the valve with a marker.
Using a Phillips screwdriver, loosen the clamps and disconnect the hoses one by one. First the hose connecting to the adsorber, then the hose that connects to the throttle valve (housing). Finally, we replace the faulty adsorber sensor in the Priora.
Do not forget that when voltage is applied to the terminals in the Priora fret, the adsorber should open with a click characteristic of the valve. Reassemble the valve in reverse order.
Source
Why was the adsorber created?
Actually, this is a tribute to the environmental standard, namely EURO-2. Essentially this is a large filter that catches light hydrocarbons. According to the new standards, it is unacceptable for gasoline vapors to enter the atmosphere, because this contributes to air pollution.
Also, couples should not enter the car interior, because this is, to put it mildly, harmful! ON old carburetor cars, such a filter and its valve simply did not exist; the system there is a little different. BUT the carburetor went away along with the old standards, now there is only an injector and a filtration system is MANDATORY.
Standard adsorber for Priora - article number, device, price and location
The breather of the Priora car absorber is located on the top left relative to the engine cover. Replacing the absorber valve is not difficult, given that the instructions and steps are simple. Finding it is quite easy: the breather hose goes to the throttle to direct fuel in the desired direction.
Gasoline consumption will depend on the quality of its operation - the efficiency of the power system will decrease, since part of the engine vapor will be released into the atmosphere, as was the case in old cars. The VAZ-2170 catalog implies the presence of the following components in the “Gasoline Vapor Recovery System”:
Components
In fact, this is a large plastic jar with activated carbon inside, because it is this composition that perfectly fights gasoline vapors. The main parts can be described as follows:
- Separator + gravity valve
- Pressure meter
- Filter part (usually carbon)
- Connecting tubes
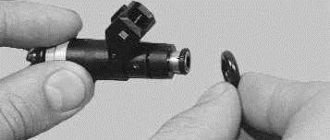
- Solenoid valve
As you can see, there is absolutely nothing complicated. Separator - serves to catch part of the gasoline, then sends it back to the tank. Gravity valve - almost never used, but it is needed in emergency situations, for example during accidents, it prevents fuel from overflowing from the tank (for example, when a car overturns).
Features of valve operation
The Grant canister purge valve itself was inherited from Kalina. Thus, the Kalina adsorber purge valve and the Lada Granta adsorber purge valve are completely identical. This allows us to assert that the signs of adsorber malfunction in both cars are identical.
If we take into account the Kalina adsorber purge solenoid valve, malfunctions and their symptoms can be completely attributed to a malfunction of the adsorber of its younger brother.
How the system works - operating principle
Why am I focusing on the solenoid valve, because it is practically the key one in this system.
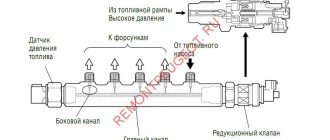
For a better understanding, I am posting a diagram of an injection car, and in this case it is a VAZ of the 10th family.
So, fuel vapor rises to the top of the tank and stops at the separator, which is combined with a gravity sensor (as I wrote above, it prevents fuel from leaking out in the event of an accident - capsizing from the tank). In it they partially condense and return back (in the form of liquid fuel).
However, the other part of the evaporation bypasses the gravity valve and passes into the adsorber, where they actually accumulate. Accumulation occurs when the engine is not running! IT IS IMPORTANT.
After starting the engine, the solenoid valve opens - thereby connecting the adsorber cavity (where the gases are trapped, as it were) with the intake manifold or throttle assembly (in different cars in different ways). THE PROCESS OF THE SO-CALLED PURGE BEGIN! The vapors are mixed with air (from the street), which is supplied through the throttle assembly, then enter the intake manifold and then into the engine cylinders, where they are burned with the air-fuel mixture.
The system is very simple if you understand how it works.
How to understand a malfunction of the absorber
Speaking about the adsorber valve, the symptoms of a malfunction will be fairly standardized, which makes it possible to obtain a fairly detailed description. So, signs of a malfunctioning adsorber valve:
— Constant smell of gasoline in the cabin.
This fact is caused by improper circulation of gases, which may have a certain leakage. Due to the proximity of the system to the air filter, odors freely penetrate into the cabin.
— Valve knock.
Signs of a malfunction of the canister purge valve on the Grant include this sound, familiar to all Grant owners.
(to fix this, you can tighten the nut, or you can purchase a new one; fortunately, the Lada Granta adsorber valve, the price of which is low, is available for purchase)
— Increased fuel consumption.
An inoperative adsorber ventilation valve is not able to control the correct path of gases, which does not allow them to be processed in the form of combustion.
— The amount of harmful substances released through the system increases.
Speaking about how the canister purge valve works and why, do not forget that increasing the environmental performance of a car is a primary task, which can be disrupted if the canister purge solenoid valve does not function correctly.
- Sounds similar to some hissing.
Strong hissing in the adsorber hose, the cause of which is the accumulation of gases, is not uncommon. Since modern requirements for cars do not allow gas emissions while parked, a certain accumulation is acceptable.
— Characteristic sounds coming from the gas tank.
Speaking about the Lada Granta adsorber, the malfunction of which is always characterized by extraneous sounds coming from the gas tank, it must be said that they are the most typical sign of a breakdown. In this case, the adsorber sensor may not give any indicators of malfunction, therefore, it must also be replaced.
New Lada: How to properly bleed the brakes on a LADA alone » Lada.Online - all the most interesting and useful about LADA cars
Thus, signs of a malfunction of the Lada Grant canister purge valve are quite easy to identify. In addition, they are detected when simply refueling the car, which necessarily requires opening the gas tank cap.
What does the adsorber valve do?
Many problems are related specifically to the adsorber valve. In essence, this is a very simple device that opens or closes under certain conditions (the engine is running or turned off).
If the valve works well, then there are no problems at all; you may not even know about its presence in your system.
However, when a breakdown occurs, for example, the adsorber cavity itself becomes clogged, or the valve does not work. The car may subsequently suffer serious damage. Because the cavity is not purged, and the pressure from the tank is not relieved.
How to repair a problem
When talking about repairing the adsorber, the fault should be clearly identified. For example, if we are talking about the Grant adsorber purge valve, the malfunction of which can be indexed by the lack of high-quality gas removal, a new VAZ adsorber purge valve can be a solution to the problem.
The repair of the adsorber valve itself comes down to using a Phillips screwdriver and its application. The procedure for influencing the Lada Granta adsorber sensor:
1) We remove the terminals so that there are no disastrous consequences.
2) Apply physical force and gently remove the valve.
3) We compare the new valve and the old one, because anything can happen in life. Buying an adsorber valve, of course, is a simple thing, but there are mistakes made by sellers/storekeepers who may mistakenly sell an unnecessary spare part.
4) We insert a new valve, assemble this system, return the terminals to their place and enjoy life. The Grant adsorber purge valve, the price of which is almost equally low throughout the Grant sales area, is also a reason for a small, but still joy.
It is impossible in the course of the story about the adsorber not to mention the fact that a huge number of Lada Grant owners prefer to remove this device. There are two reasons for this action:
- lack of desire to repair
— lack of faith in the possible environmental benefits of installing this device in your car
Signs of a malfunctioning canister valve
As it becomes clear, problems arise with the power system:
- The revolutions are floating. But not immediately, but after about 5 - 10 minutes on a warm engine
- At idle, if the engine is running, you press the gas pedal - it almost stalls. Feels like we're running out of fuel
- While driving, the car does not develop the required power, it feels like 10–15% of the engine power has been removed
- The fuel tank sensor may go crazy. It shows either “full” or “empty”, etc.
- If you open the tank to refuel. A strong whistle is heard, as if a vacuum has been created inside.
- Fuel consumption increases
- When cold, the absorber sensor can knock loudly and is often confused with engine valves
It is also worth noting that the reason is not always in the valve; often the can of activated carbon itself (that is, the adsorber cavity itself) can become clogged. If necessary, it must be replaced or disassembled and cleaned - dried, that is, the filtration of gases must be restored so that they pass unhindered.
Now a useful video.
If you experience these malfunctions, then you definitely need to look - check the valve and, if necessary, change it, fortunately it costs a penny. And also the cavity itself with activated carbon.
Replacement of components of the fuel vapor recovery system of a VAZ 2170 Priora
- Repair manuals
- Repair manual for VAZ 2170 (Priora) 2004+.
- Replacement of fuel vapor recovery system components
The components of the fuel vapor recovery system (canister, fuel vapor separator, canister purge valve, gravity valve) are removed for inspection or replacement when a persistent smell of gasoline appears due to leaks in the components and pipelines, as well as failure of the canister purge valve.
In addition, leakage of the adsorber and failure of the purge valve can cause unstable engine idling until it stops. You will need: a 10" wrench, a flat-blade screwdriver.
| Note Before removing the evaporative emission system components, disconnect the wire from the negative terminal of the battery. |
Fuel vapor separator
installed in the left rear wheel well.
1. Place the vehicle on a lift or inspection pit.
2. Remove the left rear wheel (see “Replacing a wheel” ).
| 3. To remove the separator, squeeze the quick release connector... | 4. ...and remove the fuel drain pipe from the gas tank fitting. |
| 5. Use a screwdriver to pry off the holder of the fuel drain pipe... | 6. ...and release the holder along with the tube. |
| 7. Unscrew the nut securing the steam pipe holder from the separator to the adsorber. | 8. Open the steam pipes by squeezing the quick connector latch. |
| 9. Unscrew the four nuts securing the holders of the steam outlet tube and the fuel drain tube. | 10. Unscrew the two nuts securing the separator bracket to the body... |
11. ...and remove the separator assembly with bracket, pipes and gravity valve.
| Note This is what the assembled separator looks like. To replace, purchase exactly the same one along with tubes and a gravity valve, since the tubes are not removable. |
12. Install the fuel vapor separator in the reverse order of removal.
Adsorber
The fuel vapor recovery system is installed in the engine compartment on the radiator trim on the right. Due to the specific layout of the car, access to its mount directly on the car is quite simple.
| 1. To remove the adsorber, squeeze the fastener of the quick-release connector... | 2. ...and remove the fuel vapor supply pipe to the purge valve. Similarly, disconnect the fuel vapor intake pipe from the separator. |
| 3. Remove the two adsorber mounting bolts... | 4. ...and remove the adsorber. |
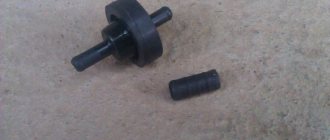
| Note This is what the adsorber looks like. Buy exactly the same one to replace it. |
5. Install the adsorber in the reverse order of removal.
Canister purge valve
installed in the engine compartment on the decorative engine cover.
| 1. To remove the valve, press the lock... | 2. ...and disconnect the wiring harness block from the valve. |
| 3. Press out the spring clip... | 4. ...remove the clamp... |
| 5. ...and remove the valve from its mounting bracket. | 6. Loosen the clamp securing the fuel vapor supply hose from the adsorber... |
| 7. ...and disconnect the hose from the purge valve fitting. | 8. Loosen the clamp securing the fuel vapor supply hose to the throttle body... |
9. ...and disconnect the hose from the valve fitting.
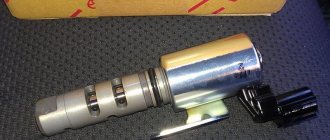
| Note This is what the adsorber purge valve looks like. Buy exactly the same one to replace it. |
10. Install the canister purge valve in the reverse order of removal.
↓ Comments ↓
1. Car structure
1.0 Car structure 1.1 General information about the car 1.2 Passport data 1.3 Car keys 1.4. Controls 1.5. Heating and ventilation of the cabin 1.6 Ensuring a comfortable air temperature in the cabin 1.7. Doors 1.8. Passive safety equipment on the car 1.9. Seats
2. Recommendations for use
2.0 Recommendations for use 2.1. Safety rules and recommendations 2.2 Running in the car 2.3 Operating the car during the warranty period 2.4. Preparing the car for departure
3. Problems along the way
3.0 Malfunctions along the way 3.1. The engine does not start 3.2 Malfunctions of the fuel injection system 3.3 Idle speed has disappeared 3.4. Interruptions in the operation of the 3.5 engine. The car moves jerkily 3.6 The car accelerates poorly 3.7 The engine stalled while driving 3.8. Oil pressure dropped to 3.9. Engine overheating 3.10. The battery does not recharge 3.13. Knocks in the engine 3.16. Wheel puncture
4. Maintenance
4.0 Maintenance 4.1. General provisions 4.2. Inspection work 4.3. Lubrication and filling works 4.4. Diagnostic work 4.5. Repair and adjustment work
5. Engine
5.0 Engine 5.1 Design features 5.2 Possible engine malfunctions, their causes and solutions 5.3 Useful tips 5.4 Checking compression in the cylinders 5.5 Removing and installing the decorative engine casing 5.6 Removing and installing the engine splash guard 5.7 Installing the piston of the first cylinder to the TDC position of the compression stroke 5.8 Replacing the drive belt gas distribution mechanism and tension roller 5.9 Replacing the power unit supports 5.11. Replacing engine seals 5.13. Engine cylinder head 5.15. Engine repair 5.16. Lubrication system 5.17. Cooling system 5.18. Power supply system 5.19. Design Features
6. Transmission
6.0 Transmission 6.1. Clutch 6.2. Gearbox 6.3. Front wheel drives
7. Chassis
7.0 Chassis 7.1. Front suspension 7.2. Rear suspension
8. Steering
8.0 Steering 8.1 Design features 8.2 Possible steering malfunctions, their causes and solutions 8.3. Steering column 8.4. Steering linkage 8.5. Steering gear
9. Brake system
9.0 Brake system 9.1 Design features 9.2 Possible malfunctions of the brake system, their causes and solutions 9.3 Bleeding the brake system hydraulic drive 9.4 Removing and installing the vacuum brake booster 9.5 Replacing the brake pedal axle bushings 9.6. Main brake cylinder 9.7. Front wheel brakes 9.8. Braking mechanisms of the rear wheels 9.9. Pressure regulator 9.10. Brake hoses and tubes 9.11. Parking brake
10. Electrical equipment
10.0 Electrical equipment 10.1 Design features 10.2. Battery 10.3. Mounting block (relays and fuses) 10.4. Generator 10.5. Starter 10.6. Ignition switch (lock) 10.7. Electronic engine control system (ECM) 10.8. Ignition system 10.9. Lighting, light and sound signaling 10.10. Windshield cleaner 10.11. Washer reservoir 10.12. Electric fan of the engine cooling system 10.13. Electric motor of the heating and ventilation system fan 10.15. Cigarette lighter 10.16. Instrument cluster 10.18. Electronic anti-theft remote control system 10.19. Immobilizer 10.21. Replacing sensors and switches
11. Body
11.0 Body 11.1 Design features 11.2 Possible body malfunctions, their causes and solutions 11.3 Removing and installing windshield frame lining 11.4 Removing and installing soundproofing upholstery in the engine compartment 11.5. Removing and installing bumpers 11.6 Removing and installing the fender liner and protective wing cover 11.7 Removing and installing the front fender 11.8 Removing and installing decorative sill trims 11.9. Hood 11.10. Trunk lid 11.11. Doors 11.12. Seats 11.13. Seat belts 11.14. Rear view mirrors 11.15. Interior fittings 11.16. Instrument panel 11.17. Heater 11.20. Body care
12. Applications
12.0 Appendix 12.1 Appendix 1. Tightening torques of threaded connections, Nm 12.2 Appendix 2. Fuels, lubricants and operating fluids 12.3 Appendix 3. Nominal filling volumes 12.4 Appendix 4. Basic data for adjustments and monitoring 12.5 Appendix 5. Spark plugs used on vehicles 12.6 Appendix 6. Lamps used on a car 12.7 Appendix 7. What you need to have in a car 12.8 Appendix 8. Tools used when repairing a car
13. Electrical diagrams
13.0 Electrical Diagrams 13.1 Diagram 1. Instrument Panel Harness Connections 13.2 Diagram 2. Vehicle Front Wire Harness Connections 13.3 Diagram 3. Engine Electronic Control System (ECM) Harness Connections 13.4 Diagram 4. Vehicle Rear Wire Harness Connections 13.5 Diagram 5. Light Harness Connections license plate light 13.6 Diagram 6. Left front door wiring harness connections 13.7 Diagram 7. Right front door wiring harness connections 13.8 Diagram 8. Rear door wiring harness connections