Do you have a dent on your car body and need to get rid of it as quickly as possible? If the problem area is small, you can try to straighten it yourself in a garage.
To do this, we will use a special device - a reverse hammer.
Of course, the car owner carries out such procedures at his own peril and risk, because the result is difficult to predict. But if you do everything correctly, you can still remove a small dent.
In today's article we will tell you how to make a reverse hammer with your own hands.
Moreover, we will consider different options for the design of a homemade product. After all, the device can be used not only for straightening a car body, but also when performing finishing work indoors - for example, when laying laminate flooring and ceramic tiles.
If necessary, drawings indicating the dimensions of the parts can be found on the Internet, but you can do without them.
Mechanical tensioner for body work, an alternative to hydraulics.
Various tools are used for car body repairs.
One of the necessary things when stretching is a stretching screed. I use a mechanical one. Many people ask why I use mechanics and not hydraulics. My answer is that I also worked with hydraulics, but mechanics are more convenient for me personally. Once upon a time, more precisely 20 years ago, I ordered 7 extensions from a turner at the factory, 200 rubles each, only now there is no factory there anymore, the Pyaterochka store is located in the factory premises, but it’s a pity, smart turners worked, although they were already old. I will list the advantages of mechanical stretching. Firstly, it is practically eternal, you just need to lubricate it periodically. Secondly, it works for both tension and tension. Third, the force is sufficient for any hood, you just need a larger lever (I put the pipe on an open-end wrench). I didn’t measure the force, but chains with a link thickness of 11 mm can break. There is also enough SUV frames to pull out; I didn’t have to pull armored vehicles, so I can’t speak for that. Fourth is the price, hydraulics are many times more expensive.
Now I’ll tell you the disadvantages - you have to unwind it manually, which takes time (quite a bit), but for me this is not a problem, I didn’t see any other disadvantages.
The extension length is 46 cm, the diameter is 28 mm. The nuts were turned by a turner from a hexagon specifically for a 32 x 36 wrench.
I have 6 stretch marks of different lengths (I gave one to a colleague).
I welded the tubes myself, to the length that I needed. The outer diameter of the pipe is 43 mm.
For pulling, special platforms are made with a small piece of chain (3 links), using two 16 mm anchors, the platforms are screwed to the floor, and from them I pull the car.
I use guy ropes to secure the car so that it doesn’t move during stretching.
Source
The role of clamps
ATTENTION! A completely simple way to reduce fuel consumption has been found! Don't believe me? An auto mechanic with 15 years of experience also didn’t believe it until he tried it. And now he saves 35,000 rubles a year on gasoline! Read more"
The main role of body clamps is to create pulling and pressing forces in the process of pulling the car body. If the slipway effectively corrects deformations by pulling out potholes in the body, then without special clamps it is simply a useless thing. Indeed, fixation and gripping is done using good clamps, usually on 4 sides. Almost everything depends on the reliability of the fixing moment. For this reason, it is important for a bodyworker to be able to select the correct clamps.
Some pile machines are equipped with mobile type clamps. They move without restrictions, giving easy access to all starting points of the metal frame, straightening it in any direction.
Clamps from the manufacturer Likota
Let's look at the most popular clamp options:
- Standard clamps for body repair are usually sold at a price of 4-5 thousand rubles. They weigh no more than 2 kilograms;
- Body Clamp 2/5 Ton. It features a narrow grip and the ability to stretch in one or two directions. Despite this versatility, it costs less than a standard clamp - 4,000 rubles. Withstands a maximum load of 2-5 tons. At the same time, in the forward direction – 5000 kg, and in the lateral direction – 2000 kg;
- Body clamp 5 ton with 120mm working width with one direction. Approximate cost: 5,000 rubles. The clamp weighs 3 kilograms and can withstand up to 5 tons in the forward direction;
- A clamp of 3-5 tons, allowing stretching in 3 directions. Approximate cost: 6,000 rubles. Direct direction – 5000 kg, side – 3000 kg each. The clamp weight is a little over 3 kg. The working width is 120 mm;
- A plate for traction forces costs 2.8 thousand rubles. Easily screwed to the body through special holes. The deformed section of the body is pulled out using a hydraulic pump or other tools. The plate weighs no more than 1.7 kg;
- Extraction device, hook costing 2000 rubles. Weighs about 1 kg and is used in body repair as a hook;
- A C-shaped clamp that can withstand 4 tons and costs 8.5 thousand rubles. Capable of working in 4 directions. Weighs a little over 5 kg;
- Clamp hook 4/5 ton. The price for this clamp is about 11-12 thousand rubles. The component weighs 12 kilograms and includes several additional accessories, such as stops, adapter, clamp, latch, etc.;
- Plate clamp for aligning car doors. It costs about 3 thousand rubles, weighs 2.2 kg. Easily attaches to the car door pillar, and then uses hydraulics to straighten the surface of the body element;
- 3 ton large jaw clamp. The cost of the clamp is 3000 rubles. Functions in one direction, weighs just over 2.3 kg;
- A body clamp with a long spout costs 2-3 thousand rubles. Withstands up to 2 tons, functioning in one direction. The design is made in a “flat” design, which facilitates access to hard-to-reach places;
- Double chain clamp for 2.5 thousand rubles. Weighs 1.4 kg;
- A C-shaped clamp that can withstand 5 tons, costs 6-6.5 thousand rubles. Weighs a little more than 3 kg;
- Body mini clamp 2/3 ton (2 directions). The cost of the clamp is 2.7 thousand rubles. The clamp weighs more than 1 kg. Direct direction - 3000 kg, side direction - 2000 kg.
How to Make Clamps for Sheet Welding and Body Work
Hello, dear readers and DIYers!
When performing various types of welding work, for example, when welding sheets or body work, it is necessary to maintain a gap between the workpieces.
In this article, Andrey, author of the YouTube channel “TEXaS TV,” will tell you how he made clamping devices that will help fix the parts to be welded with a certain gap.
Such a device can easily be made in a “garage” environment.
Materials. — Steel profile pipe 50X50 mm — Stainless steel sheet 1 mm — Bolts, oversized washers, wing nuts M10 — Steel rod with a diameter of 8 mm.
Tools used by the author. — Grinder, cutting and flap cleaning disks — Abrasive “coral” cleaning disk — Screwdriver, cobalt drills — Semi-automatic welding machine, chameleon mask — Vise, hammer, file — Automatic core — Ruler, marker. Manufacturing process. So, the material for the clamp body will be a 50X50 mm profile pipe with a wall thickness of 5 mm. First of all, the author cuts two pieces 33 mm long from it.
Then the surfaces are cleaned and deburred using a flap disc.
Both workpieces are fixed in a vice, and a longitudinal center line is marked on one side. A slot is made at this point.
The blanks are rotated 180 degrees, and a pilot hole is drilled in the center on the opposite side.
The holes are then drilled to a diameter of 10 mm. To ensure that your drill bits are always sharp, you can quickly sharpen them using a special screwdriver attachment.
Two rectangular plates measuring 55X25 mm are cut from a steel sheet 1 mm thick.
The M10 bolt head is fixed in a vice and a slot is made in it. A steel plate should fit into this slot.
A hole with a diameter of 8 mm is drilled near the edge of the plate. It should be at such a distance that when installing the finished part into the body, it will be flush with the edge.
After this, the corners are rounded and the edges are sanded.
The author cut the clamping pins from a steel rod with a diameter of 8 mm.
Now all the parts are ready, all that remains is to assemble the clamp by inserting the bolt into the hole in the body from the inside. The pressure pin is inserted into a hole in the plate. To press it to the body, you need to tighten the wing nut.
I thank Andrey for his recommendations on making a simple but useful device for welding work.
Good mood, good health, and interesting ideas to everyone!
The author's video can be found here.
Source
Become the author of the site, publish your own articles, descriptions of homemade products and pay for the text. Read more here.
Clamps from AIST
Now, for comparison, let’s look at clamps from the manufacturer Aist:
- Retractable hook 5-ton, price 1.8 thousand rubles. Has a working width of 80 mm. Designed for chains and effective fixation of the brace to the body;
- Door pillar straightening plates 2-ton. The cost of clamps of this type is 2.7 thousand rubles. Ideally fixed to the surface of the car body;
- Plate bracket, an excellent option for stretching a deformed body. Withstands up to 3 tons when used with chains. Fixation is carried out using a screw. The cost of the plate is 2.7 thousand rubles;
- 2-way clamp that holds 3/2 ton. Used for body straightening. Makes it possible to pull metal in the forward direction with a force of up to 3 tons, in the lateral direction - up to 2 tons;
- A 5-ton clamp for body work from the Aist company, priced at 2.9 thousand rubles, is very functional. It works in only one direction, the width of the jaws is 45 mm;
- 2-ton clamp for body work, priced at 2.9 thousand rubles. The ideal flat design makes it easy to work in confined spaces. Functions in one direction;
- The grip, priced at 3 thousand rubles, is a very convenient tool for carrying out various work on the body;
- A pincer-like 5-ton body clamp, priced at 3.4 thousand rubles. The width of the jaws is 40 mm.
Varieties
Despite the fact that the design of the reverse hammer is quite simple, over time even it has had several modifications. This or that option is used in different cases - it all depends on the skill , as well as the type of deformation. But in general, the design is always the same, the operating principle is the same. The differences lie only in the method of attaching such a tool to the body.
The simplest version of the hammer:
- This is a metal rod, at one end of which there is a hook, and at the other - a load and a stop;
- A hook is attached to the washer, and the washer is welded to the place of deformation by welding;
- Provided impact forces are applied to the load, the deformation is extended to the desired moment.
But the second option (also quite simple) will differ somewhat from the first. At the end, instead of a hook, there is a simple thread. In order to level the surface using such a device, a hole is made in the center of the deformation, into which the threaded end is inserted, and a nut and washer are attached to it on the reverse side.
A vacuum hammer is the most complex version of its implementation. It is attached to the surface of the deformed area using rarefied air. The suction cup begins to work both in the usual way and with the help of a compressor.
Thanks to the vacuum device, minor body damage can be repaired and the paintwork can be preserved intact.
Clamps and grips from Stanzani
Another well-known manufacturer in Russia offers the following models of clamps for body straightening:
- C55 is a multi-purpose kit used for most door hinge work. It makes it possible to exert force on the hinges very effectively;
- C 121 is a special gripper for stretching with a force of up to 6 tons;
- Plate C123 for body work with effective properties. It has several holes;
- C126 – Picolo clamp is a small grip equipped with a durable ring. Withstands force up to 4 tons;
- A set of clamps for MacPherson struts with universal properties. You can effectively straighten the racks without disassembling by combining the set with hooks;
- Self-clamping 6-ton screw clamp for body stretching C 128;
- Efficient 10 ton self-clamping screw clamp C 134 100 mm;
- Floating grip for stretching C 135 with an eye, allowing you to stretch the body at any angle with a force of 10 tons;
- 4-ton flat-lipped gripper C 146, allowing deep insertion.
Watch a video about clamps and their use in body repair
The above clamps and grips are effectively used for straightening the body. Moreover, they can be used with different equipment, both with a slipway and with a jack, for example.
Extensions, inserts and clamps create optimal conditions for manipulation. It is imperative to pay great attention to safety when working.
If chains are used during the work, the straightening angle should be exactly perpendicular to the curved area of the body.
The body is also straightened using a square. The latter is fixed on a stand or on the garage floor, again, exactly opposite the damaged area of the body.
Learn more about body editing from video and photo materials. Read interesting articles on the topic of body repair on our website.
Forget about fines from cameras! An absolutely legal new product - Traffic Police Camera Jammer, hides your license plates from the cameras that are installed in all cities. More details at the link.
- Absolutely legal (Article 12.2);
- Hides from photo and video recording;
- Suitable for all cars;
- Works through the cigarette lighter connector;
- Does not cause interference to radios and cell phones.
The process of straightening a car body
A reverse action hammer for body repair allows you to return curved surfaces to their original appearance. With excessive deformation, internal stress appears in the metal, forming compression or tension in various areas. The nature and size of the dent area is of no small importance. So, if unevenness occurs on the central part of the body, new, even more complex flaws will appear during the alignment process.
Therefore, when straightening, visual control of changes in size and shape of deformation is an integral part of the process. To prevent the appearance of new compressions, straightening should be done from the edge to the center of the unevenness, moving slowly in a circle. When the work is done correctly, the stress in the metal is completely eliminated, and the body takes on a smooth appearance. To level out minor deformations, a light hammer made of aluminum alloy or a counter support is used.
Main stages of work
The process of straightening with your own hands using a reverse hammer must be performed in strict sequence.
- Initially, you should thoroughly clean and degrease the deformed surface.
- Then remove the paint and varnish by sanding.
- Attach round nuts to the polished area using spot welding.
- Attach the supplied steel hook to the end of the hammer. Hook it onto the nut, grasping the handle with your right hand and the weight with your left.
- Correction of a curved surface is performed by sharp movements of one hand to the other, and it should be taken into account that the speed of adjustment will directly depend on the force of the blows.
Types of slipways and their main differences
There are 4 types of design:
- Floor-standing. Standard rail mounted design.
- Roll-on. Small in size. Such structures are stored in a garage or workshop.
- Frame. Structures on chains designed for complete repairs and lifting the machine to a height.
- Platform. Designed for professional repairs. Suitable for large machines.
Floor structures
The floor slipway is also called stationary. Its difference is that there are rails on the floor that allow you to move the mechanisms. With their help it is easy to carry out body work.
The stationary slipway is convenient thanks to retractable mechanisms.
Floor structures have 3 advantages:
- They take up little space.
- They cost less than other slipways.
- Fast installation of transport.
The disadvantage is the complexity of installation of the structure.
Roll-up
A rolling slipway is a slipway that is used for light repair work if there is no full-fledged slipway or its use is impossible for some reason. The difference is that the rolling slipway is small in size - it is not necessary to roll the car up to it. You can bring the rolling slipway to the car.
This design has advantages:
- It is customizable for different types of cars.
- Possibility of equipping the device with hydraulics.
- The clamp fastening design has no analogues.
- Can be used with most types of machines.
- Compact size.
The disadvantage is that it is impossible to carry out complex work involving large distortions.
Frame
A distinctive feature of frame structures is the use of the frame as a base. The car is secured with chains. Most often this design is used for minor repairs. But, at the same time, the structure of frame stocks is more complex than others. They are equipped with grippers that allow you to fix the car body in the required position or even lift it to a certain height.
Platform models
The platform model is very similar to the trestle structure. It allows you to pull the car body in any direction. A lot of different equipment can be installed on the slipway platform. Pulling on a platform is very convenient, and the functionality is enough to make professional repairs right in the garage.
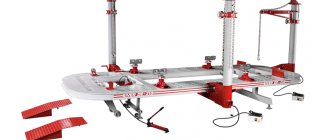
Mobile homemade slipway
This is the kind of slipway our forum member Evsey made.
The design of the lightweight and mobile Finnish slipway Autorobot micro A was taken as the basis.
The main materials used in the manufacture of steel were channel No. 10 and No. 12.
Read also: How to find out about the accrual of tax on a car
Below in the photo are the main components of the slipway.
An important detail of the slipway is the sill grips, a kind of vise. For their manufacture, sheet steel 16 mm thick was used. The width of the sill grips is 150 mm, the tightening bolts are 12, and the bushings are 14 mm. The springs were used from the valves of the classic VAZ. The “jaws” of the grips are made of metal rasp.
To work with this slipway, hydraulics from the kit are used, designed for 10 tons. This is the chain clamp located on the draft tower (boom) of the slipway, and also how the sill grips work.
Slipway in operation:
And here is the actual diagram with the dimensions of the slipway.
To simplify the work, special stands were welded with the car driving onto them from the front or back, and it became easier and also much faster to bring the slipway under the belly of the car.
This design of the slipway has the ability to install a device to pull down. To do this, you need to modernize it a little by placing a sliding roller under the chain links.
Pros and cons of this do-it-yourself slipway design. It may be worth taking them into account if you repeat this or a similar design.
Cons and improvements:
- There are only two sill grips and no height adjustment.
- Lock for turning the boom horizontally: there was 5 mm iron, a minimum of 10-15 mm was needed.
- During operation, weak points began to emerge and were strengthened.
- The length of the telescopic boom is, in principle, excessive, so it can be made shorter.
- How to hook a car to the sills from below with these grips if they do not have flanges, for example, a BMW type car? To do this, you will need special adapters, which cost quite a bit of money (there are homemade options).
- The mobility of the slipway and the ability to turn it in different directions can be considered both a plus and a minus, but in a small garage there will be a problem with movements. On the other hand, not every car repair requires the use of a slipway, and in this case it can simply be rolled out of the garage. And for a small garage it will be more practical to make a stationary slipway (we’ll talk about it a little later).
General impressions of Evsey (the author of the project) from working with his slipway:
In general, it’s beautiful, the car stands dead on the slipway, the hydraulics pull extremely easily, as if you weren’t pulling iron, but cardboard or paper. Before this I used a regular winch, so I can compare and say that this is heaven and earth. Stapel has proven himself to be a real hard worker, his rating is 5 plus, he is very mobile and reliable.
You can read details and discussion of this design on our forum here.
As one of the options for a small homemade slipway for use in the garage, below is the video from Boris AvtoDok, where he talks in detail about his design.
In the second video, errors identified during work, how he corrected them and what modifications he made.
Tools and materials for creating a structure
We will need the following materials and tools:
- Metal profiles.
- Extended profiles (needed for racks).
- Metal corners.
- Welding machine.
- Bolts and nuts.
- Fastening mechanisms.
- Paint and primer.
- Chains and hooks.
- Hydraulic equipment.
- Spray gun.
- Power rack.
Step-by-step construction instructions
The construction of any home-made structures begins with the design stage. You need to make a slipway that is convenient to use. It is important that it does not take up too much space, blocking free movement.
The second point is always the creation of the structure's frame. The last point is to install fasteners and tightening devices yourself.
Drawings and dimensions
First you need to make suitable drawings. Ready-made options can be found below. The markings are made according to the dimensions of the vehicle. Afterwards the stage of preparation and selection of tools and materials begins. We will also need to make a mounting system large enough to fit our vehicle. It would be nice to cook it with the ability to change the height.
- Once all the drawings are ready and the materials have been selected, you can start working. First you will have to remove moisture from the materials and coat them with a primer. You can paint them right away, or you can leave this step for last.
- Now weld the metal corners to the base profile.
- Weld the profile (this will be the stand). It is secured with bolts.
- Now the chains, hooks and retractable devices are welded.
How to stretch car bodies
Pulling out a car or a car body at a cost even if there has been a minor accident or other damaging factors is quite expensive.
Although, it seems that there is nothing difficult when performing such work. The main thing is desire, free time and the necessary tools, then repairing the car body is possible on your own. How the body is stretched and pulled out, let’s figure it out step by step:
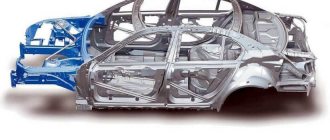
First, you need to determine the amount of work required, and then the car must be washed, then thoroughly inspected. First of all, you need to make sure that the spatial geometry of the body is not broken. You can check the geometry by measuring the distances between all control points.
When there is no information on these points, then you can navigate by the visible power structure. For example, the distances between the suspension mounts and engine mounts are symmetrical.
When the geometry of the body is damaged, then restoring the car with your own hands will be extremely difficult. Because you not only need to know how the body is pulled, you need specific equipment, in fact, you need a whole stand that allows you to pull the body in any desired direction. The equipment is bulky and expensive.
Of course, you can try to use the means at hand, for example, guy ropes or jacks, however, it is very difficult to efficiently restore the car body using such means.
If you do not have the opportunity to use the appropriate stand (for example, rent), then there is no point in purchasing a stand - repairs will be cheaper in the service.
The second thing you should pay close attention to is rust stains. Moreover, through corrosion cannot be ignored. The appearance of a rusty spot on the surface does not mean that the body is not completely rotten - there may already be no metal under the paint. Such places should be checked (with a simple tap, everything will immediately become clear by the sound).
Calculation of required materials
Before starting work on the manufacture of a slipway, it is necessary to complete its drawing and calculate the amount of materials required. The platform should look like a rectangle (or better yet, several) made of metal profiles with a cross-section of 50×50 or 70×40 (the thicker the better). The optimal length is 2000 mm, the width is equal to the width of the car's wheelbase.
Why was this width chosen? In general, it is possible to manufacture a slipway with a width equal to the width of the wheelbase of the car. Or smaller than it, but with “shoots” from the frame, on which the clamps will be attached. The first method is preferable due to the location of the clamps.
In the middle of the platform it will be necessary to weld a stiffener from a similar metal profile. During the work, additional metal will be required, the amount of which is difficult to calculate at the initial stage of work.
After the calculation of the required amount of metal profile has been completed, it can be ordered from a special database or you can use an existing one.
To ensure the functionality of the slipway, it will need to be equipped with good hydraulics - a kit with a tonnage of up to 10 tons is suitable.
You also need to remember that there are two types of slipway: stationary (that is, installed in a specific place without the ability to move) and mobile (equipped with wheels and adapted for storage in a vertical position). If the second option is chosen, then you also need to purchase a set of wheels: 4 or more for the frame, 2 for the power rack.
Stationary floor slipway in the garage
And now, we have smoothly moved to a stationary slipway or, as it is also called, floor-mounted. Here is a statement from Evsey, the author of a mobile slipway made with his own hands and which we talked about in the first part of our article:
If I had originally built this garage for body repair, I would have concreted the channels along the entire length of the inspection pit, and anchored the grips to the car sills to these channels. And the traction boom would also be attached to anchor fasteners. I would also put channels or rails into the walls, that is, I would weld a kind of cage so that it could be pulled in any direction in several directions at the same time. Then I think it would be possible to undertake repairs of any complexity.
What is the most important thing in a slipway? The most important thing is that you can securely fix the car and then you can pull it in any direction, of course, if the design of the slipway allows it.
I cannot offer drawings for such a slipway, because... I don’t have my own, but for every craftsman, if the slipway was not purchased, but made with his own hands, then it was made according to the principle of his own vision of the situation (tasks to be solved, raw materials, garage size, finances and other “wants”).
Basically, these are channels welded and embedded in concrete with a cut for attaching various devices (threshold grips, “tower”). Some auto repairmen make a whole cube out of channels throughout the entire volume of the garage. This kind of slipway allows you to pull the body in any direction and at any angle. Of course, this solution is the most convenient, but very expensive.
The design of a homemade floor slipway in a video from Ivan from Nizhny Novgorod. Video in three parts.
Part one - general design and budget.
Part two - Benefits.
Part three - Drawings and full layout.
If you are planning to make a floor slipway with your own hands, then approach this issue thoughtfully and purposefully. Draw a sketch depending on the size of your garage and the intended work, decide on a list of necessary materials, think about how and where you can save money.
It would be a good idea to familiarize yourself with the various designs of homemade slipways, of which you can find plenty on the Internet. And take the best from them, taking into account mistakes and shortcomings - learn from the mistakes of others!
Making a slipway
The frame is assembled by welding. That is, skills in working with a welding machine are required.
Stages of work:
- First of all, a rectangle is assembled from a metal profile of the estimated length and width; exactly in the middle it needs to be reinforced with an additional profile. The frame is assembled as the future owner of the slipway deems necessary. He may want to further strengthen the longitudinal sides of the frame, perhaps the transverse ones. There is no definite principled position on this issue.
- To increase the stability of the car on the slipway, it is necessary to weld heights in its corners that will prevent the car from possibly sliding off.
- The next stage is installing fasteners on the longitudinal sides of the frame. Fasteners are clamps with jaws that are required to securely fix the vehicle frame when loads are applied to it. There cannot be a strict location for fixing the fasteners; they must be able to move along the entire length of the frame. Making clamps with your own hands is also possible, but if they are on sale, then there is little point in this, since a homemade clamp will cost about the same as a factory one.
- Next comes the installation of the power rack. A power rack is an inverted L-shaped device that must also move across the entire frame and fit securely anywhere. You can make not one, but two power racks.
- Giving the slipway an aesthetic appearance. This stage consists of ordinary painting of the slipway.
- Well, at the end of the work, the homemade slipway is equipped with those repair devices for which it was created: hooks, chains, hydraulics.
The homemade slipway is ready, its use will help you perform those types of body repairs that were previously only possible in auto repair shops, and methods of its practical use can be seen in various videos.
Tags: body clamp, slipway, do it yourself
Comments 66
Hello. There's no need to waste time here. It’s better to make your own adaptations for the slipway and spotter, etc. Good factory metal lasts for many years. The file won't take it. But if the clamps are g... Then you can even throw the factory in the trash. They are of little use. They bend, the notch is eaten instantly. There are also quality Chinese ones. Now everything is Chinese. You need to look when you take it.
Yes, I later bought a factory one, it coped with its task)
Everyone here advises you to buy it because... metal G, out of idle curiosity I want to ask if it is possible to find high-quality metal or at an expensive price.
you can find it, you’ll just have to mill it from a solid one
Adaptation for a torture chamber?
yeah for a dentist
it would be funnier - for a urologist
The factory clamp solves the problem, this homemade product is complete bullshit, it won’t fit anywhere with scarves later. I use inexpensive tota clamp clamps, maybe you can find them in your region. I use chains from a coal conveyor. I cut one link as a connector, so far I haven’t been able to straighten it, although there are and minibuses and cargo cabins, and there’s a lot of metal there.
IMHO: the wedge should be made sharper...thereby the clamping force will be greater...well, the long sides of the “jaws” could be thicker...
only if you weld the front walls or weld the back mortgages
buy the real ones at the store... you'll suffer with the homemade gun... yes... they're expensive... but they work as expected...
It is advisable to change the operating principle of the clamp. A simple grab breaks the winch with a force of 250 kg. It is necessary with a wedge clamp, the harder you pull, the more the gripping jaws compress.
This one is much weaker than mine, it’s definitely for me to pull out the spar and not a jammed empty seam. rather weak
Mine is tested and pulls 2.5 tons, but yours is drawn and not tested. There is no justification for the assumption of weakness...
what does 2.5 tons mean and how is force measured?
winch 2.5 tons. which he pulled to the limit and tapped with a reverse hammer to relieve the tension... You are too self-confident.
It’s not a matter of self-confidence, the rigidity of the structure is simply not visible, all hope is in the thickness of the metal
It seems to me that the quality of the metal will not allow the idea to be realized. will bend. and if you cook it, it will weaken it even more. dangerous if it breaks
Idk. If it’s filthy ferrous metal, then at least cook it. trying is not torture. If it flies off once, we'll see. I'd rather buy a normal clamp
You can’t heat it, it will tear when jerking...
It seems to me that the quality of the metal will not allow the idea to be realized. will bend. and if you cook it, it will weaken it even more. dangerous if it breaks
What difference does it make what you cook?
The heating area is, firstly, smaller and the properties of the metal are completely different from those of the arc.)
yeah, and if it doesn’t warm up, it won’t cook
The heating area is, firstly, smaller and the properties of the metal are completely different from those of the arc.)
in this case, under such loads, welding is not very reliable. maybe I'm wrong. but taking risks is more expensive for yourself
The heating area is, firstly, smaller and the properties of the metal are completely different from those of the arc.)
not long ago I cooked a “miracle shovel” from 12 rods and a profile. I’ve already tried to pin and strengthen it. I cooked it semi-automatically - one horseradish bends and breaks. I never expected this. and all our construction ferrous metal is like this.
Read also: 15 days for an unpaid fine
It seems to me that the quality of the metal will not allow the idea to be realized. will bend. and if you cook it, it will weaken it even more. dangerous if it breaks
Welding will have no effect, since the edges of the channel will be weakened, which are not involved in the work in any way, that is, it’s the same as taking the channel a few mm narrower.
a neighbor uses a Soviet household vice, having slightly modified it
can you take a photo?
The photo is problematic, the garages are cooperative, it’s hard to meet each other, but I’ll try to explain - these vices consist of two parts, one anvil with fasteners to the table, a clamp is screwed to the anvil, made according to the principle of tweezers with a spring, type “hand vice with a clamp”
And it's a good idea
look now added pictures
Okay, that's what I thought too.
The channel can bend inward in the center when you tighten both bolts in the center, thereby reducing the clamping force of the jaws and the fastening of the end bolt will deteriorate. A gap will appear between the channel flanges and they will bend outward. Maybe weld strips along the edges to create more rigidity?
like factory