Replacing the Renault Duster alternator belt is a simple job and any beginner can do it.
This element must be changed in accordance with the maintenance regulations, but there is a possibility of premature failure. The main sign of a problem is a whistle, which appears when the electrical system is under increased load. In this case, you will need to remove the old alternator belt on the Duster, check it and replace it with a new one.
Duster drive belt replacement interval
According to the maintenance regulations, the Renault Duster alternator belt is replaced every 60 thousand km or 4 years.
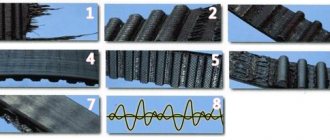
Signs of wear on the Renault Duster alternator drive belt that will require this replacement:
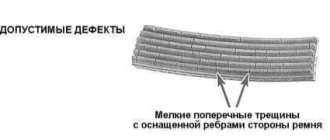
- Random breakdowns, located across the ribs. Small cracks are visible to the naked eye, they are located along the ribs or one rib. Causes: constant exposure to high temperature. Cracks appear at the top of the rib and become larger as they curve along the sides of the cord. If breakdowns appear a centimeter or two centimeters apart, then replacement is needed.
(link to photo source) - Chipping. Rubber particles came off a long strip of dense fabric (belt) of the Duster. If there is chipping, the strap may become damaged at any time during use. Cause: Spalling occurs when cracks located next to each other run parallel to the cord. The main causes of this type of wear are heat, stress and the natural aging process.
(link to photo source) - Badasses. The material partially flows from the ribs into the grooves of the product. Cause: Poor tension, misalignment, new material installed on damaged friction wheels, or a combination of these factors. Scuffing often occurs on diesel engines.
(link to photo source) - Abrasive damage. The back of the belt is shiny. With more severe damage, the tissue part becomes visible (it is damaged).
(link to photo source) - Rib detachment. The rib from a long strip of dense fabric is strongly shifted or separated from the base of the product.
(link to photo source) - Uneven rib damage. Very severe wear of one rib relative to the others. The sound of impacts may be heard.
(link to photo source) - Hit of stones. On the back of the long strip of thick fabric there are small holes, small depressions, and there may be frayed fabric around them.
(link to photo source) - Wear of edge boundaries. The sides are glossy, the end cord threads are worn out, and the ribs are torn.
(link to photo source) - Oil contamination. The upper part of the belt becomes scaly and swollen.
(link to photo source) - Belt noise. Knocking, chirping, creaking sounds, and clicks are heard.
(link to photo source)
Articles
Regarding what type of Renault Duster is equipped, there are two types of drive units - with and without air conditioning.
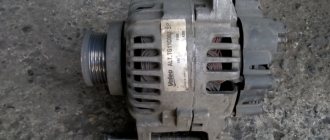
Alternator belt kit for Duster with roller (art. 7701476476)
Therefore, when purchasing a kit for replacing the alternator belt for Renault Duster or separate spare parts, it is important to take into account the configuration and volume of the power plant :
- For a diesel engine with a volume of one and a half liters, there is a generator belt kit for Duster with a pulley (article number - 7701476476). Price from 3.5 thousand rubles.
- For a 2.0 engine without air conditioning, a Renault Duster alternator belt kit with article number - 7701478717, price from 3.1 thousand rubles.
- For the 2.0 power unit, a generator belt kit under article number 117209732R with a price starting from 5 thousand rubles.
If there is no original for the 1.5 engine, analogues are used:
- Gates K-026-PK1203 set price from 4 thousand rubles.
- Febest 0290-J1E kit price from 2.5 thousand rubles.
For a power plant with a volume of 1.6 (without a cooling apparatus), analogues are suitable:
- Gates K026-PK-1130 priced from 3.8 thousand rubles;
- Riginal RG-534014130 priced from 1.3 thousand rubles.
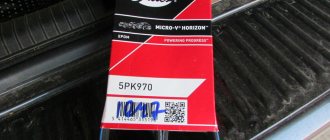
The generator belt marking for the 1.6 engine is 6PK1203, the roller part number is 523-0557-10.
Alternator belt for 1.6 engine (art. 6PK1203)
It is possible to replace only the alternator belt for Duster.
Preparatory work
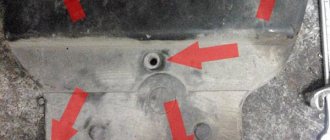
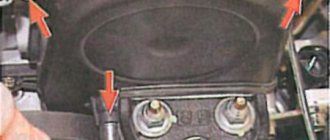
First, remove the plastic box located to the right of the cylinder block. To remove the plastic hose, you need to press down two clamps and remove the fixing rubber clamp, after which the box can be easily removed. In the opened space, use a screwdriver to remove the two rubber plugs that cover the camshaft axles, and unscrew the metal fastener by unscrewing the two 8mm bolts.
Insert the camshaft clamp into the holes that were closed with plugs. This is a U-shaped plate, 5 mm thick, with a distance between the vertical parts of 100 mm, and their width is 36 mm. To fix the half rings, they must be positioned horizontally, after which the device is inserted into the slots and reliably blocks the camshafts.
By unscrewing the nuts on two studs, the heat sink is removed from the cylinder head. Next, the car is raised on a jack or lift, the protection is removed, and under it, install a jack or other device that allows you to lift it or put it back on supports, which will be required when replacing the timing belt, also for the convenience of unscrewing the bolts.
Using the E14 head, unscrew the plug for the crankshaft clamp located on the cylinder block. Replacing the timing belt on a 2-liter Duster requires removing the engine mount. From the fastenings of the fuel supply pipe, remove the harness clamp from the bracket. Then six mounting bolts are unscrewed, which will require a 16-inch head - three attached to the drive cover and three directly to the body.
In the opened space, the metal cover of the timing belt casing is visible; to remove it, you need to unscrew five bolts and nuts to 13, after which it can be easily removed. Remove the plastic part of the protective casing by unscrewing 5 x 8 bolts.
The crankshaft lock is a steel cylinder with a diameter of 8 mm and a length of 50 mm, at the end of which there is a handle for easy installation into the block. The device is simply inserted into the crankshaft, preventing it from turning. Unscrew the crankshaft mounting bolt, use a 16mm wrench to press out the tension roller and remove the alternator belt.
Replacing the Duster accessory drive
First you need to prepare an inspection hole or overpass where the work will be done. Place anti-roll shoes under the rear wheels and put the car on the handbrake.
Regarding what equipment is included, there are 2 types of alternator drive belt diagrams on the Duster (with and without a cooling device). The drive tension is adjusted automatically by the tension device.
How to replace the strap on a Duster with air conditioning installed:
- Dismantle (remove) the right front wheel.
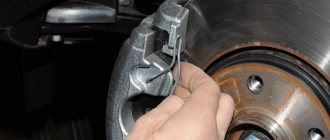
- Unscrew 3 screws securing the fender liner to the front bumper, and 1 self-tapping screw connecting the fender liner and fender. Bend the front part of the fender liner and place it behind the brake disc.
(link to photo source) - Use the “eighteen” head to rotate the crankshaft using the bolt for installing the pulley of additional machine parts in the direction of movement. arrows.
(link to photo source) - Inspect the Duster strap and if you find a crack, peeling, or tearing of the rubber from the fabric, replace it.
With 2.0 engine and air conditioning
(link to photo source)
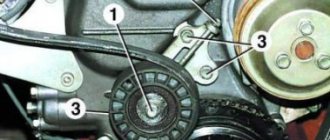
Study the drive diagram of additional elements of the machine with a cooling device, which includes the following elements:
- Drive pulley.
- Tension roller.
- The wheel that drives the hydraulic power steering pump belt drive.
- Strap.
- The gear that drives the generator belt drive.
- Support roller (OP).
- Air conditioning compressor pulley.
How to replace the alternator belt on a Duster:
- It is necessary to loosen the tension of the drive; to do this, put a sixteen socket wrench on the hex bolt of the tension device and turn it clockwise.
(link to photo source) - Remove the Duster belt from the pulleys, overcoming the force of the tensioner spring.
(link to photo source)
Marking of the drive belt for additional components with a cooling device for motor 2.0 - 7 RK 1792 (seven V-ribbed, length 1792 mm).
To replace the support roller (OP), you need to: use a “13” head to unscrew the installation bolt, and remove the OP with the bolt. To check the quality of the OP, rotate it while holding the shaft support ring. If the rotating part of the mechanism is noisy, then it needs to be replaced.
(link to photo source)
The tensioner is replaced as follows: using Torx T-40, you need to unscrew the roller installation screw, remove the rotating part of the mechanism in the form of a reel (a small metal wheel) and its cover.
(link to photo source)
If the tension product spring malfunctions, unscrew the fastening bolt with a “sixteen” head and remove it together with the rotating part of the mechanism in the form of a coil. When installing the tensioner together with the roller, the protrusion located on the base of the tensioner must fit into the groove of the bracket for mounting additional units.
(link to photo source)
Installation of parts is carried out in reverse order. When installing the drive, you need to lay it on the pulleys and place it under the rollers (tensioner and support type).
With 1.6 engine and air conditioning
To loosen the tension (roller) of the alternator belt on a Renault Duster:
- Place a spanner wrench 15 onto the tensioner bolt from below the machine.
(link to photo source) - Rotate the roller bracket in the direction of movement clockwise.
- Remove the poly-V belt for driving additional devices from the support roller of the drive wheels.
(link to photo source)
The marking of the poly V-belt with air conditioning is 6-rk-1822.
When replacing a belt on a Renault Duster, change the support and tension rollers. To replace the first one:
- Use a socket wrench with a thirteen-size head and unscrew the bolt securing it.
(link to photo source) - Remove the outer part of the roller, dismantle the OP and the inner. cover.
(link to photo source)
To replace the tension product, if the spring is faulty, use a ten-point head to loosen and completely unscrew the two bolts, remove the tension product together with the tensioner (roller). Install the elements in reverse order. When installing the strap, we place it on the drive wheels, placing it under the rotating parts of the mechanism in the form of coils, taking into account the diagram.
(link to photo source)
Checking the condition of the rollers
Renault Duster uses plastic rollers with a ball bearing located inside, which does not require replenishment of lubricant during operation . To check the condition of the bearing, it is necessary to rotate the roller; extraneous noise and jamming of the element are not allowed. Additionally, the roller should be rocked in a vertical plane; if runout of the ball bearing is detected, the roller must be replaced. Do not operate parts with damaged or worn outer parts, which will damage the surface of the new belt.