- Examination
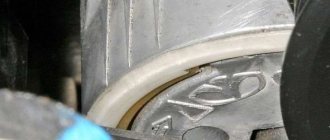
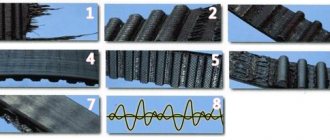
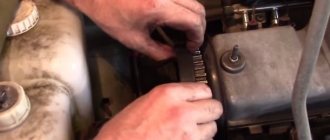
- Typical examples of wear on V-belts
- Typical examples of wear on multi-ribbed drive belts
Drive belts, or V-belts as they are sometimes called, are located at the front of the powertrain and play an important role in the functioning of the engine and many other vehicle systems. Over time, belts wear out and must be regularly inspected in accordance with the vehicle's routine maintenance schedule in order to avoid serious engine failures, the consequences of which can cost the car owner a pretty penny to correct.
| The V-shaped family also includes multi-ribbed belts. |
The number of drive belts used on the engine depends on the vehicle configuration. Belts are used to drive auxiliary units such as a generator, steering and water pumps, air conditioning compressor, etc. Depending on the arrangement of the pulleys, more than one unit can be driven by one belt.
Stop the engine, open the hood and locate the drive belts at the front of the power unit. Using a flashlight, use your fingers to feel the belts along their entire length, checking for cracks and delaminations.
The presence of abrasions, polished areas and other obvious defects on the belt is also unacceptable (see illustrations Typical examples of wear on V-shaped drive belts
and
Typical examples of wear on multi-ribbed drive belts
).
Inspect the belts on both sides by twisting them. A worn or damaged belt must be replaced.
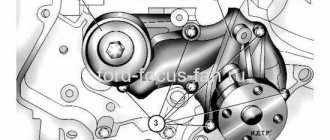
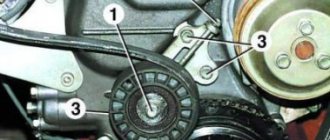
Check the position of the belt tensioner lever; it should move freely and be positioned between the stops on the base plate. If the tensioner lever is pressed against the stop, both the belt and tensioner should be replaced.
| Layout of the auxiliary drive belt tensioner lever (1) and its stops (2) - models without AC/V |
| Layout of the auxiliary drive belt tensioner lever (1) and its stops (2) - models with AC/V |
Replacement
Gasoline models
|
|
Diesel models
Models with 1.7 l SOHC engine
|
|
Models with 1.7L DOHC engine
|
|
- Models with 2.0 l engines
- Diagram for routing the accessory drive belt on 2.0 l engines
|
|
|
Replacing the alternator belt Opel Astra H Economashka TE37
The Opel Astra H is, of course, a very high-quality car, but the German designers did not take into account that their brainchild can be used in Russian conditions, where there is traditionally a lot of dirt, dust and everything else. Naturally, the alternator belt quickly fails and the car owner is forced to change it.
Many car owners replace the alternator belt on an Opel Astra in auto repair shops. There, the car engine is lifted with a jack, and all sorts of complex actions are performed, which, naturally, increases the cost of repairs. In fact, you can replace this element easier and with your own hands - just strictly follow the instructions below:
So, the planned procedure for the Opel Astra H Economy TE37 occurs as follows:
- Initially, the air filter is quickly dismantled - just loosen a couple of clamps.
- Find the upper bolt of the power unit support and remove it completely. The lower ones are only slightly weakened.
- The new belt, using a conventional pry bar, is tucked under the first leg.
- The previously removed bolt is returned to its place (without fully tightening it). One of the remaining two is removed. The procedure for threading the belt is repeated. The same is done with the third support.
- Using a spanner, the roller is pulled back, which allows you to loosen the damaged product and then completely remove it. You can simply cut it off.
- To complete the procedure for replacing the alternator belt, all that remains is to put the new element on all the pulleys, pull back the tensioner, put it on the workplace and release it - the belt on the Opel Astra H will tighten and completely move into position for further use.
It's simple - the whole procedure took, at most, a couple of ten minutes!
You may also like
Replacing the drive belt in Opel Astra J, photo and video instructions
We have an Opel Astra J car under repair, on which it is necessary to replace the drive belt, otherwise it is also called the auxiliary unit belt, the alternator belt. We will show you detailed photos and video instructions on how to do it yourself in a garage.
Let's get to work, tear off the bolts from the front right wheel, jack up the car and dismantle it. We need to remove half of the fender liner, to do this we unscrew the 4 fastening screws, three of them are immediately visible, and the fourth is located under the bumper:
To unscrew we use a T20 Torx bit. Next we remove the 4 plastic rivets from the fender liner. After this we get direct access to the drive belt. To remove it, you must first remove the power steering belt:
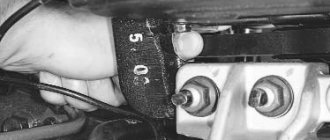
We put a 19 key on the drive belt tensioner:
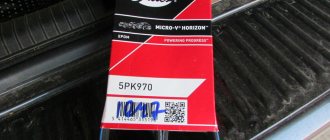
Pull counterclockwise. We remove and install a new rivulet belt, we have it from Bosch, article number 1987947949. We lower it down and first put it on the pump pulley.
Then it goes under the wheel arch, we pass it through the generator pulley and drive roller. If you have any difficulties with this, it is better to draw a diagram in advance of how the old belt stood. After you have passed the belt through all the rollers and pulleys, use a 19 key to move the tensioner counterclockwise. Don't forget to put back the power steering belt. Next, we reassemble in the reverse order.
Video of replacing the drive belt in the Opel Astra J:
Backup video on how to replace the drive belt in an Opel Astra J:
Read times: 3,600; Today: 3
Why shouldn't repairs be carried out at random car repair shops?
ATTENTION!
It is recommended to provide the car for diagnostics to a car service center, where there are qualified personnel who can distinguish one malfunction from another. Otherwise, you can disassemble a working unit, but the fault will remain. This often happens in garages or when repairs are made by an inexperienced mechanic. To replace the belt drive of the electric generator of an Opel Astra N car, it is recommended to contact a trusted car service center with trained personnel.
Replacing the drive belt on an Opel Astra h
Many car owners neglect the condition of the attachment belt, believing that there is no need to change it. Until, at one point, it breaks, burying the water pump, air conditioning and power steering. In this article we will look at how to independently replace the drive belt on an Opel Astra J.
Timing for replacing the drive belt
According to the maintenance regulations, on the Opel Astra h 1 6 the drive belt must be replaced every 30 thousand hours of operation. The service life of these parts is measured in hours, not kilometers.
For example, while sitting in a traffic jam. However, in practice, the service life of the part will greatly depend on weather conditions, load on electrical appliances and driving style.
Experienced car owners are advised to prepare for replacement after 15-20 thousand hours or after two years.
Naturally, you should not forget about routine diagnostics of the tension belt. The main symptom of a malfunction is a whistle associated with belt slipping.
However, the whistle may be due to liquid getting on the system components. You should not sound the alarm if you hear a whistle, say, after rain or driving into a puddle.
If the whistle appears when the car’s electronic systems are under load, you should urgently check its condition.
Small horizontal cracks are an acceptable wear defect. If there are no ribs on the surface and long vertical cracks appear, the belt must be urgently replaced.
Unacceptable defects include areas that are polished to a shine and frayed ends from which threads come out. In addition to the belt, it is also worth inspecting the tensioner pulley. It must be parallel to the thrust plates.
If it is adjacent to them, it should be replaced.
Symptoms of a faulty alternator belt drive
The stable operation of all vehicle mechanisms depends on the condition of the drive. The drive is a belt drive with an automatic belt tensioning device.
The malfunction is characterized by the following symptoms:
- A light comes on on the car panel, which indicates that the battery has stopped charging - the drive belt of the electric generator has broken.
- An extraneous noise or whistle is heard from under the hood; this is typical when the belt slips. Often this noise can be confused with another fault. A similar sound occurs when the generator bearings fail.
The most common fault is belt stretching. This defect can occur due to long-term use or a manufacturing defect.
The average service life of an alternator belt is 150 thousand kilometers, and it is significantly reduced when the vehicle is used in urban environments, where the engine continues to run as a result of prolonged periods of standing in traffic jams.
Removing and installing the generator drive belt tensioner
- Removing and installing the generator drive belt tensioner
- Gasoline engines
- Removal
| Execution order |
|
| On some models, the tensioner assembly may be secured with two bolts. |
Installation
| Execution order |
|
| On models with two tensioner mounting bolts, there are no protrusions on the mating surface. |
- Keeping the tensioner spring charged, place the belt on the pulleys (see Chapter Routine Maintenance).
- Reinstall the locker and crankcase guard, then lower the vehicle to the ground and tighten the wheel bolts to the required torque.
- Diesel models
- Removal
- Models with 1.7 l SOHC engine
| Execution order |
|
|
|