The question of organizing sound insulation sooner or later arises before every owner of a foreign or domestic car. Unfortunately, after driving on bad roads, not a single brand of car can withstand it, and after a while the metal and plastic parts of the “iron horse” will begin to loosen, which is why irritating noises, “crickets” and other rattling noises appear in the vehicle’s interior.
This atmosphere creates a lot of unpleasant sensations for the driver, who must be extremely vigilant on the road. In addition, listening to music in good quality with such accompaniment is also a rather dubious pleasure.
In order not to overpay for the expensive services of specialized car dealerships and to get rid of unpleasant noises by spending a minimum of money, it is enough to figure out how to make a car soundproofing yourself. There are many video instructions on this matter; the most visual and interesting ones will be given in the article.
And now, in order. First of all, let’s figure out what sound insulation (or Shumka in common parlance) is and what materials are used for it.
Materials for car sound insulation
Shumka consists of several components, each of which must be made of a specific material.
Vibration isolation
Extraneous sounds appear due to vibrations, the frequency of which is 20 Hz or more. To avoid such a hum, it is necessary to purchase vibration-isolating material, which is made on a rubber basis. It resembles liquid rubber and can be coated with a metallized coating on top. Vibration insulation dampens noise well, and it can be laid either in whole sheets or in strips at equal intervals. This material is sold in sheets measuring 0.5x0.7 m or 0.5x1.2 m. In stores you can find the following brands: Vibroplast, Bimast, Vibroplast, Isoplast, as well as less popular materials: STP SPLEN sound insulation and TEAC. Let's look at some of them:
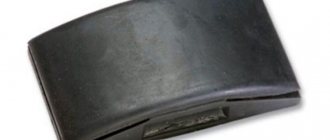
- Self-adhesive sound insulation Vibroplast Silver with a metallized coating. It is flexible and is an easy-to-use material. Equipped with markings (5x5 cm squares), thanks to which you can easily cut sheets of the required size. Suitable for treating interior floors, doors, roofs, hoods and trunks. Does not require heating. Costs from 100 to 300 rubles.
- Bimast Bomb coated with aluminum foil. To work with the material, it must be heated to 40 - 50 degrees, which is not very convenient, but Bimast has the highest efficiency compared to analogues. Suitable for wheel arches, speakers, tunnel, driveshaft and area above muffler. Costs from 480 rubles.
Healthy! Most vibrations come from the engine compartment, floor and wheel arches. If you have car audio installed, then the doors near the speakers, the rear parcel shelf or the trunk lid may also make noise. The least amount of vibration can be heard from the pillars and roof of the car, so cheaper material can be used in these places.
The vibration material is applied first, followed by the sound insulation itself.
Noise insulation
A sound absorber is made of soft, porous materials designed to absorb sound waves coming from outside. Most often, drivers purchase material for car soundproofing from the following companies:
- Bitoplast 5. This material performs two functions at once - noise absorption and sealing, so you don’t have to buy additional anti-creak. Effectively eliminates rattles and squeaks in the car interior. This material is made from polyurethane foam with a protective anti-adhesive layer. In addition, Biplast retains its properties even at very low temperatures (down to -50 degrees). Costs about 360 rubles.
- Accent 10, which performs only a sound-absorbing function. This material consists of polyurethane foam coated with a metallized film. Allows you to get rid of 90% of noise. Accent 10 is adapted to low temperatures (up to -40 degrees), and it does not deform when heated to +100 degrees. Most often used to process the hood, trunk and engine compartment partition. It also costs about 350-390 rubles.
Important! Do not confuse noise and sound absorbers with soundproofing materials, since they are fundamentally different from each other in their properties and composition.
If possible, it is better to combine Shumka of different compositions. For example, one material can be glued to the outer panel of a car door, and another to the inner panel. When gluing the engine compartment or wheel arches, different materials can be laid directly on top of each other. The fact is that different noise insulations retain different frequency ranges, so thanks to this trick you will achieve a better result.
This is interesting: How to remove and paint windshield wiper blades
Another secret. Conventional building materials can be used as a sound absorber. For example, Teksaound soundproofing. It costs an order of magnitude cheaper and is used both for houses or apartments, and for cars. Another such all-rounder is Guerlain (soundproofing).
Attention! The video contains elements of profanity.
There is also liquid Shumka. It is most often used for outdoor work. Materials such as liquid sound insulation of wheel arches have excellent anti-corrosion properties. The composition of this material can be of an aerosol or painting type (for application with a brush or spatula). Mastic liquid sound insulation is resistant to reagents and other aggressive environments.
Padding material
Another material that you should think about buying before you make a car soundproofing yourself is a cushioning (anti-creaking) material. It is used to get rid of unnecessary noise produced when metal parts of the machine come into contact. Previously, its analogue was plasticine, foam rubber, etc., in general, everything that can be found at home. Today there are specialized anti-creaks, for example, “Madeline”. This decorative fabric-based material, about 1-1.5 mm thick, is equipped with an adhesive layer and a protective lining with anti-adhesive properties. Most often, madeleine is used to seal gaps between decorative parts of the interior, car body, air ducts or in the dashboard. Costs about 750 rubles.
If you purchased a universal sound-absorbing material, then there is no need to spend money on a seal. Experts still recommend purchasing all components separately. The fact is that if you buy a universal coating, it will take less work, but the car will gain a lot of weight.
Some experienced motorists prefer to independently combine different compositions of materials. If you are one of them, then be sure to keep in mind that the amount of a particular material directly depends on the selected noise insulation technology (whether it will be a two- or three-layer “sandwich”).
If you have decided which materials to purchase for soundproofing your car yourself, it’s time to move on to the preparatory work.
When is it necessary to vibration insulate a car?
Discomfort is due to the following reasons:
- Insufficient vibration isolation from the car manufacturer.
- Worn or damaged standard insulation.
- Replacement of car body parts - door, fender, hood, etc.
- Installation or replacement of audio equipment.
Any modern car is equipped with vibration isolation at the factory. However, its quality and completeness depends on the class and price of the car.
In business-class cars, this issue is given great importance, so modifications are usually not required there, since the designers have done everything possible to prevent noise from entering the cabin. In cars of medium and low price categories, vibration isolation is not given such great attention. Usually it is either practically absent or partially made and protects the places with the strongest sound source - the engine compartment, the underbody and wheel arches
Therefore, if the owner is not satisfied with the standard vibration isolation, additional vibration isolation is carried out, which can be partial, with the isolation of certain areas, or complete, when almost the entire surface of the car is protected.
Like any other material, the vibration-isolating layer loses its properties over time and collapses. Destruction can also occur due to mechanical stress. Therefore, if the car is more than 10-15 years old and extraneous noise begins to appear in the cabin, which causes discomfort, it is necessary to replace the old vibration insulation.
Another reason why it may be necessary to perform vibration isolation may be the replacement of any parts of the body. New spare parts need to be inspected and if they do not have a protective layer, then it is better to have one done.
Vibration isolation also needs to be done when installing or changing an acoustic system
In this case, special attention is paid to protecting places where sound sources are located - doors, luggage compartment and dashboard
What are vibration isolation materials?
All vibration-isolating materials are square or rectangular sheets that have a bitumen base, on top of which foil is usually glued. The operating principle of this material is to dampen vibration by converting it into thermal energy.
The main parameters of vibration-isolating materials are:
- Mechanical loss coefficient.
- Specific gravity.
- Thickness.
The mechanical loss coefficient is the most important parameter of any vibration isolation. It shows how much noise a given material can absorb.
The higher the coefficient value, the better the protective ability of this type of vibration insulation.
Specific gravity, along with the mechanical loss coefficient, is one of the most important parameters, since the greater its value, the heavier the vehicle becomes when vibration is isolated, which in turn leads to increased fuel consumption, as well as increased load on the suspension.
Preparing for soundproofing
First of all, it is necessary to prepare the following tools (in addition to vibration and noise insulation and seal):
- a construction hair dryer (an ordinary household hair dryer will not work in this situation);
- stitching roller (with it you will glue the material to the surfaces of the car faster and better);
- scissors;
- stationery knife (for piercing bubbles);
- solvent or degreaser (they will need to treat the surface; regular White Spirit will do).
After this, dismantle all parts, clear the area and clean the surface of dirt and dust. The room temperature during operation should not be lower than +18+20 degrees. If all conditions are met, you can begin laying the Shumka.
General recommendations for working with materials
Vibration insulation is applied first. If it involves heat treatment, then warm it up with a hair dryer. When laying the vibra, it is not enough to simply apply it to the surface; you need to roll it well with a roller in all accessible places until the foil texture disappears. If the material is poorly pressed, then over time it will begin to peel off. Please note that the vibration will only have anti-corrosion properties if there are no bubbles underneath it, otherwise moisture will begin to accumulate in these places. Therefore, use a utility knife, carefully piercing them. At the joints, it is better to glue the vibration insulation end-to-end. The vibration does not have to be applied in whole pieces.
But it is better to apply Shumka in as large pieces as possible and under no circumstances cut it into strips, this will reduce the sound insulation effect to almost zero. In addition, individual small pieces will simply fall off over time. It is best to draw a kind of pattern on the roll of Shumka according to the dimensions of the surface to which you are going to glue it. After this, cut out the template and, slowly tearing off the protective film from it, begin sequentially gluing the material. So, step by step you can fix the sound insulation as evenly as possible. In this case, there should be no bubbles either, so go over the material well with a roller. If you do glue the sound insulation in pieces, then be sure to make sure that each part fits tightly to the adjacent one, without leaving any loopholes for noise.
This is interesting: How to make side panniers for a motorcycle with your own hands
There are no special subtleties when working with the seal; the main thing is to ensure that the material does not stick out at the ends of the parts.
Now let’s look at where sound insulation is most often installed.
Why is it necessary to carry out soundproofing work in Autostudio:
- All noise insulation work is standardized and strictly regulated. Thanks to this, our clients receive traditionally high-quality noise insulation services;
- Instead of the recommended 65-70% coverage of the area, we cover 95-98% of the surface, which can significantly increase the effect of noise insulation work;
- Thanks to the high technical level of our specialists and the use of special tools, your car will retain its original appearance. Damaged fastening pins for car interior elements will be replaced with identical new ones. Complete absence of odor from noise and vibration insulating materials throughout the entire life of the vehicle. The materials do not absorb moisture and are not subject to destruction under the influence of the environment. No squeaks from car interior elements after assembly.
- By choosing Autostudio, you will receive a guaranteed result after the work is completed. The noise level will decrease by 3-4 dB, which will reduce the sound pressure level by half. The fatigue of the driver and passengers will also be reduced, safety will be increased, and thermal insulation will be increased.
- Our company is transparent for its clients - you can be present near your car while the work is being carried out, or upon completion we will provide you with a photo report.
- To carry out the work, we use professional tools - a specialized roller for rolling out sound insulation, a set of tools for carefully removing car trim and panels, an industrial hair dryer with nozzles for heating bitumen materials, spanners, screwdrivers, tools with socket heads, degreaser for surface preparation, a knife, scissors, metal ruler.
- From the very beginning – from the moment your vehicle enters the production area – it receives the utmost care. Before starting work, Autostudio technicians will equip body parts with protective covers.
- Using a specialized tool, the interior is disassembled - dismantling the trim, seats, fasteners, kick panels, and so on. All dismantled elements are packed in protective film during the soundproofing work. In order not to damage the body and interior of the car, potentially dangerous elements of the interior, for example, seat slides, are wrapped with film. After stripping the car interior down to the metal, noise-absorbing, vibration-damping, and anti-squeaking materials are applied using a specialized roller and an industrial hair dryer. Upon completion of the work, the dismantled elements are installed back in their original places, the damaged pistons are replaced with new ones. A satisfied Autostudio client can enjoy not only a reduction in noise levels, but also a new, more colorful sound of the installed acoustics.
- Autostudio.ru is an officially authorized and recommended service center for installing sound insulation with Standartplast materials (see certificate)
Examples of work here
What to look for when choosing a soundproofing company?
Sound insulation of the hood
When soundproofing the hood lid, you should take into account its weight, since if you make this part too heavy, the shock absorbers will most likely soon leak. Therefore, it is better to use a light vibration for this area, for example, Vibroplast Silver. It is also worth considering that soundproofing the hood itself is not done in order to get rid of the noise made by the engine. In fact, this is necessary for its insulation. As insulation, you can choose Accent 10, which will retain heat and will not change its properties from high temperatures.
Important! There is no need to throw away the factory thermal insulation, since the new one cannot be a full replacement.
Some cars do not have a factory hood shroud, in which case use the thickest material possible.
Reviews from car enthusiasts about do-it-yourself car soundproofing
1. Soundproofing is a fiction
“I don’t understand why you need to hang all sorts of heavy things like vibroplast and vizomat on your car? It is clear that the cabin will be quieter, but if you drive in a car while listening to music, extraneous noise will not bother you. Maybe people drive in absolute silence and suffer from unnecessary sounds? IMHO, you just need to turn on the music and the noise won't be so obvious. I think that sound insulation is an invention that only exists in our country, or are there such craftsmen abroad too? Doing an unnecessary service and cutting money is a great idea, but no one needs a useless waste of money. This is my personal opinion, which may not please the “noise” craftsmen.
Soundproofing doors
When processing doors, it is also worth considering the weight of the materials; if they are too heavy, you risk breaking the hinges. Therefore, it is important to understand why you need sound insulation in these areas. If you want to improve the sound, then you can’t do without a little expense and will have to glue at least 4 layers of Shumka. For more “modest” requests, only a vibration applied to the inside of the door opposite the speakers will be sufficient. It is also worth noting that the thinner the metal, the more material you will need.
Before work, the doors must be disassembled, the trim removed and the surface treated with a solvent. In the heat of work, do not forget to leave free space for cables, rods and other wires located in the doors.
First of all, it is necessary to treat the inside of the doors with vibration insulation; for this you can use Vibroplast Silver. In places behind the speakers, Bimast Bomb is suitable. The second layer is Shumka with a thickness of about 4-8 mm. After this, external sound insulation is carried out. The material is glued under the door cards, after which they are covered with anti-squeak.
Attention! The video contains elements of profanity.
Noise insulation of wheel arches and trunk
The niche for the spare wheel should be completely covered with vibration, the same applies to the plastic lining of the trunk.
Do-it-yourself noise insulation of wheel arches will save you from road noise, especially in winter when studs are used. To process the wheel arches, you must first remove the standard plastic wheel arch liners (but do not throw them away), clean the parts from dirt and dust and treat the free surface with a vibration isolator. The fender liners themselves can also be covered with material.
Attention! The video contains elements of profanity.
Noise in the car, install soundproofing
So, let's figure out where the noise in the car comes from. When driving a car on roads, the source of acoustic discomfort is primarily the wheel arches, engine compartment and air flows. The interior trim affects noise to a lesser extent.
When the car is stationary and a person is inside, the sound of raindrops on the roof, howling wind and external stimuli in the form of city traffic and other loud sounds on the street can be unpleasant.
In order to improve the comfort of people in the car, automakers naturally install noise insulation as standard, but considerable savings are made on it.
In most cases, there is material in the form of felt under the front panel to reduce noise from the engine and gearbox, dust- and moisture-proof lockers can be installed in the wheel arches, a couple of sheets of noise- and heat-insulating material are glued to the roof, and something is placed on the floor Something similar to car sound insulation.
But this does not give the acoustic effect that the owner expects from his favorite car. And when the question arises about additional sound insulation of a car, the car enthusiast needs to figure out whether he can make sound insulation for the car with his own hands or should he entrust it to specialists.
Roof sound insulation
If you want to get rid of the sound of rain pattering on your roof, then be sure to spend some time on the roof of your car. Good sound insulation will also get rid of “crickets”.
When treating the ceiling, take into account its weight; if you make it too heavy, the handling of the vehicle will noticeably deteriorate. Shumka for this area should be chosen with a thickness of no more than 8 mm. Each material is laid in one layer. Before work, calculate all the values to install the ceiling cladding in its place without problems.
Installation of sound insulation of the main areas of the car
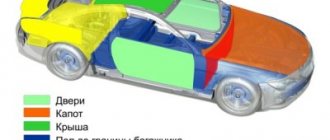
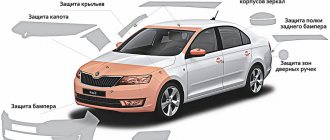
To determine where to start installing sound insulation for a car, you need to conditionally divide the body into several zones. Any soundproofing instructions highlight the following main installation areas:
- interior floor (front, rear and middle);
- doors;
- trunk;
- interior roof;
- engine compartment shield;
- trunk and hood lids.
Numerous examples of sound insulation provided on the Internet suggest the following sequence of actions:
- Determine the areas in which it is necessary to dismantle car parts and interior items.
- In areas that will be subject to vibration and noise insulation, disassemble the interior.
- Select one of the zones, preparing the necessary materials and tools for work.
- Following the necessary recommendations, proceed with installation.
- After completing local work, proceed to processing the next area.
- Having completed the installation of the intended zones, install all the interior parts in their place.
Soundproofing the floor
In addition to the wheels, while driving on the road, the floor of the car also makes noise, and pebbles knocking on the bottom bring a lot of unpleasant sensations. For this area it is better to use the highest quality materials, for example, Bimast Bomb (although this is a heavy vibration, its characteristics are the best). A layer of Shumka 4-8 mm thick is applied on top.
Make sure that there are no joints between the sheets of materials, and try to cover as large an area as possible, preferably with one sheet. The same applies to soundproofing the car floor.
After applying all the components, leave the car for 12 hours so that all the adhesive bases “set” well.