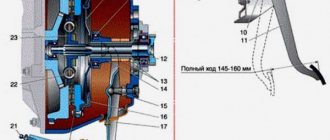
How to change the crown on the flywheel of a UAZ. How to remove and install the flywheel
In general, a small fluffy animal came to my clutch, and in order not to climb twice, I decided to change the flywheel crown at the same time, since in one of the places the teeth were licked half the length.
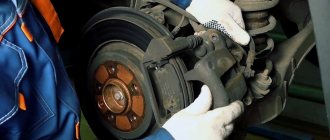
Often there is advice to unfold the crown (remove and press on the other side). I think this is bad advice, since in the event of a broken ring tooth, the Bendix may find itself “tooth to tooth”, in which case, at a minimum, the starter will be damaged, and at maximum, the bell may crack. Thus, it only makes sense to unroll the crown if the car is planned to be sold soon. If the engine is planned to be operated for a long time, then the crown should be replaced if there is significant wear. The procedure for removing the flywheel does not present any big problems, the only thing is that in order not to upset the balancing, it is necessary to mark the position of the clutch basket relative to the flywheel, and the flywheel relative to the crankshaft. The old crown itself can be knocked down without any problems or heating with a 0.5 kg hammer. In this case, you need to use a chisel-type spacer so as not to hit the flywheel with a hammer and chip it.
Pressing of the crown is carried out with its preheating:
The fire is set to medium. If it is low, it will not warm up; if it is too high, it will heat up unevenly. Heat for about 10 minutes. It's better to overheat than underheat. Because if it doesn’t fit, you’ll have to remove it and heat it up again, but I don’t think it will be possible to heat it red-hot on the stove no matter how hard you want. I think I heated it to about 200 degrees, it fit without any problems: First we tap around the perimeter, then we look where we haven’t reached the stop and hammer in that place. Basically, if you heat it up properly, it seems to sit in place without a hammer at all.
After the flywheel has cooled, we make notches on the teeth to facilitate engagement with the bendix:
It is not necessary to grind down the half of the tooth, it is enough to grind down the edge, and preferably on the right side :). The process is not complicated, but tedious - there are 137 teeth.
For dessert, we mount a neodymium magnet in one of the balancing holes and pour glue around it:
You will learn why a neodymium magnet is needed in a flywheel in one of the following series :).
An internal combustion engine is a complex mechanism that combines many elements that perform specific functions in different operating modes. The flywheel is responsible for the stable functioning of the power unit, taking on excess vibrations and ensuring uniform engine operation without fluctuating speeds or jerking.
How to replace a flywheel
Replacing the flywheel involves dismantling the part. This stage is performed according to the following scheme:
- We remove the gearbox.
- We dismantle the flywheel casing together with the driven and pressure disks.
- We fix the part with a screwdriver so that it does not rotate when unscrewing the bolts.
- We unscrew the six bolts that secure the flywheel (the bolts should be unscrewed in a cross pattern to make the job easier).
- Remove the flywheel and support washer. You need to remember how the flywheel is located relative to the inspection mark.
The main steps for installing a new flywheel are:
- When installing a new spare part, you should ensure that its position is similar to that in which the removed part was located.
- The assembly of all mating elements is carried out in the reverse order of disassembly. It is important to ensure that the flywheel housing is positioned correctly and adhere to the tightening torques recommended by the car manufacturer for the mounting bolts (approximately 100 N*m).
Tighten the mounting bolts on the flywheel crosswise. In addition, you should check that the part itself stands without distortion.
After the flywheel is removed, it is necessary to ensure a stable position of the crankshaft, since if it turns, this will significantly complicate the assembly. If the crankshaft turns, first set the piston of the 4th cylinder to top dead center, and install the flywheel in accordance with the mark.
We recommend
“Signs of an unbalanced wheel: we understand the types of imbalance” More details
If you follow the flywheel replacement technology, you can ensure long-term and uninterrupted operation of the unit.
Description
The flywheel is made in the form of a wheel with a diameter of up to 40 cm. Thanks to it, the kinetic energy of engine rotation occurs, which ensures smooth rotation of the crankshaft when the pistons pass dead spots. The flywheel can be conditionally classified as different systems of the power unit, since it takes part in the operation of each of them:
- As part of the crank mechanism due to participation in the torque of the crankshaft and reduction of the unevenness of its movement.
- As part of the transmission by performing the function of the clutch drive disc.
- As part of a gearbox in the form of a driven gear when transmitting torque from the starter to the crankshaft.
Flywheel design
The flywheel is cast from gray cast iron, which makes its production not too expensive. A crown is pressed onto its outer edge, which is a steel rim with a uniform pitch of teeth, which transmits the rotation of the starter when starting the engine. The design itself is designed in such a way that the middle of the part is made lightweight, and the main mass is placed near the outer edge to increase inertia. The product has 6 holes for mounting to the crankshaft using a flange and other holes for attaching the clutch basket.
Interchangeability of conventional, dual-mass and lightweight flywheels
Since a new dual-mass flywheel is very expensive, for most owners of cars equipped with these modifications, the issue of interchangeability of this clutch unit and the internal combustion engine is relevant. The main nuances are:
Rice. 19 Replacing a conventional flywheel with a lightweight one
Thus, the classic all-metal flywheel is more suitable for gasoline cars, has a simple design, and has a long service life. A lightweight flywheel is used for tuning internal combustion engines by a limited number of drivers; dual-mass modifications are installed by default on diesel cars at the factory.
Types of flywheels
According to the type of design, flywheels are divided into the following types:
Solid
The most common type, which has a simple design and is found in most modern car engines. It is a heavy cast-iron disk, up to 40 cm in diameter, on the surface of which a crown with teeth is mounted to engage the starter at the moment it begins to rotate. On the engine side, the flywheel is connected to the crankshaft by a flange using a hub, and the other side acts as a clutch disc.
Damper or dual mass
It consists of a pair of disks connected using a special spring-damper device. With this arrangement, the flywheel is capable of solving the following problems:
- Taking on excess vibrations of the crankshaft;
- Protection of the transmission from overload and unnecessary rotational movement;
- Reducing possible wear of synchronizing elements;
- Ensuring easy and smooth switching of speeds;
- Ensuring savings in fuel consumption.
Tooth - crown - flywheel
As a result of wear, the teeth of the flywheel rims should not have a length of less than 15 mm in the ZIS-120 and 7 mm in the GAZ-51. If the length of the teeth is less than 18 mm, it is allowed to repress the crown with the reverse side. Before pressing, the ring gear is heated to 400 C and pressed onto the flywheel, ensuring tension in the range of 0 30 - 0 97 mm in ZIS-120 and 0 39 - 0 64 mm. Nicks, burrs and breaks of no more than two teeth (not located nearby) are cleaned with a personal file.
| Starter drive and freewheel. |
Installation and replacement
The flywheel is removed for replacement in case of damage, wear, or repair. If replacement is necessary, purchase a product manufactured by the company that manufactured the engine, but there are analogs from third-party manufacturers that are similar in characteristics to the original, which are usually used when tuning the power unit. Required for use when removing the gearbox and clutch. Dismantling is carried out in the following order:
- Removing the gearbox and clutch.
- Marking in any way the location of the crankshaft and flywheel relative to each other for subsequent ease of assembly.
- Unscrewing the flywheel mounting bolts, holding it from turning with a screwdriver.
Installation of the product is carried out in the reverse order of dismantling. During assembly, the bolt threads are lubricated with an anaerobic fixative after degreasing it and the threaded holes. Tightening is done crosswise with a force of 35 N*m and further turning at an angle of 30-45 degrees. During assembly, the bolts are always replaced with new ones. The flywheel is installed in only one position relative to the crankshaft, but it is impossible to mount it incorrectly, since one of the six mounting bolts is located asymmetrically.
The flywheel is replaced with a similar one. Sometimes car owners change the flywheel to a lightweight model, guided by the desire to obtain higher dynamic characteristics. The decision will be justified if the engine idle speed approaches 1700 rpm. and higher. When installed on a standard engine with 800 rpm, it will stall and run unstably.
Why you may need to replace the flywheel
As a result of aggressive driving, driving with the clutch engaged, and abrupt starts from a standstill, accelerated wear of the flywheel teeth and its adjacent surface occurs. Such defects lead to vibration, slipping or noise during engine operation. Flywheel malfunctions not only create discomfort for the driver, but can also cause an emergency. How to avoid such troubles?
The appearance of extraneous noise while the engine is running may indicate the need to replace the flywheel. In addition, such work may be required:
- with high mileage of the car;
- if clutch parts have been changed frequently;
- due to natural wear and tear of the flywheel.
Signs of a flywheel malfunction may appear when starting or stopping the engine. If they appear, you should contact specialists for diagnostics and subsequent replacement of the part.
Let's take a closer look at the operational issues that lead to the need to replace the flywheel.
All possible malfunctions of this part can be divided into several types.
1. First defect: wear and/or damage to the ring gear of the element
Causes of malfunction:
- wear or malfunction of the starter and its parts;
- incorrect installation of the starter in the flywheel housing;
- foreign particles have entered the flywheel housing;
- violation of assembly technology;
- worn ring gear.
Debugg:
- replacing the ring gear;
- correct installation of the starter in the flywheel housing;
- diagnostics and repair of the starter (if necessary).
2. Second defect: flywheel runout
Causes of malfunction:
- worn or faulty clutch;
- clutch slip;
- natural wear and tear of parts;
- incorrect assembly of the unit.
Debugg:
- diagnostics of the unit for runout;
- with minimal runout, it is necessary to turn the flywheel on a lathe;
- if the runout is strong, the flywheel needs to be replaced;
- diagnostics of clutch operation with subsequent repair or replacement of this unit;
- diagnostics of the clutch release drive with subsequent repair (if necessary);
- tightening the mounting bolts taking into account the required tightening torque (approximately 100 N*m).
The permissible flywheel runout values can be found in the automaker's reference books and technical documentation. It is important to understand what can happen if the permissible runout parameters are exceeded.
Strong runout of the flywheel can lead to destruction of the working surface, which is associated with the driven clutch disc. Symptoms of this malfunction appear while the engine is running. To eliminate runout, you need to ensure the correct tightening torque of the mounting bolts.
3. Defect three: violation of the functionality of the working surface under the clutch driven disc
Reasons for the malfunction:
- worn or faulty clutch;
- clutch slip;
- long engine mileage;
- incorrect assembly of the unit.
Trouble-shooting:
- flywheel replacement;
- clutch diagnostics followed by repair or replacement (if necessary);
- diagnostics followed by repair of the clutch release drive.
Important: operation of the flywheel on a car with a faulty clutch leads to the appearance of cracks and other defects on its working surface.
Flywheel malfunctions can be identified by carrying out diagnostics at a car service center.
We recommend
“Winter tires for a crossover: studs versus Velcro” More details
4. Defect four: damage to the seat under the crankshaft flange
Causes of malfunction:
- wear of the part as a result of high mileage of the engine;
- incorrect assembly of the unit.
Debugg:
- flywheel replacement;
- diagnostics followed by repair or replacement of the crankshaft;
- reinstallation of the crankshaft into the flywheel housing;
- compliance with technological requirements when assembling the unit;
- tightening the flywheel mounting bolts in compliance with the tightening torque requirements.
Correct torque when tightening fasteners is an important condition for repairs.
5. Fifth defect: malfunction and wear of the threads of the holes intended for mounting bolts
Causes of malfunction:
- incorrect assembly of the unit: the casing is positioned incorrectly or is poorly secured;
- wear of elements caused by long-term operation of the motor.
Debugg:
- flywheel replacement;
- cutting new threads (if possible);
- diagnosing the correct installation of the flywheel housing with subsequent correction of errors;
- flywheel balancing.
Important: Whenever replacing a flywheel, the crankshaft assembly with disk and flywheel must be balanced. Only after such a procedure can the car be operated.
Balancing ensures the correct operation of all mating parts. In addition, you should check that the flywheel housing is installed correctly and securely.
Possible faults
When the flywheel operates, the following malfunctions may occur:
1. Damage or wear of the rim teeth. It can be eliminated by replacing the product, or, if you have the appropriate equipment, by removing the old rim and pressing in a new one.
2. The appearance of scoring and scratches on the contact surface of the clutch driven disc. It can be eliminated by grinding the product using special equipment, and the thickness of the removed metal should not exceed 0.3 mm. If such equipment is not available, the part is replaced.
3. Breakage of the damper spring of the dual-mass flywheel. Eliminated by replacing the entire product.
Flywheel repair
The main malfunctions of the flywheel logically follow from its design:
Rice. 14 Development of teeth
Rice. 15 Damper spring failure
But during the destruction of the springs or bearings of the damper flywheel, parts of the parts can damage the starter and clutch parts, which will sharply increase the cost of repairing the machine.
Causes of malfunction
In addition to an aggressive driving style (fast acceleration/sharp braking), the causes of flywheel malfunction are:
These reasons can greatly increase the amplitude of non-systemic oscillations in a diesel engine. System vibrations are taken into account by the manufacturer; to compensate for them, technical solutions are used in the design of the internal combustion engine itself.
Diagnostics
Since the flywheel rotates on the internal combustion engine shaft, it is very difficult to diagnose its malfunctions. For example, even for a visual inspection you will have to remove the cover and partially disassemble the clutch assembly. Extraneous sounds (crackling) are very similar to starter malfunctions, since the Bendix teeth engage with the flywheel crown.
Thus, during an external inspection after disassembly, it is possible to identify gear defects and burrs on the clutch disc side (when grinding, a maximum of 0.3 mm can be removed).
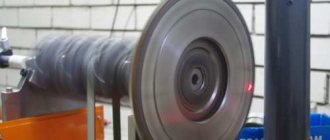
Replacing the crown
Since the rim teeth are made by milling on high-precision machines, it is impossible in principle to weld and grind them to ensure the factory configuration. Therefore, the crown is replaced by cutting off the angle grinder with abrasive equipment, pressing a new consumable element instead onto the cast iron body.
Rice. 16 Replacing the crown according to the mark
The main nuances of the repair are:
Rice. 17 Crankshaft position sensor
Service station specialists have a drawing of the motor, do not make mistakes, and work on professional equipment. At home, it is difficult to dismantle the rim without damaging the body and put a new crown on it.
Damper flywheel repair
Without exception, all manufacturers of dual-mass flywheels recommend replacing this complex design unit entirely after a car with a manual transmission has driven 150 thousand kilometers. However, some service shops have the equipment and highly qualified personnel to repair this unit.
The main problems are:
Rice. 18 Repair of dual-mass flywheel
The repair is cheaper than replacing the flywheel with a new damper part, but not by much.
Do-it-yourself partial repairs
All flywheels, regardless of design, have a crown in the form of teeth, which is involved in transmitting force from the starter when starting the engine. It is made of steel and is structurally pressed onto the body of a cast iron flywheel. If the teeth wear out or cracks appear, the crown must be replaced. This operation is justified by the fact that the price of a new product is 5-6 times higher than the cost of the crown. The process of self-replacement is quite complex and consists of the following steps:
1. The removed flywheel is placed on a reliable base, and uniform blows are applied along the entire perimeter. In most cases, the crown moves and falls off. If this cannot be done with a chisel, the part is preheated.
2. Heating the flywheel crown to increase its diameter due to thermal expansion. To do this, the part is placed for 25-30 minutes in an oven with a temperature of about 250 o C, or if it is not available, 3-4 supports are prepared, a crown is placed on them, a rag soaked in solarium is hung along the diameter and set on fire. When heating, it is unacceptable to heat the crown red-hot, and it is also undesirable to expose it to direct fire from a fire or gas stove.
3. After warming up, quickly, but without fuss, transfer the part to the flywheel, on which it should immediately sit. If necessary, alignment accuracy is achieved by using a hammer.
4. After complete cooling, the repaired flywheel is ready for installation on the engine.
If the front part of the ring is worn by the starter teeth and there is no other damage, there is no need to replace the entire ring. It is enough to turn it over to the other side.
Replacing the flywheel crown
will be carried out in case of wear and tear, usually during engine repairs or in emergency conditions. The flywheel crown serves to rotate the crankshaft during starter operation.
When the starter is turned on, its drive gear engages with the teeth of the flywheel ring, rigidly mounted on the crankshaft and sets it in motion.
The teeth on the starter drive are beveled to fit easily between the flywheel ring teeth. When the bevel of the tooth on the starter gear is clogged, the gear cannot get into the teeth of the flywheel and, while rotating, begins to cause nicks on the crown and there comes a moment when the teeth cannot engage at all, since the teeth on the flywheel crown have reached their maximum wear.
This is easy to verify if you remove the starter and look at the flywheel crown, where you can see worn teeth when turning. On some models (VAZ -2108 and their modifications), wear can be seen through the window used for setting marks.
Repair
Like any other mechanism, the flywheel becomes unusable over time. Types of possible malfunctions of the element include wear of the teeth of the steel outer edge, the occurrence of cuts on the surface that is located close to the clutch disc, spring breakage, etc.
If the teeth of a steel rim wear out (grind down), then repair is reduced to replacing the product, although restoration is possible with professional equipment. You can also knock out the rim (more details below). The old rim is simply renewed and replaced with a new one.
If cuts and burrs appear on the flywheel, it is recommended to use the method of grinding the product. Professional equipment is also intended for these purposes, a machine that is capable of removing the thinnest layer of metal (up to 0.3 mm). If there is no equipment, the product is replaced with a new one.
Finally, a breakdown of the spring on a dual-mass flywheel necessarily leads to the replacement of the entire product.
As the flywheel continues to operate, it may also require partial repairs.
How to press out and replace a steel rim without professional equipment
A steel crown is present on all flywheels, regardless of type. The teeth of the rim are involved, as mentioned above, in important processes of transmission of rotation.
So, the steel rim is pressed onto the cast iron element of the flywheel. When the teeth wear out or cracks occur, the rim is replaced. This operation is justified by the fact that the cost of a new flywheel is several times higher than the price of a new steel ring with teeth.
The algorithm for performing the operation to replace the rim looks like this:
Advice. Masters recommend warming up the product a little before doing this. This will make the task of removing the steel crown somewhat easier.
In order to easily install a new steel ring on the flywheel, you will need to expand it in diameter. And how to do it? Take advantage of the physical properties of metals, or in other words, heat the rim in an oven.
In both cases, it is not recommended to heat the metal to redness.
After heating, the rim must be quickly transferred to the flywheel and inserted. To achieve accurate alignment, it is recommended to use a hammer.
Attention. The flywheel is put in place only after the steel rim has completely cooled.
It will also be interesting to know that in some cases the ring gear is damaged by the starter teeth. In this case, only the front part of the rim will be damaged, and in this case there is no need to completely change it. It will be enough just to turn the steel rim over to the other side.
Dual-mass flywheel repair
If low-power automobile internal combustion engines can be equipped with a solid conventional flywheel, then modern engines must have a dual-mass flywheel. This product is less susceptible to breakage of crown teeth and other wear. Just look at the reviews about such flywheels posted on auto forums.
The versatility of the dual-mass flywheel lies in its design. It consists of 2 discs: one is placed on the crankshaft, the other on the clutch mechanism. The discs are capable of rotating independently of each other, and to eliminate friction, a RADU bearing and an entire system with damping springs are used.
However, whatever one may say, the dual-mass flywheel is also susceptible to breakdowns. It is the springs of the damping system that are most often destroyed. This occurs due to excessive loads, impacts, etc. Bearings can also fail, although this is less common.
In general, increased loads lead to other consequences. The lubricant dries out faster and its original properties are lost. As a result of this, the metal elements of the entire system are destroyed - bearings, springs, etc.
Attention. One of the common causes of wear of a dual-mass element is considered to be incorrect driving style. When a car often moves at low speed, this is very critical for a dual-mass flywheel. Torsional vibrations increase several times, the load on the springs increases, etc.
Components of improper driving also include an incorrect start, an excessively sharp lowering of the transmission clutch, or simply an aggressive manner of cornering and overtaking.
How to check a flywheel of this type for malfunctions? First of all, an experienced motorist recommends paying attention to sounds and extraneous noises.
So, if at low engine speeds you hear strange engine sounds, then this is most likely evidence of flywheel wear. The noise always increases in idle mode, when cold, when starting the engine, etc.
Diagnostics is carried out as follows:
Attention. When turning the flywheel, you should also feel some force. It is caused by the work of the springs, and this is normal. If the element rotates too freely in any direction or jams, the flywheel needs to be replaced.
Adjusting an improved flywheel can be done by yourself, but you should be able to find separately sold flywheel parts in stores, including various small parts. In some cases, it is possible to transfer small parts from an old dual-mass flywheel, where another part is damaged, but the remaining parts are normal.
Another difficulty in self-repairing a dual-mass flywheel is the need for careful balancing of the flywheel. And this is done only on professional equipment.
So, in order to repair such a flywheel, it must be removed from the car. The bolts with which it was fixed to the motor and clutch must be replaced with new ones; they will no longer be reused (this cannot be done).
The prefabricated parts of a dual-mass flywheel are connected to each other, usually using rivets.
Here's how to repair such a product:
Attention. An unsuccessful level of repair will be indicated by increased vibrations and jerking of the car engine during planting and at start-up.
Of course, it will be easier to replace the flywheel than to repair it. This refers to the installation of a conventional solid flywheel. Yes, some indicators will worsen. For example, starting from a standstill will be somewhat worse, vibrations will increase, especially when the internal combustion engine is operating at low speeds.
Repairing the flywheel, rather than replacing it, is a necessary measure caused by the high cost of the part, the prohibitive price of original car parts, etc. As a rule, the cost of replacing some models can reach 20-50 thousand rubles.
I would like to warn motorists against installing lightweight flywheels. The fact is that motors equipped with these components are characterized by unbalanced operation. The engine stalls easily and starts poorly.
Source
Replacing the flywheel crown of a VAZ 2109 with your own hands
- I decided to cheat a little and remove the transmission in a more convenient and simpler way - without draining the oil or disconnecting the drives. To do this, you need to completely remove both trailing arms, which are more often called “sabers”.
- Next, remove the starter and disconnect the rocker, both gearbox supports and the reverse sensor ground wires.
- When the levers are removed, the transverse movement of the struts is sufficient to disconnect the box from.
- Place the removed gearbox on the floor, you should now have full access to the flywheel and clutch.
- To unscrew the flywheel bolts, you need to secure the flywheel itself well. There is a special clamp for this; if you don’t have one, you can make something similar. I made a homemade analogue for myself from a guide, which was taken from a server rack, with holes made in it. Afterwards, the guide was screwed to the flywheel using the basket mounting bolts. Use this improvised device to hold the flywheel from turning.
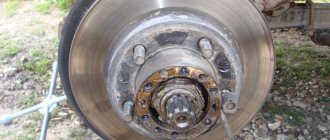
- Before removing the flywheel, be sure to mark the relative positions of the flywheel and crankshaft.
- Knock down the old crown using a drift and hammer.
- Replacing the flywheel crown of a VAZ 2109 is carried out as follows. Take a new flywheel crown and heat it up. I personally used paper for this, wrapped it around the flywheel and set it on fire.
- After it has warmed up sufficiently, carefully place the crown on the flywheel, with the inner chamfer facing the flywheel. Tap it lightly to seat it in place. Everything takes no more than 20 minutes.
- Assembly is no different from disassembly, the only thing is that it is done in the reverse order. The flywheel bolts should be tightened to a torque of 62 - 89 N*m. The basket bolts are tightened with a torque of 19 - 31 N*m. To avoid distortion, the bolts are tightened in a staggered manner.
- To center the driven disk, use a 1/4 extension, with a layer of electrical tape wound up to a diameter of 15 mm and 20 mm.
- The stabilizer and wishbone mounting bolts are tightened after the machine is lowered to the ground, that is, under load.
Symptoms and causes of malfunction
Due to difficult access to the flywheel, visual inspection of this gear of the gearbox is difficult, so car owners remember about it with the following symptoms:
- problems starting the engine;
- jerking, grinding and extraneous sounds when the bendix engages the flywheel.
The reasons why teeth wear out are:
- defects in the manufacture of the flywheel - overheating of the toothed rim during landing leads to tempering of the steel, a decrease in strength, and an increase in the ductility of the structural material;
- non-parallelism of the axes - the gear ratio is very high, any deviation of the axis of the starter shaft from the axis of the crankshaft will lead to the development of a tooth involute on one side;
- violation of the tooth profile - over time, the transmission elements wear out, at the moment of gear engagement/disengagement, the profile is cut off completely;
- lack of lubrication - due to the design features of the transmission, it is physically impossible to apply lubricant to the bendix and the flywheel crown.
In any of these cases, it is recommended to replace the flywheel crown. In some cases, bedix can grind off only part of the tooth from the outside, so it is enough to change the sides of the crown.
Attention: The flywheel assembly is not a symmetrical part; it will not be possible to turn it over due to the displacement of one mounting hole of the bolted connection, so you will have to remove the crown and turn it over to the side suitable for further operation of the gearbox.
Isn't it easier to buy a new one?
It may be simpler, but imagine the cost of this part. As a rule, if you change the whole thing, the price will be 5–6 times more expensive than buying just a crown. However, there are small problems - replacement is not an easy process and if you have never done it, you may simply install this part incorrectly, it will quickly wear off. Or you will “kill” the starter gear.
Therefore, the bottom line is that the replacement should be carried out by professionals, preferably at a service station, with a guarantee.
Why don't they pour it completely along with the teeth?
I also asked myself the same question - after all, it seems easier to just take and pour a ready-made flywheel in the form of a gear, and not “bother” with various crowns! Just? But no!
It's all about weight, strength and price - the crown, as a rule, is made of heavy and durable metals, it can be cast iron (or its alloys), some types of steel, etc. This metal is not light, and it must also withstand loads. If you make the entire “blank” from such metal, it will turn out strong, but much heavier and more expensive!
Another reason is renovation. Nowadays a worn-out crown can simply be removed and a new one put on, thereby saving a lot of effort and money. But a completely cast part cannot be repaired (if, for example, teeth are broken), only remelting and a new casting.