Putty is needed to eliminate unevenness. A base layer of putty is applied to the surface to be repaired, and when it dries, a primer is applied. Sanding is required between these two stages. At first glance, there is nothing complicated here, but any material, even the best, shrinks. If necessary, you can apply two layers of putty, drying and sanding several times. Next we look at how to dilute putty for cars, choosing the desired proportion of hardener and base material.
How to use car putty? (lots of photos and videos)
Good afternoon.
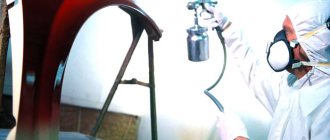
In today's article I will tell you how to use car putty, namely how to apply it correctly and rub it in correctly. Traditionally for our site, the article is supplied with a large number of photos and video materials. So, to apply putty to the car body we will need:
- Sandpaper with mark 40-80-120
- Bar depending on the size of the damage
- Silicone remover (degreaser)
- Spatulas
- Container for diluting putty (plexiglass or large spatula)
You may need:
Straightening tool such as spotter, back hammer, mallet, etc. those. the tool that will allow you to bring the body shape as close as possible to that intended by the factory.
To rub the putty you will need:
- Bar (commensurate with the size of the damage)
- Sandpaper (40-80-120-180-240-360, depends on the required surface quality, i.e. we will sand it for the next layer of putty or we will already prime it)
Attention - when rubbing the putty, do not forget about the respirator.... With a price of 30-50 rubles, it reduces the likelihood of dust getting into the lungs by 90 percent! Silicosis is a very terrible disease!
How to properly dilute and apply putty?
If you don't like to read, watch this video:
The putty should be applied to a previously sanded (80-120) and degreased surface. If you ignore these rules, the putty will fall off in a layer!
For large damage, first apply putty with fiberglass, then universal/aluminum, then soft. Small damage can be immediately masked with universal or soft putty. We have a separate article on the types of putties on our website.
Application order:
- Mix the putty in a ratio of 97 parts putty, 3 parts hardener.
- Stir thoroughly until a homogeneous mass is obtained.
- We apply with spatulas, forming the required surface as closely as possible. Avoid applying putty in layers greater than 5mm.
- If the putty begins to clump, stop applying.
- Dry for 1.5-2 hours
- We rub it sequentially with sandpaper 80-120-180-240 (under the primer to dry)
- Attention.
- If it is impossible to achieve the required shape in one application, that’s okay. The more layers of putty you apply, the less likely it is to shrink. The main thing is not to forget to matte the surface and degrease it.
Typical mistakes when applying and processing putty.
Very little hardener.
In this case, the putty will take a long time to dry, and when processed with sandpaper, the dried putty will roll off. Also, with a high degree of probability, the putty will shrink (the putty surface will move in waves).
A lot of hardener.
In this case, the putty will harden “in the moment,” i.e. during normal hardening, if the application of the putty has not yet been completed, the master notices that the putty is rolling off, but if you hurry, you can “finish it” as this process takes 2-5 minutes. If there is a lot of hardener, this process takes 20-30 seconds and it is impossible to finish anything. But this is not the main problem...
A few months after painting, the hardener will come out as a change in paint color! While it's not that noticeable on dark colors, it's a disaster on light colors!
Temperature too high.
The putty can be dried at temperatures up to 60 degrees. This gives both quick drying time and instant shrinkage, but if you overheat, the putty will soften and fall off! Nothing terrible will happen - just translation of the material.
Temperature too low.
The putty can be applied at temperatures above 10 degrees. At low temperatures, the putty will shrink more, and polymerization may not complete; as a result, during subsequent sanding, the putty will clog the sandpaper.
Wet sanding.
The putty is very hygroscopic; if you rub the putty “wet”, it will absorb water and subsequently the water will worsen the adhesion of the primer and paint to the surface.
If you do everything correctly, you will be able to do something like this:
putty was applied with fiberglass
applied universal putty and rubbed
apply liquid putty
hood repair results
That's all for me today. If you have any questions about how to use car putty or if you want to add to the article, write comments.
Rules for using putties.
Attention! It is possible to apply putty directly to acidic primers, one-component acrylic and nitro primers (i.e. those sold in cans and do not require a hardener), but this is a bad idea - everything will fall off!
Preparing the surface for putty (true for all putties):
- The surface to be puttyed must be sanded dry, P80 - P120 - P180 and degreased with a remover to remove silicone;
- Degrease the steel surface, sand it dry using the P80 - P120 method and degrease again;
- Degrease the aluminum surface, matt it with a special fiber (e.g. Scotch Brite Fine, Scotch Brite Very Fine) and degrease again;
- Degrease the primer, sand it dry using the P220 - P280 method and degrease again;
- Degrease the old varnish coating, sand it dry using the P220 - P280 method and degrease again.
Mixing proportions:
Uni putty - 100 parts by weight, Hardener - 2 to 3 parts by weight. Those. 3% hardener, 97% putty.
Application time from the moment of mixing with the hardener: From 4 to 6 minutes. at 20°C.
Drying time: 20 to 30 min. at 20°C.
Drying time can be shortened by heating for 10 minutes. at a temperature not exceeding 60°C.
Terms of use.
Mix the components until a homogeneous mass is obtained, observing the mixing proportions of the hardener. For this purpose, it is recommended to use putty dispensers; with experience, this can be done by eye. The putty should be applied with spatulas, applying a layer up to 5 mm thick. Minimum application temperature +10°C.
Preparing and mixing putty
- Too little hardener (catalyst). The putty does not cure in the required time. Sanding is difficult, it gets into lumps, scratches and risks occur.
- Too much hardener (catalyst). This “putty” does not harden faster. The active hardener remains in it, which reacts with the resin and pigments of the filler and paint. The result is defects: uneven coloring, the formation of spots and obvious contours of painted areas.
Sanding and finishing putty
- You should always degrease the cleaned surface thoroughly before each layer of putty.
- Before use, mix the putty well; over time, it will settle in the jar.
- Add hardener in a certain ratio to the putty (as indicated by the manufacturer)
- Do not mix a large amount of putty at once, since when adding a hardener you have 7-10 minutes before it begins to harden, you simply will not have time to distribute it on the surface of the part. It is better to calculate the amount of work in advance and dilute the required amount.
- Don't try to display the form all at once. Divide into several approaches.
- For quality control, use “Developer Powder” or development in the form of aerosol black paint.
- If you are going to putty on metal where there were pockets of corrosion, then you need to apply “Acid Primer” to this area, then “Soil Filler”, then you can apply putty or epoxy primer, then putty. You can be sure that after such treatment, the repair will be of much higher quality and the part will last much longer.
- “Control for glare” - Apply degreaser to the part from the dispenser and you will see irregularities in the glare.
Different primer materials, their types and varieties
A primer is needed to improve the adhesion of metal and paint. An even layer of metal can be immediately covered with primer without fear of further peeling. However, in reality, both primer and putty are used. The latter comes in several types:
- Polyester;
- Epoxy;
- One-component nitro and acrylic putty.
As you can understand, two-component polyester putties are now the most popular. This material itself can be filled with fiber, aluminum chips, etc. Such compositions are called filling or basic. And you can use them if you have a “final” putty, which is used before priming.
Polyester putty filled with fiberglass
So, two types of materials were named: filling putty and final putty.
There are no fillers in the universal polyester putty. If the thickness of the resulting layer does not exceed 0.5 mm, such material is always suitable for use.
Features of using automotive putty
The process of puttying a car body is one of the most important actions when leveling a damaged surface, and the layer of putty applied will become the basis for painting the vehicle. Therefore, the service life of the new paint coating depends on whether the car body is puttied correctly.
Both the putty itself and its application have their own nuances, therefore, if you want to putty a personal car with your own hands, you need to have some knowledge, including the sequence of work, and what material is best to use.
Purpose and application
Depending on the type of repair work being carried out, it must be borne in mind that the car putty should also be different, providing the best effect when using this substance. Let's look at the types of leveling agents and what they are intended for:
- Aerosol. Available in the form of a spray, it is used for the final treatment of large parts of the car body. To remove roughness caused by grinding, the so-called liquid putty is used, which is sprayed over the coating, which ensures an even layer;
- Closing pores. An acrylic product with one main component is used. It is necessary to eliminate surface unevenness after priming. It is produced as a ready-made composition; you just need to squeeze it out of the tube and spread it evenly over the body;
- Containing aluminum impurities. A very elastic product that does not allow large shrinkage of the material. It is used for repairing plastic surfaces, as well as minor dents or scratches. This putty will help protect the vehicle from cracks;
- Having a fiberglass structure. This putty is indispensable when it is necessary to repair deep cracks, significant rusty areas, dents and large irregularities. Considered as the initial coarse layer on which the finishing fine-grained substance will be applied;
- Suitable for plastic components. This putty is very convenient when carrying out repair work, as it has excellent elasticity;
- With plasticizers included in the composition. Used when the impact on the vehicle is minor. The putty has good contact with polymers, penetrating deeply into their structure.
Important! Before starting work on puttying a car with your own hands, you should purchase not only putty, but also sandpaper, primer, varnish, paint and material that will cover undamaged parts of the car.
Proportions for correct dilution of putty for cars: do it yourself
Putty is needed to eliminate unevenness. A base layer of putty is applied to the surface to be repaired, and when it dries, a primer is applied. Sanding is required between these two stages. At first glance, there is nothing complicated here, but any material, even the best, shrinks. If necessary, you can apply two layers of putty, drying and sanding several times. Next we look at how to dilute putty for cars, choosing the desired proportion of hardener and base material.
Composition and technical characteristics
Automotive putty is used to eliminate damage and unevenness on the surface of metal and plastic parts, so it must have a viscous consistency.
All putty data must:
- Have good adhesion to the treated coating;
- Possess the ability to spread evenly with the surface;
- Sag as little as possible after hardening occurs;
- Easy to handle.
Attention! High-quality putty cannot be fragile!
Putties usually contain one of the following substances:
- Acrylic;
- A mixture containing nitrocellulose;
- Polyester resin.
Based on the presence of the main components, they are distinguished:
- One-component putty. If nitrocellulose is present in the base, then it is the final repair layer, but the drying process takes a long time. With an acrylic base, the slightest defects are removed, such as marks after sanding;
- Two-component putty. A more popular option, the main substances of which are epoxy or polyester resin. Before use, the putty is mixed with a hardener, which is present in the mixture in small quantities. Unlike polyester putties, epoxy putties take a long time to dry and are difficult to process, but coatings can be applied to them without an insulating layer.
Consumption per 1 m2
Depending on the type of putty and the material it is based on, the consumption for a specific area varies significantly. If a finishing agent is used to level out uneven surfaces of a car, the layer is small, and therefore a small amount of putty is required.
How to choose putty?
The choice of material is the most important point on which the success of the process largely depends. There are putties designed for deep and minor damage. So for deep dents the following must be purchased:
- means for deep repair of damage;
- finishing agent.
The modern car market also offers a universal option, designed for both starting and finishing work.
Depending on the composition there are:
- One-component putty materials made on the basis of:
- nitrocellulose mixtures. Such putties are characterized by optimal shrinkage, but require long drying;
- acrylic Ideal for most car enamels, designed to correct minor defects;
- polyester resins. This type is characterized by minimal shrinkage, but a prerequisite is the subsequent application of an insulating layer.
- Two-component. For their manufacture, polyester or epoxy resins are used. A hardener must be added to such a composition, otherwise the polymerization process will not take place. At the same time, epoxy products do not require the application of an insulating layer before painting.
Putty for cars
A high-quality putty should spread evenly over the surface, have good adhesion, and have minimal shrinkage after curing.
In any case, you should not skimp on putty and give preference to well-known manufacturers - a low-quality product of questionable production will not adhere well to the surface of the body or move away from it.
Therefore, in the case when the car owner does not yet know how to properly putty a car, it is better to consult with a specialist in a car shop, and also read reviews from experienced motorists.
Advantages and disadvantages
Each type of car putty has its corresponding pros and cons:
- Rough putty can be used with almost any type of finishing coating, is resistant to temperature changes, very elastic, and has good plasticity. The only disadvantage is that the drying time is quite long;
- Putty with fiberglass is easy to process during the grinding process, has great strength, and will last a significant period of time;
- Finishing agents for repairs adhere well to other types of putties, are very elastic and resistant to temperature changes. This type can quickly harden, so it is not recommended to use it when using a large amount of the prepared mixture in order to facilitate processing of the applied layer;
- Liquid materials are easy to use and can be used on damaged areas of various sizes. The advantages include the ability to process a large surface in a short time, but the disadvantage is the rather high rate of hardening of the mixture;
- The main advantage of the universal coating is the ability to carry out very quick body repairs. This mixture has a strong structure and, when used correctly, forms a fairly smooth surface.
Types of automotive putties
Based on the principle of use, putty can be divided into the following types:
- Having a general purpose. These include universal ones, with a lightweight structure, and also soft ones. The main substance is talc, or quartz microspheres with an empty body, providing lightness of the mixture and ease of stirring and application. Usually spread in a small layer over the surface of the damage, previously cleaned of rust;
- With a certain specific purpose. They, in turn, are divided into corresponding types:
- Reinforced with fiberglass. A very practical material with moisture-repellent properties, is quite plastic, and can be used even when applied in a thick layer. The fiber can be either short or long, both of which are not recommended for use on plastic parts. Do not apply to coatings exposed to temperature changes;
- With carbon fiber reinforcement. The advantages are strength and elasticity; it is better to cover the surface in several layers, since this type has significant fragility and is susceptible to cracks;
- Containing aluminum dust. You may experience difficulty mixing the mixture with the hardener. If the material has been applied correctly, water-repellent properties are formed, heat is well tolerated, therefore it is often used when repairing the hood, as well as when processing the seam after welding;
- Specially designed for application to bumpers. Very elastic and vibration-resistant, bonds well with plastic. When applied, apply in a small thickness;
- Spraying. It is used as a final layer, sprayed from a spray gun over a large area of damage. This putty should be mixed with a hardener, which is also in a liquid state, and after drying, the coating must be sanded and coated with a primer;
- Finishers. Apply at the final stage of repair. Due to the low viscosity, a thin spread over the surface is ensured, with a thickness of less than two millimeters;
- Having only one component. This is an independent mixture that does not need to be combined with a hardener. Only minor damage left after leveling can be covered up. Apply over the primer, right before the painting process.
Putty rules
To get a high-quality, smooth surface after puttying, you need to follow some rules:
- Degrease and clean the damaged area;
- Combine putty and hardener in the correct proportions, depending on the expected effect.
Important! It is not necessary to use a lot of hardener; too much will lead to cracks.
- Clean the spatula before applying putty for your car;
- If there is a large volume of work, it is better to apply several thin layers rather than one thick layer in order to avoid the entry of air and increase the density of the composition;
- There is no need to sand the product if the next layer is leveled in the interval from ¼ hour to 1;
- It is better to use a medium-sized spatula when applying, and level with a large one.
Applying automotive putty to the ground
It is recommended to apply the putty only on primer with an admixture of epoxy. This is carried out during restoration, and not during full repair of damage, when the car is cleaned to bare metal in order to protect the surface from corrosion. When quickly restoring a car's surface, the use of primer is not required.
Finishing coat of automotive putty
This putty is applied in a small thickness and is well evenly distributed over the surface. When the coating begins to harden, a sticky feeling is possible, which can be removed with a solvent, and then the damaged area is sanded.
Preparing your car for painting with your own hands
Compliance with the correct surface treatment technology before starting work is the main condition for obtaining a reliable and high-quality coating, a long-lasting effect of cosmetic repairs, and the accuracy of recreating the original lines and contours.
Before starting the puttying process, it is necessary to perform several preparatory operations on the surface of the car. Namely:
- grinding the treated area;
- elimination of dust deposits;
- degreasing metal or plastic;
- surface treatment with anti-corrosion primer.
Special paper is used for sanding metal and plastic elements. Large surfaces can be machined, while small damaged areas can be carefully sanded by hand. Emery cloth has different gradations depending on the grain size.
How to properly apply and process the material with your own hands?
Before starting work, the putty is thoroughly mixed with the hardener until the mixture becomes homogeneous and the pink streaks completely disappear.
Important! It is necessary to observe the required proportions of the mass of the base and hardener, otherwise the repair composition may crack and it will be necessary to carry out the repair again.
To apply the putty mixture you need a set of special spatulas of various shapes. To achieve a smooth surface, you need to practice techniques for quickly and accurately applying alternate layers.
If a deep dent on a bumper or threshold is being filled, it is a mistake to try to close it completely in one step by putting a lot of putty on the working part of the spatula. The best option is to apply 2-3 layers of coarse or universal putty. This will save both time and material. Since while the putty dries for 15-20 minutes, you can work on two damaged areas in parallel. It is recommended to putty in a warm room with subsequent drying of the repair area, since at sub-zero temperatures the putty does not gain all its strength properties and does not dry.
Detachment can also occur due to a violation of the temperature regime. Typically, manufacturers recommend working with this material at a temperature not lower than +50°C.
When the putty has “set”, you can begin sanding the surface using a block or a special plane.
It is advisable to conduct a development express test .
To do this, spray black paint from a can on the surface in small dots or use developing powder. After sanding, areas that require additional application of compound will be visible. If the dent has almost completely leveled out in appearance, finishing putty is applied to the surface. After it dries, take abrasive sandpaper P240 , which needs to be used to treat not only the dent itself, but also the adjacent areas. A fine-grained abrasive will help form a smooth transition that hides the location of the former defect. And the final stages of processing are degreasing and priming.
Since each spatula has its own contour, the formation of protruding strips of putty on the surface is inevitable. This is the main difficulty of the process. While the material is soft, it is difficult to eliminate stripes: this will only create unnecessary depressions. After drying, it is also difficult to clean off excess relief; it will require a lot of time and effort.
The hardener added to the mass first hardens, then crystallizes, and approximately 5 minutes after application the material acquires an elastic rubber-like structure. At this point, the protruding stripes can be easily cut off with a sharp blade or knife.
Interesting! In order not to miss this short moment, you need to test the surface with your fingers. Due to the chemical reaction, it will become hot, this will be a signal that it is time to take a knife and carefully cut off the excess.
Drying automotive putty
Drying of putty can be done both in natural conditions and with the help of infrared lamps. The heating temperature during this procedure usually varies from 60 to 80 degrees. Although in some cases the manufacturer declares a maximum value reaching 100 degrees. You must not forget about the need to dry the treated surface (after “wet” grinding).
Both manufacturers and consumers of these products are bothered by fine dust that occurs during manipulations of processing the hardened coating with sandpaper, to avoid the appearance of which, as well as to prevent clogging of the sanding tool, “wet” processing is used, which involves moistening with water. However, the presented option has a serious drawback: the porous structure of the putty swells when saturated with liquid.
When purchasing some mixtures, you should avoid wetting, because this process can increase the drying time and change the initial volume. We must not forget that if the surface is poorly dried, moisture will, after a certain time, lead to corrosion and lag in the paint composition. In this regard, before carrying out putty work, you need to refer to the instructions and find out which method of processing the material (dry or wet) is best to use in a particular case.
Tips to help you do everything right
To ensure that restoration activities are carried out efficiently and quickly, you should pay attention to a few small tips:
- It is not recommended to putty the damaged area with one layer of the mixture, since several layers reduce internal stress, and, therefore, reduce the likelihood of cracks and failures;
- When putting putty on a car, you need to hold the spatula at an angle of 30-40 degrees to the surface;
- You cannot check the quality of grinding only visually, as you may not notice poorly polished areas;
- you need to check the grinding with your palm in order to immediately identify areas that require improvement;
- putty is sanded much faster than a metal surface, so if you are careless you can remove more than you should;
To check the quality of the work done, you can use developing powder.
It is a black substance that is applied with a sponge to the surface to be treated before sanding. Sandpaper immediately cleans convex places, and where you need to add putty, the powder will remain. This way the overall picture and the places that need to be improved will be clear.
By following simple instructions and watching special videos, you can carry out the putty work yourself. And, despite the apparent complexity, everyone can carry out high-quality car repairs.
Sources
- https://prometey96.ru/lada-remont/kak-zashpaklevat-mashinu-svoimi-rukami.html
- https://life-with-cars.ru/pokraska-avtomobilya/podgotovka/vidy-avtomobilnyh-shpatlevok-i-ih-primenenie/
- https://VseoKraske.ru/pokraska-avto/shpaklevka-avtomobilnaya
- https://VsyaKraska.ru/shpatlevka/avtomobilnayaa/
- https://www.myavto.net/teoria_kuzovnogo_remonta/75-shpatlevanie-avtomobilya.html
- https://krasymavto.ru/kuzovnye-raboty/remont/kak-pravilno-shpaklevat-mashinu.html
- https://avtozhidkost.ru/avtomobilnaya-shpaklyovka-kak-razvesti-skolko-sohnet/
- https://autokuz.ru/pokraska/kuzov-bamper/kak-zashpaklevat-mashinu.html
Tips and recommendations for use
The body repair process will be easier if you follow some recommendations:
- Before diluting the car putty, you need to mix the putty and hardener well;
- At elevated temperatures, it is necessary to reduce the amount of hardener by half;
- To obtain a thick mixture, you can add a polymer with fiberglass;
- The putty should be stored only in airtight containers;
- On parts with increased vibration, it is recommended to use putty with greater elasticity.
Review of popular manufacturers
Many automobile mixtures deserve the attention of consumers. The quality of such putties and the impeccable reputation of the manufacturers leaves no doubt. Let's look at a few of the most popular formulations:
How to dilute car putty? Useful tips
During various body works, you still have to ask about how to dilute car putty.
This question makes sense regardless of whether you have minor scratches on board or whether the corrosion has thoroughly affected the wings or sills - it will simply be necessary to align the cleaned and treated fragments before painting. And after cleaning up existing damage, using a rust converter and other necessary procedures, it’s time to putty. For the most part, working with it does not require any special skills, although it does take a lot of time. Therefore, most car owners cope with the task on their own - at least if the amount of work is not too large. After all, if you turn to a certified service with such a problem, you can lose quite a significant amount of money. In addition, the local craftsmen, as a rule, persuade the client to paint the entire body after carrying out anti-corrosion and restoration work, and this costs a pretty penny.
How to dilute car putty, in theory, should be written on the product offered by the manufacturer. However, many car enthusiasts who are planning to straighten their car are faced with the lack of sufficiently clear instructions - both on the packaging and in the form of a separate insert.
How to dilute correctly, in what proportion to stir and cook
You can prepare the putty mixture either on a small piece of organic glass or on a special tool. But, despite this, many craftsmen prefer to use only two spatulas of different sizes. They should be cleaned immediately after work, before the remaining material has completely hardened.
If this happens, it will be quite difficult to remove them later. And this is important so that even the smallest irregularities are not left on the tools, as this may affect the quality of further work with their help. Additionally, they can be cleaned using a special solvent.
Storing putty involves settling of solid particles from its composition and the formation of a film of resin on the surface. As a result, before using this material, it is worth stirring it very thoroughly, thereby obtaining a homogeneous mass with which you can further work.
In addition, in this case, the correct mixing ratio can be achieved, since the filler will not participate in the reaction. To remove the putty from the container in which it is located, you need to use only clean tools.
Residues on them may react adversely with the material. This can affect its quality.
The putty should be applied to the surface using a spatula. They can be made from thin steel or ordinary stainless steel.
There are also products made of rubber or plastic. They can also be quite convenient in some cases. If you need to finish fairly large surfaces, you can also use a construction spatula for finishing work. In this place about a spatula for puttying walls. A ruler can also be useful to control the shape of the sanded surface.
Polyester putty is a material consisting of two components. They must be mixed immediately before work.
Here about latex. In this case, the resin with a hardener, which acts as a catalyst, can properly level the surface.
In this case, you should definitely follow the proportions established by the product manufacturers. The putty should only be applied in a thin layer. A layer that is too rough will not allow you to obtain a high-quality coating.
After preparation, you need to work with the putty in a fairly quick time - from 5 to 10 minutes. That is why the layer should be applied in a short time and very precisely.
It is because of this that there is no need to mix components in larger quantities than required.
It is worth highlighting two features of this process:
It is in connection with the above-mentioned features of diluting putty that it is necessary to adhere to the instructions for use and the manufacturer’s recommendations.
For more information on how to properly dilute putty, watch the video:
Proportions
A mysterious tube must be included with a jar of car putty. The inscription on it may be different: some manufacturers claim that it is a hardener, others call the substance a catalyst, and others call it an activator. However, it's not the name that matters. Without this additive, the putty will not harden, or it will dry out until the second coming. But how much should be added?
In principle, if you have a wide range of work to do, and all the purchased putty will be used, then you don’t have to think too much and pour the tube into the bucket with the base. However, much more often a relatively small amount of putty is required - to correct the sills or to smooth out a fender dented by a neighbor in the parking lot.
If you dilute the entire jar, then you will have to throw away the unused material - after combining with the hardener, the putty begins to set even in a closed bucket, even if it takes quite some time.
When you need a little putty, but there is no indication on the can, take as a basis the ratio of activator to base as 1:100 - this is what most brands mean. But there are manufacturers whose putties require an even smaller amount of hardener (1 to 200, for example). Therefore, in the absence of precise instructions on the can, it is better to look for what is written about this on the manufacturer’s official websites.
It should be remembered that experienced repairers advise taking into account the temperature around the car being restored. If, to put it mildly, it is not hot (say, + 10 or below), then it is worth adding more hardener.
Proportional ratio of putty and hardener - how to dilute and use
Any automotive putty mixture, no matter what it is, comes complete with a small tube of the substance. Here's how long it takes for car putty to dry. It is a material hardener, also called a catalyst or activator. Terminology directly depends on the manufacturer.
The main thing is to use this substance, diluting it with the putty itself, since without it the material will not acquire its properties. The main problem with this process is the question of how to properly dilute automotive putty.
Mostly one tube of hardener is designed for the entire can of putty. But it is not always worth using such an amount of material. First of all, this applies to cases where the car only has a small dent or a bent threshold.
Leaving the prepared putty mixture, which could not be used, for later will not work. This is due to the fact that this material, when mixing the components, immediately begins to set and harden.
If you need to use only a small amount of putty, it is best to take as a basis a proportional ratio of 100: 1. Here we talk about how long it dries. The vast majority of manufacturers use it. But in some cases, the instructions may indicate an even smaller amount, proportional to 200: 1.
General rules
One of the most common mistakes when preparing putty is combining two masses at once, completely, and carelessly kneading them. As a result, the putty turns out to be non-uniform, lays down unevenly and hardens at different speeds. To achieve the desired result, that is, a smooth surface that is easy to grind, without breaking off pieces in the process, the hardener should be introduced gradually, in small doses, carefully mixing the base each time.
It is easy to determine whether mixing is sufficient: the activator is specially made pink. As long as there are streaks in the mass, work with the spatula does not stop.
For ease of mixing and speeding up the process, people recommend using two spatulas - a large one and a smaller one. But whether to take this advice is up to you.
It happens that, even knowing how to dilute putty for cars, or having carefully read the instructions (if, surprisingly, they are included in the kit), the repairman receives a smooth, even, but runny mass that does not want to harden. The situation can be saved by drying the problem area with a hair dryer. And for the next fragment of the body, add a little more hardener to the putty.
Application of polyester
Understanding how to dilute putty for auto proportions is also worth knowing how to work with the created material. Without this, it is impossible to achieve the desired result.
Before you begin work on eliminating a flaw on the surface of a vehicle, it is necessary to degrease the surface, as well as grind it.
The thickness of the putty should not be allowed to exceed the limits of 450-500 microns. The thinner it is, the less work will be required later related to grinding.
The material can be applied to primer with an epoxy resin base. Sanding bare metal can be done using P80 abrasive. If you need to repair old paintwork, then it is best to use abrasive from P180 to P240 as a final sanding.
This can significantly improve the quality of the connection between the putty and the damaged surface itself. Under no circumstances, according to the experts, should you apply the putty mixture to acidic soil. You should not try to eliminate all the irregularities in one approach.
Apply the material only with a clean spatula. The work should be completed at the moment when the putty is noticed “dropping” on the surface. After a certain period of time they will take on a solid appearance. For a good result, this procedure must be carried out several times, alternating it with grinding.