Replacing the distributor (ignition distributor) on a VAZ 2108-VAZ 21099
Direct replacement
Removal
1) First, de-energize the engine system by disconnecting the negative terminal from the battery. (Instructions and procedures are described in the article: “Replacing the battery” in the first paragraph).
2) Next, disconnect the high voltage wires from the distributor cover.
3) Remove the vacuum hose from the vacuum regulator fitting.
4) Then completely unscrew the top nut securing the distributor and wire holder.
5) Remove the holder from the car engine.
6) Use your hands or a screwdriver to disconnect the wire block from the distributor.
7) Now unscrew the two remaining nuts that secure the distributor at the bottom: use a wrench to unscrew the left nut of the distributor.
Then unscrew the right nut.
 Remove the distributor directly from the engine of the car.
Installation: 1) First, remove the two screws from the cover and remove it.
2) Then turn the slider with strictly outer contact opposite the “first cylinder” terminal located on the cover.
3) Install the distributor in the reverse order of removal.
4) Place the negative terminal on the battery and set the initial ignition timing. (We recommend that you familiarize yourself with the process in the article: “Installing the ignition”).
Changing the cover
1) First, disconnect all high-voltage wires from the cover.
2) Then use a Phillips screwdriver to remove the screws holding the plastic cover to the distributor.
3) Remove the cover and replace it with a new one.
Note! The cover on the distributor is installed in only one position. And the high voltage wires are put on the cover in the order: 1-3-4-2. There is a marking “1” on the distributor cover itself, start counting from there in order, counterclockwise.
Replacing the slider:
1) First, remove the cover according to the instructions described above.
2) Next, remove the slider from the shaft by pulling it with your hand.
Note! The slider is installed in its place only in one position, when the slot on the shaft is directed in the opposite direction from the contact!
Additional materials Below is a link to a video with information on today's topic:
How to remove and install the distributor on a VAZ 2109
- 1. Disconnect the wire from the negative terminal of the battery;
- 2. Completely disconnect all high-voltage wires;
- 3. Disconnect the throttle valve drive cable;
- 4. Unscrew all nuts. This is necessary in order to remove the device from the bracket that secures the wires;
- 5. To maintain the initial ignition timing, make marks on the distributor body and the drive of auxiliary elements;
- 6. Pull the wires out of the ignition distributor. To do this, use a screwdriver to bend the clamps;
- 7. Remove the rubber plug located in the crankcase hatch;
- 8. Start cranking the crankshaft until the piston of the first cylinder is located at TDC;
- 9. After unscrewing the remaining nuts, remove the distributor;
- 10. Installation and replacement of equipment on a vase is carried out in the opposite order.
Remember the marks and checking the initial ignition timing.
Removal and installation of VAZ 2109 distributor
It is important that before you begin removing the distributor, you need to remember the position of the distributor relative to the body. You can even apply marks so that during installation you can put the VAZ 2109 distributor in the same position.
Now we disconnect the high-voltage wires from the distributor cap, there are 4 of them, as well as one central one from the ignition coil.
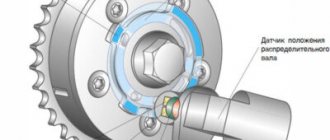
In the picture below we see which plug with wires also needs to be disconnected.
Then remove the distributor corrector hose.
We begin to unscrew the fastening of the VAZ 2109 distributor itself. There are three of them.
It is most convenient to unscrew with a regular key. We do not unscrew the side fastenings completely, since it is necessary to set the TDC marks.
Before removing the distributor, you need to set the piston of the first cylinder to top dead center. To do this, you need to align the marks on the housing and the flywheel through the hole in the gearbox housing. Set neutral and use a 10mm key to turn the crankshaft pulley to the desired position. It should look approximately the same as in the picture.
And only after this we remove the distributor from the studs.
A new distributor for a VAZ 2109 costs about 1,000 rubles. Before installation, you need to remove the cover by unscrewing the fastener.
When reinstalling, you need to make sure that the outer contact of the slider is opposite the output of the first cylinder on the cover.
Simply put, when the distributor has already been installed on the studs, lean the cover and see if it matches or not.
Now you can screw all the distributor fasteners into place. And you need to remember that it is necessary to maintain the original position of the distributor relative to the body in order to maintain the ignition timing.
Installation of VAZ 2109 distributor
Device and purpose
So, what device and what functions does the ignition distributor perform, what is its location and what is the order of the wires on the VAZ 2109 distributor? The VAZ 2109 distributor is one of the components of the ignition systems. Its purpose is to regulate and supply an electrical impulse to the switch of the coil itself. It also distributes the spark to the spark plugs, taking into account a certain sequence.
In domestic "nines" two types of VAZ ignition systems can be used - contact and contactless. Accordingly, two types of distributors can be used. These devices may differ from each other only in design, but not in function. In particular, we are talking about the presence of contacts and sensors. In the contact system, a breaker is used directly, and in the non-contact version, a special sensor is used. As for the main technical characteristics, they are generally identical.
Distributor device for "nine"
If we talk about the device, the VAZ 2109 uses a special distribution element equipped with a Hall sensor. This unit itself is designed for four sparks, it also has built-in centrifugal and vacuum advance controllers.
In accordance with the diagram below, the main components of the design are as follows:
- Sealing ring. Thanks to it, the tightness of the structure as a whole is ensured.
- Device coupling.
- Washers for adjustment.
- A roller with a centrifugal device installed on it.
- Base plate.
- A disk, the so-called screen, designed to protect the structure from dust.
- Runner. In practice, the distributor slider is a fairly reliable element, but it can also fail.
- Directly Hall sensor.
- Lock washer.
- Thrust washer.
- The body itself, inside which the structure is located.
- Vacuum corrector.
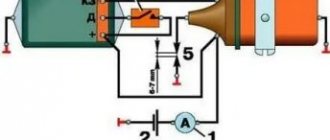
Device connection diagram
Typical faults
First, let's look at the symptoms that indicate a faulty distributor:
- the vehicle begins to jerk for no reason while driving;
- the engine stopped starting normally;
- when you press the gas pedal and increase the speed, detonation begins - the knocking of the so-called fingers;
- the dynamics of the car have deteriorated significantly - it takes much longer to gain speed;
- Gasoline consumption increases.
Repair of the VAZ distributor is carried out in case of such breakdowns:
- The device slider is burnt out;
- the reason is the distributor cover, on which the contacts have burned out;
- the Hall sensor has broken or its bearing element has become loose, and the bearing could jam;
- cracks or other mechanical damage may appear on the cover;
- there is no contact of the Hall sensor connector;
- engine fluid gets into the device, in this case it is necessary to replace the distributor oil seal.
Do-it-yourself distributor repair
Before you repair a faulty distributor, you will need a VAZ distributor repair kit. You can find it at any auto store. The dismantling and installation procedure is described below (the author of the video is Dmitry Slesarenko).
Removal and installation
If the distributor fails, it can either be repaired or replaced with a new one. Here everything depends on the specific breakdown.
The sequence of removal and installation steps is as follows:
- First you need to de-energize the car's electrical circuit; to do this, disconnect the battery.
- After this, you need to disconnect the wires from the distribution unit. Having done this, also disconnect the vacuum pipe that goes to the corrector.
- Next you need to find the cable holder that goes to the throttle actuator. This cable must be removed.
- Dismantle the bracket that secures the wires, along with them and the studs. To do this you will need to unscrew the nut. Be careful - there is a washer under the nut, you cannot lose it.
- Having done this, you need to install marks on the housing of the distribution unit and the drive of the auxiliary elements. If you do not put the marks, then after further installation of the mechanism in place you will have to set and adjust the ignition again.
- On the distributor body you can see the connector to which the harness with high-voltage wires is connected. You need to press out the fastening, use a screwdriver for this, and remove the wires. Then remove the rubber plug, which is located in the clutch housing itself.
- Rotate the crankshaft with your own hands until the piston of cylinder 1 reaches TDC. The mark on the flywheel in the hole must coincide with the middle mark located on the housing scale.
- After this, you can unscrew the nuts that secure the distributor and dismantle it.
- As for further installation, it is carried out in the reverse order. When installing the device in place, you must make sure that the distributor shaft is turned so that the outer contact of the runner is located against the terminal that corresponds to 1 cylinder of the internal combustion engine. The terminal itself is located on the cover.
- When installing, combine the risks as we reported above. If you have difficulty installing the ignition, use this article.
Sorry, there are no surveys available at this time.
Signs of incorrect ignition settings
Signs that ignition adjustment is necessary on a carburetor VAZ-2109 may vary. The first symptom of a broken ignition angle is a decrease in car power. This often happens when the carburetor is clogged and the required amount of fuel does not enter the combustion chamber.
The second sign by which you can suspect that the ignition is not working properly is that the gas pedal goes to the floor when you press it.
The third is unstable operation of the car at idle. This often occurs due to clogged jets or incorrect mixture supplied by the carburetor.
The fourth sign is increased fuel consumption. It’s time to highlight it as the main symptom of a malfunctioning ignition system. Naturally, it can also occur during other malfunctions, but, as practice shows, a broken distributor angle causes high fuel consumption.
The fifth sign is problematic engine starting. When faced with such a problem, you should not blame the carburetor, it has nothing to do with it, the cause must be sought in the ignition system.
To avoid false signs, it is necessary to adjust the carburetor before looking for faults in the ignition system.
Replacement of distributor and its parts on VAZ 2108, VAZ 2109, VAZ 21099
Distributor location: Located next to the battery, at the end of the cylinder head cover. See the photo below for more details: When to change the distributor? It fails quite rarely; most often the distributor parts, such as the slider, distributor cover and others, must be replaced. Below is a list of malfunctions that occur in the engine when the distributor or its components fail:
- the car starts to jerk;
- the car simply won’t start;
- loss of power from the car engine, the car drives worse;
- increase in vehicle fuel consumption.
The principle of operation of a four-stroke power plant
You can understand why it is important to connect high-voltage wires correctly if you study the principle of operation of the power plant. The carburetor or injector of the VAZ-2109 operates on approximately the same principle, since both power plants are four-stroke.
- First, the cylinder volume is filled with the fuel mixture and exhaust gases. This process is called "inlet".
- The engine then goes into compression. With it, the valves are closed, and the crankshaft and connecting rod move the piston upward. The mixture of fuel and air is transferred to the combustion chamber.
- During the expansion stage, the ignition is switched on and a spark appears. It ignites the fuel mixture, resulting in the formation of gases. They put pressure on the piston, causing it to move down. This force is transmitted through the connecting rod to the crankshaft.
- The process is completed by the “release” of exhaust gases through the exhaust system.
In order for the engine to operate smoothly and without jerking, the processes must take place in a certain order. This, first of all, concerns the order in which the cylinders are put into operation.
Setting the angle of the closed state of the breaker contacts
The angle of the closed state of the breaker contacts (UZSK) is, in fact, the gap between the contacts of the breaker. Due to constant loads, it gets knocked down over time, which leads to disruption of the spark formation process. The UZSK adjustment algorithm is as follows:
- Disconnect the high-voltage wires from the distributor cover.
- Unfasten the two latches securing the cover. Remove the cover.
After setting up the UZSK, the ignition timing is always off, so it should be set before assembling the distributor.
Video: setting the gap between the breaker contacts
Replacing the distributor with your own hands
Before you begin to remove the distributor (ignition distributor) on the VAZ 2109-2108, you must disconnect the negative terminal from the battery. This procedure is not as difficult to perform on your own as it might seem, but there are very important points that are worth paying attention to. This will be discussed in detail during the description of the procedure. To perform this repair you will need the following tools:
- 10 open-end wrench or socket wrench
- Socket head and ratchet handle
- Phillips blade screwdriver
Features of installing a distributor on the engine of VAZ 2108, 2109, 21099 cars
Let's consider the features of installing a previously removed or new distributor (ignition distributor) on the engine of VAZ 2108, 2109, 21099 cars. We will carry out the installation taking into account the fact that the position of the distributor on the engine, before removal, was not remembered or noted in any way. Therefore, it is necessary to install the distributor so that the ignition timing is as close as possible to the required one, so that you can then start the engine.
Features of installing distributor VAZ 2108, 2109, 21099
— Set the pistons of the first and fourth cylinders of the engine to the highest dead center
To do this, turn the crankshaft clockwise until the mark on the camshaft pulley matches the protrusion on the rear timing cover.
Fitting marks on the camshaft pulley and rear timing cover
In the hatch on the clutch housing, the long mark (mark) on the flywheel should be opposite the triangular cutout of the scale.
Marking on the flywheel and triangular cutout in the degree scale 21083
You can turn the camshaft pulley mounting nut with a 17mm wrench (to do this you will have to remove the protective cover of the timing drive) or with a large slotted screwdriver by the flywheel teeth in the clutch housing hatch.
— We prepare the distributor for installation
Let's remove the cover from it. We install the contact of the slider on the output of the high-voltage wire of the first cylinder. This can be done by placing the cover on the distributor and finding the mark for the output of the first cylinder on it.
Aligning the slider and cover before installing the VAZ 2108, 2109, 21099 distributor on the engine
— Install the distributor on the engine
Lubricate the sealing ring of the distributor with engine oil. We insert it into the mounting socket on the studs. In this case, the protrusions on the distributor shaft coupling should fit into the slot at the end of the camshaft. If the first two points are fulfilled, then they will coincide.
Attaching the distributor to the engine
We secure the distributor, but do not tighten the nuts completely, since later we will set the ignition timing and it will be necessary to rotate the distributor. Replace the cover and tighten the two screws securing it. We connect the high-voltage wires to it in the correct order.
— We set the ignition timing
“Setting the ignition timing on engines of VAZ 2108, 2109, 21099 cars.”
Notes and additions
— Cylinder counting on VAZ 2108, 2109, 21099 engines is carried out from the timing drive. That is, the first cylinder is the farthest from the distributor.
Twokarburators VK - More information on the topic in our VKontakte group, on Facebook Twokarburators FS and on Odnoklassniki - Twokarburators OK
More articles on VAZ 2108, 2109, 21099 cars
— Malfunctions of the distributor of VAZ 2108, 2109, 21099 cars
— Checking the Hall sensor on VAZ 2108, 2109, 21099 cars
— Checking the ignition coil on VAZ 2108, 2109, 21099 cars
— Checking the switch of VAZ 2108, 2109, 21099 cars
— Checking the vacuum ignition timing regulator on VAZ 2108, 2109, 21099 cars
— How to remove and replace the Hall sensor on your own?
Purpose and types of distributors
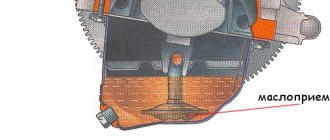
The main distributor of the “six” is located on a horizontal platform made to the left of the engine valve cover. The unit shaft, ending with splines, enters the drive gear inside the cylinder block. The latter rotates by the timing chain and at the same time rotates the oil pump shaft.
The distributor performs 3 functions in the ignition system:
- at the right moment it breaks the electrical circuit of the primary winding of the coil, causing a high voltage pulse to form in the secondary;
- alternately directs discharges to the spark plugs according to the operating order of the cylinders (1-3-4-2);
- automatically adjusts the ignition timing when the crankshaft speed changes.
The spark is supplied and the air-fuel mixture is ignited before the piston reaches the upper extreme point, so that the fuel has time to fully burn. At idle, the advance angle is 3-5 degrees; with increasing crankshaft speed, this figure should increase.
Various modifications of the “sixes” were equipped with different types of distributors:
- VAZ 2106 and 21061 were equipped with engines with a working volume of 1.6 and 1.5 liters, respectively. Due to the height of the block, distributors with a long shaft and a mechanical contact system were installed on the model.
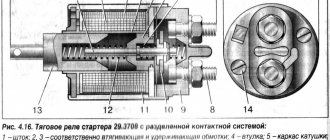
- VAZ 21063 cars were equipped with a 1.3 liter engine with a low cylinder block. The distributor is a contact type with a shortened shaft, the difference for models 2106 and 21063 is 7 mm.
- The updated VAZ 21065 series was equipped with contactless distributors with a long rod, working in conjunction with an electronic ignition system.
The difference in the length of the drive shaft, depending on the height of the cylinder block, does not allow the use of the VAZ 2106 part on a 1.3 liter engine - the distributor simply will not fit into the socket. Installing a spare part with a short shaft on a “clean six” will also not work - the splined part will not reach the gear. The rest of the filling of the contact distributors is the same.
Adjusting the ignition using the tachometer
To carry out this type of economical ignition adjustment of the Zhiguli 2109, two people will be needed. One should be in the interior of the Nine, the second should rotate the distributor.
Step-by-step adjustment using the tachometer
- Turn on the ignition and watch the tachometer needle.
- A second person must loosen the bolts securing the distributor and turn it.
- When you turn the key in the ignition, the tachometer needle sharply deviates and returns to zero.
- The distributor should remain in the position when the tachometer needle deviates.
- This method of adjusting the ignition timing requires patience, as it is very difficult to adjust the first time.
Specifications
Before we begin to describe the process of refining and increasing the power of the VAZ 2109 carburetor engine, it is worth understanding what power units were installed on the vehicle, and also consider the main technical characteristics.
During the production process, the “nine” was equipped with three options for carburetor engines:
21081 (1.1 8V)
| Name | Index |
| Volume | 1.1 liter (1099 cc) |
| Number of cylinders | 4 |
| Number of valves | 8 |
| Fuel | Petrol |
| Injection system | Carburetor |
| Fuel consumption | 6,7 |
| Cylinder diameter | 76 |
| Cylinder operating order | 1-3-4-2 |
2108 (1.3 8V)
| Name | Index |
| Volume | 1.3 liters (1289 cc) |
| Number of cylinders | 4 |
| Number of valves | 8 |
| Fuel | Petrol |
| Injection system | Carburetor |
| Fuel consumption | 7.0 l |
| Cylinder diameter | 76 |
| Cylinder operating order | 1-3-4-2 |
Purpose of distributor VAZ 2109
In any ignition system, contactless or contact, there are two circuits - high voltage and low voltage. The distributor, the ignition distributor, is exactly the device that deals with both high-voltage and low-voltage wiring. Its main task is to distribute high voltage between the spark plugs at the right moment and in a certain order.
The distributor works as follows: High-voltage voltage is generated in the ignition coil by electromagnetic induction. It is supplied via a high-voltage wire to the central contact of the distributor cap. The contact is in constant interaction with the slider, which distributes the current across four contacts corresponding to the spark plug in the cylinder. The slider is in constant rotation and alternately closes the central contact with the spark plug contacts. Current is supplied to the spark plugs through high voltage wires in the order determined by the order of operation of the cylinders - 1-3-4-2. The slider is driven by a drive shaft, which is connected to the camshaft.
How to test the ignition yourself
This fairly simple method of checking the operation of the ignition system can be used both for cars of the “ninth” family and for other passenger vehicles equipped with a carburetor engine. However, it should be noted right away that some experience is required here, since the test is carried out by ear.
So, first you need to accelerate the car to a speed of 50 km/h and engage fourth gear. Now press the gas pedal all the way and listen to the engine. If at this moment quiet detonation sounds appear, it means that the VAZ-2109 ignition timing is set correctly. The late timing is indicated by the absence of sounds during acceleration. In the case when the detonation sounds are too loud, one should conclude that the ignition is early. In both the first and second cases, your car’s engine requires re-adjusting the ignition timing.