The differential bearings are mounted with a preload of 0.25 mm. The tension is ensured by selecting the thickness of the adjusting ring installed in the gearbox housing socket under the outer ring of the differential bearing!
So, if the bearings are good, then it’s better not to touch them, since I started looking all over Kharkov for these rings, not every store has them, and if they do, then, as always, they don’t have the required thickness!
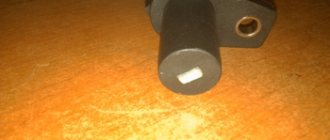
secondary shaft assembly
secondary shaft assembly
A small manual from the encyclopedia for assembling the gearbox:
1. When assembling the gear selector lever and the joint with the gear selector rod, first degrease the threaded holes in the joint body and the lever hub, as well as the mounting mounting bolts. 2. Apply thread sealant to the bolt threads. 3. We press the oil seals of the input shaft, drives and gear selection rod using mandrels or suitable pipe sections. 4. Lubricate the working surface of the oil seals with a thin layer of Litol-24 lubricant. 5. We install an oil seal with a right notch in the clutch housing (for right-hand drive), and an oil seal with a left notch in the gearbox housing (for left-hand drive). The arrows on the oil seal housings must coincide with the direction of rotation of the drives when the vehicle moves forward. 6. When assembling the secondary shaft, we replace the retaining rings of the synchronizer hubs with new ones. We press the outer and inner rings of roller bearings, ball bearings, gears and synchronizer hubs with mandrels or suitable pipe sections. 7. When assembling the hub with the synchronizer sliding clutch, before installing the retainer, apply a little grease to it and put it in the cracker. 8. Using a screwdriver, press the installed synchronizer spring towards the hub and put the block with the lock in place. In this case, the deepest socket should be located opposite the latch in the sliding coupling. 9. When assembling the differential, lubricate the satellites and drive gears with oil. 10. We mount the differential bearings with a preload of 0.25 mm. The tension is ensured by selecting the thickness of the adjusting ring installed in the gearbox housing socket under the outer ring of the differential bearing. 11. Selecting the thickness of the adjusting ring is necessary if replacing one of the following parts: differential box, differential bearing, clutch housing and/or gearbox housing. 12. After installing the differential into the clutch housing, it is necessary to secure one of the drive gears with a mandrel (plug) so that they do not move from their seats during further assembly. 13. Before assembling the gearbox housing with the clutch housing and the rear cover, apply a layer of sealant around the perimeter of the mating surfaces.
mileage 15 km after repair
I have already driven almost 1000 km . Catalog numbers and manufacturers of spare parts:
1. Input shaft: 1.1. Front single-row radial roller bearing: Catalog number
: 2108 - 1701031, 42205, NJ 205 (international name)
Manufacturers:
• EPK plants (Saratov, Volzhsky, Aviation Bearing Plant) produce the following varieties: 42205 KM (SPZ), 42205D1 (ZAP), 6-42205 A1E1USH1 (SPZ and VPZ), the latter is the most common and in demand.
• 10 GPP (Rostov-on-Don) offers modification 42205 AEM. These products occupy an intermediate position in the quality-price range. • The Samara SPZ-4 plant produces the simplest modification of this type, with a polyamide separator. They are very cheap, but knowledgeable motorists prefer not to use them. • If you are offered a “Vologda bearing” of this type, then it is a Chinese counterfeit (23 GPZ does not make them now). Catalog numbers
: SKF NJ 205 ECP; KOYO NJ205; Toyota 97123-06205; 6205ZZ; 93306-205U6-00 (Yamaha); 6205ZZCM
1.2.
Rear single-row radial ball bearing: Catalog number
: 2108 - 1701033, 50305, 6305 (international name) Quantity: 2 pcs.
Manufacturers:
• 3 GPP (Saratov) and VBF (Vologda), as well as HARP (Ukraine) - prices and quality are higher.
• GPZ (Moscow), SPZ-4 (Samara) (low quality, low price), • It is not recommended to buy bearings with other markings, since these are most likely Chinese products, which bear the markings of the companies ordering their production. The imported analogue is designated 6305. Closed 6305 ZZ and 6305 2RS (metal or rubber plugs). A bearing with a thermal gap is designated 6305/C3 (analogous to 76-305). Metal plugs - ZZ, rubber plugs - 2RS. Products of the SKF, FAG, KOYO brands are much more expensive and reliable than others. Catalog numbers
: SKF 6305 N; NTN-SNR 6305N; Toyota 90099-10142; 6305DDU; 6305NR; 90601-0012 (Subaru); 97100-06305; 5-81229-104-0
2. Secondary shaft:
2.1. Front single-row radial roller bearing: Catalog number
: 2108 - 1701180, 42305, NJ 305 (international name)
Manufacturers:
• EPK plants (Saratov, Volzhsky, Aviation Bearing Plant) produce the following varieties: 42305 KM (SPZ), 42305LM (SPZ), 6-42305 A1E1USH1 (SPZ and VPZ), the latter is the most common and in demand.
• 10 GPP (Rostov-on-Don) offers modification 42305 AEM. These products occupy an intermediate position in the quality-price range. • The Samara SPZ-4 plant produces the simplest modification of this type, with a polyamide separator. They are very cheap, but knowledgeable motorists prefer not to use them. • Some suppliers will also offer you the Craft brand. These Chinese bearings are the cheapest, but are completely unsuitable for installation in car gearboxes. Catalog numbers
: Koyo NJ 305; Coram NJ 305
3. Bearing of the secondary shaft of the gearbox, single-row needle without rings in a plastic separator (for speed gears):
Catalog number
: 2108 - 1701108 Quantity: 5 pcs.
Dimensions: 30x36x25 Catalog numbers
: K32X37X27 (SKF), PW-P1108 (Pilenga)
4. Single-row tapered roller differential bearing:
Catalog number
: 2108 - 2303036, 7207, 30207 (international name) Quantity: 2 pcs.
Catalog numbers
: NSK 30207, KOYO 30207JR; HR30207J; MB 393957; MT 202119; MA 125934 (Mitsubishi)
5. Seals:
5.1. Drive oil seal: Catalog number
: Corteco 12015250\Corteco 12015250B
5.2. Input shaft oil seal: Catalog number
: Corteco 19034619B\Corteco 19034619
5.3. Gear selector rod oil seal (yoke oil seal): Catalog number
: Corteco 12010803\Corteco 12010803B
6. Reverse gear Pilenga
Catalog number
: GB-P 0850
7. Engine mounts.
Manufacturer: BRT 7.1. Side engine mount bracket for LADA Samara 2108-1001040-10RU 7.2. Rear engine mount bracket for LADA Samara 2108-1001031-10RU 7.3. Front engine mount bracket for LADA Samara 2108-1001015-10RU
What affects service life
There is no clear answer regarding the frequency of replacing the input shaft bearing. Therefore, the procedure is carried out depending on the current condition. The wear rate of elements is influenced by several factors, including:
- The quality of the bearings used;
- Driving style;
- Conditions under which the vehicle is operated (weather, road quality);
- Frequency of visits to car repair shops or self-diagnosis of the car’s condition, etc.
Checking status
Let us say right away that it will not be possible to replace the bearing without removing the gearbox. Therefore, first of all, we get acquainted with the features of dismantling the gearbox, after which we proceed to further actions.
Make sure the bearing and its components are in good condition. To do this, check the following:
- There should be no cracks or defects on the shutdown plug;
- The bosses, which are used for mounting on the release bearing, should not show signs of severe wear;
- Check the spring bracket under the soldier. The casing contains a stand for fixing the fork. The spring bracket normally does not have any signs of defects or wear;
- The presence of signs of wear on a soldier is a bad sign.
Replacing the rear bearing
It is not at all necessary to disassemble the gearbox in order to replace the input shaft bearing yourself. But you can't do it without removing the gearbox.
- After removing the gearbox, remove the bell housing and remove the retaining rings.
- Using a powerful screwdriver, pry out the bearing using its ring groove.
- Using the shaft bearing as a support, move the input shaft slightly forward.
- Armed with a hammer, begin striking the end of the input shaft.
- Periodically start turning the shaft and continue to apply systematic blows.
- The degree of tension between the shaft and the bearing can be different, so you will have to hit the end either for a couple of minutes or for half an hour. In any case, the bearing will definitely come off its seat.
- Using gentle but precise blows, press in the new bearing. Only hit the inner ring of the bearing. In this case, the shaft needs to be pulled forward, so you will have to work with a small hammer. It is more comfortable.
Replacing the rear bearing
Which wheel bearing to choose for replacement
The front wheel bearing is of both domestic and foreign production. As they say, there will be something to find for such a car. But it’s better not to buy Chinese spare parts to replace the front wheel bearing on a VAZ 2114. They are inexpensive, but hence the quality is not very good, and you won’t go far with them.
Which wheel bearing to choose for replacement
It is better to pay attention to imported spare parts, especially from Europe. Although they are more expensive, their quality speaks for itself. When purchasing, be careful not to confuse them with Chinese counterfeits, there are many of them now.
It is also worth looking at domestic manufacturers, such as those from Vologda or Samara. Excellent quality at a reasonable price. They also include instructions for installing the bearing, which makes the task even easier.
How to buy original bearings
In order to distinguish an original bearing from a fake, look at the box; it must have proper presentation. The rotation of the bearing is tight, but the fake bearing rotates very easily, no effort is required. The inner holder of the original has all the necessary numbers and inscriptions. But on fakes they are located both inside and outside. The differences between them are minimal, there may be a different brightness of color on the bearing, or a slight difference in shape.
- Wheel bolt wrench;
- Two jacks;
- Car stands;
- Power wrench;
- Thirteen two head;
- Wheel chocks;
- Open-end wrench for ten, seventeen (2 pieces), nineteen;
- Ratchet driver;
- Socket head for eight, thirteen, fifteen, seventeen, nineteen;
- Head with E12 profile;
- Extension;
- Phillips and slotted screwdrivers;
- Penetrating lubricant;
- Hammer;
- Extension;
- Oil collection container;
- Lithium grease.
- Place wheel chocks and loosen the wheel nuts on the right and left. Thirty-two head nuts.
- Loosen the wheel bolts, jack up and remove the front wheels. After removing the wheels, place stands under the sills and lower the car on them.
- Loosen the fastening nut and remove the negative terminal of the battery.
- Remove the air filter housing. To remove, unscrew the two bolts securing the front panel, disconnect the power connector for the mass air flow sensor and loosen the clamp securing the pipe to the body. Next, remove the pipe fitting to the filter housing and then lift the housing and disconnect the air intake pipe. After completing the procedures described above, the case no longer holds anything, remove it. The mounting bolts are for a thirteen head, and the clamp is for a Phillips screwdriver.
Apply penetrating lubricant, loosen the clutch cable to the box and remove it from the bracket. In order to loosen you need two seventeen keys.Remove the clutch cable from the fork and place it to the side.
Remove the small terminal from the starter and unscrew the nut securing the positive wire. Head nut for thirteen.
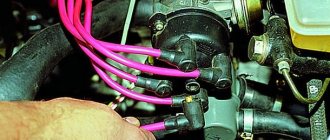
Unscrew the ignition coil bracket mounting bolt. Thirteen head bolt.
Unscrew the upper starter mounting nut. Fifteen head nut.
Unscrew the two upper bolts securing the box to the engine. Nineteen head bolts. The location of the first bolt is in the photo below, and the second bolt is located under the thermostat.
Replacing the front bearing
Changing the front input shaft bearing is more difficult. But it is still quite possible to do such work with your own hands.
Removing the front bearing
In normal condition, the front bearing rotates smoothly, no jamming or play is observed. If defects are found as a result of the inspection, the element will have to be replaced.
To work you will need:
- Screwdriver;
- Hammer;
- Bearing ejector.
If there is no ejector, use sawdust and Litol 24 lubricant. We will tell you more about their use.
Replacing the input shaft bearing on a VAZ 2114
- Registration
- Entrance
- To the beginning of the forum
- Forum Rules
- Old design
- FAQ
- Search
- Users
It seems like yes, it was a long time ago.
Can. You take a grinder, cut out a piece of the crankcase, change the bearing, then weld everything together, and voila.
Added after 1 minute 31 seconds:
This is if it’s front and rear, yes, it’s possible.
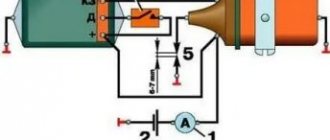
If you press the pedal a little and release it a little by 1 cm, the tone of the howl changes.
Freedom for parrots and c105!
When the pedal is released, the release pedal is not engaged, it seems
but with the pedal fully depressed, i.e. the gearbox and engine are disconnected,
If you press the pedal a little and release it a little by 1 cm, the tone of the howl changes.
When the pedal is fully depressed there is no sound at all.
This means that the bearing raceways do not have pitting, and its wear balls wear out, so the loaded one stops making noise.
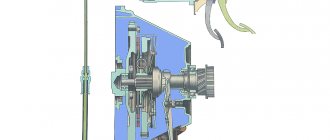
Design
Based on the image, you can easily understand the design elements of the input shaft and determine the location of the components that interest you during repairs.
Node diagram
According to the figure, we are dealing with the following structural elements.
Item number
What is this
First gear gear
Second gear gear
Fourth gear gear
Rear input shaft bearing
What affects service life
There is no clear answer regarding the frequency of replacing the input shaft bearing. Therefore, the procedure is carried out depending on the current condition. The wear rate of elements is influenced by several factors, including:
- The quality of the bearings used;
- Driving style;
- Conditions under which the vehicle is operated (weather, road quality);
- Frequency of visits to car repair shops or self-diagnosis of the car’s condition, etc.
Checking status
Let us say right away that it will not be possible to replace the bearing without removing the gearbox. Therefore, first of all, we get acquainted with the features of dismantling the gearbox, after which we proceed to further actions.
Make sure the bearing and its components are in good condition. To do this, check the following:
- There should be no cracks or defects on the shutdown plug;
- The bosses, which are used for mounting on the release bearing, should not show signs of severe wear;
- Check the spring bracket under the soldier. The casing contains a stand for fixing the fork. The spring bracket normally does not have any signs of defects or wear;
- The presence of signs of wear on a soldier is a bad sign.
The input shaft is a block consisting of drive gears. Some of them are made on the shaft, the other is pressed with great tension. That’s why we are talking about a non-separable design, where only the front and rear bearings are replaceable. If other components fail, the entire assembly must be replaced.
Input shaft bearing: main signs of wear, replacement instructions and care recommendations
Destruction of the input shaft bearing is a fairly common problem that every car owner faces sooner or later. During vehicle operation, this part is subject to serious mechanical loads, as a result of which it wears out and ceases to perform its functions.
Where is it located and how to get to it?
In most cases, the bearing is located directly on the input shaft, adjacent to the oil seal. And in some transmissions these two parts are combined. Most often, gearboxes are equipped with roller bearings. Their sizes may vary depending on the make and model of the car.
To understand whether this part is really wearing out, you need to perform two simple steps: drain the working fluid and remove the casing from the gearbox.
Signs indicating destruction
The malfunction can be identified by the following signs:
- At idle speed with the clutch released, a knocking noise is heard.
- If the part has already partially collapsed, then this may be indicated by problems with the clutch (it does not turn on or does not turn off).
- A whistling sound coming from the transmission indicates a lack of lubricant (in this case, you just need to change the oil).
- If a howling sound is heard from the gearbox, this usually indicates the presence of cracks and chips in the bearing housing.
Please note: if a part is partially destroyed, you cannot leave the motor running for a long time. If you ignore this recommendation, the broken particles will be welded to the input shaft under the influence of high temperatures. As a result, you will have to change it too.
Replacement instructions
To replace a part, you must perform the following steps:
- Disconnect the battery terminals.
- Remove the chips from the body.
- Unscrew the speedometer drive.
- Disconnect the exhaust gas removal system.
- Remove the gearbox.
- Clean the housing from dirt and dust
- Remove the cover.
Typically, the bearing is secured using retaining rings. They can be removed by simply pressing with a screwdriver. After removing the rings, insert the sharp end of a screwdriver into the ring groove and move the shaft forward. The bearing is firmly pressed onto the shaft. In this regard, for dismantling you will have to use a hammer, while turning the shaft (this must be done carefully, otherwise the shaft can be damaged).
The new part should be pre-lubricated and only then put on the shaft and pressed in using a hammer. Make sure the part is level and moves without resistance. After completing the installation, reassemble the gearbox in the reverse order from disassembly.
What to do if there is no significant wear?
If upon inspection you see that the part is intact, then it is not necessary to change it. In this case, it will be enough to apply a layer of lubricant. Of course, if you already have a new spare part, then it is better to install it. Even if the old bearing looks normal, the metal on it is still worn out. Therefore, it will not last very long.
For lubrication you will need:
- Buy lithol.
- Pour it into a container.
- Place the part there.
- Place in a water bath.
There is another way - to inject lithol through a syringe directly into the bearing. This is a more labor-intensive procedure, but also safer.
Where can I order a replacement bearing?
If you find symptoms of a bearing failure, but do not want to change it yourself, contact our car service center! We guarantee:
- Professional service.
- Efficiency.
- Favorable prices.
To arrange a repair, contact us by phone listed on the website.
Replacing the rear bearing
It is not at all necessary to disassemble the gearbox in order to replace the input shaft bearing yourself. But you can't do it without removing the gearbox.
- After removing the gearbox, remove the bell housing and remove the retaining rings.
- Using a powerful screwdriver, pry out the bearing using its ring groove.
- Using the shaft bearing as a support, move the input shaft slightly forward.
- Armed with a hammer, begin striking the end of the input shaft.
- Periodically start turning the shaft and continue to apply systematic blows.
- The degree of tension between the shaft and the bearing can be different, so you will have to hit the end either for a couple of minutes or for half an hour. In any case, the bearing will definitely come off its seat.
- Using gentle but precise blows, press in the new bearing. Only hit the inner ring of the bearing. In this case, the shaft needs to be pulled forward, so you will have to work with a small hammer. It is more comfortable.
Replacing the rear bearing
Disassembling the VAZ 2115 gearbox
Wash the gearbox, preventing water from entering the crankcase, and place it on a disassembly stand. Remove the power unit suspension bracket and the clutch release cable mounting bracket.
Remove the primary and secondary shafts at the same time (
| Rice. 3.13. Removing the gear selector mechanism |
Unscrew the gear selector mounting bolts (
| Rice. 3.14. Secondary shaft parts: 1 – nut; 2 – thrust plate; 3 – sliding clutch of the 5th gear synchronizer; 4 – sliding coupling hub; 5 – synchronizer blocking ring; 6 – 5th gear gear; 7 – distance ring of the needle bearing; 8 – needle bearing; 9 – 5th gear gear bushing; 10 – thrust washer; 11 – ball bearing; 12 – thrust washer; 13 – 4th gear gear bushing; 14 – 4th gear gear; 15 – sliding clutch for synchronizer of 3rd and 4th gears; 16 – sliding clutch hub; 17 – third gear gear; 18 – retaining ring; 19 – thrust half-rings of the secondary shaft; 20 – 2nd gear gear; 21 – sliding clutch for synchronizer of 1st and 2nd gears with reverse gear; 22 – retaining ring of the synchronizer hub; 23 – hub of the sliding clutch for the synchronizer of 1st and 2nd gears; 24 – synchronizer spring; 25 – cracker; 26 – retainer; 27 – 1st gear gear; 28 – roller bearing |
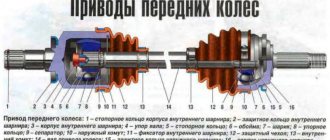
If it is necessary to disassemble the secondary shaft, clamp it in a vice with soft pads and use a universal puller to press the ball bearing from the shaft. The bearing is pressed off the input shaft in the same way. Then remove the driven gears of IV, III, II and I gears and synchronizers assemblies from the secondary shaft in the order indicated on
| Rice. 3.15. Differential assembly: 1 – satellite axis; 2 – retaining ring; 3 – semi-axial gears; 4 – speedometer drive drive gear; 5 – differential box; 6 – satellite; 7 – driven gear of the main drive |
– if it is necessary to replace the driven gear, unscrew the bolts securing it and compress gear 7 (
| Rice. 3.16. Details of the gear selection mechanism: 1 – gear selection rod; 2 – gear selection rod lever; 3 – housing of the gear selection mechanism; 4 – three-arm gear selection lever; 5 – blocking brackets; 6 – axis of the gear selection lever; 7 – guide axis of locking brackets; 8 – reverse fork; 9 – clamp; 10 – thrust washer; 11 – spring |
If necessary, disassemble the gear selection mechanism by unscrewing the nut securing axle 6 (Fig. 3.16) of the gear selection lever and remove the retaining rings from the reverse fork axle and from the axle 7 of the locking brackets, remove the reverse fork 8, gear selection lever 4 assembly with a locking bracket 5, a lever axis 6 and a spring 11 with a thrust washer 10.
If necessary, remove the speedometer drive by unscrewing the nut securing it and, supporting the driven gear shaft, remove the speedometer drive.
Replacing the front bearing
Changing the front input shaft bearing is more difficult. But it is still quite possible to do such work with your own hands.
Removing the front bearing
In normal condition, the front bearing rotates smoothly, no jamming or play is observed. If defects are found as a result of the inspection, the element will have to be replaced.
To work you will need:
- Screwdriver;
- Hammer;
- Bearing ejector.
If there is no ejector, use sawdust and Litol 24 lubricant. We will tell you more about their use.
Now that everything is ready, you can get to work.
- Remove the gearbox from your VAZ 2109. The task is not the most difficult, but it cannot be called an easy walk either.
- Remove the clutch cover with pressure plate from the flywheel.
- Remove the clutch driven disc from the flywheel.
- Now dismantle the flywheel itself.
- If there is a puller, there will be no problems with removing the bearing. But in its absence, arm yourself with improvised means - sawdust and Litol.
- Prepare a mixture from Litol 24 and sawdust. The proportions will be 1 to 1.
- You will need approximately the entire plastic lid from a large jar of the prepared solution of sawdust and lubricant.
- Mix the ingredients thoroughly to obtain a homogeneous mass.
- Fill the internal cavity behind the bearing with the prepared solution. Please note that after this the old bearing can no longer be used.
- Using a driven disk centering mandrel, press out the bearing. Add a little mixture periodically as the bearing begins to gradually move out of its seat.
- Make sure the element comes out of the socket completely.
- Clean the nest from any mixture remaining inside. Make sure that nothing is left there, otherwise you will soon have to carry out repairs again.
- Place the new bearing over the seat and lightly tap it into place with a hammer. You should only hit the outer ring.
- Be sure to press the bearing completely. Here you will need any metal tube or mandrel of suitable diameter.
- Return all dismantled components to their place, reassemble the structure in the reverse order.
Replacement
Many people turn to a service station to replace this bearing. It is noteworthy that car services often refuse to perform such work. It’s understandable, because the procedure is painstaking, and you can’t get a lot of money for it.
Dismantling works
To do the job yourself, follow the instructions.
- You can often find advice about the need to completely disassemble the gearbox to replace the bearing. But this is optional. You can do without such complex manipulations.
- In any case, you will have to remove the box, so familiarize yourself with this procedure.
- Before removing the gearbox, remove the negative terminal from the car battery.
- All the chips are removed from the box, the wire from the speedometer is unscrewed.
- Next, the trousers of the vehicle exhaust system are dismantled.
- After this, you can completely remove the gearbox.
- At the next stage, the bell is dismantled. You can try to do without it, but then it will definitely constantly interfere with your work.
- Thoroughly clean the box from accumulated dirt.
- The bearing is secured using retaining rings. To remove them you will need a flathead screwdriver.
- The rings are pryed off and loosened a little, after which there will be no more problems with removal.
- To make it more convenient, arm yourself with tweezers that can be used to remove the ring.
- Using a flat-head screwdriver, pry the bearing by the ring groove, and at the same time move the input shaft slightly forward.
- Insert a pry bar between the gearbox and the bearing. It is unlikely that you will be able to do this without an assistant.
- You will operate the tools, while your friend will hold the pry bar.
- Your main task is to press out the bearing. To do this, precise, strong, but most accurate blows are applied to the input shaft.
- In the process of striking, the shaft must rotate.
- This work will take you about 20 minutes. But if you have a special puller at your disposal, you can speed up the work. Although it is really convenient to work with a puller only if you decide to disassemble the gearbox.
- Before installing a new input shaft bearing, be sure to lubricate the element with regular engine oil.
- Carefully press the component into place using gentle, light blows with a hammer. It is better to use a pipe of diameter or a stand.
- When pressing, apply blows to the inner race, in a circle, as evenly as possible.
- Once the bearing is pressed in, make sure it is seated properly. Scrolling should be calm, without obstacles.
- Reassemble the box in reverse order and install it on the car.
Location at checkpoint