Designing and building your own subwoofer enclosure can be a rewarding endeavor. Not only will it save you money, but it will also provide better quality than store-bought products. You can also customize the enclosure to suit your needs.
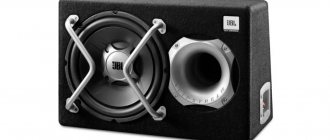
Designing a box for a subwoofer with your own hands may seem like a difficult task, but in this instruction I will show you what and how to make a box for a subwoofer, as well as my visual calculations, drawings and design options. To make the body, you will need woodworking skills. Woodworking work will include assembling the frame, reinforcing the interior, and painting. Building a subwoofer can take anywhere from a few days to a week depending on your skills and desires.
What materials do we need to assemble the subwoofer?
The material for making the subwoofer box must be durable, dense and well insulating sound. Multilayer plywood or chipboard is perfect for this. The main advantages of these materials are their affordable price and ease of processing. They are quite durable and provide good sound insulation. We will make a subwoofer from 30 mm thick multilayer plywood.
To make a subwoofer box we will need:
- Wood screws (approximately 50-55 mm, 100 pieces)
- Soundproofing material (Shumka)
- Drill and screwdriver (or screwdriver)
- Jigsaw
- Liquid Nails
- Sealant
- PVA glue
- Carpet, approximately 3 meters
- Klemnik
Types of structures
Before we begin the active phase of making a do-it-yourself enclosure for a home speaker system, let’s consider what types of designs there are.
Open systems
Speakers are mounted on a large shield. The edges of the shield are bent back at a right angle, and the rear wall of the structure is completely absent. In this case, the speaker system has a very conventional box. This model is suitable for large rooms and is not suitable for playing music with low frequencies.
Closed systems
Familiar designs in the form of boxes with built-in speakers. They have a wide sound range.
With bass reflex
Such cases, in addition to the speakers, are equipped with additional holes for the passage of sound (bass reflex). This makes it possible to reproduce the deepest bass. But the design is inferior to closed boxes in terms of clarity of articulation.
With passive radiator
In this model, the hollow tube was replaced with a membrane, that is, an additional driver for low frequencies was installed, without a magnet and coil. This design takes up less space inside the case, which means the size of the box can be reduced. Passive radiators help achieve sensitive bass depth.
Acoustic labyrinth
The interior of the case looks like a labyrinth. The twisted bends are waveguides. The system has a very complex setup and costs a lot of money. But with proper manufacturing, ideal sound delivery and high bass accuracy occur.
Stages of creation work
To make a rectangular or cubic speaker with your own hands, you will need to properly manufacture the housing (box) in which the electronics are located. To make the body, follow the drawing.
- Mark and saw the board (possibly from lumber) into prefabricated edges from which the body is assembled.
- In the front wall for the speakers (and bass reflex, if the design provides for this), drill holes in circles. Knock out the fragment to be removed from the board drilled in a circle, process the edges with a file or grinder. Insert the speakers (and a piece of bass reflex pipe) to check how level they will sit there.
- Screw the speakers by their mounting loops to the front edge. Insert a piece of pipe instead of the bass reflex. Seal all cracks with sealant or Moment-1.
- Assemble the main part of the box: connect the top, bottom, side and back edges to each other using epoxy glue or corners. If corners of the crack are used, it is recommended to seal them with sealant or plasticine. Some perform sealing using Moment-1 or epoxy glue - in the latter case, the column will be “indestructible”.
- Follow steps 1-4 for the second column. It is more convenient and faster to produce both cases on the same days.
- When the main body is ready, cut out the seventh fragment of the body - the inner wall separating the power supply and amplifier from the acoustic (sound) compartment. The fact is that the re-reflection of sound from the abundance of sharp edges of parts worsens the performance of the speaker at low frequencies. The housing of the second speaker does not require a partition - it is passive and does not require a power supply. An option is possible when, instead of one stereo amplifier, each speaker uses its own mono amplifier. It’s up to you to decide whether to place a common (powerful) power supply in one of the speakers or to have a separate (less powerful) one for each of them.
READ MORE: Repairing a Beko washing machine, troubleshooting troubleshooting yourself at home Selecting spare parts How to remove the cover and replace the bearing
Manufacturing of the housing is completed. To mount the electronic component, do the following.
- Attach the amplifier and power supply to the internal partition.
- Connect the power supply and the amplifier to each other - power will be supplied to the amplifier's power supply input.
- Connect a speaker (if there is one) to one of the amplifier's outputs. For the second (passive speaker), drill a hole for the audio connector, connect this connector to the second channel of the stereo amplifier.
- Drill a hole for the audio input connector in the rear wall, connect the connector inserted into it to the amplifier input.
- Cut out a connector for 220 volt power in the back wall and mount this connector in it. Connect the network connector to the input of the power supply.
- Insulate all solder joints using caulk, hot glue, tape, or tape.
- If there are several speakers, you will need crossover filter coils and additional capacitors that form oscillatory circuits with the first ones. Three-way speakers with the help of a filter clearly distinguish between high, mid and low frequencies across different speakers.
To make a separation filter, do the following.
- Saw off a couple of pieces from a plastic pipe of the required diameter. You cannot use a metal-plastic pipe - it will turn the coil into a source of an electromagnetic field, in addition, recalculation and additional inductance measurements on a special multimeter will be required.
- Cut and grind the sides for the coils.
- “Sand” the pipe pieces in the gluing areas. Glue the coil frames using hot melt glue, Moment-1 or epoxy glue. Wait for the glue to dry and harden.
- Based on the description of the column diagram, wind the required number of turns of enamel wire of the appropriate diameter.
- Mount the coils on the bulkhead or back wall of the speaker. They are secured both with adhesive and with self-tapping screws with washers (each coil is held at three points by one of the edges). Central fastening using a self-tapping screw or bolt with a plastic/metal washer larger than the outer diameter of the pipe is also allowed. Such washers are used for hanging household appliances and cabinets on walls using through studs.
- Connect the coils to the capacitors - according to the diagram in the description. You should get a full-fledged bandpass filter.
This provides natural sound. The number of filters - for high, mid and low frequencies can be equal to the number of speakers (or the number of speakers in the column minus one, depending on the circuit).
From paper
Making a column from plain paper is not as easy as it seems. You will need glue containing a hardener - the layers of paper are impregnated with it. Epoxy is best suited for this - coils and printed circuit boards are often made from it (the material resembles getinax). Do the following.
- For a square column, mark and cut sheets of paper according to the template of each of the walls. In the sheets from which the front edge of the speaker is glued together, cut out holes for the speakers and the bass reflex output. For the back there are holes for audio connectors and a power socket.
- Dilute and apply some epoxy glue to the sheets that serve as the first layer. Glue two layers for each wall and leave them to dry.
- The next day, glue the third layers to each wall. Add one every day. The interval between stages can be reduced from one day to several hours to speed up the process. But in this case the quality may suffer. Repeat these steps until the thickness of the walls of the future column reaches at least 1.5 cm. Instead of paper, you can use thick cardboard.
Disadvantage - evenness and accuracy when gluing sheets is important, otherwise the structure will lead to the side. The advantage of the method is the use of paper from old magazines and newspapers, cardboard (except wavy cardboard, with voids inside).
A round body will speed up the process: a roll of paper is wound onto a piece of pipe with a wide clearance, soaking as it goes. Secure the starting winding line with tape. The development looks interesting, in which the role of a voice coil is played by a strip of metal foil, and the role of a diffuser is played by a sheet of paper. Do the following.
- Apply metal tape or double-sided tape with foil to a sheet of paper. Place the coils so that they do not touch.
- Bring the ends of the tape or foil to the sound source.
- Place a magnet under a sheet of paper, connect the gadget and turn on the music.
You won't get high volume - the amplifier in the gadget is too low in power. Mid and low frequencies will be added to the “rustling” sound. Powerful speakers use a multilayer design - an electrostatic membrane, designed for high amplifier power.
From a tire
A speaker made from a tire cannot be compared in terms of coordination and amplitude-frequency response with branded or homemade rectangular systems. The rigidity of the walls is insufficient - rubber and hard rubber dampen low frequencies due to excessive elasticity. A stereo music system needs a large speaker - its diameter should be fixed in the tire, but not fall inside. The other side of the tire is covered with plywood or a board made of other lumber, placing the power supply and amplifier on it.
A more advanced design will be the part of which on the speaker side is closed with a wooden ring cut from the same plywood. The speaker is not mounted on the tire itself, but on a plywood ring, which can be connected to the back, where the blank plywood wall is located, using long through-tapping screws or bolts.
READ MORE: Photo wallpapers in modern interior styles examples of choice
From a Pringles can
https://www.youtube.com/video/6Fg9oRsjl9g
The simplest, but unusual option is to use aluminum, cardboard, plastic cans and glasses as speakers, making slits and inserting a smartphone into them. A more “advanced” option is to place a speaker of suitable diameter in a can of chips or a glass. The principle of any such speaker is based on the fact that the sound, reflected from the walls, acquires additional volume.
From the bottle
Any plastic or glass bottle will do. It is safer to cut and drill plastic. For glass, you will need diamond drills and a crown, and the process itself is performed under water for safety reasons. Do the following.
- Using a hole saw, drill a hole in the bottle for the speaker.
- Drill mounting holes for self-tapping screws. The bass reflex will be either an open neck or additional holes drilled with a smaller diameter crown for a piece of plastic pipe.
- Fill the holes with sealant and install the speaker with pre-soldered wires. Tighten the screws. You cannot screw them “dry” into glass - the bottle will crack and shatter into pieces.
From headphones
A headphone column is an option in which, instead of a dynamic head, which is not designed for decent volume at a large distance from the listener, any modern speaker is used. The headphone space is sharply limited to accommodate the amplifier and power battery. In such a column, a piece of the same PVC pipe is used. However, when the column is passive, the process speeds up significantly. The step-by-step instructions are as follows.
- Disassemble the headphones and remove the heads with membranes.
- Insert speakers in their place. The speaker is chosen as thin and flat as possible.
- Connect the wires that previously supplied high-frequency voltage to the membrane heads.
- Secure the speakers using self-tapping screws.
- Close (if possible) the mesh inserts.
It is possible to turn headphones into speakers if they were initially large enough to completely cover your ears. If the speakers do not insert completely and do not close, then use an equivalent replacement made as follows.
- Remove the membrane heads from the headphones.
- Cut holes in the bottom of a plastic or cardboard glass, slightly smaller in diameter than the heads themselves.
- Insert and glue the membranes.
Such acoustics are more of a joke - they are not designed for professional use. For full-fledged speakers you need speakers. If it was not possible to insert small-sized speakers instead of headphone membranes, the cylindrical design that is already familiar to you will be suitable as a basis.
- On the back of the headphones, cut a hole into which the magnet on the back of the speaker will fit. The hole should be much larger than the magnet itself - only the side supporting structure will remain from the headphone body. The back (outer) wall of the earphone will be cut off entirely.
- Using hot glue or Moment-1, glue the earphone to the piece of PVC pipe you just made.
- Place the power supply (or lithium-ion battery with a charge controller) and the amplifier itself inside the pipe. The result is an active column.
- Similarly, make a base for another earphone and place the speaker in it. The result is a passive speaker. In stereo systems, only one of the speakers is active.
- Remove the audio cable from the passive speaker and solder a plug with a standard diameter of 3.5 mm to it.
- Insert the same connector into the active speaker to connect the passive one. Connect one of the amplifier's stereo outputs to it. The second is directly to the speaker of the active speaker.
- Insert another connector into the active speaker - to connect an external sound source (for example, a smartphone), connect it to the stereo input of the amplifier.
- Connect the power supply to the power input on the amplifier.
- Check that all parts and assemblies are securely fastened, close both columns with a plug.
What will be needed for production?
In addition to the material from which the housing is made, an active speaker requires:
- one broadband, or 2-3 more narrowband speakers;
- ready-made or homemade power supply;
- ready-made or homemade audio power amplifier;
- regular wire or cable;
- winding wire;
- plastic pipe of suitable diameter;
- rosin, solder and soldering flux;
- adhesive sealant;
- epoxy glue or furniture corners.
Tools needed:
- pliers;
- side cutters;
- flat and shaped screwdrivers (a set of screwdrivers is best);
- wood hacksaw;
- file or chisel;
- hand drill and set of drills.
READ MORE: What is an impact screwdriver?
Features of the tool The functions of a drill are also performed by a screwdriver turned on at high speeds.
Types and characteristics of materials for the housing
Housings for speaker systems are made from different materials: chipboard, MDF, plastic, metal. The most extravagant products are made from glass, the most mysterious ones are made from stone. The material for home production is chosen to be simpler and easy to process, such as chipboard. Let's tell you in more detail what else you can make them from.
Particle boards consist of shavings and large chips, compressed and joined with an adhesive base. Often this composition emits toxic fumes when heated. The slabs are afraid of moisture and can crumble. But at the same time, chipboard is a budget material and is easy to process.
Such enclosures cope well with vibrations, although sound passes through them freely.
Small options are made from chipboard 16 mm thick; large products will need material 19 mm thick. To give an aesthetic appearance, chipboard is laminated, covered with veneer or plastic.
Plywood
This material is made from thin (1 mm) compressed veneer. It can have different categories depending on the wood derivative. A product with 10–14 layers is suitable for boxes. Over time, plywood structures, especially in humid air conditions, can become deformed. But this material perfectly dampens vibrations and keeps sound inside the system, which is why it is used to create housings.
Joiner board
The blockboard is made from double-sided veneer or plywood. A filler of bars, slats and other material is placed inside between the two surfaces. The slab weighs little and is easy to process. Thanks to these qualities, it is used for making boxes.
Oriented strand board is a multi-layer material made from recycled wood waste. This is a durable, elastic product that is easy to process. The texture of OSB is very beautiful, but uneven. To make cases, it is sanded and varnished. The plate absorbs sound well and is resistant to vibrations. Disadvantages include formaldehyde evaporation and a pungent odor.
Bass reflex (FI) - vented box
A bass reflex is the next most common type of acoustic design. In a bass reflex, part of the energy that is “put against the wall” in a closed box is used for peaceful purposes. To do this, the internal volume of the box communicates with the surrounding space through a tunnel containing a certain mass of air. The size of this mass is chosen in such a way that, in combination with the elasticity of the air inside the box, it creates a second oscillatory system that receives energy from the back side of the diffuser and radiates it where needed and in phase with the radiation of the diffuser. This effect is achieved in a not very wide frequency range, from one to two octaves, but the efficiency is within its limits. increases significantly.
In addition to higher efficiency The bass reflex has another important advantage - near the tuning frequency, the amplitude of the diffuser oscillations significantly decreases. This may at first glance seem like a paradox - how the presence of a hefty hole in the loudspeaker housing can restrain the movement of the cone, but nevertheless. In its operating range, the bass reflex creates completely greenhouse conditions for the speaker, and exactly at the tuning frequency the oscillation amplitude is minimal, and most of the sound is emitted by the tunnel. The permissible input power is maximum here, and the distortion introduced by the speaker is minimal.
Above the tuning frequency, the tunnel becomes less and less “transparent” to sound vibrations, due to the inertia of the air mass contained inside it, and the loudspeaker acts as if it were closed. Below the tuning frequency, the opposite happens: the inertia of the speaker gradually disappears and at the lowest frequencies the speaker operates practically without load, that is, as if it had been removed from the housing. The amplitude of oscillations quickly increases, and with it the risk of spitting out the diffuser or damaging the voice coil from hitting the magnetic system. In general, if you do not take precautions, going for a new speaker becomes a real prospect.
A means of protecting against such troubles, in addition to being careful in choosing the volume level, is the use of infra-low-pass filters. By cutting off part of the specAvtozvuk Kirovtra, where there is still no useful signal (below 25 - 30 Hz), such filters prevent the diffuser from going into disarray at the risk of your own life and your wallet.
The bass reflex is much more capricious in the selection of parameters and settings, since three parameters are subject to selection for a specific speaker: box volume, cross-section and tunnel length. The tunnel is very often made so that with a ready-made subwoofer it is possible to adjust the length of the tunnel by changing the tuning frequency.
DIY repair
If the audio system fails, you may need to repair it yourself. The reasons for this problem are:
- Mechanical damage.
- An unacceptable sound frequency reaches the head, which leads to its burnout.
- Diffuser wear.
- Loudspeaker failure. You can repair the speaker yourself, without resorting to the help of specialists.
First you need to dismantle the head, being careful and clean. Otherwise, the coil sleeve may be damaged.
Having gained access to the sleeve, you need to unwind the old wiring and determine the number of turns in the layer and coil. The more accurate the calculations are, the faster and better the repair will be completed. Next, you need to evaluate the diameter of the wires using a micrometer. A caliper is also used for such purposes, but the accuracy of its measurements is low.
Repairing a passive speaker by rewinding is not difficult. To do this, strips of paper are prepared, which are inserted in a circle in the places of the body and coil. If the rules are followed, the gap will be uniform.
Here we will look at the three main types of boxes (boxes) used in subwoofers (as well as in other speakers). But first, a little about the purpose and function of any box. The acoustic head emits sound not only “forward” but also backward, while the front and rear sound waves are opposite in phase. In this regard, there is a term “acoustic closure”, in which the waves on both sides of the diffuser add up and (if they are opposite in phase) cancel each other out. In this case, ideally you will not hear anything at all, but in practice the sound will be very far from the original. The acoustic system box allows you to eliminate this short circuit and give the sound the required characteristics in terms of power and frequency.
