Hi all! My recent trips with family and friends on vacation and into nature clearly showed that even SUVs can experience a shortage of luggage space. And when you have a Niva at your disposal, you won’t be able to fit everything you want inside the car.
That’s why I decided to discuss with you the expedition rack for the Niva. Although there are other roof racks.
You can install this design both on a regular domestic Niva with index 2121 or 2131 (2 and 4 side doors, respectively), and on Chevrolet brand products. Although for any other car that structurally allows for roof racks to be mounted, a similar option for expanding cargo transportation capabilities is suitable.
Mounting methods
Understanding what the roof rack of a particular type of car is called, you understand what you want to equip your vehicle with.
But don't rush into buying. You also need to make sure that the chosen design will fit your car and the existing mounts. If they are provided.
Car racks differ from each other in the method of fastening. And here there are options.
Gutters
Until relatively recently, it was possible to install a roof rack on a domestic car only on the gutters.
These are special recesses that are located along doorways. They are needed to drain water from the roof during rain or snow. Drains are present on many domestic cars. But on foreign cars they are becoming less and less common.
The advantage is that the structure can be installed on the gutters in any position, since there are recesses along the entire length of the roof.
But this option is only suitable for our cars or some old foreign cars. Therefore, this option is rarely considered.
Doorway
Another popular type of fastening involves the use of a doorway. For this, special clamps are used.
A system of metal fastenings is used, which consists of adapters/kits. She clings to the edge in the doorway. Supports are placed on the adapters, and stability is ensured by the tightening mechanism and the rubber base of the trunk.
On some cars there are factory holes for mounting bolts in the door opening itself.
This design is suitable for almost all cars. It is dismountable, which allows you to remove it from your old car and install it on a new car. At most you will have to buy a new adapter.
But aesthetically this is not the most attractive fixation option. Plus, abrasions form at the point of contact over time.
Regular places
Many cars come from the factory with the ability to attach a roof rack. And there are special plugs for this. By removing them, the driver gains access to the fixation system.
Installation is simple. But for this you need to meet several conditions.
To begin with, only model racks are suitable for standard mounts. That is, those that are designed specifically for a specific car. Plus, you won’t be able to change the position of the structure.
Longitudinal arcs
If longitudinal arches are installed on the vehicle, special crossbars are mounted on the roof during cargo transportation.
The distance between them can be chosen, which is convenient when transporting cargo of different types and characteristics.
The advantage is that the system will not come into contact with the roof, and therefore the likelihood of damaging or scratching it is minimal. Additionally, you can tighten the load using straps.
A pressing question is what the arches on the roof of a car are called. I answer. These arches are called roof rails.
The downside of the system is the high center of gravity. An alternative could be integrated roof rails.
Integrated roof rails
They are fused and have no clearance with the roof.
Such units have recently begun to appear on cars. And on crossovers or station wagons.
The roof rails have holes on the inside. With their help, transverse car luggage bars are attached. But there are also cars where you can install universal types of arches that do not have fastening screws.
The center of gravity here is naturally lower than the previous option. Plus, the arches move freely along the rails if there are no mounting screws.
But it is difficult to select crossbars for such roof rails. And there will no longer be such an option as tightening with belts.
T-profile
If there is a T-shaped profile on the roof, the motorist has the opportunity to install a car rack on it. It is positioned as the best fixation option. The profile is also called rails or runners.
Quick installation and no contact between the roof rack and the roof.
The downside is that this profile is found on few cars. Plus, it looks beautiful only on SUVs, crossovers and off-road station wagons. Putting it on sedans or hatchbacks is not the best solution.
Magnets
The option is universal, although it is rightly ignored.
The idea is to place magnets on the roof and use them to secure the trunk. Multifunctional mount and easy to install.
But you shouldn’t count on a large carrying capacity. Suitable for light loads only.
Gradually the magnets become demagnetized. And if this happens while driving, the consequences may be unpredictable. At a minimum, all the contents on the roof will end up on the road.
There are plenty of ways to secure cargo on the roof. But choose a reliable and safe one.
Main stages of work
With the right approach, you can successfully produce a professional trunk - high-quality and visually attractive, just like a purchased product. It will differ in that the car owner will assemble a frame structure based on his own needs and the functional purpose of the car. In general, the creation of a roof rack from any material is carried out according to a single scheme, in several stages.
Preparatory calculation work
When starting to create an external trunk, you should measure the roof and decide on the placement of supports. Since the dimensions of each car are different, it is necessary to measure everything yourself and make accurate calculations, especially when arranging an expedition trunk for the Niva. After this, the design of the future product is thought out: a drawing is drawn and the weight of the trunk as a whole is calculated.
You can carry out all the preparatory activities correctly only if you know the following information:
- made dimensional parameters;
- possible frame weight;
- the most probable weight of all elements of the trunk.
The completion of the preparatory work should be marked not only by the drawing up of a detailed drawing, but also by marking on it all the data obtained during the measurement. In this case, you will have to work a lot with your hands and head. After all, only a responsible approach to the implementation of the task will make it possible to produce a trunk of such a design and fasteners that will withstand enormous loads.
From words to deeds: we carry out welding work
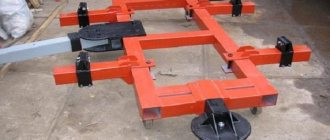
Having made the blanks according to the drawing, they are welded together in the shape of a rectangle. In this case, along the entire internal perimeter of the resulting figure, ponds are fixed opposite opposite points in the middle of the frame. To prevent sagging of the resulting platform during loading, it is recommended to add 2-3 stiffeners to the resulting free plane inside the platform at equal intervals.
The ribs are made from profile iron. As a result, you usually get a kind of lattice frame with running parallel lintels. To strengthen the structure itself, a profile pipe with pre-prepared square-shaped cells is used. Thanks to these steps, it will be possible to make a truly reliable roof rack with your own hands.
Ensuring aerodynamics and fixing the sides
When thinking about the aesthetics and aerodynamics of the luggage structure, it is worth putting an arch in front. To do this, measure the required length of the material, with an overlap of 5 cm at the edges. In the bending areas, a triangular sector is cut out and folded. Thus, the arc for the front base of the trunk is ready. All that remains is to attach it to the structure, cut it to size and weld it. Also, jumpers are immediately welded to the arc.
The best option, of course, would be removable jumpers, because there are different cases. To attach the sides, holes are made into which bushings of the appropriate diameter are inserted. They are scalded in such a way that the profile does not bend when the bolts are tightened. After this, the sides themselves are made: the posts are cut to the required length (usually 6.5 cm) in the required quantity (about 8 pieces).
To arrange the mounting stud, the following steps are performed:
- two holes of 8 cm are drilled;
- a pin is placed in them;
- the part is welded;
- the required amount of thread is cut from it;
- The pin is screwed into the existing holes.
After this, the side upper crossbar is constructed. At the front, the workpiece is bent in the same way as the front frame. The paired element is done the same way. To attach the upper front crossbar, a bushing is welded to the bend of the side crossbar, and a piece of the stud is welded directly onto the front beam itself. The arrangement of the rear crossbar occurs in a similar way.
Aesthetic touches
When making a trunk for a Niva with your own hands, it is important to complete the manufacturing process, namely to paint the finished product. To do this, first clean the platform from scale and burrs.
Then the metal is degreased and primed to avoid rust formation in the future. The best option is to prime the surface with a zinc-containing primer that can withstand the effects of salt solutions.
The drying period of the structure should take at least a day, but it is better that the drying lasts two days. After a long waiting period, you can begin painting the trunk. Usually enamel is used for these purposes. After painting, you can put closed decorative nuts on the trunk in the places where the bolts are attached. Install the trunk on the car yourself using roof rails.
Side top bar
Have you forgotten how we bent the front arch? We also bend the side upper crossbar. One, another. Next, we weld the bushing to the bend point of the crossbar on the side so that the upper part of the front crossbar is securely fastened.
Now all the work is almost done. The hour has come for creative motorists. We need to paint the entire structure and give it a little style. To avoid rust, we recommend applying a coat of primer and only then thinking about paint. Among soil solutions, the most resistant to salt influences is soil containing zinc.
After applying a layer of primer, you should wait at least a day, and then use regular enamel and apply the desired color. Many people don’t like the way the bolts look at the joints of the structure. To avoid an unsightly appearance, you can place decorative nuts in these places. Here's a modern trunk for you.
Expedition trunk
Mainly used by off-road enthusiasts. The reason is simple installation, durable construction, and the ability to fasten various large objects. Such a rack is placed on the roof of a car, on special roof rails.
The most frequently transported items are:
- spare wheel;
- shovel;
- sand trucks;
- fuel cans;
- tents, sleeping bags;
- other equipment.
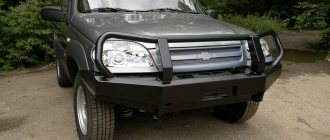
In addition to its spaciousness in the forest, it protects the body well from branches, protecting it from chipping. Most drivers install additional optics on the front.
How to do it yourself
Such a trunk can be made independently. You will need a welding machine and metal tubes of the required size. At the same time, the form is different, based on their specific needs.
The main thing when installing the trunk is to remember that its weight should not exceed 30-40 kilograms, otherwise the car’s center of gravity will be shifted upward and when turning at high speed this can lead to a rollover.
There are also ready-made solutions presented by the following companies:
- "Expedition";
- Eurodetail;
- REEF.
The expeditionary trunk on the UAZ Patriot has its pros and cons.
Let's start with the cons:
- The aerodynamics of the car decreases
- The clearance with the road decreases
- Fuel consumption increases, 2 liters per 100 km.
- When entering to park cars, there is a risk of not passing under the barrier.
- It raises the center of gravity, which is dangerous when entering a sharp turn and also increases the car's rollover when passing difficult sections of the road.
The advantages are of course more obvious. The expedition trunk is used for trips on expeditions, and therefore for transporting a large amount of cargo. For ease of loading, a ladder is attached to such a trunk. When opening the trunk, this ladder specially rises to the top on a shock absorber. To buy such a reliable trunk, you need to go to a special UAZ Patriot store, which exists at the plant itself. The trunk costs about 13,500 rubles, which is cheaper than taking, for example, a Chinese one. The ladder to the trunk is sold separately and costs 10,500 rubles, which is also cheaper. A trunk with a ladder can be ordered and paid for on the website, and if you pay by credit card, you receive a further 3% discount from the manufacturer. Delivery takes place directly to the entrance of your home. You can assemble such a trunk and attach it to the roof yourself with your own hands. A car with such a trunk looks brutal and powerful. You can transport large cargo and even inflatable boats on such a trunk, which is very convenient for travelers.
The price of the issue and a couple of practical tips
If you look at the offers of dealers offering additional accessories for VAZ 2121 cars, their price tags for forwarding luggage racks vary within 10 thousand rubles. Plus or minus 2 thousand in one direction or another, depending on the quality, brand, amount of material, technical characteristics and other things. For comparison, roof rails will cost you from 2600 to 3800 rubles. But you must understand that ordinary Nivov roof rails can withstand a load of up to 50 kg, and a full-fledged expeditionary roof rack can withstand a load of more than 200 kg.
To be fair, we note that if the price of an expeditionary trunk is too high for you, you can easily make it yourself. You will need metal tubes of 25 or 32 diameters for the base of the frame and a diagram borrowed from the Internet, specifically for the VAZ 21214. A homemade expeditionary trunk is a fairly popular topic for discussion among the Nivovods.
Of course, such a trunk cannot be compared in terms of quality of finish and “kosher” quality with the factory one, but it will turn out to be a very practical price solution. “Knight's move” implies the purchase of metal structures, welding, priming and painting. In terms of costs, it will be at least two times cheaper. Especially if you yourself have welding skills.
Expedition trunk for UAZ loaf
First, the lower trunk frame with stiffeners is welded, then the upper retaining perimeter. To improve the aerodynamics of the structure at the front, either the structure is narrowed or the corners of the frame are rounded.
To improve the fixation of the sides at the front, additional support arches can be made.
The enclosing perimeter is attached to the rack supports to a height of 6 and a half to 9 centimeters. All elements are welded. Four supports are welded to the bottom on each side to secure the trunk to the roof.
A chain-link mesh is welded to the bottom.
After this, the entire structure is cleaned of scale, the joints are degreased, and the metal is primed with a zinc-containing primer. After drying, the product can be painted.
The trunk can be mounted either on roof rails or on brackets with bolts.
Introducing the optional trunk
Until a certain age, I was little concerned about the issue of trunk capacity. But when I had my own family, I realized that a universal car is one that can take 3-4 passengers on board and, in addition, have a huge space in the back for loading the belongings of these same passengers.
When I was lucky enough to buy my own car, at first I did not pay attention to the presence of roof rails and the possibility of installing an additional trunk with their help. But how glad I was to notice them before going to the sea. I don’t know where I got so many things from in my house, but I got the feeling that the family decided to take literally everything. I looked in horror at more and more new suitcases and did not understand how to fit it in. Standing on the street, I saw a neighbor who was also getting ready for a long trip, apparently. Although he took things much more calmly. I smiled because I realistically assessed the trunk capacity of his Renault Duster and the amount of luggage. But when the trunk was full, things began to move onto the lid.
Great decision, I thought. While my girls were getting ready, I quickly read reviews on the Internet, watched a video and decided to buy myself a trunk. Luckily, installing it yourself took little time. Used 2021 models were available for sale, but I decided for myself that I’d rather take a brand new one.
But now I decided to share with you what I managed to find out.
Railings
You will not be able to install the appropriate trunk without roof rails. Or you will have to do them yourself, make changes to the car’s body configurations, and so on. That is, theoretically, this is all possible, but you will have to spend more time and money compared to cars where integrated roof rails were initially provided.
Installation is possible on any car - Lada Largus, Kalina station wagon, Chevrolet, Hyundai, German, Japanese cars and so on. All that is needed is the need for such a design.
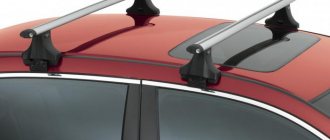
Essentially, roof rails are slats that run parallel on the roof of a car. In addition to slats, roof rails include fastenings, holders and seals. They prevent moisture from penetrating the metal, thereby protecting against corrosion.
The arcs are made from high-quality metals and coated with powder paints on top. This way their appearance is preserved for many years. Even if installing a trunk is not part of your plans, roof rails will remain a good decorative element of the car.
Railings are divided into two types.
- Universal. Any car can be equipped with such aerodynamic arches. They can be purchased and installed as needed on Opel, Hyundai, Niva, etc. models. Buying them in St. Petersburg or any other city is not a problem;
- Model. These are produced specifically for the car. That is, for Sandero Stepway, Skoda Yeti, Mitsubishi Outlander, Kia Sportage and so on.
Another classification provides for division into:
- Integrated. They are installed directly at the factory during car production;
- Removable. They can be mounted additionally if the car owner so desires.
Luggage racks
You can choose a large and spacious expedition trunk, or get by with a compact model for personal purposes and transporting a small amount of additional luggage that does not fit inside the luggage compartment.
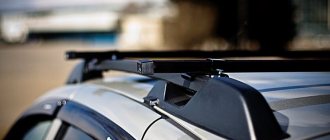
It is important not to miscalculate the size so that the trunk looks beautiful on the car, fulfills its purpose and does not cause unnecessary problems, does not interfere with the opening of the back door, etc. A modern trunk mounted on roof rails is a pair of crossbars that are mounted on the base of the roof
There are different manufacturers and prices, which affects the quality of products, their shape, cross-section, materials used
A modern roof rack mounted on roof rails is a pair of crossbars that are mounted on the roof base. There are different manufacturers and prices, which affects the quality of the products, their shape, cross-section, and materials used.
If you rely purely on the manufacturer, then it is better to pay attention to:
- Lux (Lux);
- Thule;
- Amos alpha;
- Atlant.
This is especially true for Thule products. This is the Swedish flagship, which is the leader in this segment on the market. Although the products are quite expensive, this is fully compensated by quality, reliability and durability.
Tuning and installation of additional equipment
Car enthusiasts equip expedition racks with additional equipment:
- Spotlights are often attached for illumination.
- A ladder is installed on the fifth door at the rear for easy access to the trunk.
- Of course, there is a bracket for a spare wheel.
- Various rope hooks.
- Closed niches for transporting things.
In addition, additional side lights are installed. The specified equipment is available for sale or is manufactured personally in accordance with requests.
Drivers love to innovate with their car.
It is only important to do it correctly, using technology. Below are several types of hand-made tuning:
- To secure the spare wheel, a bracket consisting of a nut, stud and washer is welded to the basket. A stud is screwed into the welded nut and the wheel is placed on it. It is pressed on top with another nut. It is better to mount a nut rather than a stud, since the welded stud cannot be unscrewed and will interfere with the position of the load.
- Additional lighting is also installed independently. When installing the lights, the main thing is that they do not protrude beyond the dimensions and side of the trunk, otherwise they will be knocked over by branches.
- The optimal front headlights are high beams. And for side lighting, a diffused light lantern is suitable.
- The antenna of the radio station must be securely fixed, otherwise at the first meeting with a thick branch it will simply be “blown away”.
Advantages and disadvantages of additional equipment
The additional equipment installed on the car has both advantages and disadvantages. Advantages of additional equipment:
- The equipment is reliably protected, which is convenient when moving in the forest.
- The second is additional space for transporting cargo.
- Car enthusiasts note the daring and brutal appearance of such additional accessories.
Among the shortcomings are the following:
- Violation of the aerodynamics of the car.
- When it’s busy, you can feel the appearance of “sailiness”.
- Fuel consumption increases slightly.
- A slight upward shift in the center of gravity.
Video review of an expeditionary car roof rack
A well-installed stationary expeditionary roof rack on a car will bring a lot of emotion, and small disappointments will result in creative, painstaking work to improve the design. Turning a blind eye to aerodynamic properties, one can rightfully consider the owner of a powerful basket a successful driver. After all, the trunk passed the necessary test drive, was modified, re-equipped and added invaluable experience to the owner.
A smart person won't go uphill, a smart person will go around the mountain
Since it was not possible to successfully solve the problem head-on and immediately equip the trunk with my own hands, I began to look for workarounds. Came to the following conclusions:
- The shelves must be secured in such a way that they can be easily and quickly dismantled, if possible without the use of tools.
- Purchased shelves for the trunk of a VAZ need to be modified so that the space above the arches in the trunk can be used for storing essential items.
- To eliminate misunderstandings when developing the design of the shelves, you need to make a mock-up.
Read news about the new Niva
- How to install fog lights on a Chevrolet Niva
- How to make an expeditionary trunk for a field
- Do-it-yourself trunk for the field
- Do-it-yourself trunk for the field
- How to install fog lights on a Chevrolet Niva
- Do-it-yourself expedition trunk for a Chevrolet Niva
- UAZ or Niva - which is better, car characteristics and features ::
- FROST car air conditioners // Online store // Prices // Air conditioners for cars Lada VAZ, VolksWagen Polo, Daewoo Matiz
What are the advantages?
- The ability to transport a load weighing about 110 kg, without damaging the smooth roof.
- The price range is significantly lower compared to the same trailer.
- The cargo is securely secured, so there is no need to worry about it.
- You can come up with many other devices.
- Whatever the burden, it will not interfere with looking at the road when moving.
A few years ago, the choice was small; universal roof racks were produced that fit any make of car, both sedans and SUVs, and were attached using a drain. Now technology has moved forward, therefore, the choice has become more diverse and wider. You can choose a foreign manufacturer if you trust the West more, or you can try to work with domestic production. The taste and color, as they say.
Now, first of all, attention is paid to the method of fastening and the materials used. It can be aluminum alloy or stainless steel, as well as plastic, but durable
An additional compartment for transporting things can be individual or suitable for all cars.
How to install the structure
There are 3 types of mounting the trunk on a UAZ: on roof rails (arches), on gutters, and directly on the roof. The choice of a specific method depends on what kind of car you have. The Patriot has standard arches, the 469, Hunter and “loaf” have the basket installed on the gutters or roof. Let's look at each type of installation in more detail.
Installing the luggage rack on the arches
When mounting the expedition vehicle, you should take into account that it is quite heavy (25–35 kg) and it is better to involve a partner for installation. The trunk should be positioned so that the brackets sit evenly on the arches. Next you need to tighten the bracket bolts. The junction of the roof rails and the trunk must be rubberized. The rubber prevents the device from moving and also protects the arcs from scratches. New purchased products usually come with installation instructions, which greatly simplifies the process.
Installing a roof rack on gutters
UAZ SUVs, like many other domestic cars, have special grooves on the roof, called gutters (foreign car manufacturers have largely moved away from them). It is in these very recesses that you can secure the trunk well. Fastening is done with special L-shaped brackets. This method, like the previous one, does not involve disruption of the roof structure, and therefore is also widely in demand. The downside is the low reliability of fixation: the possibility of the structure being torn out under heavy load cannot be ruled out.
The factory device is attached to the gutters in much the same way as to the roof rails. Let's figure out what the brackets for mounting to gutters look like if you have a homemade trunk. First you need to select the thickness of the steel used to make the brackets. The preferred thickness is between 2 and 4 mm. Three types of elements will be required:
- L-shaped brackets;
- support plates;
- clamping strips.
The prepared parts need to be attached to the structure and the expeditionary unit must be installed on the gutters. Installation is as simple as with roof rails. The only point that needs to be taken into account is the need to install rubber spacers between the gutters and brackets so as not to damage the car body.
Installing a rack directly on the roof
This installation of the product is considered the most reliable, since the likelihood that the trunk will disappear is almost zero. The disadvantage is the need to drill through the body. In order to do this, you need to remove the roof trim in the cabin. Then you should mark holes of the appropriate diameter for the bolts and drill them.
For drilling, you need to select the part of the roof where there is reinforcement (closer to the edge). From the inside (in the internal frame) holes are drilled with a roller cutter. This is necessary to secure the trunk with nuts.
Rubber spacers are installed at the fastening sites to prevent paint damage and corrosion. The rubber bands should be treated with sealant. Fastening is done with nuts from the interior. Upon completion, the removed casing is returned to its place. Non-original roof rails are installed in the same way.
UAZs are often used for trips to the dacha, picnic, fishing, hunting or for work. As a rule, this involves the need to take a lot of bulky items with you. It is difficult to do without a roof rack on the car. And by installing an expedition vehicle - purchased in a store or homemade - you turn your SUV into a real truck, allowing you to take with you whatever you want.
What else could I add?
The main function of a roof rack is to save space inside. By installing additional equipment, you can expand its functionality.
- “ ” - lanterns that will illuminate the road even better.
- There is space for a hijack and a shovel in the inner and outer sides. Oh, how the gardeners will be happy.
- If you often drive through overgrown areas, such as forests, you can install branch guards. They will protect the glass from damage.
Don’t forget also that the expedition vehicle protects the roof itself well from dents. As you can see, such a trunk can serve as a good tool not only for saving space, but also for installing useful equipment. In addition, in addition to the racks themselves, other structures can be attached to the roof rails for transporting fishing or hunting equipment.
As you can see, it’s possible to make a trunk with your own hands. Larger Mitsubishi L200s will require a side ladder. For small foreign cars, a reinforced frame will be sufficient.
DIY crafts for a master class competition
Close... [X]
First you need to make 2 brackets at an angle of 45° or 60°. To do this, the beams are attached at an angle of 90°, and then rotated until they achieve the desired angle. This pair of brackets is attached to the wall, taking into account the width of the future canopy. To achieve this, you need to attach the vertical beams to the wall, first check with a level whether they are evenly attached. This method is used when the task is: how to make a canopy over a suspended entrance.
Pedals for driving a sewing machine
It is better to prepare the mortar for gluing tiles in small portions so that the excess mixture does not have time to harden.
You can glue wheels from a toy car to a gift package for a man or boy. This will sound especially original if the gift itself is related to the automotive theme. DIY paintings
Make holes in the plug in which the end of the chain will be fixed. Place the chain there and thread any pin that needs to be secured on both sides in any convenient way. Place the chain on the puller and tighten. Perform adjustments for the plug in the clamped and unclamped state. Thus, the puller will have two positions: one allows you to put it on the filter, and the second allows you to grab and unscrew the filter element. Guides are attached perpendicular to these racks, for which you will need boards with cross-sectional parameters of 4x10 centimeters. Their distance should not exceed one meter.
6. Having reached the end, the end of the strip must be tucked under the nearest overlap (if necessary, tear off the excess).
Correct assembly of the wardrobe is the key to long-lasting and trouble-free operation of the entire structure. At the same time, the flawless installation of wardrobe doors is of paramount importance. If you follow certain recommendations regarding the assembly of the product, then the installation of this element of cabinet furniture will not take much time and effort. Further in the article we will provide detailed instructions regarding the independent installation of wardrobe doors. We give each edge of the petal an oval shape. Next, we warm the flower over the fire, giving it a more lively appearance.
We fill all the cavities around the base box with professional polyurethane foam with a dispenser. DIY toys
You can make just a beautiful Christmas tree, or you can decorate it with candies, so you will get not just a decoration, but a useful element of the New Year's sweet table. We will need a small box (it can be from under anything) - this will be the basis of the tank.
Directly in front of the pump it is necessary to install a coarse filter and a check valve. The fine filter must be installed behind the pumping station. This is due to the fact that it should not be exposed to debris and dirt, as it can quickly fail. A check valve is needed to prevent water from flowing back into the well through the main line. It is definitely worth installing a pressure gauge and a pressure switch. This will allow you to monitor the state of the system and, if necessary, bleed the media from the hydraulic tank. By the way, after all the work is completed, it is necessary to further debug the pressure switch. If you adhere to the rules described above, then the water supply from a well in your dacha, the system diagram of which has already been discussed, will work efficiently and correctly. But that's not all, so let's look at a few important nuances: - a drill with a brushing attachment. This is a polymer abrasive brush for sanding wood. If you are absolutely afraid of a drill or cannot purchase such an attachment, you can get by with an ordinary metal brush, but this is time-consuming and difficult. And the wood will end up not being as polished as it would have been with an attachment. Its price is around $3;
And making angels out of ice is very simple. Take soap molds or any other silicone angel molds. All 4 spreads.
image
DIY postcards for March 8th master class postcards
Similar news
.
The trunk installed on the roof of the UAZ Bukhanka will allow you to place most of your things, ensuring the comfort of passengers.
If the trunk is used irregularly or you don’t want to spend money on buying it, you can make it yourself from scrap materials that every car enthusiast probably has in his garage.