In Russian-made cars, as in any other, fuse blocks are necessary to combine all electrical circuits. In addition, they perform the function of protecting electrical devices and appliances from overvoltage. Now you will find out where the VAZ 2108 fuse box is located, what the elements of the device are responsible for and how to replace them.
In old-style vehicles that were manufactured before 1998 inclusive, the fuse block (fuse block) is designated by the combination of numbers 17.3722. Externally, the unit is equipped with a plastic case, inside of which a microcircuit is installed. The wires of electrical appliances, as well as the so-called barrel fuses (they are made in the shape of a barrel), are connected to this circuit.
Vehicle VAZ 2108 (tuning)
If we talk about cars of later years of production, then in such cars the power supply is designated by the marking 2114-3722010-60. Such vehicles, unlike earlier models, are equipped with fuses.
In addition, the difference between the mounting blocks in earlier and later car models lies in the electrical circuit.
It is also necessary to add that, regardless of the type of vehicle engine (whether it is a carburetor or an injector), the power supply itself, as well as its circuit, may vary depending on the year of manufacture.
Here we note that domestic car enthusiasts are sometimes confident that the location of the power supply parts, as well as its electrical circuit, directly depends on the method of fuel supply. We hasten to assure you that this is not at all the case.
In VAZ 2108 vehicles, regardless of the year of manufacture and model of power supply, the devices are located in the engine compartment under the windshield, directly opposite the driver's seat.
Loading …
As for the differences between the old and new boxes:
- on both blocks the PP designation is different;
- The PPs themselves may have different denominations;
- In newer models of units, the electrical circuit does not have a cooling fan relay, as well as devices for washer for the rear window.
old type power supply
So that you can be familiar with both the old and the new PSU, we will consider the electrical diagram and the purpose of each individual box.
Old type device for VAZ 2108
The purpose of the fuses in the old type block
It is also necessary to tell our readers about the purpose of the relay.
| Number | Purpose |
| 1 | Ensures the functionality of components designed to clean headlights. |
| 2 | This component is designed to provide the functionality of the rear window cleaning motor. |
| 3 | This software is designed to protect against breakage of turn signal headlight bulbs and hazard warning lights. |
| 4 | The relay ensures the operation of the windshield wiper motor. |
| 5 | Using this relay connector, you can determine the functionality of the high or low beam lamp or interior light bulb. To do this, you just need to connect the lamp to the socket. |
| 6 | This relay ensures the operation of the rear view glass defroster. |
| 8 | Ensures the functioning of high beam lamps. |
| 9 | Responsible for the functionality of the low beam headlights. |
| 11 | Responsible for the operation of the cooling system fan. |
| 12 | Steering horn. |
New type block
Below we will look at the electrical circuit and the purpose of the new PSU elements.
Diagram of new PSU components
We will also consider the purpose of each power supply component.
Purpose of fuses in a new type of block
Below is a table of the assignment of components in the new model power supply.
| Number | What is he responsible for? |
| K1 | This relay ensures the operation of the rear window washer. |
| K2 | Provides operation of turn signal lamps and hazard warning lights. |
| K3 | The purpose of this part is to ensure the operation of the windshield wiper motor. |
| K4 | This component ensures the functioning of the brake light bulbs, as well as the vehicle's dimensions. |
| K5 | This component is responsible for the functioning of the high beam bulbs. |
| K6 | This component is responsible for the performance of the headlight cleaner. |
| K7 | The seventh element ensures the functioning of the engine for vehicles equipped with electric windows. |
| K8 | Ensures the functioning of the steering horn. |
| K9 | This relay is designed to protect the cooling system fan. |
| K11 | Responsible for the functionality of the rear window heating mechanism. |
| K12 | Ensures the functionality of low beam headlights. |
Step-by-step replacement instructions
The replacement procedure itself in machines with a new and old model power supply is virtually no different. The only difference is in the purpose of the block components.
- First you need to open the hood and disconnect the battery from the power supply. Any work on replacing elements, or generally related to electrical work, should be carried out with the battery disconnected.
- In the area of the windshield, opposite the driver's seat, you need to find your power supply. It is hidden behind a plastic cover. Dismantle the cover to get to the PP.
- On the back of the plastic cover you will see a device diagram printed on the cover, where the location and purpose of each fuse is marked. For example, you need to change the element that ensures the operation of the headlights, interior lighting, or fuel pump. To locate the failed component, use this material or the diagram printed on the back of the cover. To dismantle the PP, remove it using special tweezers. If you need to replace the relay, pull it out by rocking up and down.
- Replace the failed element with a new one. Pay attention to the denomination - it must be the same in both cases. don't forget to connect the battery.
Open the hood and find the power supply installed under the windshield near the driver's seat. Bend the block latches and disconnect the clamps, then remove the power supply cover. Using tweezers, remove the burnt out component. Determine the inoperability of the element by the burnt-out fusible thread. Install a new one in place of the failed part, while observing the digital rating indicated on the plastic case.
Video “Reworking the power supply using the example of a VAZ 2109”
This video shows the procedure for converting an old type power supply unit to a new one using the example of a VAZ 2109 car.
Was this article helpful?This article was helpfulPlease share the information with your friends
Source: https://avtozam.com/vaz/2108/kak-pravilno-zamenit-predohraniteli/
Replacing the device
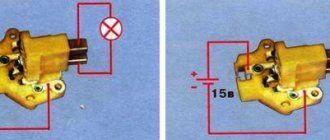
To replace the VAZ 2109 regulator, you must first disconnect the negative terminal from the battery. Then use a screwdriver to remove the two bolts that secure the housing to the generator. Disconnect one wire and remove the assembly along with the brush holder. That's it, all that remains is to install a new one in its place. As you can see, it’s not difficult to replace anything, and if you have a spare one, you can do it in the field.
Video about checking the VAZ 2109 voltage regulator:
The VAZ 2109 car model began to be produced back in the early 90s. Nowadays, this model is significantly different from older editions - it is more comfortable and easy to use. The health of the car depends largely on the constant current power - the voltage regulator and relay are responsible for this.
What fuse goes to the dimensions of the VAZ 2108, 2109, 21099
Dimensions (exterior lighting lights) of VAZ 2108, 21081, 21083, 2109, 21091, 21093, 21099 cars are powered through fuse No. 9(8A), No. 10(8A) in the mounting block 17.3722 or F10(7.5A), F11(7 ,5A) in mounting block 2114.
- In this case, the dimensions of the right side “hang” on fuses No. 10 (F11), the left side on fuses No. 9 (F10).
- What fuse goes with the dimensions of the VAZ 2108, 2109, 21099?
- Location of fuse No. 9 and No. 10 in mounting block 17.3722 (finger-type fuses)
See photo at the beginning of the article.
Location of fuse F10 and F11 in mounting block 2114 (scissor fuses)
How to check the fuse? — We replace it with a known good one and check whether the dimensions work.
How to quickly check the serviceability of the electrical circuit of the dimensions?
- We connect the test lamp with one terminal to the fuse and the other to ground and turn on the dimensions. If the circuit is working properly, the lamp will light up.
- We connect the voltmeter with one probe to the fuse, the other to ground and turn on the dimensions. If the circuit is working properly, the voltmeter will show a voltage of at least 12 V.
- We use a piece of wire. We press one end of it to the fuse, and touch the “ground” with the other end. We include dimensions. If there is current, there will be a spark between the ground and the wire (only for VAZ 2108, 2109, 21099 with a carburetor engine).
Notes and additions
— On VAZ 2108, 2109 cars of the first years of production, the dimensions were included separately on the right side and separately on the left. The side light was turned on using a separate switch.
— Scheme for switching on the side lights of VAZ 2108, 2109, 21099
Scheme for switching on external lighting (“dimensions”) VAZ 2108, 2109, 21099
More articles on the dimensions of VAZ 2108, 2109, 21099, etc.
Dimensions of VAZ 2108, 2109, 21099 do not light up
Dimensions of VAZ 2113, 2114 cars, connection diagram
Dimensional switch VAZ 2108, 2109, 21099
Diagram for switching on the external lighting (side lights) of the Niva 21213 car The fuse blows, causes, fault diagnosis
Switching relays and fuses of the mounting block 17.3722 VAZ 2108, 2109, 21099
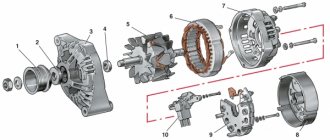
Checking the generator with an electronic oscilloscope
An oscilloscope allows you to accurately and quickly check the serviceability of the generator and determine the nature of the damage using the shape of the rectified voltage curve.
To check, assemble the circuit according to Figure 3.
Disconnect the common terminal wire of the three additional diodes from the D+ plug of the voltage regulator and take measures to ensure that the tip of the disconnected wire does not short circuit with the generator ground.
Connect the wire from the battery to connector D+ of the regulator via switch 1.
Thus, the excitation winding will be powered only from the battery.
Turn on the electric motor of the stand and increase the rotor speed to 1500–2000 min-1.
Using switch 6, disconnect the battery from terminal B+ of the generator and using rheostat 4, set the output current to 10 A.
Check the voltage at the B+ terminal of the generator using an oscilloscope. When the valves and stator winding are in good working order, the rectified voltage curve has a sawtooth shape with uniform teeth (Fig. 4, I).
If there is a break in the stator winding or a break or short circuit in the valves of the rectifier unit, the shape of the curve changes sharply: the uniformity of the teeth is disrupted and deep depressions appear (Fig. 4, II and III).
After checking the shape of the voltage waveform at terminal B+ of the generator and making sure that it is normal, check the voltage at plug D of the generator with the wire disconnected from plug D+ of the voltage regulator.
Plug D is the common terminal of three additional diodes (see Fig. 1) that supply the excitation winding when the generator is operating.
The voltage curve here should also have a regular sawtooth shape. An irregular curve shape indicates damage to the additional diodes.
Source
Fuse box location diagram for VAZ 2108, 2109, 21099
Let's talk about the location of all electrics in the circuits for the VAZ 2108, 2109, 21099. From the article you will learn where the fuses and relays are located, as well as what each of them is responsible for. In addition, we will give examples of troubleshooting electrical problems and replacing fuses with your own hands.
It must be said that the electrics in front-wheel drive VAZs 2108, 2109, 21099 are simple and unpretentious. Spare parts, components and the fuses themselves cost pennies, so don’t worry if they fail. Buying fuses for the VAZ “chisel” model is not difficult, they are available everywhere, and by the way, there is no threat of a shortage of these spare parts.
If a component of the car breaks down, for which the electrician is responsible, immediately figure out what the problem is. Using our recommendations, fuse diagrams and their meanings, you can easily replace fuses with your own hands. You can make the replacement without tools, following only the instructions.
The diagram below shows how to find the fuse box.
Immediately below the windshield is the fuse box.
The cover is removed by simultaneously pressing 2 latches as in the figure below.
How to open the fuse box
Take plastic tweezers, small pliers with narrow ends.
Use tongs or pliers to remove the fuse
Gently but firmly grasp the fuse with pliers and remove it with a vertical upward motion.
Removing the fuse from the block
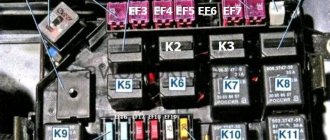
The photo below shows the appearance of the block without a cover.
Fuse box top view
The rear fog lamp fuse is separate from the unit and is located under the panel to the left of the driver.
Rear fog lamp fuse
Let's move on to the values of each of the fuses. In the table below we have covered the topic.
Removing and replacing the Lada Granta air filter with your own hands
Table of fuse values for VAZ 2108, 2109, 21099.
| Fuse, no. | Current strength, Ampere | Values |
| F9 | 7,5 | Right fog lamp |
| F8 | 7,5 | Left fog lamp |
| F1 | 10 | Relay, valve and activation of headlight cleaners |
| F7 | 30 | Headlight cleaner operation, washer pump, washer, rear window wiper and defroster, heater and radiator fan, glove box light |
| F16 | 15 | Windshield wipers, turn signals and tail lights, alternator, brake fluid level, oil pressure, parking brake, carburetor choke, coolant temperature, fuel level and voltmeter |
| F3 | 10 | Car interior lighting, rear lights |
| F6 | 30 | Window lifters |
| F10 | 7,5 | License plate lighting, engine compartment lighting, instrument lighting, side lights, cigarette lighter lighting |
| F5 | 20 | Klaxon |
| F11 | 7,5 | Side light of rear right lamp |
| F2 | 10 | Alarm |
| F4 | 10 | Relay, switching contacts and rear window heating element, cigarette lighter |
| F15 | 7,5 | High beam right headlight |
| F14 | 7,5 | Left high beam |
| F13 | 7,5 | Low beam left headlight |
| F12 | 7,5 | Low beam right headlight |
Replacing the mounting block on VAZ 2108, VAZ 2109, VAZ 21099
Welcome! Mounting block - on cars of the Samara family, only two blocks were used, the first block was installed on carburetor cars and was used until 1998 (it had the index “17.
3722"), after 1998, when cars of the Samara family began to be transferred to an injection system, another mounting block from the VAZ 2114 car began to be used and it had an index similar to the car brand (“2114–3722010–60” it was marked), differed these two blocks are relay types (They were smaller on the new block and more compact) and fuses (on the old block cylindrical fuses were used like on the classics, for clarity, cylindrical fuses can be seen in the photo below, but on the new one they were already flag fuses).
Note! In order to replace the block with a new one, you don’t need a lot of tools, the main thing is: Stock up on socket heads, buy an extension cord for them, also a screwdriver just in case (Use it to pick out the mounting block if something happens), and also take a wrench to unscrew the nut securing the negative wire to the terminal!
Where is the mounting block located? On all cars of the Samara family (It doesn’t matter what engine is installed, the make of the car is also important, that is, VAZ 2109 or VAZ 2114), the block is in the same place, in order to see it, lift the hood of the car and look under the windshield, It is indicated in the photo with an arrow for clarity (But there the top cover is removed from the unit, and you will have it, so keep this in mind).
When do you need to change the mounting block? You can change it to a new model (With flag fuses), you can never change it at all and constantly drive the old one, but electronics are delicate things and over time (Over the years) the contacts burn, oxidize and deteriorate, especially if the car is not stored in a garage on the street (As a rule, there is high humidity on the streets, from which all electronics suffer), then problems with the mounting block will sooner or later begin, fuses may constantly blow out, in addition, in the place where the contacts are oxidized, the heat will increase due to with which your block will not melt much, another problem with the electronics will appear (For example, you have a fuse and it is intact, but the entire circuit to which the fuse goes does not work), in this case the contacts may have come loose (If you know how to solder, then You don’t have to change the block, just disassemble it and solder all the contacts according to the diagram that can be found from photographs on the Internet).
How to change the voltage regulator (tablet) on a VAZ 2115-09, etc. (part 1)
EARNING ON THE WEB IN CASHBERY I invite you to Twitch.
Note! When the starter switching relay is ready to fail, as we have already said, the car will not start and will not respond to turns of the key in the ignition switch, the same thing happens when the battery charge is weak, for this reason, if you suspect it, either charge it or change it to the newest one for which the design is intended if the oil is already very worn out, in addition, exactly the same situation (the car will not start) can occur due to the ignition switch, speaking directly because of its contact group, but on cars with a relay turning on the starter this happens occasionally , since the relay also unloads the contacts at the ignition switch, the contacts are less likely to burn out, but still, about how to check the contact group of the lock, you need to read the title from the text of the article: “Replacing the ignition switch without its contact group on a VAZ”!