Many car enthusiasts do everything possible to make their car stand out from the crowd. Some decorate the body of their “iron horse” with airbrushing, others are engaged in tuning and use fiberglass to make a bumper or other parts. Knowing how to make a bumper from fiberglass, you can not only improve the appearance, but also independently restore the damaged power part. It is important to prepare the necessary materials, be patient and diligent, and the resulting bumper will be impossible to distinguish from the factory one.
Features of fiberglass bumper
Fiberglass fabric is often used to tune vehicles, equipping them with original spoilers or non-standard fenders on wheel arches and other parts of the body. Some hobbyists are even engaged in the manufacture of automobile bodies based on a self-made matrix, gradually applying layers of fiberglass on it. The material can also be used to seal rusted body parts, as well as to restore part of a car bumper.
Vehicles are often customized with fiberglass fabric
Fiberglass bumpers have become quite a popular car accessory due to the following features of fiberglass:
- affordable price. The cost of manufacturing a fiberglass power part is much lower than the price of a finished bumper;
- increased strength. Subject to technology, fiberglass construction is as strong as aluminum;
- light weight. The fiberglass layer, after hardening, is lightweight compared to metal bumpers;
- resistance to corrosion processes. The fiberglass bumper is quite durable, as it does not rot or corrode;
- elasticity after hardening. In case of slight deformations, it restores its shape;
- manufacturability. The process of creating a model and restoring a bumper can be easily done at home.
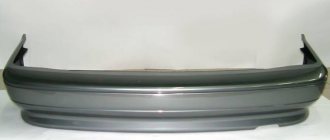
A self-made fiberglass power bumper can radically change the appearance of a car. If, as a result of fighting off-road, the integrity of a part is damaged, it is easy to give it its original appearance. It is enough to reinforce the damaged part of the bumper with glass material using resin. And if a broken bumper cannot be repaired, it can be replaced with a new one without causing damage to the family budget.
Along with its advantages, fiberglass, like any material, also has its weaknesses. The main disadvantage is the increased toxicity of dust released during processing of the finished product or finishing the surface of the fiberglass matrix. It is necessary to use a respirator to protect the respiratory system, and also work with glasses and gloves.
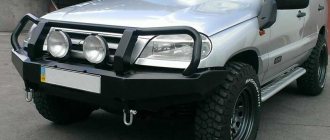
Fiberglass power bumper can change the appearance of your car
Master class on making a do-it-yourself fiberglass body kit
This material is chosen by 80% of lovers of DIY car crafts. To dispel doubts about the strength of the material, watch the video. The questions will disappear by themselves.
Deciding to make a body kit for a car with your own hands is always difficult for a beginner. At least because the question of materials is open. Write down:
- fiberglass;
- epoxy resin;
- a lot of plasticine;
- gypsum and clay;
- flexible wire;
- wooden bars;
- cream;
- fine mesh.
Step 1
Stock up on a drawing of the future body kit. Constantly checking with it, sculpt a frame on the car. In wide places, supplement it with bars, and in thin places with mesh. Provide recesses for an additional pair of headlights and air intakes. Do not sculpt it tightly - the structure will have to be removed.
Step 2
Prepare liquid plaster, then coat the frame with cream. This will allow the clay to easily move away from the machine. Place the layout on bars or boxes. Next, pour the prepared plaster into the plasticine part. Leave the future kit to think about its behavior. Joke. The hardening process is long and depends on the weather. In hot weather it will take 1–2 days, in cold weather – 3–4.
Step 3
After the part has hardened, remove it from under the plasticine. Drill small holes to bleed air. Coat the mold with cream, then prepare epoxy resin and strips of fiberglass.
Step 4
Place strips on the plaster mold until the thickness reaches two millimeters. Then lay a flexible metal film to strengthen the structure. Again, continue to cover everything with fiberglass. When ready, leave the body kit to dry and return to it in a couple of days. Remove the structure from the plaster mold, cut off the excess and sand it. Ready!
What are the advantages of a fiberglass power bumper?
Car owners highly appreciate the advantages of a fiberglass-based bumper.
After all, it has a number of advantages:
- ease. Fiberglass construction is much lighter than steel and even aluminum. In sports cars, where every gram is important in the fight for speed, fiberglass parts help reduce the weight of the car;
- non-standard. If desired, you can make a power part of any shape. After such tuning, the car will stand out noticeably among other cars. After the paint has dried, the bumper is difficult to distinguish from the factory one;
- long service life. The bumper retains its original appearance and shape for a long time, as it is not subject to corrosion. If used carefully, the product will last quite a long time;
- increased strength. The box-shaped structure, reinforced with stiffening ribs, is capable of withstanding significant loads and impacts.
Thanks to these advantages, fiberglass bumpers have gained wide popularity among car enthusiasts.
Installing body kits on a car with your own hands
Securing all the purchased equipment is the most difficult task assigned to you. To do this, you need to acquire the appropriate tool, which will depend on the chosen type of body kit. Metal body side parts may often require welding, which is a difficult process reserved only for professionals.
In the case of plastic parts and fiberglass body kits, you can use simpler mounting options and start the process of assembling the body kit in your own garage. Otherwise, it is better to immediately contact bodywork specialists and get professional help. The sequential steps when installing a plastic body kit are as follows:
- remove the front and rear bumpers of your car to make room for purchased parts;
- remove the fender liners, which will be put on after installing all the body kits;
- attach the front bumper to the same fasteners that held the factory version;
- then you should immediately install the rear bumper using the same factory fasteners;
- with the side parts of the body kit everything is much more complicated - you need to position them as accurately as possible;
- after an even and precise position, use the fasteners that come with the set of body kits;
- Next, all that remains is to install the fender liners in place and evaluate the appearance of the car.
Often the body kit is purchased unpainted, so it is necessary to pre-paint it. This must be done before installing the body kit, otherwise you will have to deal with rather complex painting of an already installed part. You can fully count on an excellent visual result if all the tools and materials were selected with high quality.
If certain inaccuracies occurred at the stage of selecting materials, paints and fastenings, installing the body kit yourself will not go so smoothly. Some Chinese body kits do not have fasteners, which forces the driver to use self-tapping screws, screwing them into the car body. This will cause corrosion of the body in the drilled areas after just a few months of use.
So, in order to make a homemade spoiler for your car, you will need a certain amount of fiberglass or carbon fiber. In order to start making a spoiler with your own hands, you will first need to make a blank, so to speak, the shape of the future spoiler.
How to make a spoiler for a car
The blank is best made from two parts: an upper part and a lower part. As a material for the blank, a piece of foam plastic of the required size is quite suitable. You will also need a piece of chipboard to make an arched guide rail and hardboard cut to a pattern, which will make the future spoiler for the car more convex.
We make our own bumper from fiberglass
Before starting work, you need to figure out how to make a fiberglass bumper with your own hands. Every car enthusiast who is ready for painstaking work can master the manufacturing technology. After all, this creative process will take at least a week. Everything will depend on the temperature conditions and the configuration of the power part.
Every car enthusiast can master the technology of bumper manufacturing
Having decided to form a bumper with your own hands, you will have to perform a number of operations:
- develop a sketch of a tuned part;
- assemble a layout or make a matrix based on the drawing;
- make a fiberglass part according to the shape of the matrix;
- apply a paint coating to the surface.
Before starting work, it is necessary to decide on the material for reinforcement - fiberglass. It is offered in various types, which differ in composition and properties.
The surface of the future bumper can be formed using the following materials:
- glass veil. It has low weight and increased flexibility. The material is suitable for forming a relief surface of a part and creating an outer layer;
- glass mat. It gives the future bumper an increased margin of safety after the resin has hardened. Using glass mat, the main part of the power part is formed;
- powder glass mat. In terms of strength characteristics, it is significantly superior to glass veil and glass mat. The material is alternated with glass mat when forming the bumper.
To make a bumper, you should prepare everything you need and study the technology.
Making your own fiberglass body kits
An aerodynamic body kit can greatly improve the appearance of your car. Different shapes and designs of body kits can give vehicles a bold, sporty, stylish, modest and even funny look. In addition, a high-quality part can significantly improve dynamic characteristics: controllability, operational stability and fuel consumption. That is why we can say that the work is carried out according to complex tuning. Moreover, if we consider a specific type, then the front bumper body kit, as it were, lands the car at high speeds, and the rear bumper body kit removes air turbulence that can lift the car. Aerodynamic body kits are presented on the market in a wide variety, but all of them, as a rule, have a considerable price. There is only one way to save significantly on tuning - making the body kit yourself.
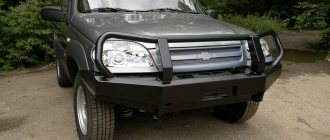
Car with body kit
Before you make a body kit with your own hands, you should decide for what purpose you need it? If to change external tuning, then the product must be without extra holes and design changes. When it comes to driving characteristics, changes in the body and deformation of other parts are inevitable.
Please note: at low speeds the benefits of the aerodynamic body kit are not visible, but from 100 km/h everything becomes apparent. At high speeds from 140 km/h, the body kit begins to affect handling. Because of this, aerodynamics should not be discounted.
Tools and materials for making a car bumper
If you are planning to make a bumper with your own hands from fiberglass, you should purchase and prepare everything you need according to the list.
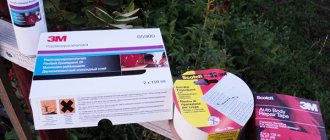
It is necessary to prepare in advance all the materials for making the bumper
To complete the work you will need:
- fiberglass fabric;
- resin for lubricating layers of fabric;
- electric drill with a set of drills;
- grinder with cutting wheel;
- Sander;
- brushes of different widths for impregnation of the material;
- sandpaper of various sizes;
- masking tape;
- metal and rubber spatulas;
- ruler, scissors and glue;
- rubber roller for smoothing layers of fiberglass;
- hardener for adding to resin.
You should also stock up on technical plasticine, polystyrene foam, and polyurethane foam. To remove the finished product from the matrix, you will need a parquet polish or a special composition. It is necessary to worry about personal protective equipment. Use a respirator or protective mask. Wear glasses and protect your hands with gloves.
Part manufacturing stages
Making a body kit for a car from fiberglass will take 1-2 weeks, so you should be patient and plan your free time in advance.
Materials and tools
To make a car body kit with your own hands, you will need:
- drawing of the future product;
- fiberglass;
- plasticine (a lot);
- epoxy;
- gypsum;
- fine mesh;
- sharp knife;
- wooden blocks;
- wire;
- foil;
- cream or Vaseline;
- sandpaper or sanding machine.
It is best to create a new tuning element in a warm garage with good lighting. When working, it is important to keep the room clean. Particles of dust and debris can stick to the workpiece or the final paint and give the finished part a sloppy appearance.
Operating procedure
Step-by-step master class on creating a car body kit from fiberglass and epoxy resin:
- Fashion a plasticine frame on the car, with all the recesses for headlights, air intakes and other elements according to the drawing. In wide places it can be supplemented with wooden blocks, and in narrow places it can be reinforced with a mesh.
- Remove the frame, coat it with cream and install it on bars or dense boxes of the same height.
- Dilute liquid plaster and pour it into the plasticine frame.
- Leave the workpiece to harden (in summer this will take a couple of days, in winter - three or four).
- When the plaster part dries, remove it from the plasticine mold.
- Coat the plaster blank with cream and begin gluing it with strips of fiberglass using epoxy resin.
- When the thickness of the fiberglass layer reaches 2-3 millimeters, lay foil over the entire surface of the workpiece to strengthen the part and continue pasting with fabric.
- Leave the finished element for 2-3 days until completely dry, then detach it from the plaster mold.
- Cut off the excess and carefully sand the resulting part.
How to make a fiberglass bumper - process features
Making fiberglass bumpers with your own hands is carried out using various methods:
- using a matrix filled with fiberglass on the inside;
- using a mock-up, on the outer surface of which fiberglass is glued.
Fiberglass bumpers are made using various methods.
Matrix technology is used to reproduce the shape of bumpers that have fallen into disrepair, and the breadboard method is used to produce new products. Using a car bumper, you can create a good basis for a future matrix.
To make a matrix you need:
- remove the bumper;
- remove damaged parts;
- cover the surface with tape;
- cover with a layer of warm plasticine;
- lay cold plasticine on the surface;
- compact and smooth the base.
After the materials have hardened, the matrix should be separated from the original bumper. Polyurethane foam or polystyrene foam is also suitable for making blanks. The working surface should be covered with putty and treated with sandpaper.
Making a bumper using a matrix is easy:
- coat the surface with paraffin;
- level the matrix with gelcoat;
- apply resin;
- lay down the glass veil.
Then build successively layers to the required thickness, applying the resin with a roller or brush. After hardening, all that remains is to remove the finished part. The process is similar to making a bumper using a matrix.
Features of the technology
I will say right away that building a bumper from scratch is difficult. This will require certain skills, experience, a wide range of materials and all kinds of tools.
see also
Towbar for Gazelle: which one to choose, design options
The problem is that the resulting price of such a design is prohibitive. It’s easier to make a product to order or buy a ready-made bumper from different manufacturers. After all, during the work it is necessary to create ideal symmetry, avoid any gaps, and strictly observe dimensions. Also causing difficulties are standard fastening points, for which it will be necessary to provide high-precision holes, tabs for fastening materials, and much more. In general, there are only disadvantages, and I don’t recommend starting from scratch. In addition, there is always the opportunity to take an old bumper from your UAZ Patriot, for example. Minor repairs, proper work with fiberglass, and here you have a completely new bumper.
In fact, you will need to take the old body kit, remove all unnecessary and deformed parts, add new components and, if necessary, holes. That is, the limitations are only in your capabilities and imagination.
At the factory, for inexpensive cars, ABS plastic is used in the manufacture of bumpers. Carbon or polyurethane is used on more expensive cars. Using fiberglass, you can create a product that is not inferior to factory analogues.
The technology in general looks like this:
- First, a sketch is drawn on paper. It is better to immediately provide all dimensions and mounting holes. Don't just paint a pretty picture;
- A layout is being made. Based on the available drawings and dimensions, a model is made based on one material or another, on the basis of which a new body kit will be formed;
- The model is covered with fiberglass. It is important to process it competently in order to then be able to separate the two components. That is, the layout itself and the manufactured bumper;
- Process the resulting structure and then install it on the car.
Everything looks quite simple. But don't rush to conclusions. There are some difficulties and nuances here, which are best known in advance.
The procedure for painting a power bumper
The final stage of work should be performed after fixing the bumper to the car. Procedure:
- polish the surface with zero sandpaper;
- apply a layer of primer;
- cover the base with paint.
When the paint is completely dry, you should coat the painted bumper with car varnish.
The fiberglass bumper is an important element of the car. If time does not allow you to do long and painstaking work, you should use the services of professionals who will qualitatively form the bumper according to your requirements and complete the order on time.
Replacing bumpers
Homemade bumper
There are two main ways to install this body kit:
- modernization of the existing bumper;
- completely new installation.
In the latter case, we have a finished part that is installed in place of the old one. The only negative is that a new bumper is quite expensive and is not easy to find.
The first method is simpler; it allows you to preserve factory parts and design features. At this stage, you can provide air ducts for cooling the brakes and radiator, and also consider mounting the fog lights.