In case of minor damage to the paintwork of the car bumper, auto specialists carry out local painting of the bumper. Unlike the full one, it involves painting only the damaged areas of the part, and not its entire area. Accordingly, the price of such a service is quite low and generally available to all car enthusiasts!
Reasons for painting
The bumper must be painted in the following cases:
- The car is many years old, although the plastic bumpers do not bloom and do not rust like the metal of the body, but over time the paint begins to fall off from them piece by piece.
- The bumper suffers the most in collisions. In such cases, either buy a new one and paint it, or restore the old ones, if possible.
- Even after purchasing a new car, some drivers have noticed that the paint on the bumpers begins to peel off. This is most likely due to non-compliance with the technology when carrying out paint and varnish work or the quality of the paint itself.
How to paint bumpers: methods
You can paint bumpers yourself, in makeshift conditions, in several ways:
- brushes (can be used for invisible areas, because stains are visible);
- with a spray can (one of the popular and easy ways to apply paint);
- spray gun (a compressor, a hose and a gun for spraying paint are required).
Some large auto manufacturing plants have a method where parts are dipped into a paint bath. This method is used by manufacturers of expensive cars (Ferrari, Lamborghini, etc.). And even AvtoVAZ, they say, those cars that were exported to India were painted in this way (dipped in a bath). For the domestic market, VAZ cars are painted using the application method.
DIY painting materials and tools
Work such as painting or tinting the rear window with your own hands does not in any way affect the operation of the engine and other parts, so a completely inexperienced beginner can do it. It is clear that a beginner should not attempt to repair engines and other complex technical products alone. In order for the result to be of high quality, you must follow the technology and use the following materials and tools:
- Personal protective equipment (PPE). These are gloves, a respirator or gas mask, overalls (robe).
- Degreasing liquids.
- Primer.
- Putty. It is desirable that the putty contains fiberglass.
- Sandpaper. It is necessary to sand with sandpaper before and after priming work. Sandpaper markings: P120, P180, P220, P500 and P800.
- Electric grinding machine.
- Depending on how you paint, you will need a spray can or a spray gun.
How to prepare for painting work
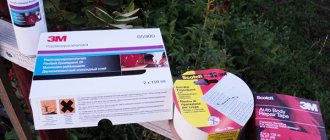
When carrying out painting work, you must adhere to a certain sequence of actions, since even the slightest failure to comply with this condition will lead to defects that will have to be corrected. Local painting requires the same serious approach as complete painting. In order to paint a plastic bumper, you need to purchase or prepare the following tools and materials:
- primer for plastic (Plastic Primer);
- putty (if the bumper is old or there is serious damage and the surface needs to be leveled);
- grinding machine (in some cases);
- sandpaper (P180, P220, P500, P800);
- a spray gun, which can be replaced with aerosol paint cans;
- degreaser (a special one for working with plastic surfaces is best);
- the paint you chose for the bumper;
- varnish;
- film or similar material to protect surfaces not to be painted;
- special clothing and respirator.
Painting work is best done in a clean and warm room.
Dust and other particles in the air can settle on the paint, after which you will have to add polishing to the list of tasks. Many people often ask questions about how much paint is needed for a bumper, how much it costs to paint a part at a service center. The price for painting work in a car repair shop varies from 5,000 to 8,000 rubles per body element. Expert opinion Ilya Vyacheslavovich
Consultant for body repair at krasymavto.ru
Ask a Question
The question of how much paint will be needed is difficult to answer, since it depends on its properties and characteristics, as well as on the surface area that needs to be treated and the experience of the painter. The average value varies between 300-370 grams based on the entire plastic bumper.
Sequence of work when painting a bumper yourself
Painting is not a job that can be done haphazardly, although many people think so. In order to prevent the paint from flying off later, you will need to follow a certain sequence:
- Preparatory work.
- Grinding work.
- Puttying (puttying).
- Applying primer.
- Sanding after priming.
- And finally, applying the paint.
Step No. 1 Preparatory work
- After dismantling, if we paint the old bumper, we proceed to a thorough wash with the addition of a cleaning agent (Fairy, Drop, etc.). If there is tar on the surface of the old bumper that cannot be washed off, it must be carefully removed with either a knife or a chisel.
- After washing and mechanical cleaning of dirt, we use a solvent, preferably WHITE SPIRIT or 646 solvent. Old paint must be removed with a spatula. If it doesn’t come off well, then by purchasing a special remover, for example, VIKA 0.5 l, the process of stripping off old paint, even with an anti-gravel coating, will easily come off. You need to apply this solution with a brush several times, then wait about 10 minutes and it will also come off easily with a spatula.
- Such special substances for removing old paint, for example, VIKA or BODI, require careful handling. Namely, work with rubber gloves, because it burns the skin and smells terrible.
- After all the old paint has been removed, you need to remove the remover with dry rags and, only then, wash everything with solvent.
Grinding work
- Some people simply use a mechanical method to remove old paint and old primer. But using a drill or screwdriver with an emery attachment spoils the plastic itself. Therefore, it is better to use chemicals to remove old paint.
- Those who still want to use the mechanical method will need a grinder. First of all, we sand with coarse sandpaper 120. If there are scratches, we smooth them out with a block and remove all burrs.
- If medium and microcracks are detected, you can weld them with a regular soldering iron. And large cracks are welded on both sides with oblong electrodes.
Step No. 2 Puttying (puttying)
- After complete cleaning, degreasing and sanding, they begin to putty. Scratches appear during the sanding process. The putty will fill them and the surface will become smooth. Putty with added glass fibers has an advantage. This putty does not settle and when it dries it creates a reinforcing layer.
- After the putty has completely dried, you need to sand this layer with 120 sandpaper.
- After sanding, apply the finishing layer of putty again. We sand the finishing putty again, but with fine-grained sandpaper, P220. We completely sand the entire surface either with a grinder or by hand.
- At this stage, you need to blow off the entire surface with a compressor and degrease the entire surface. After degreasing, treat with anti-silicone. Preparatory work for applying the primer has been completed.
Step No. 3 Priming the bumper
- Before priming, put on a respirator or mask and goggles. We take a plastic primer and apply it to the entire surface of the bumper. Typically, this primer dries quickly. Therefore, we immediately prepare the spray gun and wash it of the first primer. Prepare acrylic primer.
- We apply the primer in layers, step by step. After applying the first layer, you need to wait until it dries, then apply it again, leveling the irregular surfaces. And so on several times. Apply each subsequent layer as the previous one becomes a matte color.
- Apply a final coat of primer. If the primer is thick, it needs to be diluted a little with a solvent.
Step No. 4 Grinding the primer layer
- After applying the last layer of primer, wait 1 day. If you have a device in the garage that emits infrared rays and heats them up, it can dry out in 3 hours. With the help of such a device, all layers of primer dry.
- For sanding you need a sander and sandpaper P320-P400. After sanding with fine-grain P400, all unevenness of the primers will be removed.
- It is advisable not to sand the ends of the bumper with a machine, but to do it by hand. Using a machine can damage the primer layers.
- After sanding, you need to apply the primer again and, after drying, sand it with P500 sandpaper. After that, you need to blow it with a compressor and degrease it.
Step No. 5 And finally applying paint
- Painting is carried out in several layers.
- If debris gets in, wipe the surface with a dry cloth or interlayer paper.
- Next, we apply the varnish, also in several layers, and wait for it to dry either by natural drying or with the help of heaters.
Is it easy to paint plastic?
The first requirement for a paint layer applied to a plastic surface is high adhesion to this surface.
But the fact is that initially, after casting, the properties of the plastic surface do not at all contribute to strong adhesion to the future paintwork, but quite the opposite.
The greatest difficulties when painting are created by the surfaces of non-polar plastics. They have a chemically inert, non-porous surface with low surface tension - and the lower the surface energy of the plastic, the worse its “adhesion” to the applied paints and varnishes.
Among all plastics, polypropylene and polyethylene have the lowest surface energy - these plastics and their modifications are considered the most difficult to paint.
When painting other types of plastics, problems associated with adhesion are not so pronounced, but this does not make it any easier for car repair workers, since polypropylene, as is known, is the most popular type of plastic used in the automotive industry. Almost all bumpers (and these are the main paintable plastic body parts) are made from various modifications of polypropylene - usually a dark gray material that can be soldered and is inert to solvents.
Try to take a polypropylene bumper and immediately apply paint on it - what will happen? A knowledgeable person will answer right away: nothing good... And indeed, the adhesive properties of the coating will be very weak. What should I do?
In the automotive industry, three main methods are most often used for the preliminary preparation of plastic before applying paintwork: corona discharge treatment, low-temperature plasma or gas flame treatment.
These operations are strikingly different from traditionally accepted surface preparation methods. For example, corona discharge treatment is the effect of an electric discharge on the surface being treated, generating “jet” of plasma. Plasma processing is carried out by exposing the plastic to a plasma flow generated by a plasma torch, and flame processing is carried out by the flame of gas burners.
The purpose of this treatment is to increase the wettability of the plastic surface, thereby improving its ability to form bonds with paints. In order for the surface to be well wetted by a liquid, the surface energy of the plastic must be higher than the surface tension of this liquid. If the surface tension of the liquid (paint) is greater, it will bead up instead of uniformly wetting the surface. Therefore, all processing methods are aimed primarily at increasing the surface energy of the polymer.
Wettability. On the left is the treated surface, on the right is the untreated surface.
As a result of this treatment, changes occur in the surface layer of the plastic: polar molecules are formed in the previously non-polar polymer, increasing the surface energy of the material. The surface at the micro level becomes rough, and its effective adhesion area to the paint increases.
There is no need to explain how complex and expensive the equipment is used for these processing methods. Its operation is justified only in large factories, in mass production, but for car service conditions all this is too expensive and complicated. For this reason, polypropylene has long been considered unpaintable.
Having put their brains to work, chemists have developed alternative, simpler methods for preparing polymer surfaces—the so-called “wet” chemical methods. The most convenient and used of them is priming the surface of the plastic. A special adhesive primer applied to the surface of the plastic serves as an effective intermediary between the polymer and subsequent coatings, and in some cases adhesion can even exceed the factory level!
Now let’s leave aside the complex chemical formulations and get down to business.
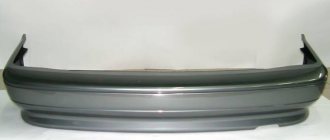
Painting a new bumper
A new bumper also needs to be prepared for painting, especially since new products are coated with various protective oils that need to be removed. They may also be partially damaged during delivery of the goods.
- Step #1. We take sandpaper number P800 and start sanding. New products have burrs that need to be cleaned out.
- Step #2. We degrease the new polished bumper from the factory shipping oil.
- Step #3. We begin priming with a 2-component acrylic primer. After applying the first layer, wait until it dries. We begin applying the second layer after the first layer becomes matte. Beginners are advised to purchase ready-made diluted soil, since dilution requires strict proportions.
- Step #4. We take sandpaper (sandpaper) from P500 to P800 and rub the primed layer. Thanks to this grouting, the primer is permanently glued to the plastic.
- Step #5. Blow off crumbs with a compressor.
- Step #6. Degrease with solvent.
- Step #7. Apply buza and apply paint in layers. Wait 15 minutes between coats.
- Step #8. Glossy coating.
Useful tips
In order to be satisfied with the work done by yourself, here are some tips:
- It is necessary to paint in a moderately warm room, where there are no drafts. If there is a draft, there will undoubtedly be sand and dust on the parts to be painted, which will significantly complicate the work.
- Regardless of whether the new bumper needs to be painted or the old one, it must be washed and degreased. If you do not degrease, the grease film will not allow it to stick firmly to the plastic and very quickly the new paint will crack and burst.
- For degreasing you need wet and dry wipes.
- Do not use a hair dryer to speed up the drying of applied layers of primer, paint and varnish. Drying naturally is better.
- Read the instructions and recommendations for working with varnish and paint. So, as a rule, it contains useful information, especially for beginners.
- If a leak suddenly appears, it must be removed. Clean the area with moisture-resistant sandpaper and polish.
If all that remains of the bumper is the name: damage repair
If your plastic bumper is full of cracks and holes, then do not rush to throw it away and buy a new one. Even if the bumper falls to pieces, it can be fixed if desired.
You will need:
- everything that is required to paint an old bumper
- industrial hair dryer with narrow nozzle
- soldering iron with a wide tip (1 cm or more)
- flat electrodes (take several types in stock)
- putty for repairing plastic
- heat-resistant tape
- drill
A flat electrode is a strip of polypropylene suitable for repairing cracks in plastic bumpers. Electrodes are divided into several types depending on the thickness and type of plastic. Find the material markings on the inside of the bumper, and in the store select the types of electrodes suitable for this plastic.
Just like when painting an old bumper, we remove the coating with a grinding machine with a P120 wheel. In places where there are cracks, remove the coating completely, down to the plastic. We remove dust and degrease the area of the crack, connect both parts and glue them to the outside of the bumper with heat-resistant tape. We turn the bumper over and work on the inside. At the crack site, we use a soldering iron to make a groove into which we will place the electrode. Do not press the soldering iron too hard, do not hold it in one place for a long time, so as not to tear the bumper. Make the groove 2–3 centimeters longer than the length of the crack. When the groove is ready, select an electrode of suitable thickness, apply it to the beginning of the groove and start heating it with an industrial hair dryer. When the electrode “floats”, pressing it, place its beginning in the groove, and thus, heating it at the base and pressing it, place the entire electrode. Wait until the plastic hardens and cut off the excess.
Photo of the restoration part
Remove the tape and repeat the same operation on the outside of the bumper, choosing a thinner electrode. When the plastic is dry on the outside, use a special attachment on a drill to cut off the excess, go through the sander again, blow off the dust, degrease and start filling with a special putty, which is then sanded with a block of P120 sandpaper. After you have treated all the cracks in this way, continue to work as with a regular whole bumper that requires painting.
Remote on video
Let's summarize. You can paint the bumper with a spray can. Despite its apparent simplicity, the process cannot be called quick and easy. If you are new to this business and the bumper you are painting is not new, be prepared to spend several days to get a high-quality result. Be prepared for the fact that newbies always make mistakes and it takes extra time to correct them. You will probably have to deal with drips of paint and varnish, and redo the work. The cost of one can seems low, but it is significantly more expensive than materials that you need to mix and dilute yourself for use in a spray gun. The consumption of materials from a spray can is higher than from a spray gun: taking all this into account, get ready that the total amount spent on materials can be comparable to the cost of painting in a car service center. But if you still decide to try, we hope that the article will help you with this.
We recommend using a spray can only for partially painting the bumper: it is convenient and beneficial when you need to remove a couple of scratches, but car repair shops ask for money as much as for painting an entire part.
- Author: Victoria Lepina
Hello! My name is Victoria, I’m 23 years old, and I’m a marketer by education. Rate this article: (5 votes, average: 5 out of 5)