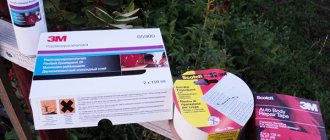
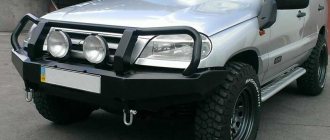
What is needed for repair
Repairing a bumper at home will not be a huge task, especially if this is not the first time you have had to work with your own hands to repair a car.
To do this, you must first prepare the working tools and purchase the required materials. ATTENTION! A completely simple way to reduce fuel consumption has been found! Don't believe me? An auto mechanic with 15 years of experience also didn’t believe it until he tried it. And now he saves 35,000 rubles a year on gasoline! Read more"
You will need the following tools for work:
- A construction hair dryer to be able to warm up and straighten dents or bumps.
- A grinder or grinder is necessary for the final leveling stage.
- Compressor.
- Spray bottle for painting seams or completely painting the bumper.
And the following materials to make your own bumper repair:
- Special putty with fiberglass and regular automotive putty.
- Fiberglass bumper repair kit containing epoxy resin and fiberglass material.
- Special solvent for acrylic paint.
- Small brushes 25-30 mm each.
- Sandpaper, different hardness.
- Primer.
- Varnish.
- Metal spatulas, it is better to buy a set.
- Dye on tap, about 300 grams.
- Mesh for placing over the seam to prevent cracks from appearing (fine-mesh, soft metal).
- Rubber gloves and tape.
Types of damage
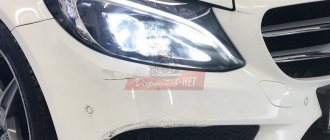
After making sure that all the tools and materials are available, you need to determine the nature of the damage. There are the following types of damage to fiberglass bumpers:
- There are dents, the bumper is seriously damaged and you need to put a lot of effort into repairing it yourself.
- Tears or tears, the material has lost its structural integrity, and the structure of the fiberglass is damaged.
- Breaks or holes are identified by the appearance of holes in fiberglass.
- Scratches, there are small and deep scratches.
- Chipping of bumper parts.
Step-by-step instructions for bumper repair technology for different types of damage
Nature of damage - gust
When there is a tear, the edges of the tears are processed using a grinding machine.
Having completed grinding the edges, the edges of the gaps are joined, and the part is placed on a table or flat surface to be able to adjust the dimensions. You can achieve complete disappearance of the damage by stripping the part with your own hands towards the cracks, at intervals of up to 5 cm. The stripping lasts until the new layer laid on the other side of the part is visible. Polyester resin is applied to the crack and around it at a distance of up to 10 cm. Work with resin using rubber gloves. The resin is applied with special brushes. The resin is covered with fiberglass (grade 300) in several layers. After everything, we leave the part for a while until the resin dries. The putty is applied in a thin layer, and sanding is carried out with sandpaper or a belt disc of a grinding machine.
Break or hole
If damage in the form of a hole is discovered on a part, repairs will take more time and effort. The hole in the bumper needs to be repaired and it's not a crack, it will require more fiberglass and putty. It is necessary to clean the surface in the area of the hole at a distance of up to 10-15 cm. This is necessary to increase the rigidity of the glass fabrics. After cleaning the surface, tape is glued to the hole on the back side of the part. The resin is applied to the hole and at a distance of up to 20 cm from it.
Fiberglass is laid on top of the resin, in 3-4 rows. The more, the stronger the connection will be. Each row is re-lubricated with resin. After the resin has dried, you need to start cleaning the resulting protrusion. Using sandpaper or a resin roller, remove this layer and clean it. A primer is applied over the covered area and sealed with putty. A metal mesh is applied to the putty to prevent microcracks from appearing. The putty can be dried with a hairdryer. You can level this place with the plane of the bumper yourself using a grinding machine and a special disk.
Dents
It depends on the complexity of the dent; if it is strong and large in size, then it is better to cut it out and carry out the same actions as with a hole. If it’s small, then we’ll use a hairdryer and do it ourselves. The damaged area warms up, and when heated to a certain temperature, we return it to its original position. Even if you can’t level it with a hairdryer, you can always cut off the protruding part and seal it with resin. Small dents that go inside the bumper are repaired with resin and putty, and you're done.
Scratches
Depending on the nature and complexity of the scratch, apply resin (for a deep scratch) or putty (for a shallow one), after sanding the area in the area of the scratch.
Breakaways
There are times when the corners of a part or their parts break off. The lost part of the bumper can be restored using fiberglass. Here, DIY repairs will be a little more difficult. After all, repeating the shape of the broken part of the bumper can cause problems, especially if this part is lost. It is better to seek help from a professional, but if you have self-confidence and decide to do everything at home, then you can try. The place where the part broke off is cleaned until the fiberglass fabrics that protrude completely disappear. Fiberglass can perfectly replicate any corner shape. The fiberglass patch is equalized with sandpaper. Part of the corner should be the same shape as the bumper. The gaps will be closed with new layers of resin and fiberglass. It is better to strengthen the corners from the inside by installing 4 layers of glass material. Repairs have been completed for any type of damage, and you can move on to the last stage of work, painting the bumper.
Painting
Painting is done using a spray gun and compressor. The paint is pre-mixed with a solvent and the color is selected. Either the damaged area or the entire bumper is painted. The first option is very difficult, the difficulty is that a non-professional will not be able to paint the place so that it does not stand out. It is better to use the second option, sand the entire bumper and open it with new paint. Painting is carried out in two layers. After the paint has dried, the bumper is installed in place. The car's bumper was restored at home.
Forget about fines from cameras! An absolutely legal new product - Traffic Police Camera Jammer, hides your license plates from the cameras that are installed in all cities. More details at the link.
- Absolutely legal (Article 12.2);
- Hides from photo and video recording;
- Suitable for all cars;
- Works through the cigarette lighter connector;
- Does not cause interference to radios and cell phones.
Types of bumpers and materials from which they are made
Modern car bumpers can be made of metal and plastic.
You need to know this: How to remove scratches on the plastic of a bumper with or without painting
In turn, plastic ones can be made from 2 types of material:
- thermoactive;
- thermoset.
What is the difference between thermosetting plastic for car bumpers and thermosetting plastic?
The main difference between a thermoactive material is that it can be subjected to secondary heat treatment. Under the influence of high temperature, the material easily melts, becomes elastic, soft and can take any shape.
Thermosetting plastic, on the contrary, is very durable, resistant to high temperatures and mechanical damage.
Car bumpers made of thermosetting plastics, as a rule, are rarely subject to cracks due to the strength and reliability of the material.
The following types of thermoactive materials are distinguished:
- Polyethylene - used in the production of food containers, bags, etc.;
- Polystyrene - various insulation materials are made from them in construction, etc.;
- Polypropylene - used in the production of auto parts, including car bumpers, food industry, etc.;
- Polyvinyl chloride - production of insulating coatings for cables, window technologies, etc.
Thermosetting materials are divided into:
- Polyurethane - most plastic auto parts, both small and large, are made from this type;
- Epoxy resins - used for joining and gluing different parts;
- Fiberglass - used in the production of heavy-duty auto parts, including bumpers;
- Phenol resins - needed in the manufacture of small auto parts, computers. boards, etc.
Do-it-yourself fiberglass bumper repair: step-by-step instructions
Fiberglass bumper repair»>
You will need the following tools for work:
- A construction hair dryer to be able to warm up and straighten dents or bumps.
- A grinder or grinder is necessary for the final leveling stage.
- Compressor.
- Spray bottle for painting seams or completely painting the bumper.
And the following materials to make your own bumper repair:
- Special putty with fiberglass and regular automotive putty.
- Fiberglass bumper repair kit containing epoxy resin and fiberglass material.
- Special solvent for acrylic paint.
- Small brushes 25-30 mm each.
- Sandpaper, different hardness.
- Primer.
- Varnish.
- Metal spatulas, it is better to buy a set.
- Dye on tap, about 300 grams.
- Mesh for placing over the seam to prevent cracks from appearing (fine-mesh, soft metal).
- Rubber gloves and tape.
Features of fiberglass
Fiberglass is another name for fiberglass; it is a unique material of its kind, consisting of several components. Fiberglass is sold not in the form of a monolith, but in the form of a substance consisting of many fibers. This material is quite durable and, at the same time, light and elastic. Fiberglass is made from epoxy resin and fiberglass, which is the main material for the production of bumpers, fenders and some other elements of the car body.
The use of fiberglass made it possible to reduce the weight of the machine, especially since it has a number of advantages over conventional plastic and metal.
The metal is very heavy, and this entails increased fuel consumption. Over time, metal elements corrode. An irreversible process leads to replacement of the unit, but if the source of corrosion is identified at its initial stage, then repairing the body with epoxy resin and fiberglass will significantly save the budget. Regular plastic is very fragile. The lack of elasticity allows it to be used only for interior decoration. By the way, epoxy can be used to repair not only fiberglass products, but also metal ones.
The production of glass fiber, which is based on epoxy resin, can be carried out in one or two phases. In a one-step production process, glass fibers are drawn from the glass mass. The two-stage production begins with the production of glass beads, which are subsequently converted into fiberglass. The final stage of these technologies is common. On it, the fibers are impregnated with epoxy and the finished material is obtained.
Fiberglass has a number of advantages that make it possible not only to produce parts for cars, but also to repair them. Lightness and strength have already been mentioned, but the advantages do not end there.
- Moisture resistance. When fiberglass is used correctly, the metal underneath will not rust.
- Thermal insulation. Due to its low thermal conductivity, fiberglass has an additional energy-saving function.
- Easy to use. Even without special skills, a car owner can independently repair a car’s bumper, hood, door or threshold.
- Wear resistance. Fiberglass parts are used in difficult weather conditions; they withstand changes in temperature, humidity, as well as the effects of reagents that are used to sprinkle roads in winter.
- Price. Saving money when carrying out auto repairs.
Types of damage
After making sure that all the tools and materials are available, you need to determine the nature of the damage. There are the following types of damage to fiberglass bumpers:
- There are dents, the bumper is seriously damaged and you need to put a lot of effort into repairing it yourself.
- Tears or tears, the material has lost its structural integrity, and the structure of the fiberglass is damaged.
- Breaks or holes are identified by the appearance of holes in fiberglass.
- Scratches, there are small and deep scratches.
- Chipping of bumper parts.
Step-by-step instructions for bumper repair technology for different types of damage
Nature of damage - gust
When there is a tear, the edges of the tears are processed using a grinding machine.
Having completed grinding the edges, the edges of the gaps are joined, and the part is placed on a table or flat surface to be able to adjust the dimensions. You can achieve complete disappearance of the damage by stripping the part with your own hands towards the cracks, at intervals of up to 5 cm. The stripping lasts until the new layer laid on the other side of the part is visible. Polyester resin is applied to the crack and around it at a distance of up to 10 cm. Work with resin using rubber gloves. The resin is applied with special brushes. The resin is covered with fiberglass (grade 300) in several layers. After everything, we leave the part for a while until the resin dries. The putty is applied in a thin layer, and sanding is carried out with sandpaper or a belt disc of a grinding machine.
Break or hole
If damage in the form of a hole is discovered on a part, repairs will take more time and effort. The hole in the bumper needs to be repaired and it's not a crack, it will require more fiberglass and putty. It is necessary to clean the surface in the area of the hole at a distance of up to 10-15 cm. This is necessary to increase the rigidity of the glass fabrics. After cleaning the surface, tape is glued to the hole on the back side of the part. The resin is applied to the hole and at a distance of up to 20 cm from it.
Fiberglass is laid on top of the resin, in 3-4 rows. The more, the stronger the connection will be. Each row is re-lubricated with resin. After the resin has dried, you need to start cleaning the resulting protrusion. Using sandpaper or a resin roller, remove this layer and clean it. A primer is applied over the covered area and sealed with putty. A metal mesh is applied to the putty to prevent microcracks from appearing. The putty can be dried with a hairdryer. You can level this place with the plane of the bumper yourself using a grinding machine and a special disk.
Dents
It depends on the complexity of the dent; if it is strong and large in size, then it is better to cut it out and carry out the same actions as with a hole. If it’s small, then we’ll use a hairdryer and do it ourselves. The damaged area warms up, and when heated to a certain temperature, we return it to its original position. Even if you can’t level it with a hairdryer, you can always cut off the protruding part and seal it with resin. Small dents that go inside the bumper are repaired with resin and putty, and you're done.
Scratches
Depending on the nature and complexity of the scratch, apply resin (for a deep scratch) or putty (for a shallow one), after sanding the area in the area of the scratch.
Breakaways
There are times when the corners of a part or their parts break off. The lost part of the bumper can be restored using fiberglass. Here, DIY repairs will be a little more difficult. After all, repeating the shape of the broken part of the bumper can cause problems, especially if this part is lost. It is better to seek help from a professional, but if you have self-confidence and decide to do everything at home, then you can try. The place where the part broke off is cleaned until the fiberglass fabrics that protrude completely disappear. Fiberglass can perfectly replicate any corner shape. The fiberglass patch is equalized with sandpaper. Part of the corner should be the same shape as the bumper. The gaps will be closed with new layers of resin and fiberglass. It is better to strengthen the corners from the inside by installing 4 layers of glass material. Repairs have been completed for any type of damage, and you can move on to the last stage of work, painting the bumper.
Painting
Painting is done using a spray gun and compressor. The paint is pre-mixed with a solvent and the color is selected. Either the damaged area or the entire bumper is painted. The first option is very difficult, the difficulty is that a non-professional will not be able to paint the place so that it does not stand out. It is better to use the second option, sand the entire bumper and open it with new paint. Painting is carried out in two layers. After the paint has dried, the bumper is installed in place. The car's bumper was restored at home.
Sealing process preparation
Before sealing the bumper with fiberglass, we recommend conducting a trial compatibility test on a small area of the damage. To determine how to glue the body bumper, carefully study the manufacturer's instructions. The adhesive material must match the surface type of the part.
If there are body kits at the site of damage, they must first be secured and only then removed. At the same stage, accurately determine the material of the spare part to select the desired adhesive base.
This information is on a stamp on the inside of the product. When the mixture is selected, all that remains is to use it correctly in order to correctly restore the spare part after damage.
In order for the repair to last as long as possible, the bumper will have to be pre-treated. The part is disconnected in advance.
Carry out mandatory training:
- thoroughly clean the car buffer from dirt accumulations;
- remove residual oil and dust;
- let the parts dry;
- wipe it with a chemical to degrease it;
- grind the broken surface with an abrasive or a grinding machine;
- if the cracks are too deep, we recommend drilling them out, protecting the spare part from increasing damage.
With the listed procedures, you will achieve stronger adhesion of the glue to the surface, which will guarantee the quality and long service life of the part.
How to glue a bumper: let's get started
Once the surface has been pre-treated, it is time to begin the bulk of the restoration process. Cover the damaged area of the spare part with a primer and wait until the substance dries completely.
The second option: seal the crack on the bumper from the outside so that glue does not leak out of it. To do this, use foil. Once the adhesive has dried, the material must be removed.
Primary gluing from the inner surface of the buffer is carried out with a composition having reinforcing properties. To do this, we recommend using a composition based on epoxy resin with a high degree of adhesion.
If you have previously decided to abandon priming work, then carefully move the damaged areas towards each other
Sometimes the cracked parts are held together with metal staples. However, fixing the two parts from the outside is done with standard paper tape. He will carefully secure the edges of the surface at the same level before painting. After gluing the hole from the inside, the tape will be easier to remove than the staples.
When both parts of the car are securely fixed, apply the adhesive mixture to both parts of the damaged part. Before it dries, glue a metal or synthetic mesh to strengthen the seam.
This can be a painting mesh, which also needs to be treated with adhesive on top. It is impossible to predict the drying time, since each chemical composition takes its own time to dry.
Final stage
When the crack is glued and the adhesive solution is completely dry, the car buffer remains visually unattractive. There is no need to sound the alarm - this is natural, because there is still finishing work ahead.
Let's get started:
- Remove any excess compound on the plastic, carefully cut it off or sand it.
- Prepare the surface of the spare part for further painting. To do this, use a primer, putty or other materials for this purpose.
- The car buffer must be painted according to technology. Such paints are available in car dealerships.
Detailed work on painting a bumper with your own hands in the video:
Results
Repairing a buffer at home is not a difficult task. Therefore, if you have minimal experience in this matter and follow all the instructions, you can quickly restore the part. And you won’t have to spend money on paying a car mechanic.
Glue for car parts has significant advantages. It is cheap, its purchase will not affect the family budget. The method of sealing a cracked buffer with an adhesive mixture is in no way inferior to sealing.
We recommend watching the video instructions on how to glue a bumper with glue yourself:
Repairing the bumper with fiberglass. (“We mold” the missing fragments.)
We restore a plastic bumper with our own hands using fiberglass.
From this article you will learn how to restore a bumper that is missing a large piece of plastic. As you can see, the bumper looks hopeless, but it is possible to restore this, and fiberglass will help us with this. When repairing a bumper with similar damage, the master requires ingenuity, because you will have to build various structures to create a “matrix” of the missing part, and of course, be patient, because I will say that this is a long process. Personally, this turnkey job took me about a week.
We walked around, had a look, now get to work.
Before removing the bumper from the car, it is necessary to secure the upper and lower parts. This needs to be done on the spot, since if you first remove the bumper and then just fasten these parts, it may turn out that the bumper “spreads” to the sides and initially the “matrix” will be crooked.
To connect the bumper parts we use a regular drywall profile.
By the way, I advise you to go to a hardware store and buy a profile, hangers and screws. For such repairs, all this will be very useful and I would even say that you can’t live without it :)
Now we remove the bumper and think about how to “cover” this big hole. After a long walk around the pit and its surroundings, I came across a Sparco mudguard, which 7 years ago were very fashionable and were on almost every “tuned” car. Now this mudguard will serve as a patch for us.
We screw it to the front side of the bumper.
The mudguard fits tightly and follows the shape of the bumper surface as much as possible.
Which is exactly what I needed, so I used it.
In order to restore the missing fragment of the bumper, we need to create a base (“Matrix”) on which we will apply fiberglass. We will do this using polyurethane foam. We take the container, shake it well, then using a water spray, we wet the surface on which we will apply the foam. If you miss this moment, then be prepared for the fact that the foam will simply fall off the bumper and the procedure will have to be repeated, which is an extra waste of materials and wasted time.
Ready.
Now we wait for the foam to dry completely.
Alignment of the "matrix".
The creation of the “matrix” of a bumper fragment must be treated as painstakingly as possible, because the final result of our work depends on it. Polyurethane foam is very easy to process with sandpaper, so it is often used to create various car parts and body kits.
We pick up a block of sandpaper, grit P 40, and try to make the surface as smooth as possible.
Do not pay attention to craters not filled with foam, we will eliminate this later.
There are two options for filling these cavities, although you may come up with something else.
And so, option 1: you can foam the cavities again, and then sand them with sandpaper. The disadvantages of this option are that you will have to wait again for the foam to dry, which is a waste of time.
2nd option , faster, more convenient and simpler. We fill the cavities with plasticine or putty for window frames (this was previously used for insulating windows). Lightly heat the plasticine with a hairdryer and easily level the surface using a metal spatula. This method has no downsides.
Preparing to apply fiberglass.
At this stage, we have the matrix of the future product ready, now all that’s left to do is to glue and glue part of the fiberglass bumper. In this article I will not repeat what materials and components are needed and how they need to be diluted. There is a separate article about this “fiberglass”.
I would like to warn you that the foam may “melt” from the resin, since when mixing the components, the reaction is accompanied by heating. Therefore, you need to protect yourself from “matrix subsidence.” For example, cover the surface of the “matrix” with masking tape; in addition, it will be more convenient for you to separate the foam from the fiberglass.
We impregnate the matrix with resin.
We apply 450 glass mat in two layers.
This will be quite enough for the strength of the bumper.
We are waiting for the fiberglass to dry completely.
At an air temperature of 20 degrees, this time ranges from 30 to 60 minutes. After which the fiberglass can be processed.
Processing fiberglass and applying putty.
For rough grinding of the surface, you can use a grinder with a flap wheel, then we process it using a grinding machine.
We use wheels with grit P 40.
For this, it is better to use a special putty with a plasticizer, but since I ended up with quite thick layers in some places, I used putty with fiberglass.
We rub it with a block of sandpaper and apply putty again, only this time fine-grained.
And so we repeat this procedure until we achieve a perfectly flat surface.
Bumper priming.
Perhaps this is the most pleasant moment after such labor-intensive work. We dilute the primer according to the manufacturer's instructions, apply it in two layers and wait for it to dry. Now it's up to the painter.
Bumper painting.
The “Hopeless Bumper” turned out quite well, as you have seen, nothing is impossible when you have such a wonderful material as fiberglass. I will be glad if my article “repairing a bumper with fiberglass” is useful to you.
PS If some points are not particularly clear to you, ask questions in the comments, I will be happy to help.
I recommend reading:
to the entry “Repairing a bumper with fiberglass. (“We mold” the missing fragments.)”
Amazing! This is great! I would never have thought that such a “fragment” could be perfectly restored with one’s own hands! It even seemed to me that a week would be too long for such a process. Although it may seem so from the outside, until I get down to business myself. My garage is empty, one of these days I’ll try to restore my bumper myself. I'm glad that my missing piece of bumper is several times smaller. )) Thank you for such a detailed description of bumper repair using fiberglass! I didn’t find anything useful on this issue on the Internet until I came here. Great article! Just a find for me!
From fiberglass, you can restore a bumper with absolutely any damage, even up to half the part being missing. I had a copy, a Mazda 626, on which the right side of the bumper was missing, and I couldn’t find a new one, so I had to restore it. It turned out perfect, even many thought that the bumper was simply replaced. With some fiberglass, two hands in the right place, and some creativity, anything can be invented. Good luck to you, Anton, in restoring the bumper.
I don’t understand, did the tape remain under the fiberglass layer? And also, did you then remove the rest of the foam that remained inside the bumper, or did you leave it as reinforcement?
After the fiberglass had dried, I first removed the foam from the back side, and then, where possible, removed the tape, since there is no point in leaving it inside the bumper. After this, on the inside, you can apply another layer of fiberglass, in case you think this structure is not very strong.
Thank you ! Great article! Respect to the author!
If you have any questions, please leave a contact number
What is your question?
Thank you very much for the article, everything is to the point, without further ado... I just need to do both the front and rear ones.
Great article. That's just how to restore a bumper that has all the elements in place, but from an impact it was all broken, but it still stands on the car simply by the holy spirit. What should you do in this case? Yes, so that on the second bump it doesn’t start to creep apart again.
It's hard to tell from your description alone! It’s like asking on the phone: “Doctor, my stomach hurts, what do you recommend?”
So, if the bumper is made of plastic and all the parts are in place, it is easier to solder it (with electrodes for plastic)
Repair of fiberglass body parts
Fiberglass has proven itself to be a reliable and practical material. Many automakers make from it not only decorative elements, but also non-load-bearing parts of the body (fenders, hood). Such elements are not subject to corrosion, but they have to be glued together or cracks repaired even more often than metal ones. Repair is advisable in the sense that even with significant damage, it is possible to restore the element to its previous shape.
Fiberglass impregnated with epoxy resin will retain its original shape. If you have a suitable matrix, you can independently produce body parts. However, such a matrix is difficult to produce, so many owners who decide to rely on their own strength restore parts “by hand,” allowing for significant errors.
Here, aesthetics are compensated by a small repair budget, which is why the use of epoxy in working with fiberglass still remains popular.
The work algorithm remains virtually unchanged. In exactly the same way as for metal structures, a patch is made from fiberglass. But when restoring a damaged part of a part, this patch is given a certain shape. The advantage of the material allows the frozen frame to be processed, puttyed and painted. Experienced craftsmen do this so skillfully that the result does not always differ from the factory stamp.
Do-it-yourself repair of fiberglass products
When tuning a car, bumpers are usually made of fiberglass and you should always be prepared for the fact that at some point you will have to repair them. The specifics of repairing such bumpers, in contrast to factory ones, which are made of polypropylene, are somewhat different. In this article we will tell you how to properly repair fiberglass bumpers.
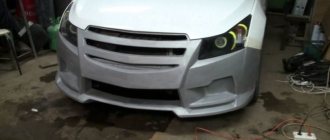
As an example, we took the front tuning body kit of a minibus, which was damaged as a result of hitting an obstacle, which led to the loss of a large fragment of the lower shelf, as well as to its rupture.
Before removing the bumper from the car, we recommend measuring the distance between its corners in order to maintain this size during the repair process.
So, let's get started.
01. Remove the bumper from the car. We install it on the floor in the workshop. At the rupture site, the bumper sagged due to a violation of its original geometric shape. In addition, part of the shelf is missing, so simply joining the torn edges is not possible. It is necessary to paste in the missing fragment.
02. The most unpleasant thing that can happen to a fiberglass bumper when hitting an obstacle is a network of small cracks over a fairly large area. These cracks indicate ruptures of the fiberglass inside the bumper material, which can lead to quite complex and time-consuming repairs. But, in this case, the presence of small paint cracks near the edges of the break was not detected.
03. There is no point in combining torn edges without pre-treatment, since the fiberglass forms protruding shaggy edges at the tear site. 04. To process the edges of the torn parts of the bumper, we use an angle grinder with a flap disk mounted on it. In the absence of one, we clean it with coarse sandpaper by hand.
05. Having finished processing the edges, we combine the edges of the tear, placing the bumper on a flat surface, adjusting it to the size we have.
06. We proceed directly to the repair of the fiberglass bumper, starting from the inside. Apply polyester resin to the cleaned surface along the crack. We apply the resin in such a way that it covers the crack itself and the surface around it at a distance of 5-10 centimeters. 07. Place pieces of thin glass mat (grade 300) on the resin. There can be several layers. The fact is that by repairing the inner surface, we restore the original shape of the bumper for subsequent repairs on the outside.
08. We repair cracks and eliminate other defects on the outside of the bumper. At the point of rupture, delaminations, chips, and cracks of not only fiberglass, but also paint are clearly visible. Some “craftsmen” simply putty over the defective areas, but very soon the results of such “work” appear on the paint layer. 09. In order for the crack to disappear completely, we clean the bumper material in a gentle way (“beveled”) towards the crack, starting from the places where the fiberglass chips and paint cracks end, but no closer than 5 centimeters from the crack.
10. Grind down the old fiberglass until the new layer we laid on the inside appears through the crack. In this case, on the outer surface of the bumper there should be a groove with flat edges.
11. Coat the groove with polyester resin and lay 300 grade glass mat, gluing the edges of the crack. We make just enough layers so that the last one coincides with the surface of the bumper.
12. After the fiberglass has hardened, we process it with sandpaper. For this it is better to use a belt sander. Firstly, it’s not so dusty compared to a grinder with a petal disc, and secondly, we immediately get a flat surface.
13. After rough sanding with P40 sandpaper, we correct the patch with a block of sandpaper no larger than P80.
14. After finishing sanding the patch, apply a layer of universal polyester putty to it.
15. When the shape of the bumper is completely restored, we move on to repairing the remaining damage. In this case, we observe breaks in the corners, without visible deformation of the bumper itself. Here we begin the repairs immediately from the outside. 16. We clean the crack thoroughly. We try to remove the delaminated fiberglass as much as possible so that in future repairs the fiberglass patch can provide the corner with sufficient strength.
17. We restore the shape of the corners using glass mat no thicker than grade 300 (thicker glass mat has greater elasticity and fits on the corners with bubbles), and we thicken the polyester resin more strongly with aerosil. By the way, Aerosil can be purchased in the same place as polyester resin and glass mat. 18. We smooth the fiberglass patch with P40 sandpaper, and the restored part takes on a uniform shape with the bumper, since the new fiberglass completely hides the tear cracks. Before applying putty, the restored part must be sanded with sandpaper no coarser than P80, since scratches after larger ones can appear on the paint and through the putty.
19. Corners need to be strengthened from the inside. At the same time, we grind down the old fiberglass almost to a new patch. 20. To strengthen the corner, we lay two to four layers of glass mat grade 300.
21. So, the repair of the fiberglass bumper is completed. All that remains is to paint it and install it in place.
DIY repair materials:
- Sandpaper of different grains.
- Epoxy resins.
- Rubber gloves, tape.
- Fiberglass material (you can buy a ready-made set of resins and glass mat)
- Not big brushes.
- Automotive putty.
- Metal spatulas.
- Reinforcing mesh.
- Primer.
- Car paint, matching the color of the car.
- Solvent for acrylic paint.
Damage to bumpers is divided into several types
- Scratches.
- Gusts or ruptures. The integrity of the structure is lost.
- Dents. Severely damaged. In addition to simple gluing, you will also need to straighten dents. If the damage is deep, you can cut it out and repair the hole.
- Holes, breaches. There is some isolated damage, but the bumper itself retains its structural integrity. Repair is more labor-intensive and will require more fiberglass and polyester resins.
- Chips. Chipping of corners of the bumper or its parts. The damaged part needs to be reproduced or restored using fiberglass material. When making repairs yourself, difficulties may arise because it is difficult to repeat the shape of a part of the bumper, especially if it is lost.
Safety precautions
When the material comes into contact with the eyes or skin of a person, in most cases it causes an allergic reaction, inflammation or toxic poisoning.
To prevent this from happening, repairs to car parts should be carried out in a protective suit, goggles, gloves, and a respirator.
The room should be well ventilated (using a high-quality hood, windows or doors). If epoxy does get on the skin, the damaged area should be thoroughly washed with soap and a nourishing cream should be applied.
By observing such basic and simple safety measures, you will not only protect yourself, but also get the job done efficiently.
Step-by-step instructions for restoring a bumper
Step 1. Regardless of the type of damage, the spare part must be removed . First of all, it will be convenient for you. Step 2. Prepare the repair site . Cover the reverse side of the damage with tape. Clean the surface and sand the edges. Cleaning is carried out in the direction of damage at a distance of up to 10 cm. Step 3. Alignment . If there are dents or uneven spots, it's time to heat them up and straighten them with a hair dryer. Step 4. Recovery . It is necessary to work with gloves. Apply the resin to the damaged area and 20 cm from it, using a previously prepared brush. The top is covered with fiberglass; the more layers, the stronger the joint. The resin should saturate the fiberglass well; for this, each layer is lubricated.
Step 5. Dry well and sand the surface with sandpaper. Step 6. Putty. For a more reliable connection of the putty with the fiberglass, apply a primer . The putty is applied in a thin layer . If the damage is serious (break, chip), an additional thin metal reinforcing mesh should be applied to the putty. Step 7. Preparing for painting. Again, dry the surface well, you can use a simple hairdryer. Sand the repair area to perfect condition.
Step 8. Painting . You can paint the entire bumper, or part of it, if the damage was not significant, the main thing is to choose the right paint tone. If you have no previous experience in painting, most likely you will not be able to do it unnoticed, so it is preferable to paint the entire bumper. To do this, you should clean the entire surface with a grinding machine and paint it with new paint in 2 layers.
Step 9. The restoration of the bumper with your own hands is completed, you can begin installing it in place .
0 0 vote
Article rating
Dent repair work
Repairing the problem yourself will directly depend on the complexity and nature. Larger dents should be repaired in the same way as holes. If the dent is not large, then the damaged area should be heated with a hairdryer and returned to its original position. After this, resin and putty are applied to the surface.
Bumper restoration is also possible at home. It is enough to spend a little time, follow the established technology and simple protection rules. When handling, gloves should be worn to prevent chemicals from coming into contact with the skin. Since resin vapors are very poisonous, you should wear a respirator when working. These measures will help not harm your own health.