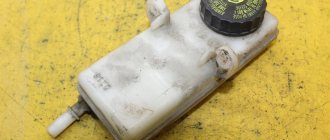
Clean plastic expansion tanks seemed like a good idea at the time, and in some ways they are. The plastic expansion tank allows you to see the fluid level, making things much easier to monitor. However, those pretty white reservoirs also have a habit of trapping rust and mineral particles floating in the coolant stream and presenting them as an ugly orange stain. Repairing the expansion tank, however, is no more difficult than cleaning everything else with a dirty rusty ring.
Why does antifreeze eject from the expansion tank or radiator?
Quite often, car enthusiasts encounter fluid leaks from the engine cooling system. Such a malfunction is not always obvious and sometimes causes difficulties in diagnosis. In this article, we will figure out why antifreeze is thrown out of the expansion tank and why the liquid level can constantly drop to a critical level. It turns out that the problem can be either a minor problem or a serious malfunction of the power unit. In any case, it must be resolved promptly.
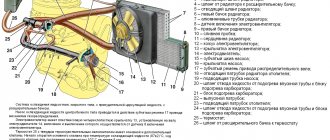
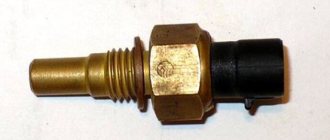
The principle of operation of the expansion tank
Each passenger car is equipped with a cooling system that contains up to 10 liters of coolant (antifreeze or antifreeze). During operation, the liquid heats up. Fluctuations can occur in the range from -40 °C (for example, in northern regions) to +100 °C. With such a temperature difference, antifreeze increases in volume by 5–10%, which is why the need arises for an additional reservoir that performs several functions at once.
- The expansion tank collects excess coolant.
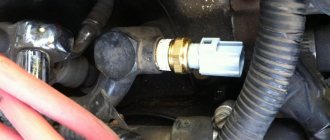
- The cooling system is closed and operates under pressure. When liquid enters the tank, the air layer is compressed and the pressure increases. It pushes out the plug. To prevent this from happening, compressed air is expelled through the valve.
- During cooling, liquid flows from the reservoir, and air from outside is supplied through the valve. This is necessary so that vacuum does not occur in the pipes (to prevent the appearance of an air lock).
The expansion tank is a plastic container with a lid. It can be of any shape. There is a bypass valve on the lid, thanks to which air or steam is released and released when the antifreeze boils.
How to identify problems with the cooling system
If antifreeze leaks from the tank, this is a clear sign of some kind of malfunction. Moreover, leaks can be both obvious and hidden. This can happen like this:
- the liquid is ejected through the reservoir cap. Then streaks will be visible around the lid and on the walls of the container. At the same time, it is easy to notice a wet spot under the car in dry weather;
- leaks occur in other places. They may affect pipes and connections, the pump and the main radiator;
- Leaks occur in hidden places. Antifreeze can leak due to a leaky cabin heater core or when the gasket under the cylinder head burns out.
Obvious leaks are fairly easy to detect. By the way, if we talk about a wet spot under the car, it should be noted that it does not always coincide with the location of the real leak. This happens because the liquid flows through the elements protecting the crankcase and the engine compartment from dust.
If you cannot determine the leak yourself, in-depth diagnostics are required, sometimes even disassembling the system. In some cases, you have to look for the problem inside the car. To do this, you need to remove the decorative panels and check the condition of the radiator. The problem may be that the coolant that splashes through the heater radiator drips onto the floor. If there are rugs on it, then the antifreeze is simply absorbed into them, and wet marks cannot be detected. But an indirect sign of a leak will be a sweetish smell and a greasy coating on the glass that is difficult to wipe off.
Flushing the cooling system or how to clean the radiator?
If you do not take care of the engine cooling system, sooner or later this will lead to dire consequences. Scale, dirt and hardened coolant fractions will clog the thin radiator channels, pipes and pump, which will lead to their failure, and possibly to overheating of the engine. In this material we will tell you how to flush the cooling system, what is the best way to flush the cooling system, whether you should do it yourself or whether it is better to trust a specialist.
What can clog the cooling system, how can you determine that it needs flushing?
The main element of the engine cooling system is the radiator. It has a developed surface of suture or seamless tubes up to 0.15 mm thick. Can be made of copper, brass or aluminum. The small internal diameter of the internal channels of the radiator and its operation at a constant elevated temperature lead to the fact that these channels become clogged with scale, rust, and tiny metal particles (for example, from the same running pump).
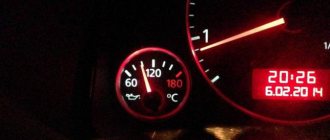
As a result, the circulation of antifreeze or antifreeze through the system is disrupted, which leads to worse engine cooling. In advanced cases, the car engine will overheat and boil not only in traffic jams during the summer heat, but almost constantly.
If you begin to notice an unreasonable increase in engine temperature, and the coolant light is constantly on on the dashboard, despite the fact that its level is normal, then it’s time to decide how to flush the cooling system.
Let’s say right away that it is much easier to contact specialists at a service station. With the help of specialized and highly effective chemicals, external and internal cleaning will be carried out much more effectively than you can do it yourself, and the cost of the service will not hit your pocket.
Grandfather's method with citric acid - a lot of fuss, but quite effective
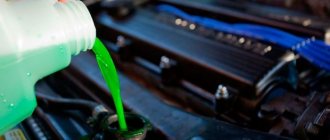
How to flush the engine cooling system? If you like to tinker with your car yourself, if your car is not too technically complex and is much more than ten years old, you can try cleaning the cooling system yourself. How to flush the radiator? This will require a lot of clean water, a kilogram of citric acid and half a day of free time. We begin the work by placing the car on a flat surface, letting it run for 10 minutes and cool for 20 minutes, and then draining the antifreeze from the cooling system through the plug at the bottom of the radiator (if there is no plug, then you need to disconnect the lower pipe).
Attention! Used antifreeze and antifreeze must be poured into a closed container and disposed of according to environmental standards, as it is a fairly toxic substance.
Next, the system must be additionally rinsed with ordinary clean water (preferably distilled, but not necessary). To do this, water should be poured into the expansion tank and collected using a container installed under the radiator drain hole. It is necessary to flush the cooling system until the drained water is clean, free of rust and debris. Once the system is flushed, close the drain plug.
Recommendations
When cleaning the cooling system, it is recommended to follow the instructions included with the selected cleaner. It is also useful to remember some important points:
- after cleaning, the system is thoroughly washed with distilled water;
- if there is heavy contamination with rust and scale, the cleaning should be repeated;
- if the cleaner is poured into a still warm system, then it should also be warm;
- When choosing a chemical reagent, the scope of its application should be taken into account.
The cooling system must not be filled with household chemicals intended for removing scale and grease from plumbing fixtures and dishes.
All the most useful and important information about the methods and methods of removing rust from a car is here.
What to do
The method for eliminating an antifreeze leak depends on the cause of its occurrence. The simplest situation is a burnout or rupture of the gasket. It cannot be repaired, so the gasket should be replaced.
If a deformation of the cylinder head occurs, most often you cannot do without the help of a specialist, since performing this action incorrectly will lead to failure of the part. A deformed cylinder head will require grinding on a special machine. But if the defects are serious, it is necessary to remove more than the permissible layer. In this case, the part will have to be replaced.
The discovery of a large crack in the cylinder block requires its immediate replacement. Small cracks in cast iron or silumin blocks can be repaired by welding - electric or “cold”.
Replacing the BC gasket with your own hands
Replacing the cylinder block gasket is a simple manipulation, and any car owner can easily cope with this task on his own. The main condition for obtaining the desired result without additional breakdowns is to follow the car manufacturer’s recommendations regarding the strength and procedure for tightening the cylinder head with a torque wrench. The sequence of actions when replacing the gasket is as follows.
- The car is de-energized by removing the negative terminals of the battery. If necessary, drain the antifreeze and reduce the pressure in the supply.
- First, the attachments are disconnected from the cylinder block. If you have no experience working with parts, it is advisable to sketch or otherwise record the sequence of dismantling the elements. Craftsmen advise arming yourself with a marker and applying the appropriate marks to each dismantled part.
- The screws securing the cylinder head begin to unscrew from the center, making half a turn each time.
- Disconnect the cylinder head and remove the old gasket.
- Clean the cylinder head and wash it with gasoline.
- Install a new gasket. To ensure precise installation, there are special bushings on the center of the block. The hole for the oil passage should be between the 3rd and 4th cylinders.
- Screw all parts in reverse order.
- Return hanging elements to their place
We recommend: When the engine is cold, it starts and immediately stalls.
IMPORTANT! The fastening bolts must be cleaned before unscrewing. This will prevent the key from falling off and protect the bolt splines from damage.
Repairing a cylinder crack
The most common way to seal a BC crack is welding. The work requires certain skills and abilities, since a violation of the technology will lead to divergence of the seam, and the problem will return. The welding sequence and technology is as follows:
- The ends of the crack on the block are drilled at an angle of 90 degrees. This procedure is necessary to prevent further expansion of the crack.
- The cylinder block is heated to 650 degrees. Then a cast-iron-copper filler wire is applied to the crack and a continuous weld is made using flux.
- The part is gradually cooled in a heating cabinet. Sudden cooling of the cylinder block after welding is unacceptable: this will lead to rupture of the seam and complete failure of the part.
The seam on the part can be made without heating, using electric welding and copper electrodes in a tin wrapper. In this case, the resulting seam requires additional reinforcement with epoxy resin. The surface is degreased with acetone or a special compound, then a layer of epoxy paste is applied to the seam with a spatula. After this, the BC is dried for 24 hours at room temperature. After drying, the seam is sanded.
Minor cracks can be repaired without welding by applying fiberglass and epoxy resin. The surface of the crack is degreased, then several layers of fiberglass are applied one by one, each coated with epoxy paste.
Causes
As a rule, the driver becomes aware of a problem such as engine oil in the coolant expansion tank when he decides to check the level of antifreeze in the system. There may be oil residues on the neck, and the coolant itself may change its color or consistency. In addition, the refrigerant may develop a relatively unpleasant odor.
Engine lubricant enters the expansion tank with antifreeze
One way or another, you need to keep in mind that mixing lubricant and refrigerant is a very bad sign for the vehicle owner. Both consumables circulate through systems isolated from each other. Moreover, they are sealed, so mixing liquids should at least alert the driver. If consumables are mixed with each other, this means that the systems are no longer sealed, which can cause engine fluid to leak.
The most likely and common reason for the mixing of consumables, in particular the ingress of engine fluid, can be:
- occurrence of mechanical damage to the operation of the oil radiator or oil cooler;
- malfunction of the cylinder head (the block gasket has expired);
- The heat exchanger (oil cooler) gasket has exhausted its service life.
It should be noted here that it is at these points that the lubrication and cooling systems come into contact with each other. In an oil cooler, such contact is explained directly by the purpose of the device. In some vehicles, the engine fluid simply must be maintained at a certain temperature, as a result of which the vehicles are equipped with an oil cooler. The latter, in turn, directly interacts with the vehicle’s cooling system, where the refrigerant acts as a coolant.
Consequences of using poor-quality coolant
In addition, one of the important reasons is the inconsistency of the refrigerants that the driver pours into the system of his car. For example, the driver detected that the refrigerant level in the expansion tank was too low and found no other way out but to pour the first available antifreeze into the system. As you know, antifreeze manufacturers can use various additives in their products. If these substances are incompatible with each other, then when heated by the engine, they enter into a chemical reaction with each other.
Torn and expired oil cooler gasket
How to determine the mixing of engine fluid and coolant?
The following are the reasons why you can determine that oil and refrigerant have mixed in your car:
- When draining the antifreeze, you see a refrigerant that is quite good in color and consistency. But, when all the coolant (coolant) has practically drained, the so-called liquid of an incomprehensible dark color begins to come out of the system (what you may have previously noticed in the expansion tank).
- A liquid of unknown composition cannot mix with the refrigerant; it immediately floats on top of the consumable. In addition, individual particles of the substance, when floating in antifreeze, may have a convex shape.
- If you decide to try the “liquid” by touch, it will be easily smeared with your fingers and will not leave greasy marks. If you try to rub a good lubricant (for example, from a dipstick), then greasy marks will remain on your fingers.
Engine lubricant enters the expansion tank with antifreeze
- You can take a napkin and soak it in the substance in the expansion tank, then set it on fire. If the oil is in the Antifreeze, the napkin will start to burn. Not too much, but you will hear a slight cracking noise when it burns. If you soak a napkin in clean refrigerant and set it on fire, it will not burn. In turn, dipping a piece of paper into pure oil will burn very quickly.
- If engine fluid is mixed with refrigerant, soot clots will begin to form in the lubricant, and deposits may appear in the oil passages. As a result, the throughput of the oil filter will be significantly reduced.
- The oil filter can become clogged with mixing products, in particular with dense balls formed as a result of mixing. Such clots can subsequently completely clog the filter, as well as cause abrasive wear of the cylinders and bearings of the camshaft and crankshaft.
- Over time, the substance can cause increased engine corrosion.
- The antifriction properties of the lubricant will be significantly reduced.
- The oil film will become very unstable and will break too quickly.