Repair of VUT and main brake cylinder of UAZ Hunter 31519
Symptoms of the problem:
The brake pedal suddenly became soft, but it doesn’t just fall right away, but when pressed for the first time it smoothly goes down all the way. At the same time, the car smoothly reduces speed. When you press it again, the pedal becomes harder, the car brakes almost normally (taking into account the fact that there are still drums behind), but the pedal slowly reaches the stop.
Inspection of the UAZ:
1. Brake fluid does not leave the reservoir. 2. A visual inspection of the brake lines and hoses did not reveal any leaks. 3. The brake master cylinder is dry. 4. Checking the condition of the front brake pads showed: pad wear is 15-20% 5. Checking the condition of the rear brake pads has not yet been carried out. 6. The patient has a “sorcerer” (from the factory).
Procedures performed:
Today the brake system was bled. All four wheels are bled. One 455 ml bottle of DOT4 brake fluid has been used. Before bleeding, the brake fluid reservoir was at the MAX level. Provided that, according to the Hunter's Primer, there is 0.6 liters of brake fluid in the hydraulic brake system, we can assume that the system is completely bled and there is no air in the system. The treatment didn't help.
It was noticed that when pumping, brake fluid came out of the air release valves of the front brakes under pressure (in a powerful stream) and in a large volume. When bleeding the rear brakes (with the same number of “pumps”), the pressure was weak, the volume of fluid flowing out was less than from the front ones). This may be normal, but it may come in handy for a correct diagnosis.
joint replacement of the vacuum booster and the main brake cylinder.
I found a lot of positive reviews, and even enthusiasm from UAZ drivers, VUT produced by Avtodetal-Service OJSC. This is not advertising! It’s decided - I’m buying VUT and GTZ from ADS. I didn’t even try to look for such a VUT in Kolomna, since the probability is “extremely small” (c) and the price tag will be “horrible”. I need to go to the capital... Early on a frosty morning I board the train to Moscow. The carriages are full of people for whom the two and a half hour trip to Nerezinovaya is just everyday work. Having bought everything I need, I return to the province. So: 42020.3151-3510010 – Vacuum brake booster JSC “ADS” – 2410 rubles.
Vacuum brake booster
3160-3505010 – Main brake cylinder JSC “ADS” – 1240 rub.
Brake master cylinder
3160-3506060 – Front brake hose “Fenox” (there was no ADS) – 340 rub. for two pieces. It's always good to have some in stock.
General view of the purchase
On a clear Saturday afternoon, my friend and I are driving to the garage to work on the brakes.
Let's move on to the repairs:
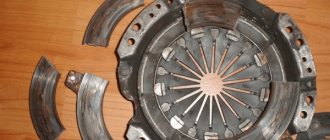
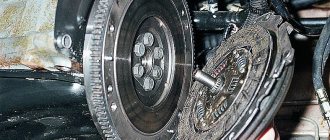
Still life with old VUT
Leaks on the check valve hose are an accidental spill of brake fluid, and not a defect in the brake system.
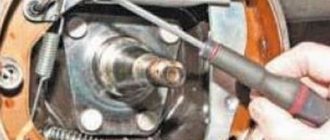
Having studied the Primer, we remove the old VUT and GTZ.
The old VUT is twice as heavy as the new one. Why?
Freed up engine compartment space
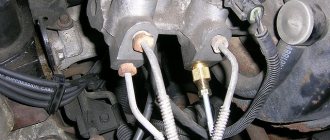
Using popular advice, the copper lines, after being unscrewed from the GTZ, were covered with protective rubber caps removed from the caliper air release valves. After installing the GTZ, fill the reservoir with brake fluid, press the brake pedal a couple of times until the fluid flows out of the exhaust channels, and only then tighten the copper lines. This allows you to avoid a large air plug at the exit from the GTZ.
New parts in place
There were no difficulties when replacing the VUT and GTZ; unexpected surprises awaited us when bleeding the brakes. Next, using the same “primer book”, with the engine running at idle, we bleed the brake system: rear right, rear left brakes, front circuit of the pressure regulator, front right, front left brakes. So, when we tried to bleed the rear left brake mechanism, we were faced with the fact that the brake fluid was not flowing from the release valve. A careful inspection of the line revealed the cause of the malfunction - a pinched copper tube. In an unpleasant set of circumstances (sagging springs + elements of rough terrain), the bridge stocking “meets” the resonator pipe, and as luck would have it, a copper brake line pipe passes at the point of collision. A blow and the tube is flattened. Since there is no warehouse with spare parts in the garage, and the day is drawing to a close, we decide to carefully fix the problem using impact tools and... tenderness))). The malfunction has been eliminated, but the condition of the tube does not inspire confidence, so this part of the line will subsequently be completely replaced.
copper tube after straightening
Having completed the work, we conduct field tests. After the necessary acceleration, I press the brake pedal with the usual movement... Instead of a leisurely decrease in speed (with Estonian pronunciation and intonation), I get emergency braking with all wheels locked. On the old (working) VUT, this effect was achieved only at the end of the brake pedal stroke. It’s a little unusual, but the result is obvious – the efficiency of the braking system has increased significantly. After just 10 minutes of driving, the behavior of the pedal was mastered - you quickly get used to good things.
UAZ LOAF Topic author Maxim
Brake fluid quality testers
guys, help, UAZ loaf 2021, you constantly have to pump the clutch, the fluid doesn’t go away, the pedal goes to the very bottom, you don’t have time to remove your foot, the car is already moving, pumping helps a little (but not for long), air is observed in the fluid,
Roma (Jager) Look in the thread somewhere there is air
Maxim (Kristie) where exactly in the thread?
Roma (Jager) Look from the main thing to the worker, I had nothing on the brake system, nothing was leaking anywhere, but air was flowing. Well, purely by chance I found a threaded connection that was sucking air into the system
Kostya (Well) maybe it’s the cuff of the master cylinder.
Maxim (Kristie) thanks, I’ll check it
Nikolay (Aksita) Unscrew the tube from the main one and bleed it, press it with your finger so that air does not get sucked in
Andrey (Philana) The master cylinder needs to be changed. If you buy a new one, then only with a return guarantee, I have 4 pieces. I was only able to pump one normally! I fucked for two days, the batch was probably defective.
Nikolay (Aksita) It’s just that these GCs need to be pumped before installation on the car.
Ivan (Boutros) look at the clutch tabs, they unscrew themselves
Maxim (Kristie) what does the air in the system have to do with it?
Ivan (Boutros) maxim you are wrong
Maxim (Kristie) I don’t understand you
Ivan (Boutros) I didn’t write about air
Vyacheslav (Yuna) ....replacing the clutch master cylinder will help very quickly...
Vyacheslav (Yuna) and all this is pumped together with the working cylinder... this is not a shock absorber that needs to be pumped before installation on the car... something like this....
Tolik (Peder) and listen, dear friend, by chance the fork didn’t bend on the release lever, and such crap happened and everyone sinned on the main one???
Maxim (Kristie) Well, then air pumping also helps
Tolik (Peder) try the Hz change if it helps until you try everything you won’t understand, at one time there was a hemorrhage with the front sports brakes, they kept it just done, went through everything and listened to advice, but the reason was petty, the spring from the pedal fell off, so all the brakes were held at half strength, warm up the discs
Tolik (Peder) search and you will find
Nikolay (Aksita) First check for worn out lugs on the levers and wear of the pin on the master cylinder and then get into the weeds.
Quick brake bleeding after replacing the turbocharger? — uazbuka.ru
Tell me, is it possible to do without completely bleeding the system in... me from a Lada, it also fits the main brake cylinder of a Lada,... I can’t bleed the brakes on a loaf!!!
How to bleed the master brake cylinder:: how to bleed...
Those car owners who have changed the master brake cylinder in their car at least once in their life know how difficult it is...
Repair kit for master brake cylinder
It was decided not to change it, but to purchase a repair kit for the main brake cylinder and repair it ourselves. After two days of operation, the cylinder literally jammed. After disassembling it turned out that the rubber bands were swollen. The same thing happened with the second repair kit. The third one lasted a week, but still refused, since the rubber bands had simply worn out.
The main brake was inspected for damage and scratches. We were unable to find anything suspicious. Repair kits were purchased in different price categories, in different stores, and everyone praised the product. Conclusion, they are selling Mr. It's a pity for the money spent, almost a third of the price of a new one.
Replacing a UAZ brake cylinder
I have an old-style UAZ master brake cylinder installed, that is, it has not one fluid reservoir, but two separate ones. There is nothing complicated when replacing it, it is changed in the same way as on the UAZ 469, UAZ 3151, “loaf”. The tubes of the front and rear brake systems are unscrewed. The cylinder is unscrewed, and a new one is installed in its place, then the tubes are connected.
- fill the fluid into the reservoir (fill in high-quality DOT type fluid);
- press out the cylinder with the lever, the corresponding outlet hole should be open;
- close the hole, release the lever. The sequence is important; when the hole is closed, when the lever is released, a vacuum is created and liquid from the tank enters the cylinder;
- repeat the operation several times until liquid appears.
After the liquid appears, screw the tubes and pump the entire system. How to quickly and independently bleed the brakes in another article.
Unfortunately, there is no similar video about replacing the main brake cylinder in a UAZ, but here it’s almost the same:
UAZ-469 car - characteristics, design, repair
Possible options:
- Technical characteristics of UAZ-469, UAZ-469B Engine characteristics (41416, 414) UAZ-469, UAZ-469B Engine UAZ-469, UAZ-469B Transmission UAZ-469, UAZ-469B Chassis, suspension, control systems of UAZ-469, UAZ-469B Electrical equipment of UAZ-469, UAZ-469B Body of UAZ-469, UAZ-469B Adjustment data of UAZ-469, UAZ-469B Filling capacity of UAZ-469, UAZ-469B
- Controls of UAZ-469
- Preparing for work UAZ-469
- Engine mount UAZ-469
- Crank mechanism of the UAZ-469 engine
- Gas distribution mechanism of the UAZ-469 engine
- Lubrication system UAZ-469
- Engine crankcase ventilation system UAZ-469
- UAZ-469 engine power supply system K-129V carburetor Maintenance of the UAZ-469 engine power supply system
- Gas exhaust system of the UAZ-469 engine
- UAZ-469 engine cooling system
- Preheater for UAZ-469 engine
- UAZ-469 engine malfunctions
- UAZ-469 clutch UAZ-469 clutch control drive Possible malfunctions of the UAZ-469 clutch
- UAZ-469 gearbox Malfunctions of the UAZ-469 gearbox, shift mechanism
- Transfer case UAZ-469 Possible malfunctions of the transfer case UAZ-469
- UAZ-469 driveshaft Malfunctions of the UAZ-469 driveshaft Rear axle UAZ-469 Rear axle UAZ-469B Possible malfunctions of the rear axle UAZ-469B
- Front drive axle UAZ-469 Maintenance of the front axle UAZ-469
- UAZ-469 frame
- Suspension UAZ-469 Shock absorber UAZ-469 Wheels and tires UAZ-469 Possible malfunctions of wheels, tires and hubs UAZ-469
- Steering of UAZ-469
- UAZ-469 brakes Maintenance of UAZ-469 brakes Possible malfunctions of UAZ-469 service brakes UAZ-469 parking brake
- Electrics UAZ-469
- Generator UAZ-469
- Voltage regulator PP132
- Battery UAZ-469
- Ignition system of UAZ-469 Possible malfunctions of devices in the ignition system of UAZ-469
- Starter UAZ-469
- Lighting, light and sound alarm system UAZ-469 Sound signal UAZ-469
- Control and measuring instruments UAZ-469
- Tools and accessories UAZ-469
- UAZ-469 body UAZ-469 awning Ventilation of the UAZ-469 body Installation of sanitary stretchers in the UAZ-469 body
- Marking UAZ-469
- Maintenance of UAZ-469 First maintenance (TO-1) of UAZ-469 Lubrication of the UAZ-469 car
- Lubricants UAZ-469 and UAZ-469B
Repair kit for master brake cylinder
It was decided not to change it, but to purchase a repair kit for the main brake cylinder and repair it ourselves. After two days of operation, the cylinder literally jammed. After disassembling it turned out that the rubber bands were swollen. The same thing happened with the second repair kit. The third one lasted a week, but still refused, since the rubber bands had simply worn out.
The main brake was inspected for damage and scratches. We were unable to find anything suspicious. Repair kits were purchased in different price categories, in different stores, and everyone praised the product. Conclusion, they are selling Mr. It's a pity for the money spent, almost a third of the price of a new one.
Replacing a UAZ brake cylinder
I have an old-style UAZ master brake cylinder installed, that is, it has not one fluid reservoir, but two separate ones. There is nothing complicated when replacing it, it is changed in the same way as on the UAZ 469, UAZ 3151, “loaf”. The tubes of the front and rear brake systems are unscrewed. The cylinder is unscrewed, and a new one is installed in its place, then the tubes are connected.
- fill the fluid into the reservoir (fill in high-quality DOT type fluid);
- press out the cylinder with the lever, the corresponding outlet hole should be open;
- close the hole, release the lever. The sequence is important; when the hole is closed, when the lever is released, a vacuum is created and liquid from the tank enters the cylinder;
- repeat the operation several times until liquid appears.
After the liquid appears, screw the tubes and pump the entire system. How to quickly and independently bleed the brakes in another article.
Unfortunately, there is no similar video about replacing the main brake cylinder in a UAZ, but here it’s almost the same:
How does the GTZ function?
The unit consists of the following parts:
- metal housing with holes for supplying brake fluid, pedal rod and connecting the expansion tank;
- 2 pistons with rubber seals;
- 2 return springs;
- guide bushings;
- end plug with gasket.
An expansion tank is attached to the top of the main distributor body, where excess fluid goes through compensation holes. Inside, the element is divided into 2 cylinders with separate pistons standing on the same axis.
The blind end of the housing is closed with a threaded plug; on the other side there is a flange for attaching to the vacuum booster. The brake pedal rod is attached to the first piston. The brake circuit pipes are connected to the lower holes - separately for the front and rear wheels.
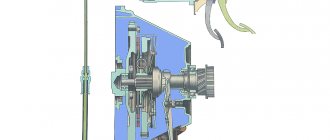
The operating principle of the master brake cylinder looks like this:
- When you press the pedal, both pistons simultaneously move forward and push fluid into the circuit tubes. Under its pressure, the wheel cylinders are activated, compressing the pads on the discs.
- Part of the liquid that does not have time to pass into the tubes flows into the expansion tank through special bypass holes.
- When the driver releases the pedal, the springs push the pistons back, returning them to their original position. Liquid from the tubes and reservoir refills the cylinders.
- To compensate for the expansion of the liquid (for example, from heating), another pair of holes is provided leading to the expansion tank.
Note. The GTZ acts in conjunction with a vacuum booster (not shown in the diagram), which helps put pressure on the pistons. This allows the system to respond faster and make the driver's actions easier.
Replacing the main brake cylinder of UAZ 31519
As practice shows, in many cases, reassembling a cylinder in a garage does not lead to the desired result. Therefore, in the event of a malfunction, we recommend replacing the brake master cylinder assembly.
You will need: a “17” wrench, a special “12” wrench for pipeline nuts.
1. Disconnect the wire from the negative terminal of the battery.
2. Unscrew the cap of the master cylinder reservoir and pump out the brake fluid from the reservoir, for example, with a medical syringe. Replace the reservoir cap to prevent dirt from getting into it.
Malfunctions of the UAZ master brake cylinder
Author: Sochi Auto Repair
The automobile braking system includes several elements that perform their own functional task. Signs of a faulty master cylinder in our material. The brake cylinder is the most important among the components of this system.
The force created when it acts on the braking system is hydraulic in nature.
Signs of a faulty master cylinder
When the brake master cylinder (MBC) fails, various troubles arise. For example, the effectiveness of the brakes may decrease or they may fail altogether. To prevent this, any car owner needs to understand the signs of brake system malfunctions and know how to eliminate them.
Working principle of the brake master cylinder
GTZ uses for its work the property of a liquid to maintain its “shape” under pressure. The design of the device includes a main cylinder, consisting of two sections, each with its own hydraulic circuit. The GTZ is installed directly on the vacuum booster.
Brake fluid is poured into a tank located under the GTZ and including 2 sections. The tank is connected to the main cylinder through holes made specifically for this purpose.
To facilitate the operation of the wall, translucent plastic was used to make the walls of the tank, making it easy to monitor the level of liquid in it.
When the level drops below the nominal value, the sensor transmits a signal to the control panel, on which the indicator lights up. There are 2 pistons installed in series inside the cylinder.
One is located freely, the second is fixed and comes into contact with the vacuum booster rod. To increase reliability, rubber seals are installed on the pistons. The pistons return to their initial position thanks to return springs that hold them in it.
After pressing the gas, the vacuum booster rod is pressed in. When moving through the cylinder cavity, the rod closes the compensation hole. This causes the primary circuit pressure to increase and drives another piston.
As a result, the secondary circuit pressure increases. When the pistons move, they create empty areas into which brake fluid flows through a special hole. The pistons move until the spring has done its work.
The pressure in the circuits increases to the maximum, due to which the mechanism begins to function. When the car stops, the pistons return to their original position. The good thing about the circuit system is that if one circuit breaks, the second will continue to work.
Common brake master cylinder malfunctions
In order to timely identify faults in the gas turbine engine and eliminate it, you need to know their main symptoms, which include:
- Increased brake pad wear or brake fluid leakage, reducing its level. If a leak is detected, it is necessary to replace the faulty part.
- Reduced braking efficiency (brake softness). This is due to a drop in brake fluid level or mixing with air. If the braking, on the contrary, has become harsher, the brake booster or the valve that regulates the vacuum booster may break.
- Increasing the brake pedal travel. This usually happens if the brakes have been incorrectly adjusted, there is air in the system, or the turbocharger is faulty.
- Uneven braking or a strong drop in the effectiveness of the braking system. The first reason is associated with fluid getting on the brake pads, the other reason is usually associated with wear of the brake discs.
Diagnosis of GTZ malfunctions
First, you should carefully study the instrument readings. Usually they promptly show problems with the brake system and signal this with a corresponding indicator on the dashboard. If such signals appear, it is necessary to carefully inspect the brake system and the turbocharger for leaks.
You also need to inspect the brake circuit outlets and joints. Having completed the inspection from the outside, you need to check the pressure in the system.
If there are significant pressure deviations from those recommended by the manufacturer, it means that one of the circuits is faulty. Depressurization is the main cause of gas turbine engine malfunction, which is easily detected by leaks and a specific smell.
We have explained the signs of a faulty master cylinder, diagnose it and get it repaired!
Malfunctions of the master brake cylinder video
Brake system design for UAZ-3303, UAZ-3909, 2206
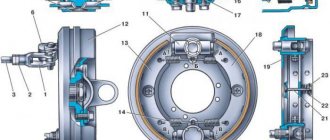
The front brakes of UAZ-3303, UAZ-3909, 2206 have two wheel cylinders, each of which acts separately on the pad. Cylinder diameter 32 mm. The rear brakes have one wheel cylinder acting on both pads. Cylinder diameter 25 mm. The front wheel brake is shown in the figure.
Two wheel cylinders 3 are secured to the shield 1 using support pins 14 and nuts 15. The support pins have eccentrics on which brass pad support bushings are installed.
- By turning the support pins with eccentrics, you can move the support ends of the pads relative to the brake shield.
- The brakes of UAZ-3909, UAZ-2206, 3303 are adjusted using support pins when assembling them at the factory or when repairing brakes with replacing pads or linings.
When correctly installing the pads with unworn linings and the brake drum, the “a” marks on the support pins (cores on the outer ends) should be located as shown in Fig. 7.4, or with deviations from this position in one direction or another up to 50°.
- The friction linings of the pads are attached to the rim with aluminum rivets recessed into the body of the lining.
- The moving ends of the brake pads of UAZ-3303, UAZ-3909, 2206 fit into the grooves of the piston tips of 10 wheel cylinders.
- The pads, with the inner surface of their rims, rest on adjusting eccentrics 13, movably mounted on the brake shield.
The eccentrics are kept from arbitrary rotation by strong springs. The pads are pressed against the eccentrics by tension springs 6.
The hexagonal heads of the adjusting eccentric axes are located on the outside of the brake shield. Using eccentrics, the required gap is established between the pads and the drum.
The pads are kept from lateral displacement by the ends of the axes of the adjusting eccentrics and by springs installed in the middle part of the pads.
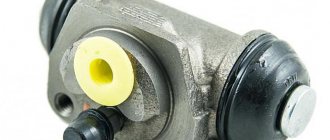
Inside each wheel brake cylinder there is a piston 10 with two rubber sealing rings 11 and a spring that presses the wheel cylinder piston to the thrust end of the pad rib.
The wheel brake cylinder of UAZ-3303, UAZ-3909, 2206 has two holes.
One hole serves to supply brake fluid from the drive system, and the other to release air from the system during bleeding: it is closed by bypass valve 4, which in the closed position ensures tightness. To prevent clogging, the valve opening is closed with a protective cap. The internal cavities of the wheel cylinders are protected from moisture, dust and dirt by rubber caps.
At the bottom of the brake shield of UAZ-3303, UAZ-3909, 2206 there are support pins, on which brass bushings, the same as the front brakes, are placed, against which the pads swing.
When correctly installing the pads with new linings and drums, the marks “a” on the support pins (cores on the outer ends) should be located as shown in Fig. 7.
5, or with deviations from this position in one direction or another up to 50°. The rear brake pad lining is shorter than the front brake pad lining. This is designed to ensure that the wear on the rear and front pads is equal.
The brake drums are the same on all wheels of the car.
The brake drums of UAZ-3303, UAZ-3909, 2206 are attached to the hub with three screws, which are unevenly spaced around the circumference; this ensures that the drum is installed on the hub in one specific position, in which the drum assembly with the hub is processed.
It is not recommended to move brake drums from one hub to another, as this will lead to increased runout of the working surfaces of the drum.
The hydraulic drive of the service brakes UAZ-3303, UAZ-3909, 2206 consists of a suspended pedal, a vacuum booster, a two-chamber master cylinder, pipelines with connecting fittings and wheel working cylinders.
The hydraulic drive pedal to the wheel brake mechanisms, as well as the clutch release pedal, swings on the axle, without requiring lubrication during operation, on a plastic bushing.
The axis is fixedly fixed in the bracket. The return spring constantly holds the pedal in its original position by pressing it against the brake light switch cap mounted on the pedal bracket.
- The brake pedal is connected through a system of shafts and rods to the pusher of the vacuum booster.
- The vacuum brake booster is used to improve the efficiency of hydraulic brakes when the engine is running.
If the amplifier fails, only the force from the driver's foot is transmitted to the pistons of the master cylinder through the brake pedal, pusher 33, control valve, buffer 21 and rod 7.
The vacuum booster does not require adjustments.
Maintenance consists of checking the reliability of fastening, washing or replacing the amplifier air filter during seasonal maintenance before the winter operating season.
11.7. Basic brake problems
Repair or replace the cylinder.
Regrind or replace the discs in the set on one axle.
Problems that arise with the brakes while traveling are considered critical and must be corrected immediately. The culprit of the malfunction is often the main cylinder, installed in the engine compartment and rigidly connected to the pedal. To find out the cause of the breakdown and repair the unit yourself, you need to know the structure of the brake master cylinder (MBC) and its principle of operation. During the diagnostic process, it is necessary to distinguish and filter out problems with other elements of the system.
Symptoms of problems
The fluid brake system consists of many parts that can become unusable: pipes, wheel cylinders, calipers, drums and pads. Typical signs of a faulty master cylinder:
- After pressing the pedal, the car stops slowly. The reason is that the cuffs of one or two pistons have lost their tightness - they have cracked or “floated”.
- To slow down, you need to press the brake pedal hard. The phenomenon occurs due to swelling of the rubber of the piston seals.
- The brake pedal travel is too short. The fluid inside the cylinder has nowhere to go because the compensation hole is clogged. Another option is that the passage is blocked by a swollen rubber seal.
- A common symptom is pedal failure, the brakes coming on at the end of the stroke. This indicates complete wear of the cuffs; as a result, liquid penetrates behind the piston and rushes into the expansion tank - the cylinder “bypasses.”
- The pads do not release the brake discs and drums and get very hot when driving. Options: one of the pistons is jammed or the bypass hole is clogged.
The listed symptoms of a GTZ malfunction are similar to malfunctions of other elements. Pedal failure also occurs when a large amount of air enters the tubes or loss of fluid in one of the working cylinders. Sluggish deceleration and increased force on the pedal are often caused by a breakdown of the vacuum booster - a cracked membrane or a lack of tightness at the joints of the hose that takes off engine vacuum.
There are signs that clearly indicate the performance of the main hydraulic cylinder and the malfunction of other elements:
- during braking, the car pulls to the side - the problem lies in a certain circuit or wheel;
- jamming of the brake mechanisms of one wheel;
- creaking and squeaking when braking;
- heating the discs and pads on one wheel.
If you eliminate these symptoms, it will become easier to check the brake master cylinder in a garage. This also includes obvious brake fluid leaks and the knocking sound of worn calipers.
Maintenance of UAZ 3160
Constantly monitor the serviceability of the service brake system, adjust it in a timely manner and eliminate any malfunctions.
Rice. 260. Main brake cylinder: 1 – protective cap; 2 – cover with sensor for emergency drop in brake fluid level; 3 – tank;
4 – body of the main brake cylinder; 5 – plug; 6.13 – gaskets;
7 – plug insert; 8 – spring; 9 – spring seat; 10, 19 – washers; eleven,
17 – pistons; 12 – thrust bolt; 14 – sleeve-limiter; 15 – stop screw; 16 – sealing cuff; 18 – outer cuff; 20 – retaining ring; 21 – connecting sleeve
Systematically check the fluid level in the master cylinder reservoir and, if necessary, bring it up to normal. Liquid level in tank 3 (see.
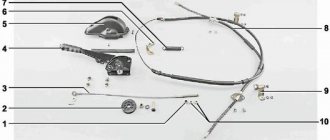
Rice. 262. Pressure regulator drive: 1 – pressure regulator;
2 – bracket (base); 3 – drive lever; 4 – adjusting bolt; 5 – elastic lever; 6, 9, 13 – bolts; 7 – bushing; 8 – lever stand; 10 – spacer sleeve; 11 – terminal; 12 – rack bracket; 14 – lever axis
During seasonal maintenance, check the operation of the pressure regulator. Clean the regulator from dirt and check the reliability of its fastening. By external inspection, make sure that the regulator and its drive parts are not damaged, the brake fluid is not leaking and there are no gaps in the connection of the strut with the elastic lever and the bracket on the rear axle (
Rice. 261. Pressure regulator: 1 – piston; 2 – piston sealing ring; 3, 6 – piston spring support washers; 4 – piston spring; 5 – body; 7 – piston head seal; 8 – body bushing; 9 – pusher bushing support washer; 10 – pusher bushing; 11 – pusher sealing ring;
12 – support plate; 13 – pusher bushing spring; 14 – plug; 15 – plug gasket; 16 – bypass valve; 17 – plug; 18 – piston sleeve;
19 – retaining ring; 20 – protective cover
When you press the brake pedal, piston 1 (see.
Rice. 258. Main cylinder drive: 1 – tank;
2 – main brake cylinder; 3 – nut; 4 – vacuum booster; 5 – pedal bracket; 6 – tension spring; 7 – fork; 8 – pedal; 9 – finger; 10 – pedal axis; 11 – brake signal switch
Adjust the free play of the pedal by changing the position of the stop (see.
Rice. 263. Bleeding the brake system
3. Remove the rubber cap from the bypass valve of the brake cylinder of the right rear brake mechanism and place a 400 mm long rubber hose onto the valve. Lower the other end of the hose into a glass vessel with a capacity of at least 0.5 liters filled with brake fluid (Fig. 263).
4. Unscrew the bypass valve 1/2–3/4 turn, then press the pedal several times. Press the pedal quickly, release slowly.
Fluid under pressure from the master cylinder piston will fill the hydraulic drive and displace air. Bleed until the release of air bubbles from the hose, lowered into a container with brake fluid, stops. While bleeding, add brake fluid to the master cylinder reservoir, making sure to avoid exposing the bottom to prevent air from entering the system again.
Keep the end of the hose immersed in liquid during the entire filling operation.
Bleed the hydraulic drive not only when it is filled with liquid, but also in the event of depressurization of the hydraulic drive.
5. Tightly tighten the wheel cylinder bypass valve while pressing the pedal, remove the hose and put on the cap.
6. Bleed the rear left brake cylinder, then the pressure regulator, and the right and left wheel cylinders of the front brakes.
7. If the vehicle is equipped with a brake master cylinder with two reservoirs, after bleeding the hydraulic drive, it is necessary to turn off the warning device, for which:
– unscrew the bypass valve of the right or left working cylinder of the rear brake mechanisms;
– gently press the pedal until the warning light on the instrument panel goes off; if the warning light flashes, this will mean that the indicator pistons have passed the neutral position and therefore the operation must be repeated from the beginning, but only by unscrewing the front wheel bypass valve;
– close the valve while pressing the pedal.
After bleeding all brake mechanisms, add fluid to the master cylinder reservoir.
Screw the reservoir cap(s) on tightly and tighten with enough force to prevent breakage.
Do not add fluid collected in a glass container during bleeding to the brake master cylinder. If the brake fluid in the system is dirty, drain it and refill the system with fresh fluid.