We replace the parking brake system drive cables if adjustment is impossible due to their stretching or mechanical damage.
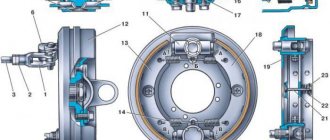
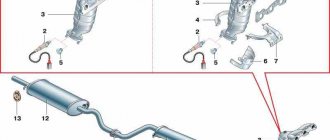
Parts of the parking brake system drive: 1 - remote sleeve (2101-3508076); 2 — roller (2101-3508065); 3 — front cable (2101-3508068); 4 — parking brake system drive lever (2103-3508012); 5 — protective cover (2103-3508040); 6 — cable guide (2101-3508075); 7 — tension spring (2101-3508078); 8 — rear cable (2101-3508180); 9 — rear cable bracket (2101-3508210); 10 — nut M8 low (16102311)
Removing the rear cable
1. Place the car on an inspection hole or overpass (see “Preparing the car for maintenance and repair”).
2. Use round nose pliers or pliers to disconnect the tension spring from the body bracket and the tip of the front cable.
3. Remove the tension spring.
4. 13 mm
unscrew the locknut, holding the adjusting nut with a wrench of the same size.
5. Hold the tip of the front cable with pliers and use a 13 mm
unscrew the adjusting nut and remove it together with the spacer sleeve.
6. Remove the rear cable guide from the front end and disconnect it from the cable.
7. Remove the cable ends from the drive levers (see “Rear wheel brake pads - replacement”) without disconnecting the pad support struts.
8. Using a screwdriver, we remove the tip of the cable sheath from the hole in the body bracket.
9. 10 mm
Unscrew the two nuts securing the rear cable bracket to the body and remove the bracket.
10. 8 mm
unscrew the two bolts securing the cable sheath holder to the brake shield.
11. Pull out the cable branch from the shield.
12. Similarly, disconnect the cable branch on the opposite side and remove the rear parking brake system drive cable.
The right branch of the cable differs from the left by the presence of a rubber tube on the sheath.
We remove the front cable guide roller if there is mechanical damage or to lubricate the contact surfaces of the roller and spacer sleeve.
1. Remove the rear cable guide from the front end and disconnect it from the cable (see above).
2. 13 mm
Unscrew the roller mounting bolt.
3. We shoot the video.
We remove the front cable to replace it.
Removing the front cable
1. Remove the rear cable guide from the front end and disconnect it from the cable (see above).
2. Using a short Phillips screwdriver, unscrew the two self-tapping screws securing the protective casing.
3. Remove the casing from the lever.
4. Remove the rubber seal from the lever bracket.
10 mm socket wrench
with the extension, unscrew the four bolts securing the lever.
6. Remove the lever along with the front cable.
7. Unsplint the connection between the lever and the cable, remove the washer from the axis of the cable tip.
8. Remove the cable end.
1. Install the parts in reverse order, lubricating the roller axis.
2. Adjust the parking brake system (see “Parking brake - adjustment”).
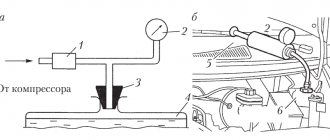
To carry out the inspection, you will need the help of an assistant who will create pressure in the brake system.
Brake system - technical condition check
We check the condition of the brake system according to the maintenance intervals (see “Periodic maintenance”).
To complete the job you will need a caliper.
1. Place the car on an inspection hole or overpass (see “Preparing the car for maintenance and repair”).
2. To check the condition of the hydraulic brake drive, you will need an assistant who must vigorously press the brake pedal 3-4 times and keep it pressed during the check, thereby creating pressure in the system. If connections are found to be leaking, tighten their fasteners.
There should be no swelling on the surface of the brake hoses; if there are any, replace the hose. Hoses, regardless of their condition, are recommended to be replaced after five years of vehicle operation, since the hose, due to aging rubber, may burst during braking. Brake pipes must not have dents or cracks. Otherwise, they must be replaced (see “Brake pipes - replacement”).
How to bleed the brakes on a VAZ 2106
Bleeding the brakes of a VAZ 2106 will take literally half an hour, and all the work can be done independently, without assistants. Consequently, we found out that air must be removed from the system in any case, since air pockets lead to pedal failure and incorrect brake operation. And brakes mean safety on the road. Therefore, if the first signs of airing of the system appear:
- brake pedal failures;
- the liquid level in the tank drops below the minimum mark;
- sluggish brake performance;
- fluid leak,
bleeding the brakes is inevitable.
Also, do not forget that the liquid is not eternal and has its own resource. The plant recommended changing it completely every two years, which is due to the high hygroscopicity of the composition. And further. Before bleeding the brakes on a VAZ 2106, it is imperative to eliminate the cause of the depressurization of the system. There can be many reasons and this is a completely different conversation. To bleed the brakes we need:
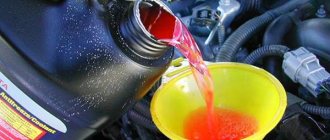
- branded brake fluid GTZ-2 Neva;
- fuel system check valve from VAZ 2108 (its index is 2108-11560010-02);
- two tubes of the appropriate diameter;
- capacity for pumping;
- key for unscrewing the fitting.
Replacing the master cylinder of the VAZ 2106 brakes
In the vast majority of cases, replacing the cylinder is the best repair option. The fact is that it is not always possible to find individual parts of brake cylinders (pistons, return springs, spacers, etc.) on sale. It is much more common to find sets of seals for cylinders on sale, but the quality of these seals sometimes leaves much to be desired. In addition, they are often counterfeited. That is why car owners prefer not to bother with repairing the old cylinder, but simply install a new one on their “six”. To do this, we will need the following tools:
- set of spanners;
- pliers;
- flat screwdriver;
- rags;
- medical syringe;
- canister of brake fluid (capacity 0.5 liters);
- 5 x 6 bolts (they will be used as plugs for the brake hoses).
On my own behalf, I can add that recently even original VAZ repair kits for seals for the master cylinder have become of very mediocre quality. Once I purchased such a kit and installed it in the leaking cylinder of my “six”. At first everything was fine, but six months later the leak resumed. As a result, I decided to buy a new cylinder, which is still in the car to this day. Three years have passed, and I have not yet noticed any new brake fluid leaks.
Sequence of work
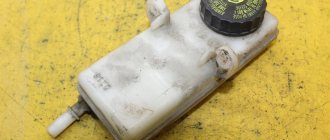
When starting to replace the master cylinder, you should make sure that the car engine is completely cool. In addition, all brake fluid should be drained from the reservoir. The most convenient way to do this is with a medical syringe (if you don’t have one at hand, a medical bulb will do). Without these preparatory measures, it will not be possible to change the cylinder.
- Use an open-end wrench to unscrew the fastening nuts on the brake hoses. The hoses are carefully removed from the cylinder body. 8 bolts are screwed into the vacated sockets. They will serve as plugs and will not allow the brake fluid to leak out when tilting and removing the cylinder. The brake hoses are also sealed with 6mm bolts to prevent leakage.
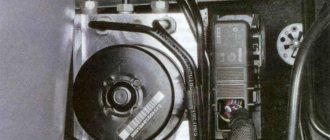
- Using a 13-mm open-end wrench, unscrew the two fastening nuts holding the cylinder to the filter housing. After this, the cylinder should be carefully pulled towards you, always trying to keep it horizontal so that the liquid does not leak out of it.
- The removed cylinder is replaced with a new one. The fastening nuts on the amplifier body are tightened. Then the fastening nuts of the brake hoses are tightened. After this, a portion of brake fluid is added to the reservoir to compensate for the leakage that inevitably occurs when replacing the cylinder.
- Now you should sit in the passenger compartment and press the brake pedal several times. Then you need to slightly unscrew the fastening nuts on the hoses. After unscrewing them, a characteristic hissing sound will be heard. This means that air is coming out of the cylinder, which ended up there during the repair and which should not be there. As soon as brake fluid drips from under the nuts, they are tightened.
Disassembling the cylinder and installing a new repair kit
If the driver decides to do without replacing the cylinder and change only the sealing collars, then the cylinder will have to be disassembled. The sequence of actions is listed below.
- First, use a screwdriver to remove the rubber seal located in the cylinder body on the side of the mounting flange.
- Now the cylinder should be placed vertically in a vice. And using a 22-mm open-end wrench, slightly loosen the front plug. Use a 12 wrench to unscrew the limiting bolts located next to it.
- The loosened plug is unscrewed by hand. There is a thin washer underneath it. You need to make sure it doesn't get lost. After completely unscrewing the stops, the cylinder is removed from the vice.
- The cylinder is placed on the table (before this you need to lay something on it). Then a regular screwdriver is inserted into the body from the flange side, and with its help all the parts are pushed out onto the table.
- A rag is inserted into the empty body. The body is thoroughly wiped. Then it should be inspected for scratches, deep cracks and abrasions. If any of this is discovered, then the point of replacing the seals is lost: you will have to replace the entire cylinder.
- The rubber rings on the pistons are removed manually and replaced with new ones. The retaining rings on the fittings are pulled out with pliers. The gaskets located under these rings are also replaced with new ones.
- After replacing the sealing collars, all parts are installed back into the housing, then the plug is installed. The assembled cylinder is installed on the amplifier flange, then the brake circuit hoses are connected to the cylinder.