HOW IS EXHAUST GASES OUT?
To remove exhaust gases, a VAZ 2114 exhaust system was developed and installed, the diagram of which is shown in the figure.
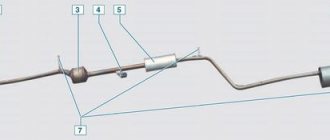
Exhaust system diagram
It consists:
- Bracket for fastening the exhaust pipe;
- Sealing gasket;
- Clamp;
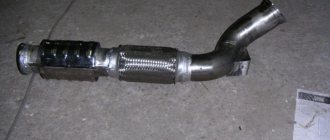
- Additional muffler;
- Rubber shock absorber;
- Central muffler;
- Rubber shock absorber;
- Clamp connecting pipes;
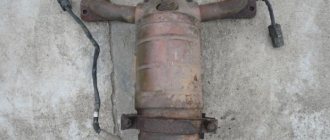
- Neutralizer;
- O-ring for the hinge;
- Oxygen sensor;
- Reception pipe.
Exhaust gases are removed as follows. From the exhaust manifold, exhaust gases enter a channel called the exhaust pipe, which directs them further into the converter. From its name it becomes clear that it is designed to burn the remaining flammable substances in the exhaust gases.
It primarily dampens exhaust noise and reduces turbulence. The next “obstacle to gases” is the muffler resonator, in which “acoustic mirrors” reduce the noise of escaping gases even more. And the last stage will be the central muffler. The exhaust system is manufactured and installed in such a way that gases are emitted outside the vehicle, which prevents them from entering the cabin.
Exhaust system connecting parts
- the sealing gasket serves to connect the manifold and the exhaust pipe;
- a movable hinge connects the converter flange and the exhaust pipe;
- the metallographic ring is located between the flanges;
- the connecting parts between the muffler pipes are a clamp with flared ends and conical rings;
- the exhaust pipe is secured with DISPOSABLE nuts to the studs of the exhaust manifold and to the walls of the bracket.
Mufflers and pipes are a single system, and if they break down, the entire muffler device must be replaced with new ones.
HOW THE CENTRAL SILENCER IS SET UP
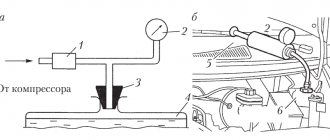
They are made of aluminized steel, stainless steel, ferrous metal and painted with powder coating. The installation of direct-flow sports mufflers is gaining popularity. The muffler structure can be seen in the figure.
Muffler
The VAZ 2114 muffler consists of:
- Metal body;
- Thermal insulating layer;
- Partition;
- Pipe with perforations;
- Calibrated hole (throttle);
- Front pipe with perforations;
- Inlet pipe;
- Partition in the middle part;
- Exhaust pipe;
- Partition in front of the muffler;
- Rear perforated pipe;
- Partition at the back;
- Metal body.
It should be noted that the exhaust system of the VAZ 2115 with a carburetor engine differs from the design described above. It does not provide for the installation of a neutralizer for exhaust gases.
What to choose?
Stinger Exhaust Systems
There are several options for muffling devices that can be used as a replacement for the old element on the VAZ 2114.
- From the factory, VAZ vehicles are equipped with an aluminum muffler, the service life of which is up to 6 years. Inexpensive, fairly reliable solution.
- More expensive variations made of heat-resistant stainless steel. They cost more than factory ones, but are distinguished by reliability and an extended service life of up to 10-15 years.
Article on the topic: Oil level sensor VAZ 2114: operating principle, check and replacement
Unfortunately, it is not uncommon that replacing a given device does not give the expected result, because instead of the expected high-quality stainless steel element, buyers are faced with counterfeits. They are made from ordinary low grade black iron. The service life of such products is no more than a year.
To give the appearance of expensive products, low-quality mufflers are coated with special paints. Therefore, we recommend purchasing parts from trusted, certified auto parts stores.
ABOUT FACTORS AFFECTING THE SERVICE LIFE OF EXHAUST SYSTEM ELEMENTS
Elements of the exhaust system operate under the influence of mechanical, thermal and other types of loads.
The following factors have a strong influence on service life:
- Rapid heating to high temperatures, which can cause overheating of system elements;
- Frequent fluctuations in rapid heating and sudden cooling;
- The occurrence of vibration during operation of the power unit;
- Susceptibility to shock and mechanical damage;
- Pollution when driving in bad weather conditions;
- Getting scratches and chips from road surface particles;
- The occurrence of corrosion spots both inside and outside the exhaust system elements;
- Insufficient effectiveness of metal protection.
It is safe to say that for most of these factors, the timing of their manifestation is easily postponed to a later time. It’s worth changing your driving style, periodically cleaning the exhaust system from dirt, applying a protective coating yourself, and the problems will go away on their own.
How to repair the exhaust system
Mechanical shocks, exposure to moisture or harmful chemical elements cause muffler failures. If the device has small cracks or burns, repairs will include:
- The muffler is being dismantled. This operation is not too complicated; the time spent on it will depend on the method of attaching the muffler and the experience of the motorist. The main difficulty when removing the device is to remove rust on the fasteners, which causes sticking of parts.
- After dismantling the element, it is necessary to carry out a thorough diagnosis and find the reason why the muffler malfunctioned. A thorough visual inspection of all surfaces of the device, internal and external, will give an idea of the nature of the problems that have arisen.
- If no visible defect is found on the outer surface, there are no burns, or through holes due to rust, then perhaps the main reason for the failure of the product will be problems in the internal resonator. In this case, repair or replacement of the resonator is necessary. Using welding tools, the old device is cut out and the new one is welded. When welding, repairs to the product are carried out in compliance with work and safety regulations.
- When repairing a muffler with small external burnouts, special means are used. These can be various sealants for sealing cracks.
- Before applying the sealant, you need to very carefully clean the edges of the damage from soot and rust. This should be done immediately before applying the mixture. If you follow the instructions for using the material, you can get a good effect. Silicone forms the basis of many sealants. It is characterized by sufficient resistance at high temperatures. The operating range of a good quality sealant can reach a thousand degrees.
- Large burns found on the outer surface that cannot be sealed with sealant are covered with fiberglass. The material is fixed to the damaged areas of the element with epoxy resin, which contains some special additives.
- After all the cracks and cracks have been sealed, the muffler is installed on the car, the ignition is turned on, and the engine idles for an hour. In this case, the epoxy resin hardens better.
ABOUT SIGNS OF PROBLEM
As soon as there is even the slightest suspicion of problems with the exhaust tract, it is necessary to take measures to identify and eliminate these suspicions. Driving with a faulty muffler can cause problems from neighbors and traffic police.
You should be alert to the following manifestations in the operation of the exhaust system:
- The appearance of increased noise from a running motor;
- The presence of exhaust odors near the car, and in some cases in the cabin;
- The appearance of smoke from burnt-out exhaust elements under the bottom of the car;
There is no need to put off solving this problem. Take a few minutes to locate and determine the breakdown. After this, a decision is made to eliminate it. There can be only two options here: repairing the muffler or replacing the VAZ 2114 muffler.
How to replace a muffler with your own hands
As soon as the first signs of failure or damage to the muffler appear, measures must be taken to replace it. Signs of a malfunction may include:
- increased noise when the engine is running;
- the appearance of a characteristic smell of exhaust gases in the cabin or near the car;
- the appearance of smoke from under the bottom of the car from escaping gases in the burnt-out part of the muffler.
Before driving the car into the garage into the “pit”, you need to think through the procedure, prepare carefully and then act according to the plan.
- Having noticed signs of a malfunction, it is necessary to determine the location and nature of the breakdown using a preliminary inspection method.
- Having established that the muffler has failed, you need to purchase it from a retail chain, first making sure that it is not a counterfeit part.
Attention! After purchasing a muffler, before installing it and testing it with the engine running, you need to make sure that it is fully suitable for replacement on a particular vehicle. All exhaust pipe bends must match the part being replaced. In case of discrepancy, the muffler must be replaced in a timely manner.
This is an important note from the experience of experienced drivers and professional car mechanics. If you do not pay due attention to this, after installation, the muffler, when moving due to vibration, can hit the body, causing serious inconvenience.
- Before installation, you must definitely buy rubber mounting pads, even if those on the car give the impression of being fully functional. Rubber parts fail quite quickly, especially in such places, under the influence of dirt and high temperature. You also need to purchase a metal-graphite ring, which is installed at the junction of the muffler pipe, under the clamp, for tightness.
REPAIR OR REPLACEMENT
Diagnostics has detected one or more small cracks in the resonator housing or main muffler. In this case, replacing them with new parts is not economically profitable. You can make repairs yourself. To do this, purchase a muffler repair kit: it includes rubber shock absorbers (the pipe is suspended on them) and clamps (for connecting the pipe joints). They can be purchased in several types.
VAZ 2114 mufflers can be repaired in the following ways:
- Buy any heat-resistant sealant and coat the burnout cracks with it, namely cracks, not large holes. The next step is to clean the body of dirt, paint and rust. After this, the cleaned area is degreased and a sealing layer is laid on the area to be repaired;
- Buy a repair kit with heat-resistant tape and binding wire. The part to be repaired is again prepared by analogy with the first method. After this, carefully wrap the body with tape and tie it with wire. The burnt area heals itself as the engine operates;
- Repair using cold welding. First of all, prepare cold welding for use. Next, you need to thoroughly clean and degrease the damaged area. After this, the damage can be repaired by welding (cold).
Of the methods described, the method using a repair kit received the most positive feedback.
For car owners who have access to electric welding, we can recommend this method of muffler repair. A patch of the required size is cut out of a sheet of metal 1.5-2 mm thick. Apply to the repair site and scald. Then the repair site needs to be treated with a protective compound. Good results are obtained by using semi-automatic welding in shielding gases.
Replacement
HOW TO REPLACE
Diagnostics showed that the repair will not give the expected effect, which means you need to change the VAZ 2114 muffler. This is quite easy to do if you have a new part. The replacement operation is carried out with your own hands in the garage or even just in the yard.
By any available means, access to the exhaust system elements is ensured. All bolted joints are processed using a wedge. If you don’t have one at hand, kerosene, brake fluids or oils will do. Prepare spare rubber cushions for suspension and tools in advance. You will need:
- Two open-end wrenches, socket wrenches or 13-socket heads:
- Metal brush;
- Small hammer.
Sometimes it is impossible to unscrew the bolts and they are cut off in an accessible way. Keep this in mind when preparing for work.
You can change the VAZ 2114 muffler like this:
- Unscrew the bolt on the connecting clamp and remove it along with the sealing gasket;
- Release it from the suspension, disconnect it from the resonator and remove it;
- When installing a new part, the gasket must be coated with sealant for exhaust systems and installed in the reverse order.
Design of the VAZ 2114 exhaust gas system.
| 1 | exhaust pipe mounting bracket |
| 2 | pad |
| 3 | bracket clamp |
| 4 | additional muffler |
| 5 | muffler suspension cushions |
| 6 | main muffler |
| 7 | muffler pipe connection clamp |
| 8 | exhaust pipe |
Muffler replacement
It is quite easy to determine that the exhaust system of a VAZ 2114 is damaged. The first thing the driver will hear in the event of such malfunctions is a loud noise when the engine is running. If you leave the engine running and get out of the car, you may notice exhaust gases coming out from under the car and not from the muffler. Well, if the system has very significant malfunctions, then the smell of exhaust gases will waft into the cabin and a short distance from the car. If you have any of the listed symptoms, you will undoubtedly need a procedure such as: replacing the VAZ 2114 muffler.
Before you start replacing a part, you must first purchase a new one. To do this, let's decide which muffler is best to install on the VAZ 2114. For example, in terms of durability, all mufflers rot the same way, and their service life can only be extended by following basic operating rules. The difference between mufflers may be that one is afraid of welding and the other is not, or a difference in the volume of the exhaust gases.
Since the exhaust system is located under the car, it is constantly susceptible to various negative influences that pollute it or even destroy it. Therefore, some muffler mounts may not be dismantled. To make the task easier, it is recommended to treat all joints and bolts with a high-pressure spray, or in extreme cases, kerosene. This will slightly corrode the dirt and make it easier to remove the muffler. Also, before replacing, get a set of new gaskets.
To get started, we will need the following tools:
- Two wrenches "13";
- Metal brush;
- Hammer;
Now, let's move directly to the process itself. For convenience, it is better to use a pit or overpass. The exhaust system on a VAZ 2114 car has several fixing bolts and clamps. They need to be unscrewed and the muffler disconnected from the exhaust pipe. A gasket is installed at the connection point. Don't forget to replace it with a new one.
Next, disconnect the resonator mount and dismantle the part. That's it, the work is completed. All that remains is to screw the new muffler into place in the reverse order. Also, when replacing the gasket, do not forget to lubricate it with sealant for better effect.
Recommendations
Let's note a couple of useful tips:
- When replacing the muffler on a VAZ-2114, you may encounter some difficulties. So, over the years of operation, the clamp nut becomes very sour. It is almost impossible to remove it even after several applications of VD-40. What to do in this case? The only way out is mechanical intervention. We take the grinder in our hands and begin to cut the hairpin on one side and the other.
- When purchasing a muffler, also take care of new clamps. They are sold with an O-ring. The element loses its elasticity over time. If you install an old clamp, it will not seal as well as before. Some of the gases will escape even before they enter the muffler. By the way, the clamps are ideal for “eight” and “nine” (since the design remains the same).
- Inspect the condition of the muffler pads. There are 2 of them on the 14th Lada. Characteristic signs of wear are cracks and loss of elasticity. The part can break at any moment, and then the muffler will cling to the asphalt. It is best to change these parts immediately, like the clamps.
- Experienced motorists advise buying not rubber, but polyurethane muffler cushions. They are harder and do not stretch over time. The muffler does not become loose or hang from its mountings. The cost of polyurethane cushions is not much different from rubber ones, and their service life is much longer.
- For better sealing, use a special heat-resistant sealant. Treat the ring and pipe joints with it. The sealant will prevent exhaust gases from leaking even if the clamp is loosened.
- Additionally, inspect the catalyst and muffler resonator of the VAZ-2114. Over time it crumbles. If so, replace it with a new one. By the way, instead of a catalyst, you can install a flame arrester. This will be an additional muffler for the VAZ-2114. It will reduce the gas flow rate and make the exhaust softer.
- Instead of the standard one, you can install a stinger muffler on the VAZ-2114. It is distinguished by high-quality assembly and pleasant sound. Has it and installs without any modifications. The cost is about 1700 rubles.
- Never buy a used muffler. No matter how much the seller convinces you of its perfect condition, remember that it has already passed its expiration date. It rusts after the first start of the engine, even if the car then sits for months. You won’t notice this corrosion from the outside, but inside everything looks much worse.
Causes of malfunction
Why does this element fail? There are several reasons for this. Firstly, the muffler constantly heats up to high temperatures. Heating can reach 350 degrees Celsius or more. As a result, the aluminum-coated paint applied at the factory simply fades away. The muffler is also susceptible to corrosion. It is located in the area of the wheel arches, from where dirt and water constantly flow. Even installing fender liners doesn't help the situation. There may also be external deformations. You need to be careful on steep descents and climbs (especially if you have a lowered suspension). The muffler is the lowest point in the rear of the body, which is easily subject to impacts. In addition, the gases themselves create a destructive effect. The muffler vibrates when the engine is running. This also affects its resource. In order to somehow provide it with free movement, the design includes rubber cushions.
Taken together, all these reasons cause the muffler to burn out or crumble its walls. The rubber cushions also wear out and the mounting bolts break.
Replacement
If you realize that the muffler has already served its purpose and needs to be replaced, be sure to carry out a number of preparatory measures.
Paying attention to the signs of breakdown that appear, check what exactly the fault is and where it occurred. Buy a new device to replace the old one. Be sure to make sure in the store that you bought a genuine product and not a fake. Buy new mounting pads made of rubber
Even if the old ones are in satisfactory condition. Under the influence of temperature and exhaust gases, rubber cushions quickly lose their characteristics. Therefore, it is not worth taking risks. Additionally, buy a metalgraphite ring. It is mounted at the place where the muffler pipe is connected, directly under the clamp. This is done to ensure better tightness. Having a complete repair kit is a very useful thing.
The preparation is complete, so you can start dismantling the old one and installing the new one:
- Place the car in the pit;
- Prepare for dismantling the clamp that connects the resonator and the muffler pipe. To do this, the two mounting bolts are cleaned with a wire brush, and the nuts are treated with the almighty WD40. If you don't have it, get some brake fluid or a rust remover. This is a problem area that makes removal difficult;
- Using two 13mm wrenches, remove the two nuts that hold the clamp;
- If all the manipulations carried out did not produce results, the fasteners will have to be cut off with a grinder. It is not difficult. Replace the clamp with a new one, of course;
- After dismantling the clamp, remove the o-ring made of metal;
- Disconnect the muffler pipe from the resonator;
- Now you can easily remove the muffler itself;
- Installation of a new exhaust system element is carried out in the reverse order;
- Be sure to lubricate the gasket ring. Moreover, it must be a special sealant for exhaust gases. This way the tightness of the connection will be at the maximum level.