Device
In 2000, the VAZ 2115 evolved. The carburetor was replaced by an injector. In subsequent years, with a difference of 7 years, the “fifteenth” models were equipped with 2 types of engines:
- 8 valves (1499 cm³, 71.6 hp);
- 16 valves (1596 cm³, 80.9 hp).
A stepper idle speed controller was installed on both motors. This is a mini-electric motor that opens/closes the air passage of the intake manifold, thus regulating the enrichment or leanness of the fuel mixture (similar to a bolt on a carburetor).
Inside the IAC there is a ring magnet, 2 windings and a lead screw (needle). Under voltage, an electromagnetic field appears in the windings, as a result of which the rotor begins to rotate in one direction or the other, pushing the needle forward/retracted along the worm gear. At the end of the needle there is a valve that opens/closes the air duct on the intake manifold.
What is a step? This is the distance between the conical shut-off valve (IAC tip) and the intake manifold, which is measured by the number of complete revolutions of the rotor.
IS THIS DEVICE REPAIRABLE?
There is no need to rush to purchase a new sensor because in some cases it is possible to repair the idle speed sensor. Very often, especially when low-quality fuel is used, or the engine life is close to a major overhaul, coking of the rod with the conical needle in the device body occurs. What do they do in such cases?
Carburetor cleaning fluid can come to the rescue. A cotton swab dipped in this liquid cleans all contacts well. After this, the cone needle rod is cleaned. Usually after these steps it starts working.
If there is a break in the wiring inside the sensor, then in some cases this can be fixed. You need to carefully disassemble the body of the device and carefully inspect its internal contents. A broken connection wire can be corrected if it is possible to solder it to the connection point. If everything works out, then the soldering area needs to be covered with a layer of varnish to protect it from corrosion. If a wire breaks inside the stepper motor winding, it is almost impossible to fix it. In this case, the sensor is simply changed.
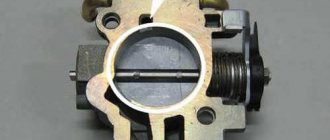
IAC device
As mentioned above, the IAC is a DC electric motor with a worm gear. The picture below shows a cross-section of the IAC with a description of all its elements located inside.
- Movable head (valve);
- Pressing plane;
- Stator winding;
- Worm shaft;
- Connector;
- Bearing;
- Frame;
- Rotor;
IAC check
Checking the regulator is carried out in two stages - visually and using a multimeter. Let's look at each stage in more detail.
Visual
It is necessary to check the visual condition of the sensor for damage, the integrity of the housing, and the absence of gaps between the connector and the metal part.
The condition of the rivets is also checked. Their absence indicates the presence of unaccounted air leaks.
Check the condition of the sealing ring; it must be free of nicks, damage and fit tightly to the IAC, otherwise the ring must be replaced.
Check the worm mechanism for contamination; there should be no traces of carbon deposits on it; the spring should be intact.
If the worm gear is dirty, it is necessary to wash the IAC with carburetor cleaner.
Multimeter
Testing with a multimeter is carried out by measuring the resistance between the contacts. This will determine the integrity of the motor winding and establish its suitability for further operation.
To check, you need to set the switch on the multimeter to the resistance measurement mode at 200 Ohms.
We connect the probes to the central terminals of the IAC. The resistance on the multimeter screen should be 50 ohms. If the multimeter shows 1, then most likely the IAC is faulty due to a break in the internal winding.
How to change the IAC on a VAZ-2115
As we mentioned earlier, the idle speed sensor cannot be repaired; it only needs to be replaced.
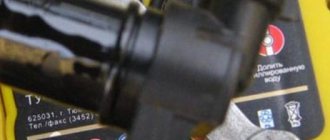
The price of a new part is about 350 rubles. To carry out the work, prepare the following:
- Sensor.
- A small amount of oil.
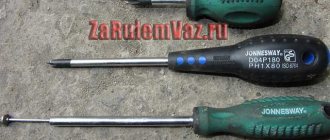
- Cross screwdriver.
Now you can start replacing:
- Park the machine on a level surface.
- Pull the handbrake.
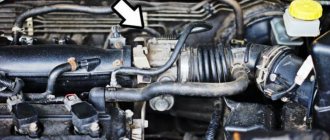
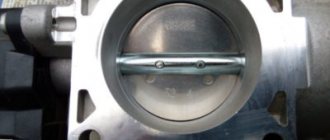
- Open the hood and locate the idle air control valve. It is located on the throttle body.
- Turn off the ignition and disconnect the terminals from the battery. This is necessary in order to avoid a short circuit in the engine electronic system.
- Disconnect the connector from the sensor.
- To simplify the replacement process, you can remove the entire throttle assembly.
- The throttle regulator is secured with three bolts; they need to be unscrewed with a Phillips screwdriver.
- After this, remove the entire assembly.
- Now you can remove the regulator. Use extreme caution during this step.
The regulator installation process is as follows:
- Before installing a new part, clean the seat, the air channel in the throttle assembly and the place where the sealing ring is inserted from various contaminants.
- If cracks are found on the ring, then it is better to replace this element.
- Before installing the O-ring, lubricate it with engine oil.
- Install the ring on the surface of the throttle assembly.
- Then install the sensor in the same place (all the way), and then tighten the fixing bolts.
- Don't forget about the bracket that secures the wires.
- In this step, reinstall the throttle assembly and screw it on.
- The final stage is checking the correct installation and tightness of all connections. Do this several times.
After all the work done, connect the terminals to the battery and check how the engine works.
If the idle speed has stabilized, then the replacement was carried out correctly. Please note that the new sensor is selected based on one parameter - the distance between the tip of the valve needle and the mounting flange (2.3 cm). The manufacturing company is determined independently - this is not so critical.
To summarize, we note that the idle speed controller is a fairly important unit that affects the stable operation of the internal combustion engine at idle. In the article, we told you how to determine the malfunction of this unit, as well as how to replace the sensor. There is nothing complicated in carrying out the work. It is important to be careful and perform all actions consistently. In this case, you can repair your VAZ-2115 without any problems.
VAZ 2115: replacing the idle speed sensor and checking it
Idle speed sensor (XX)
If the engine of your VAZ 2115 idles intermittently, you need to make sure that the sensor responsible for the engine’s idle speed is working properly. You may need to replace the idle speed sensor on the VAZ 2115, since it cannot be repaired. First, it is important to make sure what the reason is; maybe it’s not the sensor. The easiest and cheapest way is to replace it yourself, with a minimum of tools and a minimum of costs. Nowadays it is difficult to imagine a car that does not have idle speed. When driving around the city, it is simply necessary. This mode allows you not to turn off the car engine at every stop or at a traffic light.
Reverse Controller Replacement Guide
How to replace the reverse sensor:
- First, the car should be driven into a pit or overpass. Raise the parking brake lever and set the gear selector to first speed. This will prevent the machine from possibly rolling away.
- Next, you need to remove the protective cap from the contacts of the device; you need to disconnect the contacts from the RZH. When dismantling the gearbox regulator, some of the working fluid will come out, so you should place a container to collect the oil under its installation site.
- After this, you can begin to remove the device. Usually it can be removed by unscrewing it by hand, but sometimes, if the regulator is installed very tightly, it is advisable to use a wrench or socket. The head size should be 22. If the regulator is very stuck to the seat, then it may not be possible to unscrew it with the head. Try spraying the installation area with WD-40 and wait a few minutes. If this does not help, then you will have to use a chisel and hammer to remove it, but be careful not to damage the gearbox housing.
- After the old RZH is removed, you will need to install a new regulator in its place.
- If, during replacement, some fluid gets onto the transmission housing, it must be removed using a dry rag. Also clean the location where the regulator is installed, as contamination may cause it to malfunction or become inoperable.
- Reinstall the connection connector and the protective cap. If, during the replacement, a significant amount of transmission fluid comes out of the gearbox, then lubricant must be added to the box. Please note that the oil must be fresh, and not used oil that came out of the gearbox. If you notice that the drained fluid is too dirty and contains wear products, then it makes sense to think about replacing it.
Replacement
To work you will need:
- New regulator suitable for your VAZ 2114;
- Rags;
- Crosshead screwdriver;
- 13mm wrench;
- Carburetor cleaner;
Having the necessary tools and materials available, you can get to work.
- Place the car on a level surface and turn on the handbrake.
- Raise the hood and secure it firmly to avoid unnecessary injury.
- Disconnect the negative terminal from the battery. IAC is an electrical device, therefore this event is mandatory.
- Remove the protective casing from the power unit.
- Loosen the clamp slightly to disconnect the rubber tube from the air filter connection. This is necessary so that the tube does not interfere.
- Remove the clamp that holds the air filter pipe. The corrugation is disconnected and moved slightly to the side.
- The fastening screw of the cable going from the gas pedal to the throttle valve needs to be loosened slightly.
- Use a rag to remove all dirt near and on the throttle assembly itself.
- Treat the throttle assembly mounting nut, as well as the IAC mounting screws, using the almighty WD40. This will make dismantling easier.
- Remove the throttle assembly completely. To do this, unscrew two nuts using a 13 mm wrench.
- Remove the sensor connector from the terminals.
- If there is dirt at the contact points between the DHH and the throttle assembly, be sure to remove it with a rag.
- Using a screwdriver, unscrew the two fasteners that connect the throttle assembly and our desired sensor.
- Remove the regulator from the mounting socket.
- Clean the entire throttle body with carburetor cleaner.
- Install the new regulator in the same position as the newly dismantled DXH was in.
- Use engine oil to treat the new rubber gasket, which should come with the IAC.
- Replace the two screws and make sure the adjuster is firmly seated in the throttle body.
- Return the remote control to its place and check how securely the nuts are secured.
- Connect the connector to the device terminals.
- Reinstall the cable, pipes and tubes. Tighten all clamps properly.
- Reinstall the engine protective cover.
After assembly, a very important stage remains - calibration of the new IAC. To do this, you need to connect the battery and turn on the ignition. 10 seconds is enough. During this time, the electronic control unit will perform calibration on its own.
That's it, the new regulator is ready for use. To avoid problems with replacement, watch the training video.
Repair
It is not always possible or even the desire to spend money on buying a new device. Regardless of the reasons, it is quite possible to try to solve the problem of a failed or poorly functioning idle speed sensor using a repair method.
- Try cleaning the old sensor.
- To do this, you should dismantle it and thoroughly clean all contacts using a cotton swab soaked in carburetor cleaner.
- Next, the rod, needle and spring are generously treated with cleaner.
- A toothbrush can easily clean areas smeared with carburetor cleaner.
- Rinse the device again and then return it to its place.
- Not infrequently, such events made it possible to achieve excellent results; idle speed began to work again as before.
But this is the simplest repair option, which is not always worth counting on. There is a more complex, but at the same time more effective option for self-repairing a failed idle air control:
Remove the sensor, clean its external elements, as indicated in the previous repair method; Remove the three pins securing the sensor housing; Remove the regulator housing as carefully as possible
Really slow and careful not to damage the contacts; After disassembly, you may notice the presence of broken solder. In this situation, the wire is soldered in place, and the soldering area is treated with a special anti-corrosion varnish; If there are gaps in the body of the gap adjuster, they are eliminated using sealant. This will prevent air from being sucked in through the valve.
This will prevent air from being sucked in through the valve.
If, when disassembling the device, problems are discovered on the winding or the needle is worn out, repair will not help. You will have to change the IAC completely.
The issue of malfunctioning idle air control is quite common in the case of the VAZ 2114. This element cannot be called the weak point of the car, but no one wants to face such a breakdown. As, indeed, with any other malfunction. But where can you get away from them?!
Loading …
Description of IAC
The idle speed sensor refers to measuring instruments that are used to measure and convert data. It would be more correct to call it a regulator.
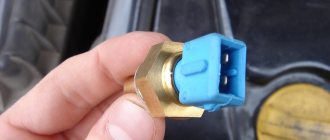
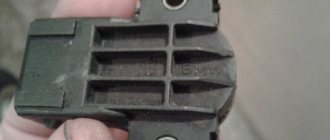
Appearance of DXX
Principle of operation
The purpose of this device is to regulate the volume of air that enters the fuel system when the throttle valve is closed. Thus, the number of revolutions of the power unit at idle is automatically adjusted. The XX regulator is used in winter to warm up the engine to the required temperature.
When the ignition is turned on, the IAC rod extends to its full length and rests against the calibration hole of the throttle pipe. The sensor then counts the steps and the valve moves to its previous position. On a warm engine, the XX device during adjustment is located at around 30-40 steps.
When you change the number of steps, the volume of air that passes through the calibration hole changes. Thus, the required volume of air enters the fuel system, which ensures normal engine operation at idle. When the rod is extended, the number of steps increases. The stroke of the rod is 250 steps.
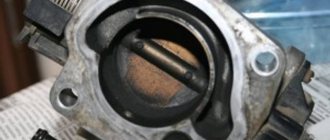
Location
In order to check or replace the XX regulator, you need to know where it is located. On VAZ 2114 and 2115 cars with an injector, it is located on the throttle body. The sensor is attached using threaded mounting screws.
DXX location
Basic faults
The IAC is not equipped with a self-diagnosis system, so the on-board computer cannot check it and send an error code to the dashboard.
But there are a number of signs by which we can conclude that the device is faulty:
- uncontrolled change in engine speed (random increase or decrease);
- the engine suddenly stalls when idling;
- it is impossible to increase the number of revolutions when starting a cold engine;
- when using devices such as headlights, a stove, etc., the number of revolutions of the power unit at idle simultaneously decreases;
- the engine stalls when changing gears;
- happens from the development of a cone of overestimation XX.
These symptoms may also occur if other sensors are faulty, but the computer can check them and display the corresponding error code on the instrument panel.
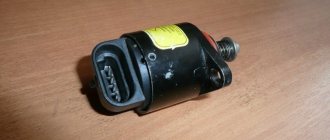
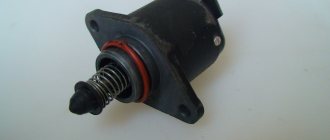
New IAC for replacement
Signs of IAC malfunction
Since the IAC is an exclusively mechanical sensor, information about its malfunction will not be displayed on the dashboard in the form of a “CheckEngine” indicator
You can diagnose a faulty regulator using indirect signs:
- Stopping the engine at idle;
- XX speeds float (spontaneously rise and fall);
- On a cold start, the engine speed does not rise;
- The engine stalls when changing gears or moving in neutral;
Idle speed sensor (XX)
This is a special device that controls the crankshaft speed:
- It is a valve that has a conical shut-off needle that is moved by a stepper motor
- The valve of the sensor we are considering is located in the channel of the throttle pipe.
- It controls the required amount of air, which is supplied bypassing (bypassing) the throttle valve.
- It is thanks to this functioning that the speed of rotation of our crankshaft is regulated.
- Depending on the nature of the engine operation, the installed sensor provides adjustment for decreasing or increasing engine speed (to optimal) when idling.
In addition to the described main function, it also affects the reduction of engine exhaust toxicity. How does this happen:
- During engine braking, the throttle valve closes (quite sharply).
- At the same time, the sensor increases the supplied air volume, bypassing this damper.
- Thus, the process of depleting the fuel mixture by adding air occurs, which minimizes the toxicity of emitted exhaust gases.
Where is the sensor located
It is installed on the throttle body, not far from the throttle sensor, screwed with two screws, or simply glued.
How is its performance checked?
- Turn off the ignition;
- Disconnect the block with wires from the regulator;
- Using a multimeter, check the resistance between pairs of contacts: A and B; C and D;
- The permissible resistance ranges from 40 - 80 Ohms;
- If other resistance readings are received, the regulator is faulty and requires replacement;
- If the resistance is normal, move on to the next paragraph (item);
- Using the same multimeter, now we measure the resistance between pairs of contacts B and C, A and D;
- The multimeter indicator will show either infinity or an open circuit;
- If the readings are different, then the regulator is faulty.
Main functions of IAC
The device is designed to control the crankshaft speed in the engine.
- This is a valve with a cone-type shut-off needle that can be moved using a stepper motor.
- The valve is located in the throttle channel.
- The IAC determines the required amount of air and supplies it bypassing the throttle valve.
- In this way, the engine speed is adjusted.
- Depending on the operating conditions of the engine, the sensor in question increases or decreases the engine speed to optimal values for idle mode.
Sensors, their purposes and malfunctions
Let's now talk in more detail about each of the sensors, let's look at where they are and what they look like.
Idle speed (IAC)
The device is located in the throttle assembly. It is a small induction coil with a needle inside. Depending on the controller readings, one or another voltage is applied to the coil winding and the needle extends a certain distance into the throttle pipe, regulating the air supply. With this, the idle speed is adjusted.
Idle speed control
Oxygen sensor
Рхх VAZ 2114: idle speed sensor, checking and replacing the idle speed control
Depending on the engine size, the VAZ 2115 may have one or two sensors. A lambda probe (also known as an oxygen sensor) is installed in the exhaust pipe of the muffler (there are two of them in 1600 cc engines). The sensor is necessary to assess the amount of oxygen in the exhaust gases and regulate the proportions of atmosphere and fuel in the working mixture. For the device to work correctly, the ceramic proletarian element must be heated to 345-360 degrees. That’s why a heater is built into its body. The VAZ oxygen sensor sends a pulse to the ECU in the range from 0.1 to 0.9 V. In the first case, the mixture is considered lean, in the second - rich.
Symptoms of malfunction
The main signal indicating a faulty lambda probe will be an error message. Starting with error P0130 and ending with P0141 according to the schedule, we can conclude that the DC is faulty. Errors P1102 and P1115 will indicate a malfunction of the heating element. In addition to the on-board computer's indications of a breakdown, it may indicate an overestimated gasoline consumption. In garage conditions, this sensor is not tested and if errors are detected, it must be replaced.
Repair and purchase of a new IAC
Above we looked at the procedure for a working sensor. If during diagnostics you cannot feel the vibration of the needle with your finger, then it is not worth repairing such a unit. It's easier to throw it away and buy a new one. There is no need to worry about this, since the price of an idle speed sensor for a VAZ 2114 is not high. The cheapest are domestic ones. The price tag starts from 350 rubles and depends on the manufacturer and type. There are 4 of them in total. It’s up to you to decide which IAC is best installed on the VAZ 2114, but the ideal option is to replace a new one with a similar one.
You can take the old one with you to the store and ask them to sell exactly the same one. Spare parts sellers can also provide advice on selection. You can buy an idle speed sensor in different places, such as auto parts stores and automobile markets. In this case, it is worth paying special attention to the type of packaging, the correct spelling of names and indicators.
Errors on the box are not typos, but indicate that the product is counterfeit. Externally, the packaging is very similar, so it is very easy for the car owner not to notice the difference. It is better to buy the necessary components and assemblies for a car in trusted places, always ask for a receipt for the purchase, and you can also ask for certificates for the model of interest.
It is impossible to determine the exact service life of the IAC. It depends on the quality of the material, the manufacturing plant, and the wear and tear of the entire vehicle. Therefore, when assessing performance, you need to pay attention to the above “symptoms”. As you can see, if the speed on a VAZ 2114 fluctuates, then you need to check the IAC first. There are no unnecessary components in a car, but the further condition of the engine depends on what speed the VAZ 2114 should be at idle. When you move the gear lever to the “neutral” position, your iron horse can stall at any intersection, which can lead to the most unpredictable consequences.
Replacing the Idle Air Controller - step-by-step instructions with photos
As we wrote above, pxx is located on the throttle body. Remove the decorative engine cover.
Disconnect the tube inserted into the air duct as shown in the figure.
Next, loosen the clamp and remove the air duct from the throttle valve.
Carefully remove the throttle cable as in the photo
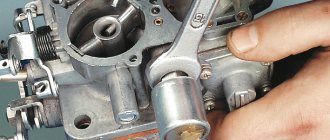
Now you need to unscrew the throttle assembly, if you manage to get to the sensor this way, then you don’t have to remove the throttle.
The throttle assembly is secured to two 13mm bolts
Now after removing the throttle, we can easily remove the rcx and install a new one.
Before installing the new px, clean the mounting hole. It is advisable to lubricate the O-ring with oil.
After installing the pxx, we reassemble in the reverse order.
Phase sensor
It is responsible for adjusting fuel injection only into the cylinder that is in the compression stroke, that is, fuel is supplied only through one injector to one cylinder. It is oriented along the camshaft, which is why it is called the camshaft position sensor. It works according to the Hall principle, producing an electrical impulse when a magnetic field is excited. If the VAZ 2115 phase sensor fails, fuel is supplied according to the principle of carburetor engines - into two cylinders at once. The result is a set of faults.
Symptoms of malfunction
The DPRV is located in the same place as the camshaft gear, on the cylinder head. The main symptom of the malfunction is high fuel consumption and loss of power. In addition, the computer displays error 0340 (sensor error) or 0343 (pulse level too high).
Examination
The malfunction of the DPRV can be judged by the error code and the burning CE lamp, but you can verify its functionality by checking the voltage at the power terminal A (12 V). The remaining terminals must not be live.
Speed sensor
Speed measurement on front-wheel drive VAZ cars is carried out using electronics. The measurement circuit includes a speed sensor and a stepper motor in the speedometer. The DS is located at the top of the gearbox and is a regular Hall sensor - the faster the sensor shaft rotates, the more the speedometer needle deviates. The catalog number of the six-pulse device is 2111-3843010.
Malfunctions
The speedometer needle shows incorrect data and may lie at zero when driving.
Functionality check
Checking the VAZ 2115 speed sensor is quite simple. All you need is a multimeter and a jack. A multimeter is connected to the speedometer drive connectors, the front wheel is hung on a jack, the engine is started and the gear is engaged. When the sensor shaft rotates, a potential should be generated in the range from 1 to 5 V. The increase in the potential value with increasing rotation speed should be smooth, without jerks and without delays. Otherwise, the DS is changed.
Throttle sensor
Until 2011, all tags were equipped with such sensors; the last year of production, an electronic gas pedal could be installed on the car, which performed the function of this device. A throttle position sensor (TPS) is needed to accurately record the throttle opening angle and transmit this information to the engine control unit. The device is mounted on the throttle body and is a simple potentiometer with a resistive plate and a slider. By changing the resistance of the plate, we change the level of the pulse, and the ECU, based on the sensor readings, draws a conclusion about the amount of air entering the manifold. When the throttle is closed, the ECU adjusts the idle speed using the idle speed control.
Symptoms of a problem
Difficulties may arise with self-diagnosis without the use of special equipment, since most of the symptoms of a non-working device are also characteristic of other breakdowns, including loss of compression in individual cylinders. Basically, all the signs of unstable engine operation, incorrect operation in transient modes, floating idle, inadequate response to the movement of the gas pedal are present. However, checking the remote sensing position sensor is quite simple.
How to check
For a working TPS, 5 V is supplied to the positive contact, the negative one goes to ground, and the third contact is used to supply an impulse to the control unit. It is at this pin that you need to check the voltage. You need a multimeter in voltage measurement mode. When the throttle is completely closed, the voltage should be 0.7 V on a new high-quality sensor, on an old one - at least 0.3 V. As the damper opens, the potential increases smoothly and without jerking to 4 V. This is the maximum value when the damper is open. An uneven increase in voltage, discrepancy with the nominal value at the beginning and end of the test is a reason to replace the sensor. Contactless devices have been installed since 2011. They are twice as expensive, but practically did not fail.
Knock sensor
A simple but necessary scanner located on the cylinder block between cylinders 2 and 3. In essence, it is a piezoelectric element that reacts to knocks in the crank mechanism, and knocking is a sign of detonation. As soon as the knock sensor detects a knock, it sends an impulse to the control unit, which adjusts the ignition timing towards a later one.
Malfunctions and symptoms
The first and main symptom is that the ECU does not respond to the detonation process: valves click as the load on the engine increases, metallic knocks are heard in the engine, the engine may stall, and most often the Check Engine lights up.
How to check
The knock sensor is checked using a multimeter set to voltage test mode with a threshold of 200 mV. If the sensor has two terminals, the multimeter probes are connected to both; if there is one, then the minus is installed on the body, the plus on the terminal. Now it is enough to apply a light gentle blow to the working surface of the device, and the arrow (or numbers) will show a voltage surge. The knock sensor is OK. If it does not respond to tapping, it must be replaced. By the way, the knock sensor can be replaced with a Volgov one, the same ones are installed on UAZ.
Video “Visual instructions for replacing IACs in a garage”
If you have any questions regarding replacement, you can find the answers to them in the visual instructions for performing IAC repairs (the video was filmed by the AvtoRemont and Not only channel).
First, I’ll explain why I decided to post a post about this seemingly simple procedure. There were no problems with replacing the sensor on the 1.5i and on the Kalina (the 1.6i Kalinovsky engine was running on 15s) - I unscrewed 2 bolts and changed the sensor. Here everything is more interesting - one bolt can be unscrewed, but the second cannot be unscrewed due to the fact that the answer only goes there at a very unpleasant angle.