We check the phase sensor on the VAZ-2114 with our own hands using a multimeter
Correct “phasing” of gas distribution is the key to stable and economical operation of any engine, especially an injection engine. The entire injection engine control system is built on data received from numerous sensors, including a phase sensor or a camshaft position sensor. Like any other consumable, this sensor requires periodic checking, which is best done using special equipment. Despite this, there are several ways to check the VAZ-2114 phase sensor with a multimeter with your own hands in a garage.
Where is the camshaft sensor on a VAZ 2114
In order to understand where the faulty part is and what are the signs of a malfunction of the VAZ 2114 camshaft sensor, you first need to answer the question “where is the VAZ 2114 camshaft sensor?” and its location in the design of the car. In model 2114 cars it is located near the power unit, next to the air filter, which is located near the cylinder head.
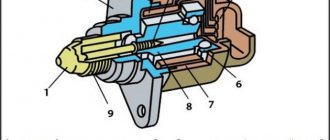
Operating principle of the sensor
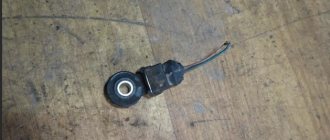
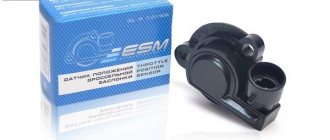
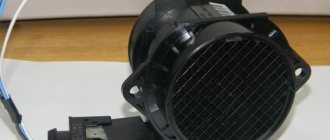
General view of the camshaft sensor
The camshaft sensor or phase sensor is a part of the main power unit of the car, which is responsible for reading information about the location of the camshaft and is also involved in adjusting the ignition angle.
This meter is similar in principle to a Hall sensor .
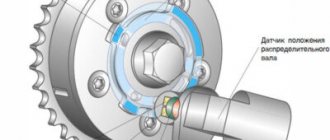
Reading occurs using a special camshaft gear that has no teeth. The missing elements are located in such a way that when this gap hits the sensor, the first piston is at the dead center, at the top or bottom.
Phase sensor operation diagram
A signal is triggered and transmitted to the engine's electronic control unit when the sensor hits the missing teeth. In turn, depending on the received indicator, the ECU adjusts the ignition angle. Thanks to the installation of such a system, Samara-2 engines have become more efficient and popular.
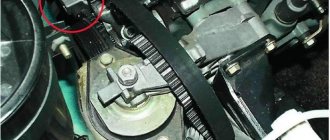
Location of the sensor under the hood of the VAZ-2114
The camshaft sensor on the VAZ-2114 is located near the air filter, at a very close distance from the cylinder head. This meter location is almost always standard for other cars in the injection group.
Camshaft sensor location
The main reasons for sensor failure
Before proceeding directly to the diagnostic process, it is necessary to find out the causes of the malfunction of the VAZ-2114 phase sensor.
So, let's move directly to the most direct and indirect indicators:
Electrical circuit of the sensor
- Check Engine on the dashboard indicates that a malfunction has occurred. In this case, the engine starts without waiting for a response from the camshaft sensor, and the ignition system works based on the latest indicators.
- Increased consumption of the fuel mixture can also serve as an indirect indicator of a malfunction of the air flow control valve.
- The car begins to lose power and dynamics as a whole.
The combination of these reasons can serve as an indirect indicator of a malfunction of the camshaft sensor.
WHAT ARE THE ERRORS THAT DETERMINE THE FAILURE OF THIS MECHANISM?
ERROR CODE - 0340
A fairly common phenomenon occurs when the “meat grinder” on the dashboard (check engine) lights up. This process appears like this: when starting the engine, the starter works for several seconds, and then phase sensor error 0340 is displayed. The thing is that when starting the car, the electronic unit The engine control waits for a certain signal from the phase sensor. If it is absent, the control unit does not send an impulse to the ignition system and fuel supply system. Consequently, the engine does not start, and the engine control lamp comes on, indicating “error 0340” on the VAZ 2114. You can diagnose the breakdown using the car’s on-board computer, or contact a specialized service center.
Check engine error on VAZ 2114
Symptoms of this problem:
- Increased fuel consumption.
- Difficulty starting the engine.
- Perceptible noise when turning on the ignition key.
ERROR CODE - 0343
Indicates a high level of the regulator pulse; this error in the VAZ 2114 phase sensor is less common than the first, and it is directly related to a malfunction of the device itself. The problem is solved by completely replacing the unit; it does not require diagnostics or visits to specialized salons. Error 0343 may be associated with simple oxidation of the wires on the mechanism, which need to be cleaned and their integrity checked.
Attention: there should be 12V at the mechanism terminal and at pin A, and 0V at the rest.
An error in the phase sensor can be caused by a malfunction of the crankshaft position sensor, it is also possible that the timing belt has slipped onto a tooth, the key of the generator belt pulley has been turned out, the crankshaft gear has become loose, wear has occurred on the upper and lower gears. As you can see, there can be many clues; the main thing is to correctly diagnose and effectively fix the problem.
Signs of a malfunction of the phase sensor on the VAZ 2114 associated with this error may be:
- deterioration in speed gain when accelerating a car;
- problems in engine operation, when starting the unit;
- The starter spins for 4 seconds when starting and the check light comes on;
- diagnostic mode failure;
- exhaust gases become transparent, the level of carbon dioxide emissions increases.
Attention: the “Check Engine” control signal (a light on the instrument panel that indicates a malfunction in the engine control system), with a working engine, should go out 0.6 seconds after starting. This is quite enough for the diagnostic system to state that everything is in order.
If the light continues to light, then there is a malfunction, and the error on the VAZ 2114 is an exact confirmation of this. It can be identified using a professional scanner at a service station or “with your own efforts.” We are talking about a superficial diagnosis of the cause, which can give an idea of the approximate identification of a product malfunction. What to do next is up to the car owner to decide; you can replace the sensor with a new one and get rid of all “instrument errors”, and you can also do a general cleaning of the mechanism wires, completely rinse the entire sensor in a special liquid.
Attention: there is such a situation - I changed the sensor, and after a few hours the light comes on again. This problem can arise when refueling with low-quality fuel, or the mechanism is incorrectly installed and requires professional intervention from specialists! You can also get caught in a marriage, and this happens. It is necessary to do initialization after changing the sensor in order to avoid such a problem.
If the car is on the road and error 0343 or 0340 appears, then the following option can be used as a temporary solution to “treat the problem”: rotate the sensor a few degrees around its axis, and then securely fasten it again.
This method will help regulate the fuel supply in the correct mode and reduce fuel consumption when driving the car.
If symptoms of a malfunction of the camshaft position sensor are detected, it is necessary to visually check the mechanism. There may be a problem with one of the following:
- external damage;
- condensation has formed or deposits have formed on the contacts;
- The integrity of the electrical wiring near the unit has been damaged.
If everything is in order, then it is necessary to dismantle the device. You can make the replacement yourself, without visiting a service center.
CHECKING PERFORMANCE
If typical signs of DF failure occur, or if errors 0343 or 0340 are displayed on the on-board computer of the fourteenth, it is necessary to check the functionality of the DF. This is done using a conventional multimeter.
Fourteeners with 16 and 8 valve engines have different DFs, so the specifics of checking them will be slightly different.
- On the first probe of the tester we set the voltage to 13.5 Volts and connect it to contact “E” on the DF, on the second probe, which must be connected to contact “B” - 0.9 V;
- Having closed the contacts, we bring a metal screwdriver to the end of the sensor. If the DF is working properly, you will see on the tester screen that the voltage of contact “B” has dropped to 0.4 Volts. If this does not happen, the DF is broken;
- We set the following voltage on the multimeter: contact “E” – 13.5 Volts, “B” – 0.4 Volts;
- We close the contacts and insert a screwdriver into the hole on the phase sensor. If the device is working properly, the voltage at pin “B” will increase to 0.9 Volts.
How to check the phase sensor?
If the outer part of the DPRV does not have visible mechanical damage, it is necessary to remove it from the car and check it with a multimeter.
Diagnostic measures are performed in the following order:
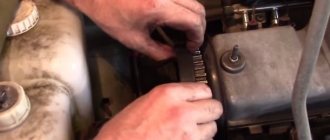
- Dismantling the device. In order to remove the part, disconnect the electrical connector, unscrew the fastening nut and remove the part from the installation site. For dismantling, use a socket wrench or a 10mm socket.
- The tester is set to DC voltage measurement mode. To carry out measurements, select a range of up to 20 volts.
- Measure the voltage at the negative and positive contacts of the electrical connector. To do this, turn on the ignition. When checking, there should be voltage on the contacts.
- Connect the positive and negative contacts of the part to the on-board network. The voltage coming from the battery must be measured. The norm is considered to be 12-14 volts.
- The tester probes are connected to the positive and signal contacts. For convenience, you can use specialized clamps. After connecting the part, the voltage on the multimeter should be at least 90% of that coming from the battery.
- Bring a metal product to the working part of the device. When holding the metal plate, the reading on the tester display should drop to 0.4 V.
If during the diagnostics it was possible to determine that the part is working, then the electrical wiring should be checked for integrity. If necessary, clean oxidation from the contact pads of the connectors. If the indicators deviate during the measurement process, the product will need to be replaced with a new part.
Phase sensor malfunctions
Unfortunately, it is not possible to visually determine the malfunction of the DF itself. Diagnosis requires specific equipment, although often the fault can be identified through routine computer diagnostics. Note that some checks can also be carried out by an ordinary car enthusiast. To do this, he will need a multimeter or universal adapter . The latter rarely appear on sale in regular stores, so we recommend searching for them in online stores or limiting yourself to using a multimeter. The following will indicate that the phase sensor needs replacement:
- “Check Engine” light on the dashboard;
- Emergency operation of the ECM;
- Increased fuel consumption;
- Unstable engine operation, especially at speeds above 60 km/h.
Often, car enthusiasts are faced with the fact that the car engine loses a lot of power. Sometimes the engine even stalls. Another specific malfunction: a problem with the operation of the automatic transmission when the DF is faulty. In fact, all of the above may indicate a breakdown of another element of the electrical system , however, if it is the phase sensor that is faulty, then the problems may go away for a while if you turn off the engine and start it again. Please note: problems will only go away for a while. During computer diagnostics, you can receive the following error codes:
- P0340 – the signal from the sensor does not reach the ECU;
- P0341 – valve timing is incorrect;
- P0342 – a low level signal is received from the sensor;
- P0343 – reverse situation: signal level too high;
- P0344 – the signal from the sensor is intermittent;
- P0365 – the circuit of the installed DPRV is broken (no signal).
As practice shows, most often problems with the phase sensor are caused by a violation of the integrity of the wiring. The device's microcircuit boasts high survivability, although over time it also fails. According to experts, the camshaft position sensor lasts about 100 thousand kilometers . However, we do not recommend taking this figure as truth - the device can last either much longer or, on the contrary, less. Problems with its operation will most likely be caused by:
- By shorting the wire signal to ground;
- Signal wire break;
- Incorrect connection of power wires;
- Malfunction of high-voltage wiring;
- Liquid accumulation in the sensor connector;
- Large or, on the contrary, small gap between the device and the marker;
- Metal shavings falling on the device body;
- Face runout of the camshaft gear;
- Breakage of the sheath of the harness or individual wires;
- ECU malfunction.
REMOVAL AND REPLACEMENT
The phase sensor on the VAZ 2114 is a complex electronic structure, repairing which on your own will not give any meaningful results. If any problems are detected, you must immediately replace the device with a new one . Fortunately, it is not expensive: the price varies from 300 to 500 rubles, depending on the region.
To replace the DF you will need a ratchet wrench with a 10mm head. The algorithm of actions is as follows:
- Turn off the battery power;
- Using a ratchet, unscrew the bolt that secures the DF to the engine cylinder block and disconnect the block of wires connected to it;
- We take out the sensor and install a new one, do not forget to clean the contacts of the block from oxidation.
If the device is installed correctly, then all errors previously displayed on the on-board computer disappear.
As you can see, the work here takes about 10 minutes at most. Have a good ride without any breakdowns!
WE REPLACE THE PHASE SENSOR
Having determined that the DF is faulty, you can begin to replace it. The process is easy enough that you will only need a ratchet wrench with a 10 mm head to do all the work yourself.
First, let's figure out where the VAZ 2114 phase sensor is located. It is located on the right side of the engine compartment, near the air filter. It is secured to the cylinder block body with one screw.
Replacement of the VAZ 2114 phase sensor is carried out in the following sequence:
- Open the hood and disconnect the power terminals from the fourteenth battery;
- Disconnect the wire block from the DF;
- Using a 10mm wrench, unscrew the screw fixing the sensor on the cylinder block;
- We remove the DF from the mounting socket.
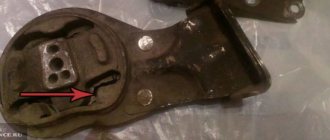
After dismantling the old device, inspect it visually; perhaps the cause of its malfunction is metal dust magnetized on the DF body. If found, wipe the device with a cloth and reinstall it. If it does not come to life and the on-board computer continues to generate errors, the sensor needs to be replaced.
The new camshaft position sensor of the VAZ 2114 is installed in a similar way. As you can see, the work here only takes 10-15 minutes (replacing the VAZ 2115 phase sensor is carried out using the same method).
Important: when installing the DF into the mounting socket to seal the fixation, it is prohibited to use any sealing agents, since the device is located in an environment with a constantly changing temperature regime, in which the sealant will simply melt and bring you a bunch of additional troubles with the engine.
There are often cases when, even after installing a new DF, errors 0350 or 0343 continue to be displayed on the on-board computer of the fourteenth.
There are two possible scenarios for the development of events. You may have come across a faulty DF (even salespeople in auto stores say that if for 10 domestically produced phase sensors there are 5 workers, without manufacturing defects, this is already good).
Checking the functionality after replacement is carried out using a multimeter, as described in the previous section of the article. If the tester data corresponds to the indicators of a fully working sensor, then the problem is not with it. Errors 0350 and 0343, indicating a faulty DF, can also occur due to a timing belt that is stretched or has slipped by 1-2 teeth, or a loose crankshaft gear.
Design and types of camshaft position sensors
In cars you can find three types of phase sensors:
- based on the Hall effect;
- induction;
- optical.
American physicist Edwin Hall discovered in 1879 that if a conductor connected to a direct current source is placed in a magnetic field, then a transverse potential difference arises in this conductor.
A DPRV that uses this phenomenon is usually called a Hall sensor. The device body contains a permanent magnet, a magnetic circuit and a microcircuit with a sensitive element. A supply voltage is supplied to the device (usually 12 V from a battery or 5 V from a separate stabilizer). A signal is taken from the output of the operational amplifier located in the chip and sent to the ECU.
The design of the Hall sensor can be slotted
In the first case, the teeth of the camshaft reference disk pass through the sensor slot, in the second - in front of the end.
As long as the magnetic field lines are not overlapped by the metal of the teeth, there is some voltage on the sensitive element, and there is no signal at the output of the DPRV. But at the moment when the reference crosses the magnetic field lines, the voltage on the sensitive element disappears, and at the output of the device the signal increases almost to the value of the supply voltage.
With slotted devices, a drive disk with an air gap is usually used. When this gap passes through the magnetic field of the sensor, a control pulse is generated.
As a rule, a toothed disk is used together with the end device.
The reference disk and the phase sensor are installed in such a way that the control pulse is supplied to the ECU at the moment the piston of the 1st cylinder passes the top dead center (TDC), that is, at the beginning of a new cycle of operation of the unit. In diesel engines, pulse formation usually occurs for each cylinder separately.
The Hall sensor is most often used as a DPRV. However, you can often find an induction-type sensor, which also has a permanent magnet, and an inductance coil is wound on top of the magnetized core. The magnetic field changing as the markers pass creates electrical impulses in the coil.
Optical-type devices use an optocoupler, and control pulses are generated when the optical connection between the LED and the photodiode is interrupted when passing the reference points. Optical DPRVs have not yet found widespread use in the automotive industry, although they can be found in some models.
Input impedance measurement
The easiest way is to check the dpkv with a multimeter and measure the resistance of its winding. To do this, you need to have an appropriate device that can cope with this. If there is no such device, then you will have to resort to amateur radio. So, having switched your multimeter to resistance measurement mode and set the limit switch to 2 kOhm, securely install the probes of the device onto the sensor contacts, and they must be clean.
To achieve this, you can wash it with alcohol or gasoline. This may be the cause of the problem. Having installed the probes on the contacts, we observe the readings of the device, which should fit into the range from 550 to 750 Ohms. If this is the case, then the sensor is most likely working. But this can be stated with a probability of 50%, because during breakdowns and short circuits the resistance may change. And if the new one had 750 Ohms, and when checked it turned out that it was 500 Ohms, then this means that it is faulty. And he had an interturn short circuit.
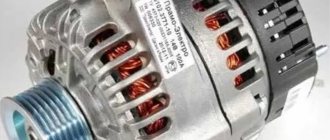
Crankshaft position sensor VAZ-2114
The VAZ-2114 is equipped with a magnetic-type DPKV. The sensor is suitable for many front-wheel drive VAZ models with an injection 8-valve or 16-valve engine: VAZ-2108-09, VAZ-2110-12, Kalina, Priora. A widely used type of sensor is labeled VAZ-2112.
The DPKV is mounted on the engine oil pump bracket, and the toothed disk is located on the crankshaft pulley. It turns out that the sensor is located in the front right corner of the car under the hood. The DPKV is not difficult to access and can be replaced quite easily even by a novice. Changing the part is very simple: disconnect the plug with wires, unscrew the fastening screw - that’s it, the sensor is removed. It is installed in reverse order. It is necessary to ensure that no dirt gets under the DPKV mounting point. After installing the part, check the gap between the sensor and the toothed disk - it should be approximately 1 mm, a deviation of ± 0.5 mm is acceptable.
Replacing the camshaft sensor on 16-valve engines
- For easy installation, you will need to remove the radiator grille. To remove the radiator grille, it will be enough to lift the hood and unscrew the mounting bolts. Once the bolts are removed, the grille can be easily removed.
- Using a special wrench, you need to unscrew the two fixing bolts. When dismantling, it is advisable to unscrew the bolts gradually so that there are no distortions when removing the part. First you need to tighten one screw a couple of turns, and then another, and so on until the very end.
- Check the DPRV for deficiencies, clean all components, and then install it again. If these frauds do not help, you should start replacing parts.
- To install a new DF, do not use sealant, because during operation of the cylinder head, the temperature regime of the area may change. If there are signs of a faulty VAZ camshaft sensor, replacing the part on VAZ 2114 cars with a 16-valve engine will be more difficult, but the dismantling mechanism itself is similar to an 8-valve internal combustion engine.