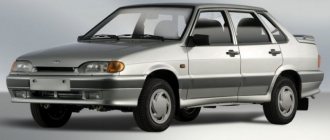
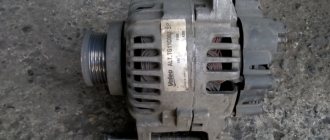
The serial models VAZ 2114 and VAZ 2115 are equipped with generators of domestic and foreign production, namely: Russian KZATE and German BOSCH.
Many car enthusiasts preferred to choose a car with a pre-installed German-type PG, since the service life of the latter is 30 - 45 thousand longer than the domestic one.
The process of repairing and do-it-yourself maintenance of a generator on a VAZ 2114, VAZ 2115 is not complicated, but it requires basic knowledge in the field of vehicle maintenance. If any difficulties arise, please consult a service station specialist.
Which generator is installed on the VAZ 2114 and VAZ 2115
The standard AC power source has the following characteristics:
| Name | Indicators |
| Maximum voltage | 13.18 V - 14.70 V |
| Maximum current | 80 Amps |
| Belt drive deflection | 0.8 cm per 10 kg |
| Weight | 5.0 kg |
| Electrical energy source | KATEK 2114 / 15 |
| Rated voltage | 12 Volt |
| Power | 450 W |
Lada 2114 › Logbook › Lost charging, replacing the generator brush assembly (brushes)
The other day I noticed that after starting the engine, it was not charging. After 30 seconds of engine operation, after re-gasping it appears. I came to the conclusion that it was time to change the brush assembly. Everyone never got around to stopping by and buying brushes. This morning before going to work I noticed that the charger had completely disappeared. I still had to urgently buy a unit. (Like the law of meanness, I just arrived at work and the charger appeared)
These are the readings given by the on-board engine when the engine is running. We begin to treat the patient.
(To begin with, of course, disconnect the positive terminal from the battery, so as not to cause a short circuit and fire.) Next, unscrew the positive wire on the generator
Unscrew the positive wire from the generator
Turn off the excitement.
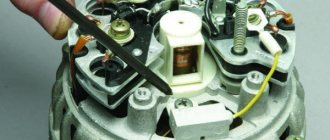
We begin to dismantle the protective casing of the generator, under which the cause of our illness is located (brush assembly)
Unscrew the two bolts and disconnect the wiring going to the brushes.
This is, in fact, the reason for the lack of charging, or rather, the brushes have run out.
Sample of an old brush assembly.
This is what the new brush assembly with cap looks like
For comparison, old and new brushes. (how long should the brushes be)
Be sure to check the stem at anchor. (the place where the brushes come into contact with the generator shaft)
In my case, I need to grind the anchor... the offset is quite large. But to do this you need to remove the generator. Unfortunately, there is simply no time or opportunity for this, since it needs to be clamped into a lathe. so I’ll install the brushes like this (knowing in advance that they won’t last for a long time) ASSEMBLY IN THE REVERSE ORDER!
The result is obvious! All work took about 15-20 minutes
Issue price: 135 ₽
www.drive2.ru
Originals, analogues, prices, articles
| Catalog item | Serial number | Price | |
| KATEK ELD-A-2114-90A (original) | BOSCH (9402.3701) (original) | From 3500 – 4000 | |
| 9402.3701 | FINWHALE 6РК-698-05 | 6202 2RS / 180202 | From 3500 – 4000 |
| KZATE 9427.3749 | Electromash 977.3701 | SKL 2114-6202 2RS | From 3500 – 4000 |
| 2114-3701010 (HORT) | KATEK 2114-3701010 | Contitech 6PK-1115 | From 3500 – 4000 |
| PRAMO-Electro 2114-3701984 | PRAMO- 3701953 | PRAMO-Electro 2114-3701747 | From 3500 – 4000 |
| *prices are as of July 2021 |
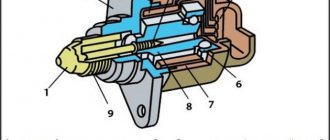
Operating principle of the electrical energy source
There are 8 coils installed in the GU housing. The material is copper, the connection method is “star”. The rotor is a steel shaft, on the back surface of which magnetic circuits are pressed, between which a winding is installed.
Excitation winding wires and copper-graphite brushes are soldered to the shaft rings. After the ignition is activated, the current from the battery passes through the brushes and winding, forming a magnetic field.
Thus, the rotor is driven, and the alternating current is converted into direct current through the coils.
On the back side of the GU there are two terminals marked “+” and “–”. Accordingly, the terminals with the indicated polarity are connected to the battery.
To rotate the PG you need a battery. When the actual voltage during operation of the unit is higher than the battery voltage, the generator will begin to supply power to the battery consumers. Thanks to this, the on-board network current is maintained within a specified range.
Characteristic reasons for the failure of the main control unit on the VAZ 2114 (2115)
- insufficient tension of the drive belt;
- contamination of contacts on rings;
- mechanical damage to the rectifier unit;
- excessive wear of brushes;
- jamming (freezing) of brushes;
- short circuit in the winding;
- power supply interruption;
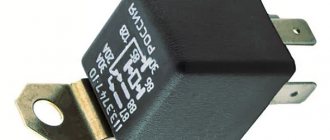
- the voltage regulator is faulty;
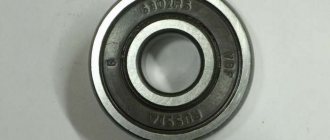
- roller bearing wear;
- pulley fixation is loose;
- Fan blades are damaged.
Methods for troubleshooting generator VAZ 2114 (2115)
- carrying out preventive measures;
- replacement of the PG assembly (in a comprehensive manner);
- drive belt tension;
- centering the fan blades;
- installation of new brushes;
- replacement of the rectifier bridge;
- voltage regulator prevention;
- inserting a new roller bearing;
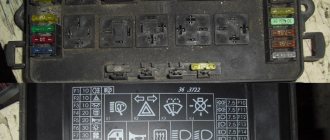
- replacing the fuse in the mounting block.
Typical signs of a faulty control unit on a VAZ 2114 (2115)
- the battery charge lamp on the dashboard flashes periodically (systematically);
- indication of battery overcharging, GU does not charge the battery;
- dim headlights;
- weakened sound of the horn, as there is little current, the reason is low voltage;
- the appearance of extraneous noise when the power source is running.
Electrical circuit diagram
Below is a diagram of the generator electrical circuit:
What problems may arise in the operation of the generator and options for solving them.
- If the brushes or voltage regulator malfunction, you will have to replace the entire assembly due to the fact that it is not collapsible.
- Rotor bearings and their replacement. We have already discussed in detail how to change a bearing on a generator, so let us just remind you that there are two bearings in the generator. One is pressed into the front cover and if it malfunctions, it is most often replaced along with the cover assembly. The second bearing is attached, rolled onto the rotor shaft, it is removed using a special puller and a new one is pressed in its place.
- Additional diodes. If the diode malfunctions, its leads can be unsoldered and then, carefully trying not to break the rectifier unit with blows, pulled out of the holder. Clean the area from epoxy resin, then install the diode and solder it. After the entire procedure, the lead of the diode, which has a color mark, is soldered to the bus, and the diode body is attached to the holder with epoxy resin.
- The generator tension belt needs adjustment. But this must be done competently and carefully, since excessive tension can increase the load on the bearing and lead to its unsuitability in a short period of time.
Many of these problems may seem trivial, but they could mean you need a new generator.
You can repair the generator yourself, but to do this you need to have certain skills, so we still recommend leaving this work to knowledgeable craftsmen. The alternator bearing is an integral part of the alternator and its failure may result in malfunction. In this case, only replacing the generator bearing can help.
On devices from different manufacturers, this process is carried out in different ways, and the bearings of the Bosch generator are most easily replaced. Car enthusiasts often ask the question of how to change a bearing in a generator. So, this is done in the following way:
Remember that even if the bearing on your car looks great, the alternator bearing will still need to be replaced.
Install the generator bearing only using a press, and never use hammers or blows.
It is important that the bearing itself sits completely in place, then install the impeller and pulley on the shaft. The next step is to put the rear bearing of the generator with the cover in place, again, do not use any blows, only using a press. Next, you just need to perform the opposite actions to those taken during removal, and that’s it, you replaced the generator bearing yourself!
Next, you just need to perform the opposite actions to those taken during removal, and that’s it, you replaced the generator bearing yourself!
Sources
- https://remontavtovaz.ru/vaz-2110/samostoyatelnaya-zamena-podshipnikov-generatora-vaz-2110.html
- https://nadomkrat.ru/elektrooborudovaniye/kak-pomenyat-podshipnik-generatora-na-vaz-2114
- https://vaz-2114-lada.ru/2012/06/kak-zamenit-podshipnik-generatora/
Replacement and repair of generator on VAZ 2114 (2115)
Location: engine compartment, to the left of the power unit, at the end.
Preparatory stage:
- a set of keys, heads, cranks;
- a torque wrench to check the tension of the drive belt;
- mounting spatula to remove the belt;
- flat head screwdriver
Step-by-step replacement instructions:
- We fix the vehicle on a level platform.
- Squeeze the parking brake.
- Turn off the ignition.
- Open the hood.
- Disconnect the terminals from the battery.
- Unscrew the fastening of the “+” and “-” terminals from the generator set.
- We turn out the coupling bolt of the support bracket.
- We lower the unit down and remove the drive belt from the groove.
- We unscrew the studs and turn out the coupling bolt.
- To change the GU, we remove it from its regular place.
Do-it-yourself dismantling of the control unit on the VAZ 2114 (VAZ 2115) is completed. We carry out comprehensive preventative maintenance of the equipment, clean the housing and elements from dirt and dust, blow through the windings with a stream of compressed air, and dry the contacts.
We replace worn parts and components with new ones as necessary, if defects are detected. The generator must be completely replaced if cracks are detected in its housing.
In this case, further use of the equipment is strictly prohibited.
We measure the resistance of the excitation winding with a multimeter and check the diode bridge for operability. We also inspect the fuse for integrity and replace it with a new one if damage is detected.
DIY generator installation:
- We fix the GU on the support brackets, put on a pin and a spring washer.
- Place the belt in the groove.
- We screw in the fastening bolts.
- We move the GU body up, tighten the mounting bolts of the bar.
- We tighten the generator fasteners with a torque wrench with a force of 28.0 Nm.
- We check the belt deflection; the range should not exceed 12 mm. tighten as needed.
- We clamp the power cables on the installation.
- We put on the battery terminals.
To reduce the frequency of replacing power units, some car owners install generators from Priora (injector, 8 valves). The equipment is more powerful in terms of technical characteristics, which means it ensures stability in the generation and supply of current to the motor.
A new generator set is 500 - 750 rubles more expensive than a standard one. The holes for fasteners completely coincide with the factory ones on the VAZ 2114 (VAZ 2115).
Recommendations for care and maintenance of PG on VAZ 2114
- strictly adhere to the technical inspection deadlines;
- when purchasing consumables and spare parts, check the correspondence of catalog articles;
- give preference to original parts where the manufacturer guarantees quality;
- in the absence of experience, carry out prevention in certified workshops;
- when purchasing components, require the manager to provide documents for the products he sells;
- Always use the vehicle’s operating manual and consult with car service specialists.
Generator brushes - easy replacement + Video
Alternator brushes are an important element of the automotive system for supplying and discharging electrical current. Without their participation, the car's generator will not be able to generate voltage.
Generator brushes - element information
The brushes we are interested in are made of graphite, which is why they are often called carbon. They are used not only on cars with an internal combustion engine, but also on a wide variety of mechanisms and machines equipped with an electric motor (machine tools, lifting devices, urban public transport, and so on). The most common are EG-4 brushes.
This brand is suitable for installation on many cars of different years of production, as it has standard operating parameters. Less commonly used are other products (for example, EG-61), which are characterized by a high margin of safety due to their impregnation with special compositions.
On domestic cars, the generator and brushes for it are located under the right front headlight of your “iron horse”. They are not difficult to find. It is enough to open the hood to see the generator - its winding and two lids, which look like tin cans, come to the surface.
When do you need to change generator brushes?
During scheduled maintenance, no one pays attention to the small elements of the generator, of course. It is for this reason that the breakdown of its brushes always comes as a surprise to the driver. Experts advise that after 50 thousand kilometers (or once every four years) you must check their serviceability and functionality, and then no problems will arise with the operation of the generator.
It is noteworthy that you can check the brushes (and, if necessary, change them) without dismantling the rather bulky generator. In addition, the following symptoms may indicate the need to look under the hood of your car and check the graphite brushes:
- unpredictable shutdown of electronic devices in a vehicle, occurring for unknown reasons;
- reducing illumination of the car interior and external light sources;
- voltage reduction;
- a car battery that discharges unreasonably quickly, which, moreover, is then very difficult (and sometimes impossible) to charge.
Any of these symptoms tells the motorist that he most likely needs to remove the old brushes and install new ones instead. You can check old products for functionality very simply. We should remove the negative from the battery, remove the voltage regulator and visually evaluate to what height the graphite parts we are interested in protrude from their “shelter”. Brushes need to be changed urgently if their height is less than five millimeters.
Replacing generator brushes - from A to Z
Let’s say right away that this operation is very simple and does not require any special skills from the driver. First, as already mentioned, you need to remove the negative from the battery, then remove the regulator (it is located on the opposite side of the generator), and then perform the following steps:
- Thoroughly clean the holder seat, as well as the pressure springs and slip ring, from soot and dust. This operation is performed using a soft bristle brush. Sometimes it may be necessary to grind the graphite brushes into the commutator using fine glass sandpaper (its grain size should be about 100).
- Install new products and make sure that they move freely in the brush holder.
- Reassemble the assembly in reverse order, and then connect the previously connected wire to the battery.
If you bought a prefabricated structure (regulator plus brushes), its installation also does not cause any problems.
Turn off the “minus” wire, remove the cap made of rubber from the “positive” wire, and then dismantle the block by unscrewing the fastening nut. Then you will need to remove the plastic casing and remove the three spring clips located around the perimeter of the block. Using a Phillips screwdriver, unscrew the brushes along with the voltage regulator, and disconnect all the wires leading to it. Mount the purchased prefabricated structure in the vacant space. Operation completed!
carnovato.ru
Reasons for changing brushes
In a car generator, most parts are constantly in motion, which causes friction and wear. The reasons for changing brushes may seem very varied, but this should be done during routine vehicle maintenance. On VAZ 2114 it is advisable to change them after 50 thousand kilometers traveled. But as a rule, few people remember about this event, and this breakdown comes as a big surprise to them. There are also markers that signal an imminent breakdown; we will arrange them in order of the most frequent possibility of occurrence:
- Inexplicable chaotic shutdown of various electrical equipment in the car.
- A noticeable decrease in the brightness of headlights and other lamps both inside the car and on the body.
- Battery that discharges too quickly and problems with voltage levels.
To check the functionality of the brushes, it is not even necessary to remove the entire generator from the car. To carry out diagnostics, it is enough to remove the negative terminal from the battery, remove the voltage regulator from it and visually evaluate how much the brushes protrude from their seat. If their size is less than five millimeters, then they must be urgently replaced with new ones, otherwise unforeseen consequences can be expected at any time.
Work order
Before starting work, you must read the instructions in full on how to fix the problem. This will allow you to act confidently. You need to understand that the reason for the loss of functionality of the generator may be not only the failure of the brushes, but also the belt or relay regulator. It is possible that the entire generator set is worn out. Therefore, during repairs, you need to check the condition of all elements. First you need to prepare the car for work: remove the terminal from the battery to eliminate problems, and disconnect the plus from the generator.
Now you can start the main work:
- Unscrew the alternator belt mounting bolt.
- Move the unit towards the engine and remove the belt.
- Disconnect the tensioner bar, plug, and terminals.
- We remove the engine.
- Now you need to make the brush assembly accessible for work; to do this, you need to open the protective casing. It is secured with three latches.
- After unscrewing the two bolts, disconnect the wires.
- There is a nut on the right that also needs to be unscrewed.
- Now you need to raise the voltage regulator.
We remove the brushes of the VAZ 2114, 2113 or 2115 generator and check them. It often happens that they are completely over.Be sure to check the stem at anchor. It is located at the point of contact between the shaft and brushes. If it is large, it needs to be sanded.
- Now you need to thoroughly clean the location of the brush assembly, clean the contacts, and check the reliability of the springs.
- Installation of new parts.
- Reassemble in reverse order.
Compare old and new brush lengths.
Also watch the video of replacing the VAZ 2114 generator brushes without removing the generator:
You can also proceed in the following order:
- We de-energize the battery by disconnecting the negative terminal.
- Disconnect the contacts.
- We unscrew the two fasteners located on the brush holder body.
- We remove the node.
- Inspect the structure for defects.
- Measuring the protruding part of the brushes.
- Installing new components.
- Installation of the unit in reverse order.
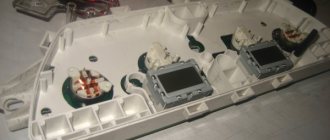
This option is relevant if you are absolutely sure that the brushes are the cause of the generator malfunction. After the work has been correctly completed, the following message appears on the dashboard.
Possible malfunctions and ways to eliminate them
Before you remove the generator and start repairing it, you need to make sure that the unit is working properly.
For example, if, when you activate the ignition in a car, the indicators on the dashboard do not light up and the sensors do not function, the reason may be:
- in the event of a break in the electrical wiring, diagnosis is carried out by checking wire 0 for a break;
- if the safety device fails, then it will need to be replaced;
- if there is a break in the section of the circuit connecting the ignition switch, as well as the safety block, in this case you will need to check all the wires.
If the instruments on the dashboard work, but the indicator does not turn on, the reasons are as follows:
- the indicator itself has failed, then it needs to be changed;
- there is a break in the electrical circuit, the wiring and contacts should be diagnosed;
- the slip rings have oxidized, are out of order, or the brushes are stuck - in this case, the brushes of the VAZ generator are replaced, as well as the rings are cleaned;
- if the problem lies in damage to the voltage regulator, then the device should also be replaced;
- If there is a short circuit in the positive valves, it is necessary to remove the generator from the VAZ and change the rectifier unit.
Work order
Before starting work, you must read the instructions in full on how to fix the problem. This will allow you to act confidently. You need to understand that the reason for the loss of functionality of the generator may be not only the failure of the brushes, but also the belt or relay regulator. It is possible that the entire generator set is worn out. Therefore, during repairs, you need to check the condition of all elements. First you need to prepare the car for work: remove the terminal from the battery to eliminate problems, and disconnect the plus from the generator.
Now you can start the main work:
- Unscrew the alternator belt mounting bolt.
We remove the brushes of the VAZ 2114, 2113 or 2115 generator and check them. It often happens that they are completely over.
Be sure to check the stem at anchor. It is located at the point of contact between the shaft and brushes. If it is large, it needs to be sanded.
Compare old and new brush lengths.
Also watch the video of replacing the VAZ 2114 generator brushes without removing the generator:
You can also proceed in the following order:
- We de-energize the battery by disconnecting the negative terminal.
- Disconnect the contacts.
- We unscrew the two fasteners located on the brush holder body.
- We remove the node.
- Inspect the structure for defects.
- Measuring the protruding part of the brushes.
- Installing new components.
- Installation of the unit in reverse order.
This option is relevant if you are absolutely sure that the brushes are the cause of the generator malfunction. After the work has been correctly completed, the following message appears on the dashboard.
What is this?
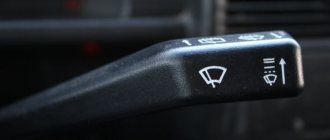
A generator in a car is a device that produces electricity from a mechanical type of energy. The device has a complex structure and is constantly subjected to heavy loads. The functioning of the entire car depends on its proper operation. It powers the windshield wipers, brings lighting devices (headlights, sidelights) into working order, and keeps the battery in good condition.
The slightest deviations in the operation of the generator do not go unnoticed. Signs by which you can understand that it’s time to look for a new current-generating device for your car:
- The battery recharges itself.
- The car stalls in the middle of the road.
- The battery is discharged prematurely.
- The headlights are getting weaker.
- The wipers stop working.
Why change brushes?
If signs of brush breakage are detected, they should be replaced. If repairs are not carried out in a timely manner, there is a possibility that you will soon need to purchase a new generator, and this is a completely different expense. The battery can only hold the ignition without brushes for a few minutes, which means it will have to be constantly charged. And soon it will be replaced.
You can check the condition of the brushes by the size of their protrusion from the seat. If the protrusion size does not reach five millimeters , then they should be replaced immediately to avoid possible problems.
It is recommended to replace it every 50,000 km or every season, which is the key to safe operation of the vehicle. It is better to have a spare set of spare parts so as not to get into an unpleasant situation on the road and then call a tow truck.
For a set of brushes you will need to pay from 150 to 200 rubles, depending on the store. The cost of repairs at a car service center will cost 200-300 rubles, inexpensive, of course, but why pay for something that you can do yourself?
Tools required for repairs
To work you need to prepare the following tool:
The price for replacing generator brushes without removal and with removal on VAZ 2113, 2114 and 2115 as of November 8, 2019 varies from 500 to 600 rubles. Inexpensive, but why pay? Independent work is quite advisable, it is not complicated, does not require special skills, and at the same time you can inspect the condition of the generator and adjacent components.
Now check the generator
We check the resistance of the rotor winding with a tester by connecting it to the slip rings. The resistance should be approximately 3–5 ohms. If the readings on the tester show infinity, it means there is a break in the rotor winding and it needs to be replaced.
I have 3.2 Ohm - the norm.
To check additional diodes, connect the “positive” (red) probe of the tester to the terminals of the stator winding, to which the terminals of the additional diodes are soldered, and connect the “negative” (black) probe to the opposite terminals of the additional diodes. If the diodes are working properly, the tester will show a resistance of 550–600 Ohms.
Approximately normal =) Instrument error + probes are pressed poorly.
Checking the rectifier block diodes. To do this, set the tester to resistance measurement mode and connect the “negative” (black) probe of the tester to the “plus” terminal of the generator, and connect the “positive” (red) probe one by one to the eight contact terminals of the diodes. If the diodes are working properly, the tester will show a resistance of 550–600 Ohms.
I did it this way, the idea is the same
Checking the generator stator windings. Alternately connecting the ohmmeter probes to the terminals of the generator stator winding, we check the winding for an open circuit. If there is no break in the generator stator winding, the ohmmeter will show low resistance (about 10 Ohms)
In my case it is 0.9 Ohm - also ok.
Just like that. I didn’t check the brushes themselves, since they require a battery and a light bulb, and something else, it seems. In short, I’m too lazy to drag it home to the 6th floor without an elevator))
Where are the generator brushes located?
Changing generator brushes is not difficult. They are located in the rear half of the device and are held in place by a single bolt. The brush assembly itself is located next to the slip rings and is connected to the voltage regulator. The brushes are held in place by springs next to the rings. Knowing the circuit diagram of the generator, it is not difficult to find the brushes. To replace, you will need a standard set of tools:
- Several wrenches;
- A pair of screwdrivers;
- New brushes;
- Liquid WD-40 (in order not to strip the threads of the bolts).
The brushes can be replaced in two ways, by removing the generator or without removing it. The design of the car, or rather the location in the engine compartment, will tell you which method is best to use. If there is free space, it is not difficult to repair the generator brushes without removing the unit, and if the engine occupies the entire engine compartment, it is impossible to do without removing the generator.
Voltage regulator of the VAZ 2107 generator - malfunctions, tests + Video
Your battery is not charging, and at night when the headlights are on, it may even be completely discharged? Familiar story! It is possible that the whole issue is a faulty generator voltage regulator. You can find out only by checking it.
Voltage regulator VAZ 2107 - purpose and first signs of malfunction
The voltage regulator is designed to automatically maintain the current strength so that the voltage generated by the generator is within specified limits, regardless of the rotation speed of the generator shaft (from the engine speed) and the current consumption of the car's electrical network. In VAZ 2107 cars, as a rule, an electronic voltage regulator is installed on the generator.
It is extremely rare that some models may come across an old-style device - a relay regulator. They were installed on generators 37.3701, produced before 1996, and on G-222. First, the device is tested on a running car. To do this, you need a voltmeter with the ability to measure DC voltage. The device must be equipped with a scale for values up to 15–30 V and have an accuracy class of at least 1.0. After starting the VAZ 2107 engine, it is allowed to run with the headlights on for 15 minutes at medium speed.
Then the voltage at the generator output is measured. To do this, the positive probe of the device touches terminal “30” on the generator, and the negative probe touches the ground (generator or car - it doesn’t matter, it’s the same thing). The voltmeter should show a voltage in the range of 13.6–14.6 V. If the measurement result is higher or lower than specified, and the vehicle is experiencing systematic overcharging or undercharging of the battery, then most likely the regulator is faulty and needs to be replaced.
Checking the removed voltage regulator
To clarify the condition of the regulator, it must be removed. It is better to test the device complete with brushes and brush holder. This will allow you to immediately detect:
- poor contact between the terminals of the brush holder and the voltage regulator;
- breaks in the output conductors of the brushes.
Electronic devices are produced already assembled with a brush holder and one-piece brushes. The relay regulator will need to be connected to the removed brushes.
A voltmeter or a 12 V lamp with a power of 1–3 W is connected to the brushes of the device removed from the generator 37.3701. For the regulator from the G-222 generator, the connection is made to terminals “B” and “W”. The “plus” of the power supply is connected to the terminals “B”, “C” (when they exist), and the “minus” to ground. First, a voltage of 12–14 V is applied, and after that – 16–22 V. A sign of the device’s serviceability will be the lamp lighting up (deviation of the voltmeter needle) in the first case and going out (zeroing the voltmeter) in the second.
When the lamp lights up in both cases, this means that there is a breakdown in the device. If in both cases the lamp does not light, then there is no contact between the regulator terminals and the brushes, or there is a break in the device. Another cause of improper voltage regulation can be worn or stuck brushes. They must protrude from the housing of the electronic device or the brush assembly of relay regulators by no less than 5 mm.
Replacing the voltage regulator VAZ 2107
If the regulator is faulty, the brushes are worn out or stick, then the device must be replaced. It cannot be repaired. For a relay-regulator in case of brush failure, it is sufficient to replace only one brush assembly. Usually they change it to a new electronic one, but you can install a three-level one, like 67.3702-02. They provide better voltage stabilization than standard regulators, taking into account the ambient temperature and vehicle operating conditions.
They are called three-level because they contain 3 voltage regulation modes. Their selection is carried out manually with a switch on the regulator, which is installed separately from the generator itself in a convenient protected place. The device is connected to the generator by wires through a brush assembly, which is supplied complete with the regulator.
carnovato.ru
Disassembling and checking the generator
So the day came when I finally decided to remove the generator, I have little free time, and I need the car at least once every two days, so what can I do, until I do everything, I won’t install the generator...
What we need to remove the generator: Key/heads, etc. at 8, at 10, at 13 and seemingly at 15
Let's start removing the generator
The first thing you need to do is remove the terminal from the battery, you can even remove both, so as not to accidentally short something))
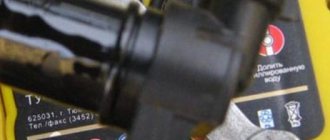
Well, then we remove the terminals from the generator. One terminal is made according to the “mother” “father” principle - it is simply pulled out of the generator. The second terminal is tightened with a nut, this nut is under a rubber plug. My rubber band burst out laughing, in the photo you can basically see everything.
Then unscrew these bolts in order
And move the generator towards the engine to remove the belt.
Next, you need to remove the protection, if of course there is one, otherwise there is no other way! The protection must be removed completely, it should not hang as in the photo, otherwise you will not remove the generator.
Next, unscrew these 3 bolts
Be careful, after you unscrew the third bolt, the generator will fall, keep this in mind! You can’t drop the generator, or maybe it’s possible, I don’t know))) But it’s better not to do this!
In principle, that’s all, now the generator is in your hands)
There is still not a lot of text about what not to do and how I unscrewed the bolts.
What not to do:
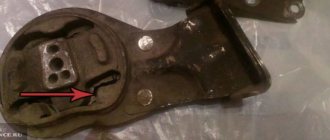
There is a bolt/stud on the bottom of the generator that DOES NOT NEED to be unscrewed! you can only weaken it a little, but this is not necessary) Unfortunately, there is no photo of this, but I circled the place where it stands.
As ALeX-71 said, to remove the generator, it is enough to unscrew this particular bolt, but this is not so, this bolt only tightens the internal bushings, which in turn hold the generator to the generator mount to the engine block, in short, even if you pull out this bolt, the generator you won't take it off either)))
It rests against the body and there is no way to get it out. I tried to push the engine, but no way)
Well, briefly about how I unscrewed the bolts, took the head and knob, inserted it into the bolt and pushed it with my foot))) There’s no other way, it’s just so inconvenient with your hands...