Introduction The heating switch-on time can be precisely adjusted from 1 minute to 24 hours. There are 3 on-time options available for programming, of which only one can be activated. Duration of switching on is set in the range from 10 to 60 minutes
When setting, remember the transition to summer/winter time!
Operation of the heater is not allowed:
• at gas stations and oil depots.
• in places where flammable vapors or dust may be generated (for example, near fuel and coal warehouses, wood chip warehouses and granaries).
• In enclosed spaces (such as a garage), even when using a timer or remote start.
The watch is in setting mode while the symbols are flashing quickly. If no button is pressed within 5 seconds, the time currently shown on the display will be saved. If the button > “Forward” or “Forward” or “Forward” and “Forward” or “Forward” or “Forward” or “Forward” or “Forward” or “Forward” and “Forward” or Issue price: 0 ₽
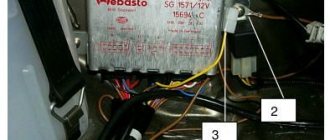
Instructions for setting up the Webasto 1533 mini-timer.
…Manual. pre-start liquid heaters of the Thermo Top series with timer 1533
The heater turn-on time can be set at any time of the day with an accuracy of 1 minute (from 00.01 to 24.00). It is possible to set up to three activation moments simultaneously, but only one of them will be activated. The duration of heater operation after starting from the timer can be set in the range from 10 to 60 minutes.
Parameters are entered into the timer memory in the installation mode. At the same time, the symbols on the display blink. If no button is pressed within 5 seconds after entering this mode, the value shown on the display at that time is stored in memory. If you press the » » button for more than 2 seconds, the quick change mode is activated.
Manually: by pressing the direct activation button (O). The display shows the heating operating symbol (O) and the remaining operating time (extinguishes after 10 sec.) Automatically: by pre-setting the switching moment. The display shows the program number and the symbol for operating in heating or ventilation mode.
Manually: by pressing the direct on button (O) Automatic shutdown: after the end of the automatic operation time. The display backlight goes off.
Setting the current time
This installation is carried out only when the heater is not working! Press and hold the “SET” button, additionally press » «. The display shows the current time and its symbol flashes. Set the current time by pressing the » « buttons. The set time is stored in memory after pressing the "SET" button or - without pressing any buttons - after turning off the display backlight. ATTENTION! Don't forget to change the timer between summer and winter time.
Press the button » «. If the heater is running, the remaining operating time is displayed.
Setting modes (heating/ventilation)
Not possible for all heater modifications! Press the “SET” button. Press and hold again: the display shows the icon for the current mode - heating or ventilation. Select the desired mode by pressing the " " buttons without releasing the "SET" button.
What is Webasto
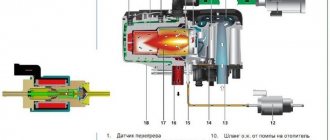
The Webasto pre-heater is used to warm up a cold engine and warm up the car interior. The device makes it easier to start the engine at low temperatures and pre-heats the cabin, melting ice and snow that has adhered to the cabin before driving, and in the presence of difficult weather conditions.
The product is a small device installed in the engine compartment, the power system of which communicates with the car, and the cooling circuit is embedded in the engine cooling circuit. It is controlled using an electronic module connected to the machine’s on-board network.
How Webasto works
The heater is started by a program timer located in the cabin, or by a remote control with which the device is equipped. The device operates as follows:
- Fuel from the tank enters the combustion chamber of the heater and heats the coolant of the heat exchanger.
- The circulation pump pumps heated liquid through the engine cooling circuit, due to which the engine itself and the interior heating radiator warm up.
How to start Webasto remotely
Remote control Telestart T91
An alternative to a timer is to install a remote control. This method is perfect for car owners who leave their cars close to home. The main condition for the operation of the remote control is that the car is in direct visibility, at a distance of no more than 1,000 meters. Its use helps to activate the system at any time convenient for the driver.
To determine the signal strength, there is a special indicator on the remote control display.
The advantages of using the remote control include:
- Convenient control of turning the system on and off at any time;
- Control over work through the key fob screen.
The disadvantages include:
- More impressive cost compared to a minitimer;
- The vehicle is in direct line of sight from the driver.
How to use Webasto
You can appreciate the benefits of a preheater only if you use it, but before that you need to learn how to use it. Operating the device is quite simple, but to master it you need to know some features.
How to launch Webasto
By default, the device is set to winter mode. If you plan to use it, the standard heater is set to the “warm” position. With a three-stage fan, select the first division, and with a four-stage fan, select the second. If a malfunction occurs, the system is locked by the electronic locking function. the Telestart remote system or using a timer. You should not turn on Webasto several times with a total usage time of more than 1 hour, as this will drain the battery .
Launch Webasto from your phone
The best option for controlling the device is to start from your phone . To do this, you use a separately connected ThermoCall GPS unit (module with antenna), which costs about 14 thousand rubles, and allows you to control Webasto functions from your mobile phone by sending an SMS message to the number assigned to the device. The module allows you to control it from five independent phone numbers - this is convenient if the car is used by several family members. Webasto applications have also been developed for control from a smartphone and tablet, which receive feedback with temperature data and alarm activation.
How to set the time on Webasto
Setting the time is done by holding the “set” button while simultaneously pressing the “forward” or “backward” button, after which “set” must be released. The current time will be displayed with the corresponding symbol flashing. The setting itself is carried out using the “forward” or “backward” buttons, and the set time will be saved by pressing “set” or after the screen goes out.
Webasto control panel
The purpose of the device is to turn the device on and off while being up to 1 km away from it, and to set the duration of its operation. The remote control will be convenient for those drivers who store their car near their place of residence. Its use is more convenient than regular programming of a mini-timer, especially since many people forget to do this, and the remote control turns on the heating by simply pressing a button. The weakness of this control method is that obstacles, radio interference and power lines reduce the range of the remote control, which is indicated by an indicator showing the signal strength.
Setting the Webasto timer
This control option is the cheapest. The timer is placed in the cabin on the front panel. With its help, you can set the moment of switching on at any time with an accuracy of 1 minute. and up to three switching points, of which only one can work. Webasto operating modes can be configured using a timer as follows:
- Manual activation - with the power button, the display will display the heating operation indicator and the time until the end of operation;
- Automatic switching on – when pre-setting the switching moment with the display of the heating or ventilation program number;
- Switching off – by pressing the switch off button or when the program time ends, the display goes off;
- Display the time by pressing the “ ” buttons. When the heater is running, the time until the end of operation is visible;
- Setting the moment of switching on. Press “set”, then within 10 seconds. use the “forward” or “backward” buttons to set the on time;
- Erasing a program – short press “set”;
- Selecting a program – press “set” for 10 seconds. until the number of the required program appears on the screen;
- Setting the operating duration is done by pressing and holding “set”, and additionally pressing “ ”, while the current time is displayed on the screen with the 5th symbol flashing. Press and hold “set” again, and additionally press “ ”, the operating mode and duration (flashing icons 4 and 7) specified by the corresponding program will be displayed. Using the “ ” buttons, you can set the required operating time, which is saved with the “set” button or after the display goes out;
- The remaining operating time can be adjusted in the range from 10 to 60 minutes. by pressing the " " buttons.
How to install Webasto?
Some types of such equipment have a fairly simple design. Therefore, it is quite possible to install these types of pre-launch mechanisms on your own. The main thing is to strictly follow all instructions in the operating instructions. In addition, it is also worth knowing how Webasto works on diesel vehicles. On them it has two modes: summer and winter. Therefore, in order to use Webasto, you need to clearly know how the winter mode is initially activated. This is usually indicated again in the instructions. In addition to the above, I would like to note one more important point. The system will not work if the fuel in the tank is already frozen. And very often this happens due to the fact that diesel fuel contains additives and anti-gels. Accordingly, it is very important to carefully select the fuel to use the system.
More information about what Webasto is will be described in this video:
Published: October 25, 2021
Webasto malfunctions and their elimination
If the heater has a standard or combi-timer, in the event of an emergency lockout, the screen will display a fault code, which may vary depending on the model of the device. The most common system of fault codes is the following:
- F 00 – control unit failure.
- F 01 – no flame or 2 unsuccessful startup attempts.
- F 02 – flame failure (repeat more than 3 times).
- F 03 – voltage deviation is higher or lower than permissible.
- F 04 – early flame detection.
- F 05 – short circuit in the flame sensor or open circuit (for gasoline).
- F 06 – short circuit in the temperature sensor or open circuit.
- F 07 – short circuit in the dosing pump or open circuit.
- F 08 – problem with the motor or impeller of the air blower.
- F 09 – short circuit in the glow pin or open circuit.
- F 10 – overheating.
- F 11 – short circuit in the heating limiter or open circuit.
- F 12 – heater is blocked (pull out and insert fuse).
- F 14 – incorrect position of the overheating sensor.
- F 15 – open circuit or short circuit in the control potentiometer.
After a malfunction occurs, all plug connectors and fuses , and if defects are found, they are eliminated. So, the most common malfunctions are the following:
1. Automatic heater shutdown:
- Flame break during operation or lack of combustion after two starts. Eliminated by turning off the device for at least 2 seconds and turning it on again;
- The heater is overheating and the operation indicator is flashing. It can be eliminated after turning off and cooling the device by turning it on again, while the air duct must be checked for permeability;
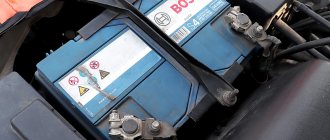
- The onboard voltage is much lower than the permissible norm. Eliminated by charging the battery and restarting the heater.
2. Black smoke coming out of the heater pipe. Indicates a clogged air duct or exhaust pipe. To eliminate this, pipelines are checked for permeability and cleaned or repaired.
If these measures fail to resolve the malfunction, you need to contact an authorized Webasto service center .
How to enable Webasto manually?
With the GSM module it is possible to control the Webasto heater from a mobile phone.
The interior control panel is usually mounted on the instrument panel - so that it is convenient to configure Webasto from the driver’s seat. First, familiarize yourself with the control panel by studying the symbols on its buttons. To launch Webasto, find a button with an image of either a flame or a similar symbol. In any case, the image will be clear - it may be similar to the symbols of the glass heating buttons or the icons located at the standard heater control buttons (handles). Webasto is turned on by pressing this button, and the operation indicator will appear on the display. Pressing it again will turn off the heater.
It must be remembered that after three unsuccessful startup attempts, Webasto may become blocked.
It is also necessary to take into account that the device may become blocked after three unsuccessful start attempts. Try unlocking Webasto by removing the fuse from the power circuit. It is also possible that the heater has already been blocked before. If the attempt to turn on Webasto from the remote control still fails, then, most likely, you will still have to turn to specialists for help. They will also tell you how to turn on Webasto correctly. The first start-up after a long period of “idleness” of the heater may take some time for the fuel system of the device to bleed. In addition, before starting, you need to make sure that there are no air pockets in the pipes - overheating of the temperature sensors will lead to an emergency shutdown. You can also turn on Webasto while the engine is running, using it as an additional interior heater, or rather, to increase the air temperature. This is especially important if you have a car with a diesel engine - the “stoves” of diesel engines do not warm up well, and when idling in severe frosts, the heaters of gasoline cars stop efficiently “heating” the interior. In order to turn on Webasto without a remote control (if it is broken or missing for some reason), you will have to find a way to “bypass” the control electronics. But at the same time, you risk damaging the device, for example, by overheating it.