Typically bearings run no more than 50-60 thousand km. depending on operating conditions and driving style. The whole work does not require professional knowledge of mechanics, everything is simple and, if you have ingenuity, takes an hour and a half. Therefore, our instructions on how to remove and replace the front wheel bearing of a VAZ 2110, 2111, 2112 with your own hands will be useful to you.
Usually, when there are problems with the bearings in the hub, you hear a characteristic howl, crunching sound coming from the area of the front wheels.
You can check this by hanging the wheel on a hillock, try to swing it at different angles with different forces. If there is play, joints and knocking are felt inside, then the car has obvious problems with the hub. To replace the bearing in the front hub of a VAZ 2110, 2111, 2112 you will need: A new hub bearing retaining rings a wheel nut a 30″ head a special puller that can be used to remove the wheel bearing. The complete instructions are shown in the photo step by step and with a description of the actions.
- Diagnostics
- Adjustment
- Replacement methods
The hub bearings are responsible for the free rotation of the wheels on the axle. They are mounted directly on the hub body, and are attached to the wheel axle with an internal race. There are plastic plugs between the clips that prevent moisture and dust from negatively affecting the mechanisms. But replacing the wheel bearing on the VAZ 2110 will still be necessary over time. Today we will talk about this.
Adjustment
Checking its functionality and adjusting it is carried out as follows:
- Raise the front wheel using a jack;
- Remove the wheel;
- Using a chisel, remove the protective cap on the front hub bearing;
- Remove the brake pads;
- The indicator holder should be secured to the steering knuckle;
- Place the leg of this indicator against the hub, as close as possible to the adjusting nut;
- Rings of spanners are placed on the studs and the nuts are tightened. While holding them, the hub rotates and moves in the axial direction;
- Using the indicator, the movement or gap indicator is determined. If it is more than 0.15 millimeters, the gap must be adjusted;
- Reinstall the wheel without using the protective cap. Secure it with two bolts screwed in diametrically;
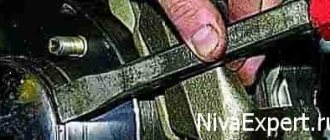
- Using a chisel, straighten the flange on the bearing nut and remove the nut with a 27mm (socket) wrench;
- Using a torque of 2.0 kg-cm, tighten the new adjusting nut;
- Loosen the nut, then tighten it again, but now with a torque of 0.7;
- Slowly release the adjusting nut 25 degrees and turn the wheel in a vertical plane. There should be a slight play;
- Check the gap. Its indicators should be in the range from 0.08 to 0.02 millimeters;
- In this position, lock the nut with the collar caulked in special grooves. They are located on the steering knuckle at the end of its axle;
- Remove old grease from the protective cap and apply new one. About 25 grams. Experts recommend using Litol 24, although there are worthy alternatives;
- Install the protective cap on the bearing;
- The wheel is installed in its rightful place.
Replacement methods
We recommend watching a video on how to remove a wheel bearing from a VAZ 2110. This will allow you to better understand the nuances of the work. A clear example will never be superfluous.
As for the replacement, there is also a video teaching how to do this process. Craftsmen use three replacement methods, each of which has its own characteristics and advantages. Therefore, it would be correct to talk about each of them.
First way
We take out the locking ring
- You will definitely need a puller to remove the bearings.
- Carefully remove the bearing with a specialized tool and replace it with a new one.
- Upon completion of the shift work, the unit is reassembled.
But there are also disadvantages - you will have to take a position that is not the most comfortable to perform the operation. Therefore, it is strongly recommended to carry out work with a lift or using an inspection pit. But even so, you can forget about comfort.
Second way
Here you have to complete the following steps:
- Carefully remove the steering knuckle to remove the bearing. After this, the hub is completely removed;
- Next, use the workbench;
- On the workbench, replace the element and then put it in place;
- It is important to follow the correct reassembly sequence
Even a professional cannot achieve a perfect match of marks, but it is more than possible to minimize deviations.
Do-it-yourself universal bearing puller
We bring to your attention another interesting design that can be made from simple available materials.
First, cut a small piece from a square profile pipe. Or you can use a “stub” of a suitable size.
We make markings and use a grinder to cut out a triangular groove. We remove burrs.
On the opposite side of the workpiece we cut out three more grooves, but this time longitudinal.
We cut a piece of metal strip of suitable length, mark it, and drill holes in the workpiece. We weld a nut to the central hole.
We screw the threaded rod into the nut. Then you need to use two bolts and nuts to attach the metal plate to the profile pipe.
We weld a nut to the top of the stud. And to it we weld a handle made of a square rod.
Using this device, you can remove not only bearings from the shaft, but also pulleys of small diameter.
There is perhaps only one design flaw - there is no way to adjust the internal size between the hooks.
But in general, the device itself turned out to be quite good, considering that scraps of metal were used for its manufacture. Suitable for a home workshop.
For details on how to make a bearing puller with your own hands, we recommend watching the video below.
Homemade three-grip tool
This type of tool is the most difficult to manufacture, since the parts have a unique shape and require precise dimensions to mate them.
Required tools and materials:
- Grinder with cutting disc for metal;
- Sheet 1 m2 10-20 mm thick;
- Hairpin M18x1.5x 400 mm;
- Two nuts M18x1.5 height 20 mm;
- Pipe section outer diameter 89 mm, wall thickness 7 mm;
- M10 bolts for hanging the legs in the eyes;
- Welding machine.
The legs are cut from a sheet of 10-20 mm, L = 200-220 mm, the cross is made from an M18x1.5 nut, or cut out of a solid sheet with a grinder. Mark the contours of the crosspiece, cut it out, drill a hole in the center, then use an M18x1.5 tap to cut the thread.
Cup puller
The main part of the tool: M18 pin, cup and replaceable disks. A threaded bolt and nut can be picked up in a store, but the remaining parts will have to be ordered from a turner based on a sketch or drawing.
For VAZ 2108, 2109, 2110, 2111 washers are suitable - 30, 34, 37, 77 mm, bowl (ring) - 77 mm. For other car brands, find the original part number and its dimensions, and then cut out the appropriate washers and cups.
Double jaw wheel hub puller
Having amateur welding skills, two gripping devices are made from plates, nuts, and studs.
Not the easiest way to make a SSP in a garage; to assemble it you will need:
- Sheet 5 mm;
- Bolt M 14x1.5x 240;
- Bolts with nuts M6;
- Nuts M14.
Removable traverse for pressing out
This option is suitable for pressing and pressing the ball bearing out of the hub without removing it from the knuckle. The photo shows an example of such a design.
- One or two strong steel plates are taken, a hole for the bolt is drilled on top and a nut is welded.
- A second nut is welded coaxially from below.
- Next, holes are made for M10 bolts at equal intervals. The legs are cut from a 10 mm plate.
- The two plates are bolted together. Between them there is a long M16 bolt.
The only purchase is a crown to match the size of the ball bearing race. Cut the required washers from a 10 mm strip.
Tools and materials required:
- Bulgarian;
- Welding and drilling machine;
- Internal pipe section D 75 mm;
- Strip 70x30x5, 2 pieces;
- M6 bolts with nuts 4 pieces, lock nuts 8 pieces
- Thick-walled washer D 45mm.
Drawings for self-production of pullers:
Click on the drawing you are interested in to enlarge it.
Preparation and disassembly
When replacing the wheel bearing of a VAZ 2110, it is necessary to park the car level, and be sure to install stops under the rear wheels. Before lifting the wheel being repaired, be sure to loosen the hub nut and loosen it (you can even unscrew it completely). This is done using a socket or socket wrench set to “30”. It is extremely important that there is a large lever - a considerable amount of force must be applied to rip off the nut.
Replacing the rear wheel bearing of a VAZ 2110 is carried out in almost the same way as the front one. The only differences are in the puller used and disassembly in order to get to the hub. That's all, now you need to lift and remove the wheel. Look carefully, what is stopping you? That's right, support! You remove it and hang it under protection so as not to damage it. And don’t even try to “accidentally” press the brake pedal.
Unscrew both bolts securing the ball (if you do not plan to replace it, then there is no point in removing the pin). You also unscrew the two guides from the disk. The disc can now be removed and put aside. Mark the position of the hub on the stand and unscrew the nuts (so as not to disturb the camber angles of the front wheels). That's all, you can try to rip the hub off the grenade. It is better to do this if you put the wheel on a couple of bolts with the back side facing it. You jerk the wheel sharply, trying not to fall.
Signs of need for replacement and diagnosis
In addition to the hum in the area of the front wheel, other signs may indicate the need to replace the bearing on the VAZ 2110. Even inexperienced drivers will notice deviations from the norm while the car is moving. The change in the trajectory of traffic around turns will be clearly visible. Due to the uneven ride, the front of the car will sway from side to side.
This is interesting: Parking with a trailer
To further check the condition of the wheel bearing, release the steering wheel on a level road . If the car skids to one side or the other, the part is worn out and requires replacement. You should not delay such repairs, since if the bearing is destroyed while driving at high speed, you will get an emergency situation and an uncontrolled skid, which can lead to an accident.
Advice: Bearing destruction is caused not only by a long period of operation of the machine, but also by poor quality of roads. At races, the likelihood of damage to a part increases significantly; a particularly dangerous situation arises when purchasing low-quality spare parts from China.
Removing and installing the bearing
It is worth noting that the VAZ 2110 wheel bearing can only be replaced using a puller. But on my own behalf I will say that it simply does not help me. From the kit - a bolt, a nut and several washers, I use only the bolt - I put it inside the bearing and hit it with a hammer (sharp).
Of course, before doing this, the retaining rings must be pulled out. You can use some of the washers that come with the puller, they are very convenient. But it’s impossible to do everything humanely, so that everything is “by the book.” A hammer saves the day, and this installation did not damage a single bearing (although the manual warns about this consequence).
Replacing the rear wheel bearing of a VAZ 2110 is carried out in a similar way. Removal and replacement can be done with the same tool. I tried to cheat with the installation - I warmed up the bearing and threw the hub in the freezer. This was of little use, only the seal on the bearing began to melt. But this ten has been driving for several years now and has not started buzzing yet.
No matter how much I tried, I couldn’t press the new bearing with a puller - I remembered various mothers, and envied the owners of sixes and all the classics, since their cones (in my opinion) change much faster and easier. The main thing is not to overtighten and lubricate generously. Therefore, I picked up that same bolt, a washer (with a diameter like a bearing), lubricated the outer race and hub, and began to carefully stuff it.
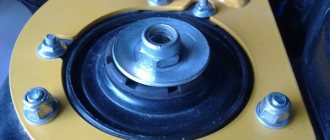
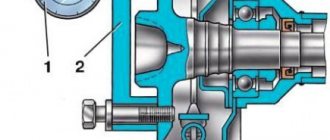
What is a wheel bearing and where is it located in the VAZ 2110
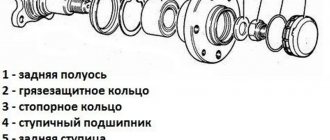
The wheel bearing is necessary for smooth and even rotation of the wheel. Replacing it is somewhat more difficult than on the rear hub due to the design of the unit. It is important to understand how the front knuckle is designed and how the hub parts are connected to each other. The diagram below shows all the elements and the immediate location of the wheel bearing.
Assembly diagram and location of the wheel bearing
If during the operation of the car you constantly hear a hum from under the front wheel and its uneven rotation is noticeable, then it is better to immediately purchase a new bearing from the store and replace the mechanism. Even if you try to adjust and better fix the old worn part, over time repairs will be required again.
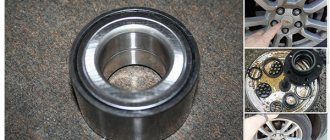
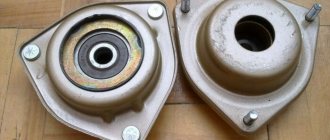
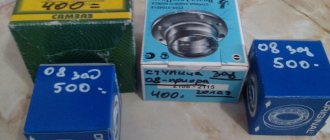
What does the front wheel bearing of a VAZ 2110 look like?
Advice: We recommend choosing Russian-made bearings; they fit most accurately in size and are of high quality.
Replacing the front wheel bearing
Note! The work must be carried out on a level basis, but the ideal option would be to use an inspection pit or a lift.
Of course, changing the bearings of the front hubs is much more difficult than in the case of the rear ones, but with the right approach everything is quite doable. In such a case, you need not only special knowledge, but also appropriate tools. Having provided all the necessary conditions, replacing the front wheel bearings of a VAZ 2110 on your own will take place without any difficulties.
Before starting repair work, you need to select a suitable bearing. Experts recommend buying domestic auto parts, for example, “Samara” or “Vologda” production. It is advisable to make sure that it is Russian products that are sold, since China successfully produces copies. Carrying out any repair is not complete without certain devices, in which case you will need:
- puller for installing bearings;
- mandrel - a piece of pipe of the required diameter, which will be used to knock out the hubs;
- 30-size head with a reliable collar;
- spanners 17 and 19 sizes.
After the preparatory steps, they begin repairs, which are recommended to be carried out following the instructions provided. So:
- First, the vehicle is put into “manual control” and 1st gear. As a rule, it is necessary to install anti-underrun chocks under the rear wheels.
- The wheel bolts are released and, using a size 30 wrench, the bearing nuts are unscrewed from the front hubs. Provided that the car has alloy wheels, you cannot do without removing the wheel. You can unscrew the hub nuts only by pressing the brake pedal, so it is best to perform these actions with an assistant.
- Using a screwdriver, you need to press out the calipers, after which the calipers are unscrewed with the 17th key from the steering knuckles. To prevent this caliper from hanging on the brake hose, it is tied up. Now you can easily unscrew the brake discs from the hubs themselves.
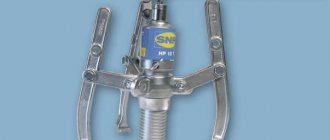
Types of wheel bearing pullers
Study the summary table, which presents several main types of BSC, as well as specific recommended models.
What pullers are needed to remove and press in wheel bearings?
For the front and rear wheels, it is recommended to use two types of tools: with three or two legs and a cup puller - this is the minimum set of removable tools for the correct and safe removal and pressing of parts of hub units.
Three replacement options
Subsequent actions can be performed according to one of 3 options. The first method involves replacing bearings using pullers, and it is not necessary to unscrew the steering knuckles of the machine. In the second case, you will have to dismantle the steering knuckles, and further work will be carried out on a workbench using a vice and pullers. If you choose the third option, you will have to completely remove the stand and change the bearings using a vice.
Note! Each of the above methods has its pros and cons, so before defining them you need to consider them in more detail.
- Method one, in which the steering knuckles are not dismantled
The advantage is that you do not have to touch the bolt that regulates the camber. The disadvantages include an inconvenient position when changing the bearing. In such a situation, it is problematic to carry out actions without a lift or inspection hole. In addition, in this position it is inconvenient to knock out the hubs and press in the bearings.
Using this method, the work of changing the bearing is carried out more conveniently and easily, but a problem arises in violations of the machine’s camber adjustment. Before unscrewing the steering knuckle mounting bolts from the strut (see Replacing struts on a VAZ 2110: how to do it right?), you need to put two marks.
Note! One mark will correspond to the position of the adjustment bolt to the strut, and the second will correspond to the position of the knuckles.
During the assembly process, you need to take into account the coincidence of these two marks. It is unlikely that you will be able to achieve initial accuracy, but the errors will be minimal. This method is ideal for those who need not only to replace one wheel bearing, but also to repair the chassis, namely changing ball joints, steering ends and silent blocks of levers.
This is perhaps the most difficult method, since you have to remove the strut, unpress the steering tip, as well as the fastening nuts that secure the upper support to the base of the body. Change the bearings only after removing the strut from the car. This task is not easy, it will require more time, but this is an excellent method for those for whom the two previous methods did not work.
The second method of replacing the bearing
If the second option is chosen, we continue repair work according to the following instructions:
- Labels are set. Using a soft guide, the steering knuckle mounting bolts are unscrewed and knocked out. The two fastening bolts of the lower ball joint to this steering knuckle are unscrewed, which is successfully removed.
- Using a tool of the required diameter, the hub is knocked out from the bearing. The retaining rings are removed. A puller is installed in a vice and the bearings are pressed out.
Note. The bearing mounting areas in the steering knuckles must be cleaned of dirt and lubricated generously.
- The bearings are pressed in and retaining rings are installed. After such actions, the assembled knuckles with new bearings are mounted on the hubs. Using the same mandrel, hammering is done until it stops. The force must be concentrated on the inner races of the bearings.
Note! The bearing must be pressed in using a press, puller or vice. You cannot use a hammer, as this will lead to destruction of the element. When pressing, apply force only to the outer rings.
- Subsequent assembly is carried out in reverse order.
Note! As a rule, the hub contains a double-row ball bearing; it does not require adjustment or lubrication during use. When pressed out, this element is always destroyed, so it is recommended to press out the hub only to replace the bearings.
In one case or another, replacing the front wheel bearings yourself will cost much less than work at a service station. For a better understanding of the process, it is recommended to watch the video. It is also recommended to use visual aids, such as photos, during the work process. When working with your own hands, it is recommended to do everything as required by the instructions in order to avoid mistakes. The price of bearings is not high, so you can easily start replacing them if there is such a need. You can also find out about replacing the rear wheel bearing on our website.
Domestic manufacturers, willy-nilly, have to adapt to European standards. And this is very cool, because in the regime of Soviet technical isolation we would still be using outdated solutions. Such a seemingly trifle as a front hub bearing, but with the transition to the European HUB system (closed roller or ball bearings, maintenance-free), the service life of the part has almost tripled. Even if we take into account the costs of local production.
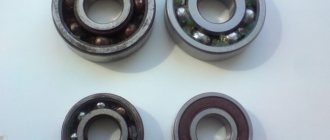
Which wheel bearings are best to buy for a VAZ-2110
Front hub bearing 2108-3103020-01.
Western European engineers took an active part in the development of the VAZ 2108. That is why the front-wheel drive first-born VAZ received the most advanced solutions at that time. Including the front wheel bearing. Domestic manufacturers have always been proud of their bearings, but time has shown that out of a huge number of factories, only five turned out to be competitive in modern conditions. And it was the hub bearing that made them industry leaders.
Articles
The tenth roller wheel bearing has article numbers 2108-3103020-01 and 2108-3103020-02 , its dimensions are 34x64x37 mm .
This part is supplied to the conveyor by the Lada-Image company. The service life of the original bearing is very mediocre and, of course, it depends on operating conditions - from 30 to 45 thousand mileage.
"Needle" test
When replacing, you can carry out a “file” test : take the new and old bearings, try to file off the edge with a file. A good clip will not give in to anything ; the file will simply slide across the surface without leaving marks. Cheap domestic bearings are made in violation of technology and therefore the needle file leaves noticeable marks on the test area - the metal is raw, and, therefore, such bearings do not last long before play appears or even fails.
Quality and inspection
This is the lyrics, and now let’s go to the store and choose a quality part. We ask Chinese artisans not to worry; we pay attention first to domestic factories. Their bearings are cheaper, but you have to choose from the following list:
- The 23rd Vologda GPP is now called VBF ;
- The 3rd GPP from Saratov is called SPZ ;
- The 10th GPP (Rostov) did not change its name;
- VPZ 15 is the Volzhsky plant;
- The 9th gas processing plant from Samara turned into the SVZ-Group plant.
Marking
When choosing, you need to pay attention to the markings: a certified bearing will be marked only according to the European standard (not GPZ-15, but VPZ, for example).
A Vologda bearing will cost about half a thousand rubles.
The price of domestic parts can range from 500 to 700 rubles per piece. Imported analogues are more expensive, but the quality standards there are different, if you do not take into account fraternal China:
- German LGR bearing with catalog number LGR-4703 , price about 700 rubles , excellent quality, if not fake;
- Italian Marel ( 2108-3103020M ) with a price of about 750 rubles , high-quality and durable, ESSO lubricant is guaranteed to be used;
- for 800 rubles you can buy a Sachs wheel bearing with number 3464 0037 , a renowned company, excellent quality;
- SNR (R172.03) , Japan, price about 1200 rubles, almost eternal bearing, if not a fake.