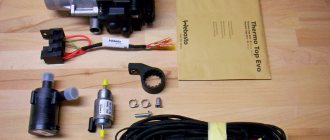
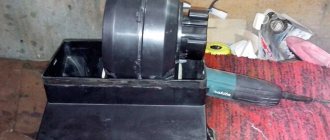
If you bought a car with a preheater installed, but have never used such devices, and the previous owner did not bother to provide you with instructions for operating Webasto, then first of all you need to understand. The main unit of the heater is the boiler, to which are supplied:
- fuel line;
- pipes for inlet/outlet of coolant;
- electrical wiring.
In addition, an air intake and an exhaust pipe are attached to it. Operating principle: fuel burning in the boiler heats the coolant. It circulates through the cooling system in a small circle, turning on the interior heater radiator and warms it up, and with it the engine. Circulation is carried out by the operation of an electric pump embedded in the cooling circuit. The heater can also warm up the car interior - its control unit automatically turns on the standard heater fan when the coolant is heated to a certain temperature (more than 40 degrees).
Very often, a Webasto heater is installed instead of an expansion tank.
You can turn Webasto on and off either manually from the interior or remotely. The operation of the device can also be programmed by setting the mode you choose using a timer. And also more equipped heaters are equipped with a GSM module for remote control using a phone. But you should not carry out a test run from afar, without being able to control the process. Also take into account the air temperature - if the car is diesel, you will most likely have to turn on the fuel heating.
Before attempting to start the Webasto heater for the first time, precautions should be taken.
Before attempting to start Webasto for the first time, precautions should be taken. Inspect everything related to the heater. First of all, pay attention to whether there are any traces of fuel leakage along the entire line - from the fuel tank to the heater. Also inspect the exhaust pipe to see if it is clogged with dirt, snow, etc. Check the integrity of the wires and their connections. And finally, carry out a test run in an open place - after all, burning fuel is not something to joke around with. It is advisable to be on the safe side by keeping a fire extinguisher handy. It is quite possible that the car will be needed urgently and there will not be time to inspect it properly. Just keep in mind the possibility of an emergency situation.
How to enable Webasto manually?
With the GSM module it is possible to control the Webasto heater from a mobile phone.
The interior control panel is usually mounted on the instrument panel - so that it is convenient to configure Webasto from the driver’s seat. First, familiarize yourself with the control panel by studying the symbols on its buttons. To launch Webasto, find a button with an image of either a flame or a similar symbol. In any case, the image will be clear - it may be similar to the symbols of the glass heating buttons or the icons located at the standard heater control buttons (handles). Webasto is turned on by pressing this button, and the operation indicator will appear on the display. Pressing it again will turn off the heater.
It must be remembered that after three unsuccessful startup attempts, Webasto may become blocked.
It is also necessary to take into account that the device may become blocked after three unsuccessful start attempts. Try it by removing the fuse from the power circuit. It is also possible that the heater has already been blocked before. If the attempt to turn on Webasto from the remote control still fails, then, most likely, you will still have to turn to specialists for help. They will also tell you how to turn on Webasto correctly. The first start-up after a long period of “idleness” of the heater may take some time for the fuel system of the device to bleed. In addition, before starting, you need to make sure that there are no air pockets in the pipes - overheating of the temperature sensors will lead to an emergency shutdown. You can also turn on Webasto while the engine is running, using it as an additional interior heater, or rather, to increase the air temperature. This is especially important if you have a car with a diesel engine - the “stoves” of diesel engines do not warm up well, and when idling in severe frosts, the heaters of gasoline cars stop efficiently “heating” the interior. In order to turn on Webasto without a remote control (if it is broken or missing for some reason), you will have to find a way to “bypass” the control electronics. But at the same time, you risk damaging the device, for example, by overheating it.
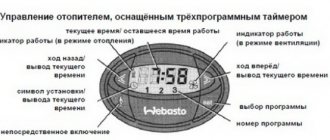
Purpose of the Webasto modular timer control buttons
Flashing symbols will appear on the display of the control panel when the ignition is turned on - if the timer is not configured. If the display is continuous, the symbols indicate the current time. The buttons indicated by left and right arrows change the time values. If you do not press them for about 5 seconds, the settings are saved in the controller’s memory.
When calculating the operating time of the Webasto heater, you should take into account the air temperature, the condition of the battery and the power of the heater itself.
In order to set the time on Webasto, press and hold for two seconds the button with the icon depicting a clock. When the symbols start flashing, use the “” buttons to set the time. The day of the week indication also changes. The “P” or “SET” button is intended to select the heater operating program and allows you to configure the automatic inclusion of Webasto. Press it until the program number starts flashing on the display. Then use the arrow buttons to set the on time and day of the week, proceeding to setting it by pressing the “clock” button. Subsequent short presses of the “P” button will sequentially change the program number until the current time is displayed. How long to turn on Webasto is up to you to decide. When approximately calculating the time, you need to take into account the air temperature, the condition of the battery, and the power of the installation. The operating time is set when the heater is turned off by pressing the “” button. But it is more prudent to carry out the first start without a timer. In the future, if the device is operating normally, you can try to turn on Webasto from the remote control. Its radius of action is usually at least 1 kilometer.
But still, even if you learn how to turn on Webasto yourself, read the instructions for use at the first opportunity. It contains information about operating rules, compliance with which will increase the trouble-free operation of the device.
Many people know that a Webasto heater installed in a car can be used as a preheater. Many even remade them by connecting a button, installing original timers or remote controls. But they all have drawbacks. Range of action, the need to program in advance and in the case of remote controls, range of action. But there is a way out. I present to your attention a GSM controlled relay:
To be able to control this device, you need to purchase a SIM card from any available cellular operator, preferably at a tariff without a monthly fee (it’s cheaper). I chose Hello from VELCOM:
You can order it on AliExpress. Installed in any convenient place, under the hood, in the cabin, or anywhere else where you can place a device the size of a pack of cigarettes. The device must be configured during installation. You can learn how to do this from the video presented, or by asking questions in the comments.
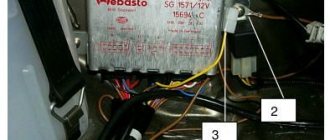
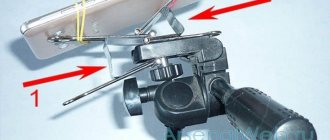
The connection is simple, you only need to connect three wires. 1 - constant + power, it can be taken directly from the battery or from the standard wiring, finding the desired wire. A 2.5 A fuse is required. 2 - ground, can be taken from the nearest ground connection point or connected to the standard wiring (ground). 3 — the control output is connected to the reheater and allows you to turn it on. I connected the control wire to the yellow wire located in the harness that connects to the afterheater. In fact, this wire, when shorted to ground, turns on the reheater.
When installing a Webasto preheater or air heater, it is also necessary to install a control and monitoring system for the heating device. Both timers or thermostats installed in the car interior and GSM modules for Webasto remote control are used as controls.
Selection by parameters
Equipping the heater with additional control, installing a GSM module for Webasto, timer, remote control
The basic configuration of Webasto includes a set with a timer.
It is worth knowing that on many cars that are equipped with a heater from the factory, the device is used as an engine preheater and does not have a timer as standard. In this case, you can fully use the heater and control it by installing a timer on Webasto. The timer is installed in the car interior and makes it possible to program preheating until the moment when the engine is planned to start and the trip is planned (for example, 30 minutes before the driver gets into the cabin and starts the internal combustion engine).
Ultimately, it turns out that autonomous heating using a timer allows you to raise the coolant temperature before starting, and the interior will also be preheated. Let's add that to effectively interact with the timer you need to know how to set the time on Webasto. This can be done by studying the functionality and operating instructions of the autonomous heater.
Another solution for controlling the heater is the ability to install a remote control on Webasto. The main advantages can be considered the compactness of the remote control itself, as well as the function of turning the heater on and off remotely. At the same time, you can set the operating time of the autonomous heater. Various remote controls allow you to control the heater from a distance of 200-300 meters to 1 kilometer; they may have a light indicator for feedback from the heater, etc.
The disadvantages include a limited coverage area, as well as possible loss of signal in severe frosts. Quite often in practice, the operation of the remote control is limited only to the line of sight of the car. In other words, in severe frosts and the presence of interference, in some cases it is not possible to start autonomous heating. Note that the Webasto GSM control module does not have such shortcomings.
A special Webasto GSM control module allows you to organize remote control of an autonomous heater using the W-BUS digital protocol or via an analog signal using a smartphone or mobile phone. The specified module works in such a way that a SIM card of a suitable mobile operator is installed in the device and the phone number is stored from which the module will then be controlled.
After receiving the command, the module’s task is to activate the heater. A control command should be understood as receiving a voice call or SMS text message from a phone whose number is stored in the module’s memory. Let us add that the Webasto GSM module can be either a standard factory solution called Thermo Call, or installation of modules from third-party manufacturers is allowed (for example, GSM module ALTOX WBUS-4, GSM module Starline M20, etc.).
Additional control of GSM modules can also be implemented through a special Thermo Call mobile application. A correctly selected non-standard or standard module allows you to start all Webasto heaters and autonomous reheaters that are supported by the original Webasto Thermo Test program.
Altox WBus-5 GPS
Webasto preheater control module from a mobile application, via SMS messages or calls. It is possible to control standard heaters. There is a function for determining the vehicle’s coordinates using satellites.
*the cost of the control with installation is valid subject to the installation of a Webasto heater. If the control is installed separately, the price will be higher.
Price with installation:* 15,000 rub.
204 liquid mob. phone nopreview
Altox WBus-4
Webasto preheater control module from a mobile application, via SMS messages or calls. It is possible to control standard heaters.
*the cost of the control with installation is valid subject to the installation of a Webasto heater. If the control is installed separately, the price will be higher.
Product is out of stock
Webasto has long become a household name, like the name “Xerox”, which is used to call all copy machines of any kind - this is a German manufacturing company Webasto AG, specializing in the production of pre-heaters used in cars. This brand became a pioneer in the car accessories section, for this reason, preheaters are named after it.
Launching Webasto from your phone
Using a special application, the system is linked to a number, and it is launched from SMS.
In this case, you cannot do without a GSM unit with an antenna. The device starts from an SMS message sent to a special number (it must be configured in advance). It is possible to link to five independent mobile numbers. This is a fairly expensive option, but it is convenient when sharing a car with several people. To date, applications have been developed for control from mobile devices and remote receipt of information about the alarm and temperature.
Webasto control panel.
Valid within a radius of 1 km from the car (the distance is reduced if there are obstacles on the way, for example, power lines). You can turn the device on/off and set the required operating time. This option is convenient if the parking space is close to you (near your place of residence and/or work). Suitable for forgetful car enthusiasts (you need to remember about the timer in time). Monitor the range of the Webasto remote control using the built-in indicator. It does not require special settings, as it immediately works at the required frequency.
For the control device, fasteners are installed on the dashboard. Be sure to study the symbols of the buttons before starting use (on startup, as a rule, a flame is shown - when it is pressed, the indicator lights up).
For remote start you will need a GSM module.
What is Webasto
Serves to warm up a cold engine and warm up the car interior. The device makes it easier to start the engine at low temperatures
and pre-heats the cabin, melting ice and snow stuck to the cabin before driving, and in the presence of difficult weather conditions.
The product is a small device installed in the engine compartment, the power system of which communicates with the car, and the cooling circuit is embedded in the engine cooling circuit. It is controlled using an electronic module connected to the machine’s on-board network.
How to start Webasto without a remote control?
If you lose the remote control, contact a service center or a specialized store for a competent replacement.
This remote device is necessary to switch modes of the Webasto device. Let’s say right away that you can complete the system at a car service center. With several incorrect start attempts, Webasto may become blocked. Try removing the fuse in the power circuit. If all else fails, you need the help of a specialist.
Keep in mind that after a long period of inactivity the device may malfunction, so first take the time to bleed the fuel system. Check the pipes for air in them. Its bubbles can lead to overheating of temperature sensors and subsequent emergency shutdown.
If the remote control is broken or missing, you can try to find a way to “bypass” the electronics. We do not recommend experimenting like this, as the device may fail.
How Webasto works
The heater is started by a program timer
located in the cabin, or
the remote control
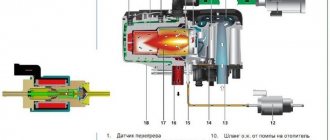
with which the device is equipped. The device operates as follows:
- Fuel from the tank enters the combustion chamber of the heater and heats the coolant of the heat exchanger.
- The circulation pump pumps heated liquid through the engine cooling circuit, due to which the engine itself and the interior heating radiator warm up.
The Webasto operation process is fully automated - its start and stop is subject to timer commands, engine and environmental temperature sensors. This solution allowed us to minimize fuel consumption to 0.5 l/h
, and the warm-up speed in a passenger car is reduced to 15 minutes at an outside temperature of -20 o C.
Webasto instructions
“Webasto” runs on a battery and uses fuel economically.
The device is placed in the engine compartment and is powered by a battery. The refrigeration circuit is connected to a similar element that serves the motor.
The system consumes fuel economically (approximately 0.5 liters/hour). At a temperature of -20 degrees Celsius, it will take about 15 minutes to fully warm up the car.
To understand the pre-start unit, we recommend studying the manufacturer’s operating manual and videos on the Internet.
An approximate description of the operating principle is given below:
- fuel is supplied from the tank to the combustion chambers of the device;
- the temperature of the cooling solution in the heat exchanger increases;
- the circulation pump turns on;
- the heated liquid flows to the engine;
- The radiator, internal combustion engine and interior are warmed up.
For automation, you can install sensors or a timer that activate the system under certain conditions.
First launch.
The system has two modes: summer and winter (the second option is usually set by default). In winter, set the device to “warm” mode. The handle of a four-stage fan is placed in the second position, and a three-stage fan in the first.
Then the heater operates automatically, thanks to the function of determining optimal efficiency based on sensor readings.
If necessary, you can adjust the settings manually (for example, adjust the intensity by rotating the thermostat knob).
How to use Webasto
You can appreciate the benefits of a preheater only if you use it, but before that you need to learn how to use it. Operating the device is quite simple, but to master it you need to know some features.
How to launch Webasto
By default, the device is set to winter mode. If you plan to use it, the standard heater is set to the “warm” position. With a three-stage fan, select the first division, and with a four-stage fan, select the second. If a malfunction occurs, the system is locked by the electronic locking function. the Telestart remote system.
or using a timer.
You should not turn on Webasto several times with a total usage time of more than 1 hour, as this will drain the battery
.
Launch Webasto from your phone
The best way to control the device is to start from your phone
.
To do this, you use a separately connected ThermoCall GPS unit (module with antenna), which costs about 14 thousand rubles, and allows you to control Webasto functions from your mobile phone by sending an SMS message to the number assigned to the device. The module allows you to control it from five independent phone numbers - this is convenient if the car is used by several family members. Webasto applications have also been developed for control from a smartphone and tablet, which receive feedback
with temperature data and alarm activation.
How to set the time on Webasto
Setting the time
is done by holding the “set” button while simultaneously pressing the “forward” or “backward” button, after which “set” must be released. The current time will be displayed with the corresponding symbol flashing. The setting itself is carried out using the “forward” or “backward” buttons, and the set time will be saved by pressing “set” or after the screen goes out.
Webasto control panel
The purpose of the device is to turn the device on and off while being up to 1 km away from it, and to set the duration of its operation. The remote control will be convenient for those drivers who store their car near their place of residence. Its use is more convenient than regular programming of a mini-timer, especially since many people forget to do this, and the remote control turns on the heating by simply pressing a button. The weakness of this control method is that obstacles, radio interference and power lines reduce the range of the remote control, which is indicated by an indicator showing the signal strength.
Setting the Webasto timer
This control option is the cheapest. The timer is placed in the cabin
on the front panel. With its help, you can set the moment of switching on at any time with an accuracy of 1 minute. and up to three switching points, of which only one can work. Webasto operating modes can be configured using a timer as follows:
- Manual activation - with the power button, the display will display the heating operation indicator and the time until the end of operation;
- Automatic switching on – when pre-setting the switching moment with the display of the heating or ventilation program number;
- Switching off – by pressing the switch off button or when the program time ends, the display goes off;
- Display the time by pressing the "" buttons. When the heater is running, the time until the end of operation is visible;
- Setting the moment of switching on. Press “set”, then within 10 seconds. use the “forward” or “backward” buttons to set the on time;
- Erasing a program – short press “set”;
- Selecting a program – press “set” for 10 seconds. until the number of the required program appears on the screen;
- Setting the operating duration is done by pressing and holding “set”, and additionally pressing “”, while the current time is displayed on the screen with the 5th symbol flashing. Press and hold “set” again, and additionally press “”, the operating mode and duration (flashing icons 4 and 7) specified by the corresponding program will be displayed. Using the "" buttons, you can set the required operating time, which is saved with the "set" button or after the display goes out;
- The remaining operating time can be adjusted in the range from 10 to 60 minutes. by pressing the "" buttons.
Understanding device functions
You will need to connect two devices: a minitimer and the main signaling unit. Unfortunately, there are no alarm connection points in the first of them. You can create such a point yourself, but first study how the heating is turned on “normally”.
The scheme discussed above is simple to implement. But it has a drawback - you have to disassemble the timer module. Other connection options also exist.
Here the yellow-blue and green-red wires are additional outputs. Our circuit, in turn, provides for connection to one additional output (to any), while it does not contain a relay.
It is necessary to distinguish between two different concepts: turning on the heating and autostart. Even the “complex” circuit developed by Starline does not contain an immobilizer bypass module. This leads to the conclusion: the operation of the immobilizer, which blocks the start, does not in any way affect the ability to turn the heater on or off. Perform a test run of heating to make sure the latter is true.
Webasto malfunctions and their elimination
If the heater has a standard or combi-timer, in the event of an emergency lockout, the screen will display a fault code, which may vary depending on the model of the device. The most common system of fault codes is the following:
- F 00 – control unit failure.
- F 01 – no flame or 2 unsuccessful startup attempts.
- F 02 – flame failure (repeat more than 3 times).
- F 03 – voltage deviation is higher or lower than permissible.
- F 04 – early flame detection.
- F 05 – short circuit in the flame sensor or open circuit (for gasoline).
- F 06 – short circuit in the temperature sensor or open circuit.
- F 07 – short circuit in the dosing pump or open circuit.
- F 08 – problem with the motor or impeller of the air blower.
- F 09 – short circuit in the glow pin or open circuit.
- F 10 – overheating.
- F 11 – short circuit in the heating limiter or open circuit.
- F 12 – heater is blocked (pull out and insert fuse).
- F 14 – incorrect position of the overheating sensor.
- F 15 – open circuit or short circuit in the control potentiometer.
After a malfunction occurs, all plug connectors and fuses
, if defects are detected, they are eliminated. So, the most common malfunctions are the following:
1. Automatic heater shutdown:
- Flame break during operation or lack of combustion after two starts. Eliminated by turning off the device for at least 2 seconds and turning it on again;
- The heater is overheating and the operation indicator is flashing. It can be eliminated after turning off and cooling the device by turning it on again, while the air duct must be checked for permeability;
- The onboard voltage is much lower than the permissible norm. This can also be eliminated by restarting the heater.
2. Black smoke coming out of the heater pipe. Indicates a clogged air duct or exhaust pipe. To eliminate this, pipelines are checked for permeability and cleaned or repaired.
If these measures fail to resolve the malfunction, you need to contact an authorized Webasto service center.
.
The Webasto heating system is an assistant that can increase engine life and the level of comfort for the car owner. Thanks to the capabilities of the device, problems with operating a car during cold periods are a thing of the past. But, to get the maximum effect, it is important to know how to use Webasto. Let us immediately note that in terms of operation everything is simple. The main thing is to know some of the nuances, which will be discussed in the article.
What is the essence of Webasto
In automotive circles, Webasto is a well-known heating system from a German brand, characterized by high quality and excellent technical characteristics. Today, the most popular Webasto models in Russia are the Thermo Top Evo-4 and Thermo Evo-5 systems.
The main and only difference between the models is power. For Thermo Top Evo-4 this parameter is 4 kW, and for Thermo Evo-5 - 5 kW. When choosing a preheater, it is important to focus on the engine size.
Considered as a whole, Webasto is a compact combustion chamber that is mounted in the engine compartment and combined with the car’s cooling system. The engine warms up thanks to antifreeze, which circulates through the cooling system using a pump through the radiator. In addition, the pre-heating is connected to the interior heating, which turns on the fan.
If you figure out how to use Webasto and configure the device correctly, then by the time the driver arrives at the garage (parking lot), the engine will already have warmed up. At the moment of starting, the engine will be warm, which allows you to avoid wasting time on warming it up. As a result, the load is removed from the engine and its service life is extended. It's no secret that a cold start in winter is equivalent to 100 thousand kilometers.
It is worth highlighting one more advantage regarding the comfort of using a car in winter. The Webasto system heats the interior and maintains the optimal temperature. This solves many problems - with fogged windows, a cold steering wheel, an “icy” seat back and frozen fingers.
Of course, for additional comfort a small “fee” is charged, equal to 0.5-1.0 liters per hour of fuel. In practice, this feature is compensated by a decrease in fuel consumption in cold weather. To operate Webasto, energy is used from the car's battery. Voltage from the power supply is supplied to the fan and other devices. The car owner’s task is to monitor the serviceability of the unit and recharge it in a timely manner. If you keep the battery charged, then there will be no problems using Webasto.
How to control the heating system
To understand how to use Webasto, it is important to understand the principles of its control. There are three options - through a timer, remote control and mobile phone. Each of them requires detailed consideration.
This is the most convenient and affordable (price) way to activate the system. The average price of a mini-timer is about three thousand rubles. The unit is mounted inside the car and is activated at a time specified by the car owner. In this case, the owner must program the device in advance, taking into account the operating features. It all depends on the time you leave for work and your wishes regarding the time it takes to warm up the engine. The last parameter can be from ten minutes to an hour. Webasto can be turned on manually using a special button installed in the car.
The remote control device costs about 10,000 rubles. The task of the remote control is to turn Webasto on and off from a distance. The range is up to one kilometer. The operating time of the device can be set remotely. This option is suitable for car owners who leave their vehicle near their home.
Having figured out how to use Webasto using a remote control, you can significantly simplify your life. Controlling the system using the remote control is more convenient than constantly programming a mini-timer. Many people simply forget to configure the device every time, which is why problems arise.
With the remote control everything is simpler - Webasto starts by pressing one button.
But it is worth highlighting one disadvantage of such management. If there is radio interference, electrical wires, or other obstacles in the range between the remote control and the receiving device, the operating range of the remote control will be reduced. To avoid problems, it is important to monitor the signal level (shown on the display).
At the end of the article, watch a selection of videos.
CELLULAR TELEPHONE
The most advanced and convenient control method is using a mobile phone, which is always at hand. How to use Webasto in this case? A prerequisite for operation is the connection of a GPS unit of the ThermoCall type. The price of the device is 14,000 rubles. Control is done via mobile phone. The user has access to all the functionality of the preheater. Activation of the system is possible from any place where there is a connection. All that is required is to send an SMS message to the number attached to your car’s system.
If necessary, Webasto control functions can be given to five more people. So, if the car has several drivers, each of them will be able to control the system through their personal cell phone. This option is convenient in situations where the whole family uses the car.
The GSM device includes a module equipped with an antenna. During the installation process, a place in the cabin is selected, near the heater. The advantage of the module is that it is invisible to outsiders, so it does not spoil the interior and is protected from theft.
To operate Thermo Call, you need a SIM card, which is inserted into a special slot. It must be purchased separately.
A big plus is the availability of Webasto applications for tablet devices and smartphones. To purchase an application, just go to GooglePlay or iTunes, download the program, and then make a payment. The software capabilities allow you to control the operation of the heater and receive data on the device’s status via SMS message. Data about the interior temperature, the fact that the alarm was triggered and other parameters are received via text SMS. Even a novice user can figure out how to use Webasto using the application.
Subtleties of Webasto operation
Along with the heater, instructions are supplied that describe in detail the rules for using the system. The main requirements include the exclusion of mechanical impacts on the device, exceeding permissible humidity and temperatures. In addition, the system is resistant to electrical discharges, water and caustic substances.
To avoid suffocation, do not use Webasto in unventilated areas. In addition, it is not recommended to turn off the system when visiting a gas station. If smoke, a suspicious odor or noise appears during operation, then it is worth blocking the operation of the device and finding out the reason. Disabling is carried out by removing the fuse from the connector, after which the heater itself is sent for repair.
An important point is the type of fuel used to operate the device. It must comply with the manufacturers' recommendations. A similar requirement applies to antifreeze. Every month the system should be turned on with a cold engine and at minimum fan power. After activation, the device must operate for at least 10 minutes. This measure is preventative and is intended to maintain the system in working order. It is also recommended to take the heater to a service center once a year to check its functionality.
Many car owners who do not know how to use Webasto turn it on several times in a row. This is prohibited. The optimal operating time is up to 60 minutes. Otherwise, there is a risk of battery discharge. After the system is turned off, the engine remains running for several minutes. The Webasto heater can operate in 2 modes:
- Winter. Here the device’s action is aimed at heating the interior. At the same time, the main task of the system is to heat the antifreeze.
- Summer. The main emphasis of this mode is on interior ventilation. Webasto's task, in this case, is to turn on the fan.
First start of the heating system
By default, the Webasto system is configured for winter operation. To use the heater in this mode, turn the car’s standard heater to the “Warm” position. If the vehicle is equipped with a 3-stage fan, place it on the first stage, and if it is equipped with a 4-stage fan, place it on the second. If any breakdown is detected, block Webasto using a special electronic blocking option.
The advantage of the heater is the ability to automatically perform its functions. The system controls the level of fuel consumption and ensures safe operation (several levels of protection are provided). Before using Webasto, just select the optimal mode.
An important feature of the Webasto heating system is its versatility and flexibility, which allows you to quickly select a configuration taking into account the make and model of the car. The functionality of the device covers the needs of the car owner, regardless of the size of the car. Thus, Webasto copes “excellently” with warming up a minibus, SUV or minivan.
Thermostat
A thermostat is installed inside the car, allowing you to regulate the activity of the heating device. The system turns on after turning the knob to the right. Then the heating works automatically - it regulates the operation of the heater, taking into account the temperature difference. Subsequently, you can increase the heating level, for which the mentioned knob must be turned further, clockwise. The serviceability of the heater is monitored by an indicator mounted on the thermostat.
Multi Comfort control panel
A special feature of the Webasto control panel is several operating modes (there are four or five, depending on the modification). For example, there is a turbo mode, as well as a mode that allows the heater to operate at high altitudes (from 1200 m above sea level). Remote control of the device via a cell phone is also allowed.
The “Multi Comfort” panel works in cars with an on-board voltage of 12/24 Volts. The panel regulates the temperature in the range of 5-30 degrees. Also in the control system there is a device that determines blink codes of breakdowns.
Through the panel, you can increase the heating power by 10%, which is important when operating a car in severe frost conditions. Another plus is the ability to connect Multi Comfort to the remote control, with subsequent control of device options from a distance.
What to do if the Webasto starter key fob is lost?
You can program a timer, for example, on weekdays at 8 am to turn on the heating. This solution is not universal, because plans can change (at least there is a risk of oversleeping). Look for standard key fobs on sale. In some cases, others may also be suitable - this needs to be checked. You can buy a used remote control from Webasta, but it is difficult to assess its condition at first glance. You can link the “new thing” to the system by pulling out the fuse:
- take out FB5 in the trunk;
- return it back;
- press the power button for 2-5 seconds;
- check the operation of the unit.