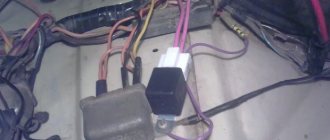
Almost all cars are equipped with electronic or electromagnetic relays. The fact is that devices that tend to consume too much current can easily burn the contacts, which disrupts the operation of the device itself. To prevent this from happening, relays began to be used in cars. In this article we will reveal what the low and high beam relay is, how to find out if it is faulty and how to replace it?
What is the headlight switch relay and where is it located?
A relay is an electrical device designed to switch or protect electrical circuits. In the electrical equipment of a car, these are important elements, without which the operation of many electrical appliances becomes impossible. The fact is that the battery and generator are sources of high current. As the current in the circuit increases, the temperature of the conductors also increases. This has an unfavorable effect on the switch contacts, which simply burn out. The contact surface area of the contacts is disrupted, which means the electrical resistance increases. As a result, the electrical appliance does not work.
Reducing the current is only possible when using batteries with low voltage. However, low voltage currently does not allow starting the engine and operating many consumers, so this method is unacceptable.
The solution to the problem is the use of special relays. When the contacts of the switch of the electrical receiver are closed, the relay is the first to receive current, which reduces the current strength and closes the electrical circuit with its contacts. Older cars used electromagnetic relays, the main element of which was a coil with a core. Gradually, they were replaced by electronic relays built on semiconductor elements.
.
Volkswagen Passat Variant 1993, 115 l. With. — electronics
Cars for sale
Volkswagen Passat, 1992
Volkswagen Passat, 1992
Volkswagen Passat, 1989
Volkswagen Passat, 1988
Comments 33
Are there two relays for each headlight? or one assembly with two relays for both headlights?
Good day. I want to stir up this idea. Everything is clear in the diagram, but I have a question... how did I connect from under the steering switch? Or should I connect those ends that go from the passenger compartment to the relay?
Precisely those ends of the wires that come from the switch in the cabin.
Tomorrow I will start this procedure. Thank you very much. not a nail or a rod)))))
Thanks for the report, I need to do the same for myself when it gets warmer outside.
there was a topic about installing a relay in the cabin from the steering column, apparently because of this... www.drive2.ru/cars/volksw...urnal/288230376152608517/
I didn’t understand this topic - headlights with dimensions immediately turn on themselves when turned on. ignition? If so, then I rule it out - install it according to my scheme and don’t worry about it. Or do the headlights stay on when you turn on the headlights? If that's the case, at least it should be for me. If it were otherwise, then when installing the DRL there would be two connection options, either to the low beam or to the headlights with a four-leg conventional normally connected relay
Well, since your dimensions remain lit separately, and the light works from the switch as it was, I’ll probably install relays under the hood.
They say that after installing the relay on the headlights, the headlights do not always work?
Rave! Why did it happen? The diagram does not intersect with the dimensions anywhere.
where the alterations were made, everyone says that when the headlights are turned on, the near one turns on immediately... so I’m interested...
This cannot be! The power circuit of the headlights breaks and one end goes to control the relay, and the other end of the power circuit goes from the battery to the headlight. Where is the connection with dimensions? Most likely, whoever tells you this went some other way, according to a different connection scheme. This is excluded here.
and I installed all the relays without removing the wires under the hood.
Is there a report? The space in the fuse box is small, and I don’t have much time to go in there and sort everything out.
Source
Basic relay faults
Relay malfunctions can be judged if the headlights suddenly stop working. First of all, you need to check the fuse responsible for this electrical circuit. If it does not burn out, the lamps are checked using a direct connection to the battery. Usually, if all the lamps refuse to work, then we can confidently assume that the problem concerns only the light relay.
All cars use two relays. The first is responsible for the operation of the low beam headlights, the second ensures the operation of the high beam. The inclusion of side lights can be controlled either by a separate relay, or connected to one of the other two. During the process of switching the light, the operation of the device is accompanied by a characteristic click, which indicates the operation of the device and that the light has actually switched.
What are fog lights for?
In general, the diagram for connecting headlights via a relay looks like this: To avoid any misunderstandings, if option 2 is implemented, when the wire from the steering column switch breaks, it looks like this in accordance with the diagram above. The solution to the problem is to decouple the power supply and headlight control circuits through a relay.
This way you will significantly increase the service life of your headlights and ensure their high safety when driving on rough terrain.
Using the same principle, the relay is installed on any other electrical consumers in the car.
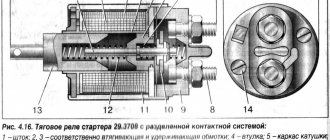
I will focus on implementation option 2. After modification, a weak control current begins to pass through the contact group of the lock, and the relay connects powerful power to the starter. The second installation option It will be much easier for car owners whose bumper already has space for mounting fog lights.
Connection diagram for fog lights Let us immediately note that the simplest PTF connection diagram is to connect the fog lights from the battery through a switch. I took a block from a gazelle and made a bracket for it. The signal to turn on the low or high beam is taken from the headlight connector, usually the left one.
How to change the headlight relay with your own hands?
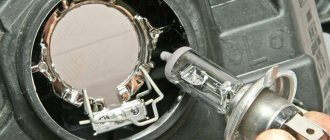
If the low beam does not work, find the relay of the appropriate nomenclature and pull it out. The installation of the relay depends on the make of the car. In some, a special mounting block is provided for this, and in early cars the relay is attached to the body by means of a “ground”. If in the case of the first everything is clear, then the second must first be freed from the contact wires, then the mass must be unscrewed. Before carrying out work, be sure to disconnect the negative terminal of the battery.
In place of the low beam relay, install another relay, for example, high beam and check the functionality of the optical device. If the low beam works, then the relay needs to be replaced. This is done quite simply: a new one is installed in place of the old one and connected, similar to the old element.
The same check can be carried out in relation to other modes of operation of the vehicle optics. When conducting diagnostics, the most important thing is to pay attention to the designations and markings of devices. If the current values differ markedly, then it is not allowed to check the functionality of the low beam using the high beam relay. In this case, it is best to purchase a new one and try to turn on the low beam using it.
If, after changing the relay, the low beam still does not work, it means that the relay is working properly and the problem should be looked for in the wiring, circuit protection devices, or in the lamps themselves for the corresponding light operating mode.
That's all you need to know about the low and high beam relays. As you can see, diagnosing and replacing devices is not difficult, and therefore you can do without an auto electrician and save a certain amount. We wish you good luck on the roads!
Connecting headlights via an additional relay
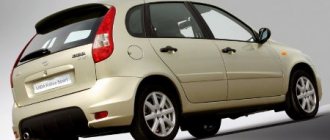
Representatives of the “classic” VAZ series and, above all, the VAZ 2101, continue to faithfully serve their owners, but time takes its toll and over the years, these quite successful and reliable cars begin to show “childhood illnesses” associated with design flaws. This fully applies to the not very successful headlight connection scheme, as a result of which, over time, the quality of road illumination significantly deteriorates, energy losses occur and some electrical connections simply overheat dangerously. In general, this is a rather unpleasant problem, but it can be easily solved by including an additional relay in the power supply circuit for the headlights of a VAZ 2101 car, and this work can be done in several ways.
Connection with placement of relays and other circuit elements under the hood of the car (using an additional fuse box)
To implement this option, you will additionally need a sufficiently powerful wire with a cross-section of at least 2.5 mm, standard “eye” type terminals and contacts of both “male” and “female” options. In accordance with the available equipment, it is possible to connect the terminals to the wire either by crimping or soldering. The necessary insulation of the joints is carried out using a heat-shrinkable tube of the appropriate diameter.
1 – headlights; 2 – additional fuse block; 3 – signaling lamp for turning on the high beam; 4, 6 – headlight control relay; 5 – block with steering column switches; 9 – battery.
We connect the circuit as follows:
- We place two (if there are fog lights -3) relays under the hood in the free space of the right mudguard;
- We take power for the relay directly from terminal “30” of the generator (pink wire);
- We connect terminals 85 of each relay with a wire to an “eye” type terminal with the nearest reliable body ground;
- From terminals 87 we lay wires to the fuse block (fixed there under the hood), and do not forget to install jumpers between the pairs in accordance with the diagram;
- We connect the wires from the headlights to the free terminals of the fuse box (left side in the diagram), being careful not to confuse the high beam with the low beam. Among other things, we connect a wire to one of the terminals related to the high beam, which we then extend into the cabin to the high beam indicator lamp;
- We also lay the wires from the control contacts of each relay through the technological holes into the passenger compartment to the steering column switch block, where we connect them to the high beam circuit (blue and gray with red wires);
- After removing the remaining wire from the cabin fuse block, in addition to everything else, we have at our disposal four unused fuses (3, 4, 5, 6) that can later be used for other needs.
Option with relay placement in the cabin under the instrument cluster
- In this case, first of all, we look for blue, gray and red wires on the terminal block of the steering column switches (they come from the fuse block) and switch them from the block to the terminals of 87 additional relays. This action will provide power to the fuse box (in the main diagram - circuits highlighted in pink and brown). Before disconnecting the wires, we make the appropriate marks on the block so as not to get confused with further connections (the blue wire refers to the high beam);
- We connect the wires going to terminals 86 of the relay to the vacant spaces on the block of the steering column switches, trying not to confuse the high and low beam;
- The power connected to terminals “30” can be taken from the ignition switch, or by pulling the wire directly from the battery.
It should be noted that the second one is somewhat simpler to implement (there is no need to pull additional wires from the engine compartment to the passenger compartment). In addition, when placed in the cabin, the circuit elements are in more comfortable conditions (contacts and connections oxidize less), which means you can count on more reliable operation of the circuit.
By the way, a similar method of improvement is fully suitable for some other brands of cars, in particular, it allows you to modernize the low beam circuit of VAZ cars of the subsequent “classic” series, as well as improve the headlight power supply circuit on the Volkswagen passat b3.
Tags relays, headlights, vases
Similar materials
Benefits of installing the system
First, we will look at the main advantages that using automatic light switching options gives us:
Convenience Now you will not forget to turn on the lights, and you will not be fined by the traffic police. As practice shows, the majority of such offenses are committed precisely because drivers forget to turn on the lights when starting to drive. In addition, you will not have to be distracted, you will know that the system works automatically at a certain point in time. Preserving the battery. As practice shows, very often after finishing driving, drivers forget to turn off the lights, as a result of which the battery runs out. If such cases are repeated periodically, the battery will run out building very quickly. The presence of such a system allows you to eliminate such troubles, because the shutdown will also be done automatically. Ease of work You can easily implement any of the options described below with your own hands, the installation instructions are simple and clear, so you can do it without outside help, especially since it’s included in the package includes all elements necessary for installation. The main thing is to be careful and use only high-quality connection methods; twisting and electrical tape are unacceptable. Low costs. The price of the required elements is low, so you will not incur large expenses. The most important thing is to choose a high-quality option that will ensure good system operation
Important! The big advantage is that you can customize the operating features of the system to suit yourself, this allows you to use devices of this kind on almost any car model.
What will you need to install fog lights?
To install fog lights yourself, a minimum set of tools is required. The car owner must have knowledge and skills in working with electrical wiring, since the safe operation of the car as a whole depends on the correct installation.
- color electrical diagram of the car;
- nippers or side cutters;
- wire cleaning knife;
- terminal crimping pliers (terminal block);
- soldering iron
Set of materials required for installation:
- a set of fog lights suitable for installation in standard holes in the bumper or universal ones that are mounted on the surface of the bumper;
- stranded copper wire with a cross-section of 1.5-2 mm² with insulation capable of operating at low temperatures and resistant to gasoline and oil vapors;
- relay for turning on (standard headlight turn-on relays from front-wheel drive VAZ models are usually used);
- remote housing for installing a blade fuse;
- 30 A blade fuse;
- a control key that matches the interior design (preferably with a backlight);
- connectors and terminals for connecting wires to circuit elements;
- heat shrink tube of suitable diameter;
- electrical tape on a polyethylene or fabric basis;
- plastic ties;
- automotive corrugated hose for laying wires.
Set of fog lights for Ford Focus 3
Requirements for installing fog lights
It is permissible to locate fog lamps directly in the headlights.
The rules for installing headlights are regulated by two regulations:
- GOST 8769-75 or SEV standard 4122-83;
- state standard of the Russian Federation GOST R 41.48-2004, corresponding to UNECE Rules No. 48.
Location of fog lights on a car