2163-11-02-02-06
...and remove the headlight bulb from the headlight housing.
...and remove the headlight bulb from the headlight housing.
...and remove the headlight bulb from the headlight housing.
Attention! The headlight lamp is halogen. Do not touch its glass bulb, as fingerprints will cause the lamp to darken when heated. You can remove dirt from the flask with a clean rag soaked in alcohol.
Install the new H4 headlight bulb in the reverse order.
Replacing the turn signal lamp
About related faults
A lighting device for any purpose that refuses to perform its function can signal to the owner of the Lada Largus that the fuse is faulty. If it is discovered that the jumper in the fuse link has burned out, then such an element requires unconditional replacement, which also means replacing the marker light bulb. This is quite easy to do. The mounting block is located on the left edge of the interior panel in close proximity to the unit for switching the modes of lighting devices. Here are the inserts numbered F1 - F39. Fuses numbered 9 and 10 are responsible for ensuring the operation of the low and high beam, respectively for the left and right headlights of the Lada Largus car.
Insufficient contact at the terminals in the fuse block can also cause problems with the normal functioning of the head optic components.
Important! When installing the lamp, do not allow your fingers to touch the glass bulb, since marks can significantly reduce the effectiveness of the product and lead to its premature failure.
There may be cases of premature burnout of the contact inside the lamp itself or banal oxidation of contacts with the ground. The last option can be easily eliminated. To do this, it is necessary to thoroughly clean the contacting surfaces of the cable lugs. A wire brush will do. If these methods do not give the desired result and the functionality of the Lada Largus lighting devices is not restored, then you will need to contact professionals for a more thorough diagnosis of the causes of the malfunctions and their subsequent elimination.
2163-5-13-12-05
Turn the lamp socket clockwise (for the right headlight - counterclockwise) and remove the socket together with the lamp.
Turn the lamp socket clockwise (for the right headlight - counterclockwise) and remove the socket together with the lamp.
Turn the lamp socket clockwise (for the right headlight - counterclockwise) and remove the socket together with the lamp.
What to choose for replacement
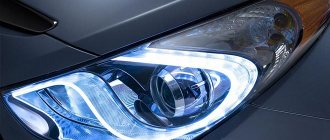
The standard factory installation is a halogen H4 light bulb on Largus. However, the modern car market offers alternative options for daytime car optics. There are three analogues:
Xenon ones have a bluish glow, which is inconvenient in cloudy or rainy-snowy weather. Halogen units shine brightly and warmly. They are a common installation option, although they are inferior in power to other analogues. The advantage of LED elements is that they can store energy for a long time at high power.
2163-5-13-12-07
By pressing the lamp, turn it counterclockwise and remove it from the socket.
By pressing the lamp, turn it counterclockwise and remove it from the socket.
By pressing the lamp, turn it counterclockwise and remove it from the socket.
We replace the burnt-out PY21W turn signal lamp with a new one.
Replacing the side light bulb
Before replacing the side light bulb, it is more convenient to first disconnect the wire block from the turn signal lamp socket (see above).
How to replace
After choosing a light bulb model for Largus, new components are purchased.
It is not recommended to use used cartridges and fuses: during long-term storage, electrical wiring contacts, terminals and adjacent components oxidize.
Required components to replace the front low beam lamp:
- car lamps;
- circuit breakers;
- cartridge;
- tools (screwdriver, pliers, etc.).
To begin with, the car's electrical network is disconnected from the power supply (battery), then the burnt-out part is removed.
2163-5-13-12-02
...and remove the lamp socket from the headlight housing.
...and remove the lamp socket from the headlight housing.
...and remove the lamp socket from the headlight housing.
We remove the baseless W5W side light lamp from the socket and replace it with a new one.
[How to save on maintenance of Lada Largus] [Maintenance of Lada Largus at 15,000/45,000/75,000/105,000 km] [Maintenance of Lada Largus at 30 thousand km] [Maintenance of Lada Largus at 60 thousand km of run] [Maintenance of Lada Largus for 90 thousand km of run] [Maintenance of Lada Largus for 120 thousand km of run] [Independent maintenance - general recommendations] [Safety rules for self-carrying out maintenance] [Tools required for carrying out maintenance Lada Largus maintenance] [Lamps used in the Lada Largus car]
Changing the lamps in the Lada Largus headlight
Largus Replacement Low Beam Bulbs
Low beam lamps on a Lada Largus car are a short-lived element, so sooner or later they will be replaced by car owners. For beginners, this task usually raises many questions. Therefore, below we will look at how to choose and how to change the low beam in Largus.
Replacing a light bulb
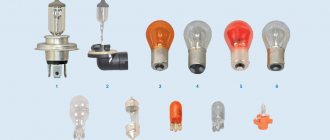
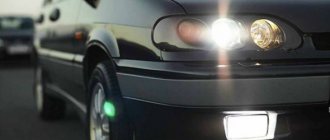
First of all, it should be said that the Lada Largus light beam uses the H4 halogen standard, that is, it has two filaments and is responsible not only for the low beam, but also for remote lighting.
Currently, you can find lamps from different manufacturers on the market, among which are the following:
In addition, the lighthouse bulb has performed well recently. Their advantages include not only low price, but also good quality.
Of course, when choosing lamps, you need to pay attention not only to the brand, but also to the following characteristics of the light element:
Standard halogens provide an unnatural yellowish glow. However, recently light bulbs with a blue glow have appeared. People call them pseudo-xenon.
However, it should be noted that such light illuminates the road only in dry weather. In fog or rain, ordinary lamps are preferable.
Moreover, in bad weather, the latter are even inferior to expensive “xenons” and “LEDs”, whose light beam power is one and a half to two times higher than that of halogen lamps. This is due to the fact that the light of these elements has insufficient penetrating power.
The note! Contact a service center to install xenon and halogen lamps, as this requires the installation of additional equipment and software changes.
- Thus, each driver can choose the most suitable light bulb, taking into account his financial capabilities and the conditions in which the car will operate.
Replacement procedure
Replacing the low beam lamp on Lada Largus is carried out in the following order:
- Work should begin by disconnecting the battery terminal.
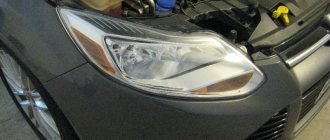
- Then remove the cover on the back of the headlight. To do this you need to turn it slightly.
- Then disconnect the device from the contacts by pulling it by the housing.
- Then remove the spring retainer with your finger. After this, it is easy to remove the bulb from the headlight, since it no longer holds anything.
- Next, the new light bulb must be replaced. It is best to do this work with gloves so as not to touch the glass flask with your hands. The fact is that greasy marks can lead to rapid burnout of the lamp.
- Then you need to secure the base using a spring clip, place the block on the contacts and then replace the plug.
- At the end of the operation, connect the battery and check the headlights.
Adviсe! It is advisable to replace light bulbs with two lamps at the same time to ensure even illumination and prevent the second lamp from burning at the most inopportune time.
This completes the low beam bulb replacement in Largus. As you can see, this operation is extremely simple.
Some troubleshooting methods
If, after replacing the lamp, the flashing light on the Lada Largus still does not light up, the cause of the problem may be a faulty fuse. Replacing them is even easier than the tabs, since they are located in the cabin, on the left side of the steering column.
Two beams are responsible for low beam:
- F9. left headlight.
- F10. right headlight.
The note! Even if the fuse is not visually damaged, it is necessary to replace a new one.
A poor connection is often the cause of a malfunction. In this case, they just need to be cleaned.
It should be noted that for the Lada Largus there is no closed relay, therefore, if replacing the fuses did not produce any results, you only need to check the contacts on the headlight, which may catch fire or oxidize.
Often the light disappears due to poor contact of the machine's ground wire. In this case, the problem is also solved by thoroughly cleaning the contact. If the light does not light, contact a service center for assistance.
Replacing low beam bulbs with Largus bulbs, which are also high beam bulbs, does not require removing the headlights or other components, so it is quite simple. However, you will first need to purchase new lighting elements based on the selection information above.
Source: https://vivauto.ru/largus-zamena-lampochki-blizhnego-sveta/
Daylight
If the optics on the Lada Largus are faulty, replacing the light bulb will require the following algorithm:
- The rubber pad is removed, which serves as protection for the electrical unit.
- The block with the installed wires is removed.
- The U-shaped lock moves (moving to the side and back).
- The electric lamp is pulled out.
- The detail changes.
It is important to remember the orientation of the cartridge - two teeth at the top, one at the bottom.
How to replace a Largus lamp:
- When installing, hold the lamp by the base or use microfiber, otherwise marks will remain on the electrical appliance and it will burn out faster;
- Repeat all the above steps to remove the optics in reverse order.
It is recommended to replace both bulbs at the same time. This will prevent unexpected overheating of the remaining part and ensure the same light beam parameter.
Conclusion
You need to make it a rule to regularly change not only the lamps, but also monitor other lighting elements. After all, the process of reducing their brightness occurs slowly and the driver simply does not notice the deterioration in road lighting.
The side lamps for a Lada Largus car are very dim bulbs, so after they burn out or even without waiting for it, you can replace the side lamps with LED ones! The LED light bulb is very bright and economical! The price is for 1 piece. T-10 lamp socket. Also, this light bulb can be installed in the ceiling lamp, in the glove box, trunk lamp, room lighting, wherever the T10 socket is used.
During operation, observant owners of the universal LADA Largus model noticed frequent failure of low beam lamps in the head optics. This places this unit in the category of short-lived components and therefore requires replacement of the low beam lamp. The manufacturer is aware of the presence of this defect and is making promises to eliminate it as soon as possible. While this is being done, owners need to have knowledge of how to replace the low beam lamp themselves.
How to choose a lighting element?
The standard version of the configuration provides for the use of halogen lamps with an H4 base. This device contains two threads, each of which is responsible for its own light (naturally, near and far). Today's auto accessories market is able to offer its customers several analogue lamp options, structurally based on the following technologies:
Advice! When choosing lamps for your LADA Largus, lean towards the offers of specialized trading entities. The market is full of cheap analogues with Chinese ancestry. They cannot boast of reliability, and the effectiveness of such products is negligible. A useful point here would be to take into account the light characteristics of the lamp.
The most efficient lighting components are diode products. They can be installed not only as low or high beam devices, but also as marker optics or turn signals.
Note that an important advantage of a lamp using diode technology is its high ability to save energy. This factor is directly dependent on the manufacturer and the quality aspects of the product.
Important! During replacement, we remember their location, which will prevent incorrect installation and the need to repeat this manipulation.