On VAZ 2106 cars, the main electrical equipment, which consumes a large current during operation, is connected via a relay. Such devices include the car's headlights, which provide low and high beams.
The main reason why the low and high beams of the VAZ Six may stop working is precisely the burnout of the relay responsible for this electrical equipment. Therefore, in today’s article we will tell you about the reasons for failure and methods for checking and replacing this important element of the car.
Relay for low and high beam VAZ 2106 - what it is responsible for
A relay is an electrical device designed to switch or protect electrical circuits. In the electrical equipment of a car, these are important elements, without which the operation of many electrical appliances becomes impossible.
A node such as a relay is a kind of switch that allows, using low-current nodes (buttons and switches), to turn on high-current nodes (in our case, the headlights of a car). If this unit did not exist, the button could simply melt due to high load, so the importance of the relay is very great.
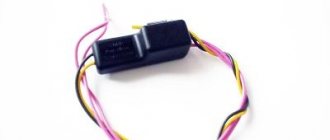
In the photo: Most VAZ 2106 relays look something like this, the size and position of the contacts may differ slightly
Where is the low and high beam relay located on the VAZ 2106
Most of the relays, as well as the voltage regulator, are located in the engine compartment.
Location of the VAZ 2106 relay in the engine compartment
If it fails, it is recommended to replace the relay assembly, since if the winding is burned out, or the relay contacts are severely burnt, it is difficult to properly restore its functionality.
This is how the VAZ 2106 relays are located in the engine compartment: 1 – battery charge indicator relay;
2 – relay for turning on the high beam headlights; 3 – relay for turning on low beam headlights. The relay for turning on the high and low beam headlights and the relay for turning on the radiator fan of the engine cooling system are of the same type (90.3747-10 or 113.3747-10), are interchangeable and are replaced in the same way
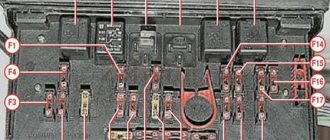
Old model VAZ 2107 fuse diagram
The “old” fuse box has 17 fuses. Each of them protects one or more electrical circuits
| F1 (8A/10A) | Rear lights (reversing light). Reverse safety device. Heater electric motor. Heater fuse. Warning lamp and heated rear window relay (winding). Electric motor for rear window cleaner and washer (VAZ-21047) |
| F2 (8/10A) | Electric motors for wipers, windshield washers and headlights. Relay for wipers, windshield washers and headlights (contacts). Wiper fuse VAZ 2107 |
| F3/4 (8A/10A) | Reserve |
| F5 (16A/20A) | Rear window defroster heating element and its relay (contacts) |
| F6 (8A/10A) | Cigarette lighter fuse for VAZ 2107. Socket for portable lamp |
| F7 (16A/20A) | Sound signal. Radiator cooling fan electric motor. Fan fuse for VAZ 2107. |
| F8 (8A/10A) | Direction indicators in hazard warning mode. Switch and relay interrupter for direction indicators and hazard warning lights (in hazard warning mode) |
| F9 (8A/10A) | Fog lights. Generator voltage regulator G-222 (for car parts) |
| F10 (8A/10A) | Instrument cluster. Instrument panel fuse. Indicator lamp and battery charge relay. Direction indicators and corresponding warning lamps. Indicator lamps for fuel reserve, oil pressure, parking brake and brake fluid level. Voltmeter. Instruments of the carburetor electro-pneumatic valve control system. Parking brake warning light relay |
| F11 (8A/10A) | Brake light bulbs. Lamps for interior body lighting. Brake light fuse. |
| F12 (8A/10A) | High beam (right headlight). Headlight wiper relay activation coil |
| F13 (8A/10A) | High beam (left headlight) and high beam indicator lamp |
| F14 (8A/10A) | Side light (left headlight and right rear light). Indicator lamp for turning on the side light. License plate lights. Engine compartment lamp |
| F15 (8A/10A) | Side light (right headlight and left rear light). Instrument lighting lamp. Cigarette lighter lamp. Glove compartment lamp |
| F16 (8A/10A) | Low beam (right headlight). Headlight cleaner relay switching coil |
| F17 (8A/10A) | Low beam (left headlight) |
Common causes of failure
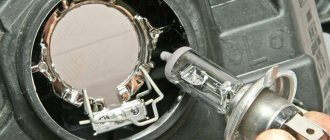
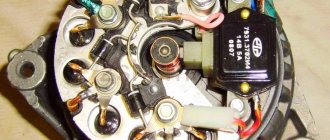
In the photo: VAZ 2106 headlight high beam relay
Most often, the low and high beam headlight relay on a VAZ 2106 car fails for the following reasons:
- When the battery is working properly, there is no charging current, which is why it does not charge. This happens when the wires are poorly connected to the relay terminals or when the circuit from the generator to the battery is broken. Eliminated by fixing the wire in the circuit, checking and adjusting the voltage regulator and relay regulator.
- Insufficient charging current with a discharged battery or high current with a fully charged battery is caused by a malfunction of the voltage regulator. It can be eliminated by adjusting the device or replacing it.
- Burning and burnout of lamps with excessive heat occurs when the adjustment of the relay regulator is violated or the contacts are closed. Eliminated by disconnecting and cleaning the closed contacts, adjusting or replacing the voltage regulator.
- High discharge current after stopping the motor. Occurs when the relay-regulator contacts close (contacts sintering, armature spring breaks) or the electrical wire short circuits. It is repaired by finding and eliminating a short circuit with the battery disconnected, checking and adjusting the current limiter, opening and cleaning the contacts, replacing the spring and adjusting its clearance and tension.
External signs of a breakdown of the VAZ 2106 light relay include the following aspects:
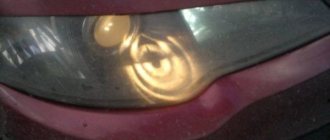
- The low and high beam headlights stopped working.
- Dimensions and turn signals stopped working
A malfunction in the relay is one of the reasons why the car’s electrical equipment has stopped working.
And there may be several reasons for its failure:
- failure (burnout) of the contact plates inside the relay (popularly called “nickels”), reduction in their contact area, “sticking”;
- breakage (burning) of the retracting and/or holding winding;
- deformation or weakening of the return spring;
- short circuit in the pull-in or holding winding.
If you find at least one of the listed signs, then the next step to fix the problem is to conduct a detailed diagnosis.
VAZ 2106 diagram
1 — side direction indicators; 2 — sidelights VAZ-2106; 3 — external headlights; 4 — internal headlights; 5 — sound signals; b — electric motor of the VAZ 2106 engine cooling system fan; 7 — sensor for switching on the electric motor of the VAZ 2106 fan; 8 — relay for turning on sound signals; 9 — relay for switching on the VAZ 2106 fan electric motor; 10 - voltage regulator; 11 — ignition coil VAZ 2106; 12 — electric motor for windshield washer; 13 — sensor of insufficient brake fluid level; 14 — ignition distributor; 15 — electric motor of the windshield wiper; 16 — spark plugs VAZ 2106; 17 — oil pressure warning lamp sensor; 18 — oil pressure indicator sensor; 19 — coolant temperature indicator sensor; 20 — engine compartment lamp; 21 — solenoid valve of the VAZ 2106 carburetor; 22 - generator; 23 — starter; 24 - battery; 25 — battery charge warning lamp relay; 26 — relay for turning on low beam headlights; 27 — relay for turning on the high beam headlights; 28 — windshield wiper relay; 29 — additional fuse block; 30 - main fuse block; 31 — reverse light switch; 32 — parking brake warning lamp switch; 33 — plug socket of a portable lamp; 34 — relay-interrupter for direction indicators and hazard warning lights; 35 — heater electric motor; 36 — brake light switch; 37 — rear window heating relay*; 38 — heater motor resistor; 39 — glove box lighting lamp; 40 — external lighting switch; 41 — rear window heating switch*; 42 — ignition switch VAZ 2106; 43 — low-high beam switch; 44 — direction indicator switch; 45 — horn switch; 46 — wiper switch; 47 — windshield washer switch; 48 — switch (controller) for instrument lighting; 49 — alarm switch; 50 - cigarette lighter; 51 — heater switch; 52 — brake fluid level warning lamp; 53 — switches for alarm lights of open front doors; 54 — alarm lights for open front doors; 55 — lamp switches located in the front door pillars; 56 — fuel level indicator with fuel reserve warning lamp; 57 — coolant temperature indicator; 58 — oil pressure gauge with warning lamp; 59 — tachometer; 60 — parking brake warning lamp; 61 — battery charge indicator lamp; 62 — control lamp for the carburetor air damper; 63 — speedometer; 64 — indicator lamp for external lighting; 65 — turn signal indicator lamp; 66 — control lamp for high beam headlights; 67 — relay-interrupter for the parking brake warning lamp; 68 — switch for the carburetor air damper warning lamp; 69 — clock; 70 — lamp switches located in the rear door pillars; 71 — lampshades; 72 — rear window heating element; 73 — trunk lighting lamp; 74 — sensor for level indicator and fuel reserve; 75 — rear lights; 76 — license plate lights.
Diagnostics and performance check
Checking the low and high beam relay VAZ 2106 (mulmeter connection diagram)
To check the relay you need (all relay contacts are labeled, and the power contacts usually have a yellowish tint):
- Apply 12 V voltage (for example, from a battery) to the terminals of the relay coil winding (control contacts 85 and 86).
- Measure the resistance (multimeter in ohmmeter mode) between the power terminals (30 and 87).
If the relay is working, then when voltage is applied there will be a click and the resistance will become close to zero (infinitesimal). Otherwise, the relay is faulty and must be replaced.
VAZ 2106 charging circuit and equipment composition.
The charging circuit for VAZ 2106 cars includes an external voltage regulator, a generator, a charging warning lamp relay and a battery charge monitoring lamp located on the instrument panel.
Generator.
Cars use an alternating current generator with a built-in rectifier. The generator is driven by a mono-V belt from the crankshaft pulley.
Relay regulator.
The voltage regulator relay ensures that the voltage generated by the generator is maintained within the range of 13.5 - 14.5V. and is located in the engine compartment on the left wing. On older models, the voltage regulator was of the magnetic contact type. The voltage regulation in this relay was carried out by closing and opening the contacts of the electromagnetic relay when the voltage increased and decreased. Currently, an electronic relay is used as a regulator, which is completely interchangeable with the old one. But the use of an electronic relay, unlike a contact one, does not allow removing the terminals from the battery while the engine is running. This can lead to a sudden voltage surge and failure of the regulator and other electronic devices. To check the serviceability of the circuit and the presence of charge, you must use a voltmeter.
Warning lamp relay.
The charging circuit of the VAZ 2106 includes a charge indicator relay of the RS-702 type that turns on and off the warning light on the instrument panel, which indicates the presence or absence of charge and the serviceability of the generator. The relay is located on the right wing in the engine compartment. The design of the relay is the same as that of an ordinary electromagnetic relay. The relay contacts are normally closed, that is, the contacts are closed when there is no power to the coil. One end of the coil is connected to the positive of the battery through the ignition switch, and the other to the generator phase terminal. One of the relay contacts is also connected to the positive through the ignition switch; in fact, it is connected to the corresponding terminal of the coil, and the second to the control lamp.
When the ignition is turned on, the electromagnetic coil of the relay receives power, but the coil is not connected to the minus and therefore no current passes through it and the armature is not attracted to the core. In this case, the relay contacts remain closed, which leads to the warning lamp on the instrument panel lighting up. When the generator operates, an alternating voltage appears on the stator winding. A potential difference will appear at the ends of the coil, and current will begin to flow through it. When the voltage value is about 7.5V, the magnetic flux force of the electromagnet will be sufficient to attract the armature and open the contacts.
Step-by-step replacement instructions
Russian car enthusiasts driving Zhiguli “classics” ask the question of how to connect or replace the light relay on a VAZ 2106 so that it functions without problems in the future. Similar work is carried out when replacing the “six” light relay.
Replacing the VAZ 2106 light relay is carried out in the following sequence:
- Disconnect the wire from the negative terminal of the battery
- Using a Phillips screwdriver, unscrew the two screws and remove the relay.
- Installation of all removed parts is carried out in reverse order. We secure the side panel upholstery with new holders.