Cars admin26.02.2020
Did you like the article? Follow our channel for new ideas of useful car tips. Subscribe to us in Yandex.Zen. Subscribe.
Light plays a very important role in a car of any brand; it is forbidden to move without it in the dark and in conditions of limited visibility, so you should constantly check the performance of the system. In this review, we will look at how to replace a low beam lamp on a Daewoo Nexia, since there are quite a lot of cars of this brand, and the question of how to carry out the work correctly arises quite often.
It is worth noting that it is not so difficult to carry out the replacement yourself, even if we are talking about the N150 modification, in which access is limited, and many craftsmen recommend removing the headlights, but we will figure out how to do it easier.
Causes of bad light and ways to solve them
Of course, there can be a lot of reasons, we will look at the most common of them, which you can deal with yourself:
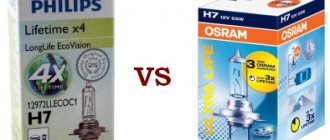
| Replacing light bulbs | Standard 55-watt options often do not provide the required brightness due to a design flaw in the reflector. Experienced car owners recommend using Philips Vision Plus lamps with an indicator of +60% illumination, this can significantly improve the quality of the luminous flux, the only negative is the high price and shorter service life, but this is the norm for this type of product |
| Adjusting the headlights | On the motor side of the body there are two adjusting screws that move the beam left and right and up and down, with their help you can make adjustments (how to do this is described in other articles on this site). It is important to set according to the instructions, otherwise you will blind oncoming drivers |
| Keeping it clean | Due to the fact that the light in this model is not very powerful, even minor dirt on the glass causes visibility to deteriorate, so periodically wipe the headlights, and if the road is long, it is advisable to stop every 50-100 km in order to wash or wipe dirt |
| If the low beam goes out | If the low beam on the Daewoo Nexia does not light up, we can recommend the following: when both headlights do not work, the cause will most likely be either the steering column switch or the fuse box. It is necessary to check all contacts using a multimeter; the operating instructions will help you understand the system better |
Important! In any case, if a malfunction occurs, always check the fuse first, then look at the contacts, and then the bulbs. Only if everything is normal with these elements, you need to look for the problem further.
Lamps for Daewoo Nexia n150
Lamps for the front headlight of Daewoo Nexia N150
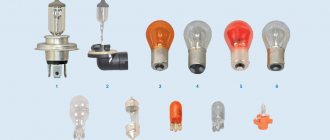
1 Front turn lamp - yellow single-pin incandescent lamp PY21W, 21 watts.
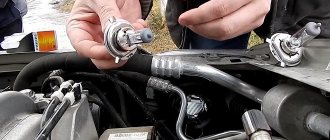
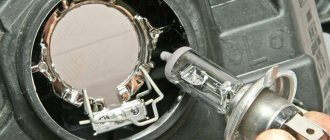
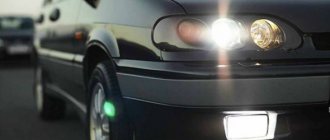
2 Low beam lamp - H7 halogen lamp power 55 watts. Cylindrical in shape, with two contacts.
3 The front lamp is a small single-pin W5W lamp with a power of 5 watts.
4 High beam lamp - halogen lamp H1; power 55 watts. Lamp H1 is smaller. A small glass cylinder at the end where the filament is located.
5 The lamp in the fog lamp is a H11 halogen lamp. L-shaped, two-contact lamp, 55 watts with a plastic base.
Tail light bulbs for Daewoo Nexia N150
1 Brake signal and side light lamp - two-pin incandescent lamp with a metal base P21/5W, power 21/5 watts.
2 Turn signal lamp - yellow single-pin incandescent lamp PY21W, 21 watts.
3 Reversing lamp - single-pin incandescent lamp PY21W, 21 watt.
4 Rear fog light lamp - single-pin incandescent lamp PY21W, 21 watts.
Workflow Description
Let's look at how to properly organize a replacement in order to carry it out quickly and efficiently; there is nothing complicated here and no special knowledge or professional equipment is required.
Step-by-step description of the work
It is necessary to perform actions in the following sequence:
- First of all, open the hood, secure it and remove the terminal from the battery so that in case of unexpected situations a short circuit does not occur in the system and you do not get an electric shock.
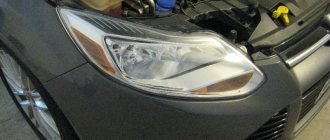
- There is a plug on the back side of the housing behind the low beam reflector; to remove it, you must turn this element counterclockwise; do not try to pull the cover towards yourself, you may damage the threads or even break the housing.
Conclusion
Replacing low beam lamps in a Daewoo Nexia is a simple process if you thoroughly understand its features and are careful. The video in this article will help you visually see the process and understand some of the nuances even better.
A burnt-out low or high beam lamp on the road is a rather unpleasant thing, especially on a remote provincial highway. Many owners of Daewoo Nexia, after reading the user manual, panic and refuse to carry out the replacement, entrusting this task to the guys from the service station. We responsibly declare that rumors about the prohibitive complexity of replacing lamps on Nexia are greatly exaggerated and now we will be convinced of this.
Low and high beam lamps
Drivers of Daewoo Nexia cars quite often change the headlights on their cars. They pursue different goals. Some are for tuning their car, others are for practical purposes, so that it shines better at night, and others are out of necessity. The need lies in the fact that, for example, the contacts of one of the headlights have become loose and it simply does not shine, or it has been involved in an accident.
To do this, you need to at least take out the headlight and disassemble it. This article will describe in detail how to correctly and effortlessly remove headlights on the Daewoo Nexia N100 and Daewoo Nexia N150. The fact is that the fastening of these parts on these two models differ significantly. On the first Nexia, replacing the headlights is very simple, you don’t need to crawl anywhere, all the bolts and fasteners are in an accessible place for a screwdriver and your hands. With Nexia N150 the matter is much more difficult.
If one of the bulbs, for example, high beams or turn signals, has burned out, then do not rush to remove the entire headlight unit on the Nexia N100. Detailed instructions on how to remove and install new lamps without removing the headlight unit:
- Turn the plastic cover counterclockwise and remove it from the headlamp
- Disconnect the electrical connector from the lamp
- Unclip the spring clip securing the lamp
- Carefully remove the lamp
- Install the new lamp in reverse order
Unfortunately, these instructions are only suitable for Nexia first models. In the second one, you won’t be able to dig into it like that. There is, perhaps, an opportunity to remove the lamps without removing the headlight only on the right side, after first removing the air filter housing. On the left side, everything is much worse. It is very difficult to get to the left headlight unit in the right way; this is exactly the case when it is easier to remove the entire headlight unit, because in addition to the battery, the Daewoo Nexia N150 also has an engine control unit (ECU) next to the headlight unit. Therefore, on this model, lamps can only be replaced when the headlight unit is removed. If, nevertheless, you decide to change the lamps without removing the headlights on the Daewoo Nexia 2, here are the detailed instructions:
- For the right side: remove the plastic air intake, unscrew the fastenings of the air filter housing, move everything to the side;
- For the left headlight: Disconnect the terminals and remove the battery. Unscrew the 3 bolts securing the ECU (head 10). Make room by moving everything to the side.
Change the low beam beam on Nexia N100
The first generation Daewoo Nexia did not raise any questions regarding optical maintenance. The 8-valve engine placed in the engine compartment allows you to work with optics. Change the side light bulb on a Daewoo Matiz. The thing is. The algorithm for replacing the low/high beam lamp on the first generation Nexia is simple:
- Disconnect the negative terminal from the battery.
- Turn the plastic cover counterclockwise and remove it from the headlight unit.
Turn the cap counterclockwise and remove it.
We disconnect the socket, remove the spring clip from its engagement and lift it up.
We take out the burnt out lamp.
We install a new lamp and put everything back together in reverse order.
The left and right operations for replacing lamps are the same, which cannot be said about the Daewoo Nexia N150.
Replacing lamps on the rear headlights of Daewoo Nexia
Fortunately, the rear of the car has not changed much in terms of optics, and therefore you should not have any problems replacing the rear headlights. This operation will take no more than an hour to complete. If you have steady hands and a lot of desire, you can do it in 20 minutes. Detailed instructions:
- So, first you need to place the car on a level surface and open the trunk;
- Now you need to disconnect the negative (-) terminal wire on the battery;
- Unscrew the two plastic wing nuts securing the rear light protection (in the trunk);
- Pull the tab to remove the 4 pistons securing the rear light protection;
- Remove the rear light protection fabric itself;
- Squeeze the two fasteners securing the light bulb holder;
- Remove the lamp holder by pressing lightly and then turning it counterclockwise;
- Install new lamps. Be sure to install only lamps of the same power as specified in the vehicle's operating instructions;
- Inside the headlight unit you can change the lamps for the side lights, direction indicators, lights when engaging reverse gear and brake lights;
- The parts are assembled in the reverse order from disassembly.
As you can see, to remove lamps it is not always necessary to remove the headlights themselves, although sometimes this is simply necessary. Replacing both front and rear lamps will take you no more than half an hour. I hope this article was useful to you.
Search
Many owners of this model are thinking about how to make Daewoo Nexia headlights better. The above article describes a simple, modern method that has been fact-checked several times.
An inexperienced driver of a standard Nexia may not realize that the car’s lighting has objective disadvantages. The same cannot be said about experienced motorists. When driving different cars, they often complain about the insufficient power of the standard Daewoo Nexia headlights. The brightness of the n150 head optics is really not enough even in new cars that have recently rolled off the assembly line. What to say about the technique of used and tarnished lenses.
The root of this situation lies in the electricity settings. For some reason, Daewoo designers made the logic of the system somewhat unusual and incomprehensible. If the battery is 12.5V, only 11 bulbs go to the bulbs, in other words, noticeably fewer. In fact, 10 percent disappear, it is not clear where.
The troubleshooting process will take several hours. It is better, of course, to have a basic understanding of the structure of electricity and devices. Additionally, you will need the ability to solder and determine the voltage of the circuit. The time and energy spent will translate into a safer and more comfortable night ride.
To quickly understand whether you need to change the wiring of your Daewoo Nexia 150, you will need a regular sensitive multimeter. We measure the battery voltage and store (record) the data. When the low beam is flashing, measure the lamp cover at the connections. If, when comparing the 2 numbers obtained, you find a difference of 1.5 V, this is untapped potential that is easy to use. In this case, the operation described below has a positive effect on the efficiency of the optics.
You may also like
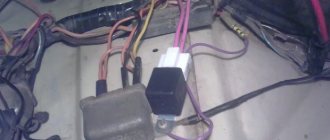
Daewoo Nexia N150, part 2, replaces conventional burnt lenses
To improve the Daewoo Nexia n150 headlight, you need to purchase accessories for you:
- two four-pin 30A relays;
- two gaskets under them;
- two 20A fuses in a sealed housing;
- 2.5kV Electronic Wire Typically the communication system uses a 2.5V connection, but in some places it will be narrow.
The approximate amount of necessary costs if you do the work yourself is 350 rubles.
Most of them at least remotely imagine working with a soldering iron; many have held it at least at one point. With the relay situation the opposite, the subject is familiar to the units. But mastery of the basic principles occurs instantly, enthusiasm and the desire to create miracles.
In a four-pin switch, the two main contacts are the positive and negative points, in other words, the power points for the device. You can bring it directly from the battery or try to find the "plus" in another place so that everything works with the ignition on. The third link is the manager. Voltage applied to it causes a corresponding click and redirects power from the main contacts to the fourth. On devices, contacts are usually labeled with standard numbers, so don't be upset when you see 87 or 30 in the annotation.
- First you need to find the pin marked 87 on the relay and connect it to the positive cable coming from the safety cable. A similar function is needed with the second one. Next, the fuse housings are connected by positive wires.
- We connect the dark colored cords coming from the relays, carefully attaching one to them. For the applied circuit it acts as a mass.
- Next, in the first block, find the point with number 86 (usually it is brown). Solder a wire long enough to reach the left lamp. It's better to leave a small margin in size. We do the same with the second block. These connections will be soldered to standard wiring so that the devices will turn on when the switch is activated.
- With both mechanisms, the 30s remain untouched. To these we attach two cables for the headlights, one for each. It is important to correctly calculate their length, the first should be shorter, the second longer. Make this feature required on both sites.