Self-disassembly of a car wheel
It’s rare that a driver has never experienced a tire puncture. If there is a car repair shop nearby, this does not become a big problem, but if for some reason it is not possible to turn to a specialist for help, you will have to do the repairs yourself. How the repair work is carried out depends entirely on the type of tires used. The easiest way to deal with a puncture is to have wheels that do not have tubes. This type of tire can be repaired without even removing the wheel using a so-called “first aid kit”. You can even ride on a broken tubeless tube for quite a long time, provided that the object that damaged it is in the hole. In the place where there is a puncture, there will be a constant air leak and this will require constant pumping. But even in this case, high-quality repairs can only be carried out from the inside, which will also require disassembly. It is almost impossible to repair a tube wheel without first disassembling it. This is due to the fact that the broken chamber must first be removed for repair.
The procedure for disassembling the wheel yourself.
Dismantling by hitting a wheel
The main difficulty of the work is that even the weight of a person is not enough to separate the tire from the rim. This is also affected by the decrease in elasticity of rubber over time. Drivers sometimes use a car to hit a defective wheel when there is no other way to repair it.
To distribute the load more evenly, you can use a piece of wide board at least 1 meter long. This method is good because there are no shock loads, but often the rubber becomes unusable. It is recommended to perform this work with an assistant to regulate the impact speed and the force generated.
The main difficulty of the disassembly process
Disassembling a new wheel will not present any problems for anyone, but with a wheel that has been in use for a long time, you will have to tinker for a very long time. This happens due to the fact that during travel the rubber seems to stick to the disc on both sides and along its entire length. And the driver faces the main task - to carefully separate the “sticking” area along the entire circumference and not damage the rubber. Two methods are most often used for these purposes:
- Impact method.
- Unstressed method.
Disassembly difficulties
Long-term use of car tires on rims can lead to an effect such as rubber “sticking” to the metal rim of the wheel. You can separate them from each other in several ways, which can use sledgehammers, angles, jacks, pry bars and much more.
Each driver usually uses one of the methods. Physically strong drivers use impact methods with a sledgehammer, but if it is possible to find a fulcrum for the jack, then the pressing method is used. The choice of method may be influenced by the degree of rubber adhesion.
We recommend: How to remove the window lifter handle?
Impact method of wheel disassembly
To use this method, we need to prepare the following tools:
- A corner or two mounting blades.
- Sledgehammer.
- Jack.
This method involves applying a series of blows with something heavy along the entire circumference of the wheel, producing a beating. This should make it easier to separate the tire from the wheel. The disassembly process itself will look like this:
- Jack up the car and remove the wheel.
- We release all the air from the wheel by unscrewing the spool. After the air stops coming out on its own, you need to stand on the tire and let the rest come out.
- Use a sledgehammer to hammer around the entire circumference, on both sides of the wheel.
- On the side opposite to the location of the spool, carefully insert the mounting blades or, if they are missing, a corner under the disc. To make this operation easier, step on the tire. Motorists categorically do not recommend using a screwdriver in this case, as this increases the risk of causing damage several times.
- Using tools, we pull out the edge of the rubber above the disc and then slowly walk around the entire circumference.
- We take out the tire.
- Turn the wheel over to the other side and do the whole procedure again.
Using this method does not require any additional skills, but you need to be careful when using it. In the process of inserting tools under the disk, you can not only damage the tire, but also deform the disk itself. If this happens, you will have to contact a car repair shop to have the discs rolled.
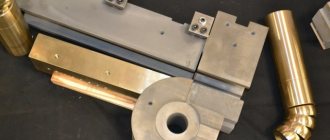
DIY tire changing machine
To manufacture the machine you will need the following materials and tools:
- Electric drill.
- Welding machine.
- Grinder with abrasive wheel.
- Rectangular steel pipe.
- Round pipe 1.5 meters, diameter 2 inches.
- Old wheel hub.
- Steel sheet at least 4 mm thick.
- Rod with a diameter of 20 mm.
The whole device consists of 2 parts: bead beating and tire mounting.
The base of the frame is made from a rectangular profile.
A 2-inch round pipe is attached to the jumper by welding at a distance of 30 cm from the edge. The height should be about 150 cm. To enhance the strength of the welds, you can use triangular scarves. To make it possible to install the wheel, the hub is welded at the height of a person’s waist.
The upper edge of the pipe should be located above the wheel at a distance of 30 cm. A bracket must be welded under the hub to fix the breaker device. It is made from a sheet of iron in which a hole is drilled. The pipe that will play the role of a lever must have a sufficient diameter so that an extension lever can be inserted into it. The tips for it should be made of a steel circle 20 mm in diameter.
They are made by sawing with a grinding machine, or turned on a lathe.
Tire removal
To remove rubber from a rim, proceed in the following order:
- Clean the wheel and deflate.
- Place a soft mat on the bottom of the machine to prevent damage to the disc. Put down the wheel.
- Lift the bump stop and place the tab on the side of the tire against the rim.
- Lubricate the seat with soap solution.
- Using the lever, disconnect the edge of the tire along the entire circumference of the wheel.
- Do a similar job by turning the wheel over.
- Install the wheel onto the hub and secure with bolts.
- Lift the edge of the tire with a mounting tool and insert the tip under it.
- Coat the edge of the disk with soapy water.
- Remove the tire bead by pulling the lever against the tube.
- Take out the camera.
- Use a pry bar to lift the other bead, place a lever underneath it, and remove the tire.
Unstressed method
This method will require a little more effort, but will prevent damage to the tire and wheel. Removing the tire in this way can be done in several ways. Before you begin disassembly, the wheel must be removed.
Method 1
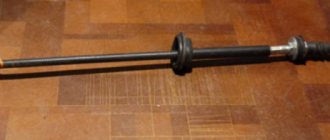
To use this method, you must have a second car and a very strong board. The process of tearing off the rubber is quite simple:
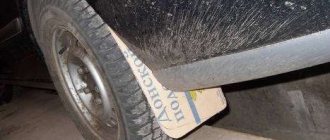
- Place the board as close to the rim as possible.
- We ask the car to drive over the hanging edge of the board. The weight of the machine should cause the edge to separate.
- Next, we simply tear off the tire along the entire circumference, simply stepping as close as possible to the junction of the rubber and the disk.
- We turn the wheel over and do the whole process again.
Method 2
If there is no second car and you don’t want to hit the tire, you can resort to the method using a jack. We will need:
- Jack.
- Towing strap.
- A wrench (large) or a pry bar.
Having prepared the necessary tools, proceed as follows:
- We remove the wheel.
- Place a pry bar or key on it.
- We place the jack on the tire, as close to the rim as possible and on the opposite side of the mount (key).
- We attach one of the ends of the sling to the mount (key) and pull it through the disk to the supporting heel of the jack and again pull it to the mount and firmly fasten it.
- We begin to work with the jack until the tire comes off completely.
- You can complete a full lift by simply kicking around the entire circumference.
How to rim a wheel with a jack and cable
This is one of the simplest ways to disassemble and trim a wheel yourself. If you follow the instructions below, you can easily do this job yourself.
- Remove the wheel from the car and clean off any dirt.
- Unscrew the nipple and bleed air.
- Place the wheel with the nipple facing up.
- Tie the tow rope to the disk and jack, as shown in the photo.
- Place the jack closer to the rim on the tire. If it is chamber, then you cannot place the jack next to the fitting, otherwise it will come off when disassembling.
- Securely fasten the ends of the cable together.
- Raise the jack up by pulling the cable and moving the tire sidewall down. Do this until the tire comes off the rim.
- If you only need to replace or seal a punctured tube, then lift the sidewall of the tire with mounting blades from the side of the fitting and place it on the edge of the disk.
- Push the fitting into the inner cavity and pull the tube out of the tire.
Attention! If the nipple is in good condition, then it can be unscrewed and used for a new camera, or put in stock.
Installing a new camera
Boarding work takes less time and effort, but it also needs to be done in a certain order.
- Take the new camera and unscrew the nipple from it.
- Release the air pressure by forcing it out.
- Move the rubber sidewall away from the location of the fitting.
- Place the tube part with the fitting into the tire and insert it into the hole in the rim.
- Reinstall the entire camera.
- Pump the camera without nipple slightly so that it straightens and takes its place. This is also necessary so that when trimming it does not get caught by the mount and damage it.
- Using mounting blades, carefully trim the tire around the perimeter.
Now all that remains is to install the nipple, inflate the tire to the pressure required by the manufacturer, and place the wheel on the car.
Disassembly of tubeless tires
The described methods are also suitable for tubeless cameras. But with tubeless cameras, the “sticking” process is somewhat stronger and when using the impact method, the chance of causing damage increases significantly. Experienced craftsmen strongly advise using a jack.
As it became clear from the article, you can carry out disassembly in a garage yourself, but this will require quite a lot of effort and these manipulations may have their pitfalls. Thus, if it is possible to contact a car repair shop, then it is better to do so. Masters have much more experience and special equipment.
Methods for tearing off a stuck tire
Several methods are used to break the “welding” using improvised means. The most common of them is percussion. It does not require any special equipment and all you need is a good hammer (or better yet, a small sledgehammer) and a piece of metal corner (10 cm long and 4-5 cm on sides).
And then we do this:
- remove the wheel from the car;
- To prevent internal air pressure from arising, completely unscrew the spool;
- install the corner (the edge of one side is driven between the rim and the tire);
- standing on the opposite side of the tire corner, we hit it with a hammer (due to the damping of the rubber, the corner can fly out, so there should be no one nearby);
- after 2-3 blows, we move the corner to a new place and strike again, and so we go around the entire circumference;
- We carry out the procedure until the edge of the tire leaves the rim;
- we beat the tire around the entire circumference;
- turn the wheel over and repeat the procedure completely.
This beating method is very simple, but it has a number of disadvantages. Using a corner with non-rounded edges will certainly cause damage to the tire, albeit minor. And as a result of inaccurate blows, the edge of the rim can be bent, so at the first opportunity you need to contact a service station to have the disc rolled.
There are also non-impact methods for tearing the tire off the rim, but some of them require other materials or improvised means.
The first option is to use a regular board, but it can only be used if you have a car that can move. The essence of the work is very simple - we lay a board (you need a strong one), so that one side of it lies close to the rim. And then we ask the driver of the car to drive over this board. The weight of the car will cause the edge to come off. And then we tear it off around the circumference with our foot. Then we turn the wheel over and repeat everything.
Jack to the rescue
This method is simple, but you need another car, which may not exist. In this case, you can use a jack (a side screw jack will not work). Additionally, you will need a tow strap and a large wrench or pry bar.
The technology of work is as follows:
- Remove the wheel from the car and unscrew the spool.
- Place a key or pry bar under the wheel.
- We install a jack on the tire (close to the rim).
- We secure one end of the sling to the mount, then stretch it so that it rests on the supporting heel of the jack and again pull it to the mount, where we secure it (in this case, everything must be done so that the sling is stretched to the maximum).
- We use the jack, and in order to properly fix the wheel, it is necessary to stand on the disk. With this installation, the sling will act as a support for the jack, and with its body it will press on the tire until it comes off.
- Next, we tear off the edge along the circumference with our foot.
We perform this operation on both sides. There are several variations of lifting with a jack - instead of a sling, a supporting surface is used, which can be the car itself or something else.
In garage conditions, you can make a special lever or use something else to carry out work. In general, the main thing is to separate the edge of the tire from the rim, but how this is done is not important.
Correct disassembly
After beating, you can proceed directly to the sorting itself. To carry out the work, you will need two mounting blades or conventional pry bars. It is not recommended to use a flat-head screwdriver so as not to further puncture or push through the camera during the process. But if you only have one shovel or pry bar at hand, then a screwdriver will also work, but only as an auxiliary tool.
Disassembly is done like this:
- To avoid damaging the nipple, prying off the splint should begin from there. To make it easier to remove the bead from the opposite side of the nipple, we step on the tire;
- carefully insert the pry bar between the tire and the disk (shallowly, but so that the end of the tool extends beyond the edge of the tire);
- Using a “pull towards yourself” motion, we move the tire bead over the rim and hold it in this position. We step back a little from the withdrawn edge, drive in the second blade and remove the bead section again (if a screwdriver is used, then after the first withdrawal we install it in the existing gap and use it as a holding tool, and pull out the shovel or pry bar to continue work);
- After removing a section of the bead 20-30 cm long, you can pull out a screwdriver or a second pry bar, since the tire will not sit back in place on its own. Therefore, all that remains is to pull the tire around the entire circumference by the rim (in the end it can be easily pulled out even by hand).
We recommend: Valve desiccant - how to make a special tool with your own hands?
After disassembling, we carry out repair work and put the wheel back together.
The main safety requirement when dismantling is to work with the mount only “for yourself”, first of all this concerns the initial stage of removing the bead. The fact is that to pull out the tire, especially when working with a short tool, you will have to put in a lot of effort. In this case, there is a possibility of fingers slipping off. If this happens, the mount or blade will fly out, and at considerable speed, and it is better if it flies away from you.
How to disassemble tubeless tires yourself
All of the above operations are also suitable for removing a tubeless tire. However, there is one nuance that should be remembered: very often the edges of such tires are literally welded to the rim, so it can be difficult to tear them off without damaging them.
And it is dangerous to use shock disassembly methods in the case of tubeless tires. To carefully separate the edge of the tire from the rim, it is advisable to use an ordinary jack, which is either tied to the wheel with a belt or placed under some kind of support (if you had to change the tire on the road, then a car bumper can serve as a support).
How to disassemble a car wheel at home
Wheel trimming is a complex process. Experts give a number of recommendations on how to dismantle your car wheels yourself:
Do-it-yourself wheel disassembly
- When you need to change one of the tires after removing it, you cannot use a different type of tire than the previous one. This is often expensive: but you shouldn’t change a winter tire to an all-season tire. And there is no summer for winter either.
- The standard size of tires, rims and tubes should be taken into account when beading.
- When a new tire is installed, the tube must be updated after removal.
- Before installation, it is important to check that no contamination has penetrated under the rubber.
- If there are no special blades for installation, you can separate the tire from the rim using a jack.
- You should not save money and put a patch on the tire in the puncture area and do the dismantling with improvised tools.
- It is important to regularly inspect rubber tires to prevent serious damage in a timely manner.
- You cannot use a screwdriver to disassemble it yourself - it will easily ruin the rubber, and this will lead to additional expenses.
Do-it-yourself tire fitting: seasonal or emergency tire replacement without problems
Car tires play an important role in the operation of a vehicle. They provide comfort while driving, make movement in the car safe, and provide reliable grip on the road in adverse weather conditions. And the first thing that both novice and experienced motorists should remember is the need to monitor the level of pressure in the tires.
Why is this so important? It is the pressure indicators that determine the readiness of the wheel for road confrontation in any weather conditions. Thus, a decrease in tire pressure leads to an increase in fuel consumption. And in a critical situation it can cause loss of controllability and stability of the vehicle. So is it worth the risk if regularly checking tire pressure will allow you to avoid many troubles associated with operating your car?
Methods
Shock
When using this method, a series of blows are applied to the tire being removed, the purpose of which is to separate the welded tire from the rim with minimal effort. Most often, the impact method uses a sledgehammer, with which the car owner hits the entire perimeter of the tire several times.
Unstressed
It is considered more labor-intensive, but the risk of damaging the tire by tearing it off the disk is minimal. This is the method that will be discussed below. Here it should be clarified that we will talk about how to disassemble tires with a tube.
Required Tools
- Set of socket heads.
- Jack.
- A pair of mounting blades.
This is what mounting blades look like, there are a lot of varieties
Sequencing
- The car is jacked up.
- Using socket heads, the wheel on which you plan to replace the tire is unscrewed.
- Now you should release all the air from the chamber. To do this, the spool is unscrewed.
Before removing the tire, the valve on the wheel is unscrewed to release air.
To remove any remaining air from the tire, you can step on it with your foot.
The edge of the tire is pryed up with a pair of mounting blades and carefully pulled out
To remove the remaining edge, one of the mounting blades is drawn along the perimeter of the tire
The lower edge of the tire is pryed off with tire irons
The tire is completely removed from the car rim
Video on dismantling a car tire at home
Tire structure: design features and types of tires
Before mastering the intricacies of tire fitting with your own hands - in a garage or outdoors, it is important to study the theoretical part of the process. To begin with, you should decide on the configuration of the car wheel, consisting of a tire and a disk with a rim on which it is put on.
All types of modern car tires are divided into several categories, which have their own design features:
- chamber , with a tire (camera) located inside the tire. In this case, the tire design also contains a cord - the main frame, a tread (with a road, special or universal pattern), beads and sidewalls;
- tubeless , in which air is pumped into the space between the tire and the rim (it is equipped with special seals to make it tight).
In addition, tires are divided into:
- road or summer , used for use on hard surfaces in wet or dry weather. Not used for operation at low temperatures;
- winter ones , the tread of which is designed to quickly remove snow and dirt from the area of the contact patch, which ensures adhesion of the vehicle to the road surface. Such tires are initially designed for operation in winter and contain components that protect the rubber compound from losing its performance properties in low temperatures;
- all-season , allowing you to ensure safe driving in any weather and regardless of changes in temperature conditions.
Ways to independently trim wheels
Beading is the reverse process of sorting. The tire needs to be put on the rim.
Standard method
Requires the following materials:
Next, lay a clean cloth on the floor. A disk thoroughly moistened with a soap solution is placed on it with the reverse side.
Do not use lubricants that remain on the surface. This threatens to cause the tire to spin during heavy braking. Soap solution is the best option.
Place the tire with the tube in place on the rim. Press down part of the cord by pressing on top of the rim with your feet. Then, inserting the pry bar between the rubber and the disk along the entire circumference, gradually thread the rest of the cord into place. Carry out similar actions on the back side of the wheel. By lifting the free end of the crowbar, the lever method is used. If the disk is light, it can be fixed to the ground or floor so that it does not move.
Technology for tubeless tires
Partially threading the tubeless onto the disc is even easier. You will need some silicone grease. The steps are similar to those presented in the instructions for beading standard tires. But then it’s a little more complicated. But there is an effective way:
- unscrew the spool so that the tire does not burst;
- Pour a little gasoline (50 g) into the side of the tire;
- bring a source of fire to the tire, for example, a lit rag on a stick.
The gasoline vapor will instantly ignite and cause an explosion, creating quite high pressure inside the tubeless tire. She'll be fully erected and pumped up a bit. You can drive to the nearest service center where you need to re-inflate the tire.
Modern re-alignment of car wheels is carried out in various ways. If earlier the main emphasis was on hand strength and human dexterity, today the main thing is a high-quality tool.
Mounting and dismantling the wheel
The ability to dismantle and install a car wheel is a great advantage for a car owner.
You can have peace of mind even in the most unusual road situations, and in conditions of urgent seasonal tire replacement. And if you haven’t yet mastered all the intricacies of car making, it’s never too late to take the first steps in the right direction. The main thing is to understand the procedure. To dismantle/install a car wheel you will need:
- a flat space that allows you to freely change wheels;
- jack - to provide free access to the wheel mounting area;
- a wheel wrench of the required size for dismantling.
Having completed the preparations, you need to proceed in stages:
- First, you need to securely lock the vehicle in place by applying the parking brake (by pulling the lever). The car is then placed in first gear. To securely secure the vehicle, it makes sense to use special devices (“shoes”).
- Having secured the car, it is necessary to “break” the wheel nuts that are subject to the dismantling procedure. To do this, you need to loosen the nuts using a wheel wrench without removing them completely.
- Next, the car should be placed on a jack, lifting it in the area where the wheel to be removed is located.
- After securely fixing the vehicle on the jack, you can begin dismantling by unscrewing the wheel nuts and removing the wheel from the axle.
The removed wheel must be replaced with a spare one. To do this, a pre-prepared “spare wheel” is placed in the “landing” area of the wheel, installing it using studs or guides, depending on the design. And then they fix it (not completely) using previously dismantled fasteners, checking the reliability of the fixation (the nuts should be screwed in order, starting from the top, in a diagonal sequence - this ensures correct alignment).
The final tightening of the nuts is carried out only after the vehicle is lowered from the jack. Upon completion of the installation procedure, you need to check the tire pressure (normally it should be 2 Bar or more) and, if necessary, bring it to the required values.
Features of mounting tube and tubeless tires
Today, tubeless wheels are found on many trucks and cars, but tubeless tires also have their uses. They are installed on bicycles, motorcycles, mopeds and scooters. Spoke wheels cannot properly maintain the required pressure and seal. In addition, old drivers are accustomed to cameras, who believe that it is easier to replace it or repair it on their own.
The disadvantage of tube tires is their greater weight compared to tubeless tires. Also, if damaged, it quickly deflates, and there will not be enough time to get to a car service or tire repair shop. To seal the tube you have to completely disassemble the wheel.
Advantages of tubeless tires:
- Slow loss of pressure, which makes it possible to get to a repair point.
- The wheel weight is less, which reduces the load on the suspension.
- Long service life, as it heats up less and there is no friction between the tire and the tube.
- The soft sidewall increases the comfort of the driver and passengers when driving the car.
Disadvantages of tubeless tires:
- Complex repairs and installation of tubeless tubes that require special equipment are difficult to install with your own hands.
- When a disc is damaged, the pressure in the wheel decreases.
- Driving on a flat tire often leads to tire destruction.
In a tube tire, the tube must exactly match the required size. If it is larger, folds will form that contribute to damage. Installing a tube in a tubeless tire can lead to damage to it, as an air layer appears between them. If you brake hard or make a sharp turn, the tire may collapse. When installing a tubeless tire, the contact points with the disc must be coated with a special sealing compound. There is no need to do this on tube wheels.
Change of shoes is on the way! Therefore, we decided to devote several issues of Tekhsreda to tire fitting topics. First, we’ll tell you how to disassemble the wheels yourself.
In mid-late autumn, car owners storm tire shops. However, you can disassemble the wheels yourself. We'll show you how to do it. We will need a special tool, as well as a screwdriver to unscrew the wheel spool, and a pair of mounting tools that will help remove the tire from the rim.
To rid the wheel of the tire, we bought a simple but very useful device - a mechanical wheel trimmer. There are several options on the market, but we chose the one that produces . It's inexpensive. Thanks to the ability to adjust the retractable rod, you can remove tires from rims of different diameters. All you need to do is select the desired position of the rod and tighten the two bolts holding it, after which you can start working.
Important points and conditions for proper disassembly
There are a number of nuances, the observance of which will help with proper disassembly at home. Here they are.
- When preparing to disassemble wheels using mounting blades, you need to remember that this is a labor-intensive task and working with mounting tools requires a lot of physical strength. To make it easier to work with a spatula, it makes sense to increase its length by putting a piece of metal pipe on it, for example. The lever arm will thus be longer, and less effort will be spent.
- Before starting work, you should inspect the edges of the mounting blades. They shouldn't be too sharp. If necessary, they should be blunted with a file.
- You should never use a screwdriver in tire fitting work, even if its tip seems dull: in this case, the risk of damaging the tube increases many times over.
- Do not start removing the tire from the place located next to the spool. If you start from there, you can simply tear it away from the camera. You need to start inserting the mountings on the side opposite to the spool.
- If the tire is being changed on only one wheel, the tire must be the same type as the others. If these are summer tires, all tires must be summer tires. If it’s winter, everyone should wear winter clothes. You should also keep in mind the tire size. It should match the tires on the other wheels.
- Tire fitting work must be done on a hard, level surface. Under no circumstances should sand, small stones or dirt get inside the tire being mounted. When the car is moving, all this will act as an abrasive material and will lead to very rapid wear of the camera (even if it was new).
As you can see from the article, even a novice car enthusiast can replace a tire on a car with his own hands. The main thing is to be careful and not to use too much force when separating the tire from the rim. Because even minor damage to the tire during this operation significantly reduces its service life.