04/24/2021 2,505 Sensors
Author: Ivan Baranov
The fuel level sensor in a car is a controller designed to monitor the volume of fuel in the tank. Its presence allows the car owner to fill the tank in a timely manner so that there is no stopping on the road while driving.
[Hide]
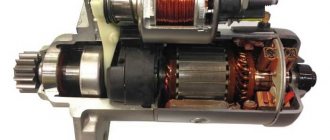
Fuel level sensor device
Gasoline or diesel fuel level meters in cars are divided into two types - lever and tubular. Depending on the type of fuel controller, its design and operating principle will be different. Digital or electronic sensors are practically not used on modern cars due to the fact that they are characterized by low accuracy.
Lever type of devices
Tubular fuel level controller
Lever
The main components of a lever-type fuel level sensor in a vehicle:
- potentiometer;
- float;
- lever element.
The potentiometer itself includes two sectors. A plate made of resistive material is applied to one of the components. The second sector is a slider that is in contact with the plate and lever. The other part of the part is connected to the float.
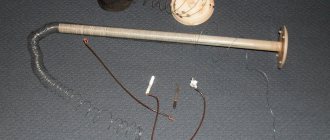
Tubular
Tubular parts have differences in terms of structural components. Such controllers are not equipped with potentiometers, but they use its principle of operation.
The main components of the device:
- Protective tube.
- A guide component is installed in the tube itself.
- A float that moves along the stand.
- Looped resistance conductor. This component is connected to electrical circuits that go to an indicator located inside the car on the dashboard.
- Contact rings. They are located inside the float. These elements are always in contact with the electrical circuit, which makes it possible to additionally loop the resistance circuit.
Monitoring control systems
A controller connected to a monitoring system is the most effective option for checking fuel consumption and tank volume. Such systems have the ability to obtain data on vehicle mileage, which is important for commercial vehicles. Information about mileage is instantly transmitted to a remote control panel. This suggests that if you have data about the car, you can use a special formula to calculate the amount of fuel consumed.
The main disadvantages of such systems:
- The cost of efficient and high-quality systems is usually high. If the machine is equipped with a diesel engine, then at least two flow meters will have to be installed on it.
- Difficult to install. To install, the consumer will have to insert the devices into the fuel line and other elements of the car system. It is almost impossible to complete the task on your own; you will need the help of qualified craftsmen. You will also have to pay for this.
- High sensitivity of monitoring flow meters to low negative temperatures. If the viscosity of the fuel is increased, then the operation of the power unit will be impossible as a result of the fact that the fuel will not be able to pass through the flow meter.
- The device is equipped with an input filter element. This component can become clogged with regular use of the car and refueling it with low-quality fuel. Foreign particles and dirt settle on the filter. As a result, the passage of fuel becomes difficult and monitoring of consumption is impossible.
Types (general classification) of automotive fuel level sensors
The question of where the fuel level sensor is located cannot be answered in one word; it all depends on the type of device. Today, the device is presented in a fairly wide variety of options. Based on design features, the following types are distinguished:
- float, also called potentiometric;
- capacitive;
- ultrasonic.
According to the characteristics of the output signal, there are the following types of fuel level sensors:
- analog. Basically, these are standard float-type devices. The analog fuel level sensor is affordable, but at the same time has a low level of protection against interference, which is why there is a high error in the readings;
- frequency The original data is transmitted to the dispatch device using a coded signal. They have a lower level of error compared to analogue ones;
- digital - equipped with a microprocessor device. The data is processed and transmitted as a digital signal. This type of fuel level sensors is characterized by high noise immunity, which ensures high accuracy of measurements.
Operating principle of the sensor
The operating principles of different types of devices differ.
Operating principle of a lever-type sensor
The float, made in the body of a hollow sealed component, is always located on the surface of the fuel. The device itself can be made of plastic or metal. When fuel is consumed, this component is lowered, and as a result of the action of the lever, the potentiometer slider moves.
The float is in contact with the sectors to which the conductors are connected. The latter are connected to the fuel indicator located in the dashboard. As a result of changing the number of plates connected to the potentiometer circuit, the resistance value changes.
When the fuel tank is full, the slider is set to the extreme position; accordingly, the current flows along the shortest path in the potentiometer. Current transmission is carried out on the sector through a plate located at the edge. Therefore, the resistance value is quite low and is about 7 Ohms. When the fuel is consumed, the slider of the device moves, which contributes to the addition of new plates to the electrical circuit, because of this the resistance value increases. If the tank is half full, the resistance value is about 120 ohms.
The GLONASS monitoring channel Fuel control showed the nuances of using monitoring systems.
If the tank is completely empty, then the plate part of the system is fully activated. Therefore, the resistance parameter will be as high as possible and will be about 330 Ohms. All described resistance values are approximate, since different controller models have certain parameters.
The main advantage of a lever fuel level sensor is the simplicity of the device, due to which such controllers are considered reliable. Their price is low. The main disadvantage of the lever controller is the wear of the contact component. In addition, such sensors have a certain error in values, in particular, we are talking about machines equipped with analog controllers.
Operating principle of a tubular sensor
The operating principle of tubular devices is somewhat different. Fuel passes through the technological hole located in the lower part of the device into the protective pipe. A float is located on the surface of the fuel. As a result of changing the position of the element with an increase or decrease in the volume of fuel, the resistance value changes.
When the vehicle's fuel system reservoir is full, the float is located on top of the safety tube. As the volume of fuel decreases, the float drops and the length of the electrical circuit increases, which leads to an increase in the resistance parameter on the wire section.
How to check the fuel pressure sensor
Depending on what fuel supply system is used for the car, there are three ways to check the sensor for functionality without dismantling the fuel rail:
- mechanical method for old-style cars with rubber fuel discharge hoses for gasoline internal combustion engines;
- multimeter;
- pressure gauge.
Dismantling the rack and subsequent diagnostics of the regulator is a more reliable way to check the quality of the mixture, since all adjacent components and wiring are checked together with the DDT. In most cases, diagnostics are carried out at a service station, since you will need to use a special stand. Self-diagnosis in the garage without dismantling the rack requires a tester and is carried out in 15 minutes.
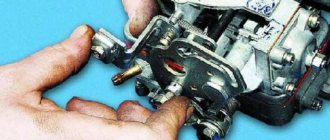
Mechanical diagnostics of an old-style regulator
For gasoline internal combustion engines in which a rubber pipe is used in the fuel removal system, the sensor is located at the inlet of the pump. The check is carried out only on a cold engine.
- Start the engine.
- Remember the nature of its operation (a faulty sensor causes the motor to trip).
- Pinch the fuel outlet pipe with pliers for 1–3 seconds.
If the fault is in the regulator, the engine will restore its operation, the speed will become smooth, and jerking will disappear. If, after the outlet pipe is closed, the motor continues to operate incorrectly, the fault may be in clogged filters or worn contacts, although the sensor is working properly.
Diagnostics with a multimeter
Using a tester, they check the performance of the RTD and the quality of power from the block. Checking the electrical signal to the block is carried out in steps.
- Remove the block from the sensor.
- Set the multimeter to voltage measurement mode.
- Set the black lead of the tester to “minus”, attach the red probe to the connector of the block.
If nothing interferes with the passage of electricity to the sensor, there is no voltage loss, the tester screen will display a value of 5 V. The permissible deviation is ±1%.
The second stage is to check the quality of the output signal from the electrical part of the regulator. Checking the signal from the sensor step by step.
The black probe from the tester is connected to the negative terminal of the battery, the red probe is connected to the signal wire of the regulator (more often the wire is located in the block in the middle in a red braid).
Start the engine and let it run for 1 minute at minimum idle speed. In this speed mode, the output voltage on the DDT should remain at a minimum of 1.3 V.
As the speed increases, the voltage parameter from the sensor should increase to 5 V. If the unit is faulty, at the highest speeds the readings may differ significantly, both up (in 10% of cases) and down. This leads to the pump starting to pump fuel and switching to emergency operation.
Checking with a pressure gauge
To check the sensor for functionality, use a pressure gauge, a device for measuring pressure in the rail and pipes of the fuel system, air pressure in tires, etc. Before checking with a pressure gauge, it is necessary to disconnect the vacuum hose from the system and connect the device between the fitting and the fuel pipe.
Before diagnosing, it is necessary to clarify the pressure value for a particular car according to the manual. The operating pressure for gasoline engines ranges from 2.5–3 Atm. During the regas process, the pressure drops by 1–2% of the norm, a working valve maintains the value within the acceptable range.
Why might it not work?
Fuel level controllers in the tank often break down, causing car owners to face problems. The parameters on the control panel are displayed incorrectly or are missing altogether. All device malfunctions can be divided into mechanical and electrical.
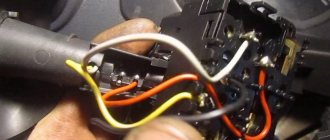
When it comes to power line faults, everything is simple – the problems are a consequence of:
- oxidation of contact elements;
- failure of safety devices;
- power line damage.
The AvtoTechLife channel, using the example of a Chevrolet Niva car, offers to learn about the nuances of diagnosing the electrical component of the FLS.
Mechanical problems can be more serious:
- Failure due to wear of the working sectors of the potentiometer. Wear of the elements occurs due to the contact of the potentiometer with the slider, since the latter regularly moves through the sectors. If the wear is insignificant and there is only a worn strip on the sector, then to eliminate the problem you can bend the slider. This will cause it to come into contact with the unworn part of the sector. However, if the wear band is wide, this will not give results and the controller will need to be replaced.
- Bend of the device lever. A malfunction usually occurs as a result of removing the controller and then installing it, during which errors were made. As a result, the controller works, but when displaying readings, incorrect values will be displayed. The deviation can be serious.
- Damage to the float due to leakage. A malfunction will result in fuel getting inside the controller, so the device will always be located on the surface. When the volume of fuel in the tank increases, the sensor will be immersed in the liquid. The values displayed on the dashboard will be incorrect.
Problems of this kind will lead to complete failure or incorrect functioning of the controller. The arrow on the control panel may twitch during operation or indicate an empty fuel tank.
If problems with the fuel level sensor are related to a mechanical component, then it is advisable to completely replace the device.
Signs of trouble
You can determine a malfunction in the operation of the controller through diagnostics; to do this, you need to know the signs of the problem:
- The indicator needle on the dashboard fluctuates constantly.
- The controller needle is located in the zero position when the tank is full. This indicates that the device's travel stop is in the wrong position.
- When the ignition is activated, the indicator needle on the dashboard does not move. This symptom usually indicates a burnt-out safety device or a problem with the electrical circuit.
- The pointer needle jerks and always falls to the zero position. The reason may be a poor-quality connection between the contact element of the potentiometer and the current collector. If the sensor is repaired independently, then the integrity of the potentiometer winding is diagnosed.
- The indicator light has stopped working, indicating that the fuel level is low. The likely cause is a malfunction of the potentiometer.
- Incorrect indications about the fullness of the fuel tank.
The Auto Electrician HF channel spoke about the nuances of checking the controller pointer arrow.
Float-type sensor for monitoring fuel level in a car tank
A float sensor for the fuel level in the tank is included in the basic configuration of the vehicle. It is located directly in the fuel tank. A change in the amount of fuel entails a change in the position of the float. The float itself can be made of either metal or plastic. This type of device is divided into two subtypes:
- lever - the float is connected to the potentiometer contact using a metal lever. Changing the position leads to a change in resistance, resulting in a change in the output voltage. The lever-type FLS is universal and can be used in any automobile fuel supply systems;
- tubular - the float is placed in a special tube immersed in a fuel container. When the amount of liquid changes, the float moves along a certain trajectory. Resistance wires are placed parallel to the direction of its movement, which are connected to the potentiometer element. This device ensures correct determination of the fuel level while the vehicle is moving downhill or uphill or in a turn.
The device connects to the car's on-board network. If a ground is connected to the fuel level sensor, no measurements are taken when the vehicle is de-energized. In this case, it is impossible to record the fact of fuel drainage while the vehicle is parked. Therefore, many people prefer to connect the FLS directly to the battery.
Replacing the device
You can connect and install the fuel level sensor yourself. Even an inexperienced car owner can cope with this task, provided all conditions are met.
When replacing the fuel level sensor, you must focus on the electrical circuit parameters that are indicated in the service documentation for the machine.
How to remove the fuel level sensor
The procedure for removing the device will have certain features depending on the machine model. If the device is installed in the fuel pump, it will have to be removed from the unit after removing the latter.
Dismantling the controller looks like this:
- In cars equipped with gasoline engines, the negative terminal of the battery must be disconnected before removal.
- The next step is to provide access to the controller. Here you need to focus on the installation location of the device. It will be necessary to remove the decorative lining of the luggage compartment or dismantle the rear seat. To do this you need a set of screwdrivers and wrenches.
- Fuel level controllers can be equipped with a safety plate located on the top of the device. To dismantle this element, you need to unscrew the screws that secure it.
- The next step is to clean the controller and the reservoir surface around the sensor. It is necessary to remove all dirt and dust, which will prevent possible dirt from getting inside the tank.
- Then the connected electrical circuits are disconnected; when performing the task, they should be marked so as not to be confused when connecting.
- The screws securing the device to the fuel tank are unscrewed. The controller is carefully removed, all actions are performed carefully to prevent damage to the device. If the sensor is located in the fuel pump, then the unit will have to be disassembled or the top cover removed from it in order to remove the meter itself.
How to install?
Installing the controller for measuring the fuel level is done as follows:
- Before the installation procedure, the seat is cleaned and the remaining sealing adhesive must be removed.
- If the controller package includes a gasket, it is installed in the device’s mounting location. The seal must be treated with airtight glue, if necessary. This will ensure high-quality sealing. When installing the gasket, it is important to align the holes for the screws that secure the device.
- The assembly procedure is performed in reverse order.
Connection diagram
Universal card for connecting FLS in a car
How to check the functionality of the sensor?
Before installing the seats and luggage compartment trim, it is necessary to diagnose the correctness of the measures taken:
- When the assembly procedure is completed, you need to diagnose the parameters on the controller located on the dashboard. To do this, you can fill the tank and make sure that the arrow on the dashboard sensor has risen.
- Then you need to drive about 30-60 kilometers. After the trip, access the controller in the tank. Make sure there are no fuel leaks or smells.
- All remaining interior components can then be assembled.
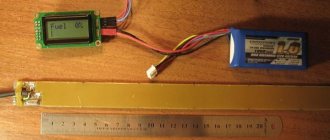
Capacitance meter - advantages for monitoring the fuel level in a car tank
A capacitive electronic fuel level sensor in the tank is mounted at the request of the motorist. It allows you to control fuel consumption with maximum accuracy, record the number of refuelings, as well as cases of unauthorized drainage. The measuring unit of this device is a capacitor, two tubes inserted into one another, but not touching each other. At the top they are connected to the device board. The cavity between them is filled with fuel. Electric current is supplied to the capacitor. The electrical resistivity of gasoline is lower than that of air. Accordingly, the less gasoline, the longer it takes to charge the capacitor.
The electronic fuel level sensor board in the tank calculates the charging time. Based on the data obtained, the height of the fuel column is calculated both in the condenser and in the container itself. This device connects to a GPS tracker and transmits information about the calculations performed to the monitoring system. It arrives depending on the user’s settings - either in real time or at a certain frequency.
DIY repair
If the sensor is equipped with a porous component, there are several options for changing it:
- You can remove it from the retainer socket and install a new one, securing it.
- Or replace the float itself along with the rod.
The second option is more preferable because it is easy to implement. If the surface of the strip on the rheostat scale is dirty, the element is cleaned.
The cleaning procedure is performed exclusively with cotton wool or a soft cloth pre-treated with alcohol. The use of harsh materials or other products is not permitted. This will damage the working layer of the scale; it is quite thin, so it can cause the rheostat to break. The element cannot be repaired; it will have to be replaced.
If the contacts of the electrical circuit come off the controller, they must be carefully soldered back or connected at the point of damage. Plates with mechanical damage (cracks, fractures) cannot be repaired, only replaced. If the sensor gives incorrect readings, the problem can be corrected by adjusting the angle on the so-called rod. This element is designed to fix the float. To get accurate readings, the angle is bent in different directions.
Sensors for diesel systems COMMON RAIL type BOSCH
Bosch COMMON RAIL performance direct fuel injection systems have gained great popularity due to their efficiency, reduced fuel consumption and reliability. There are three types of fuel supply systems, each of which is equipped with a fuel injection pump of a certain class and level:
- with control valve on the high pressure rail;
- adjusting the fuel on the high pressure pipe when exiting to the injection pump;
- “double control” type, with two RTDs on the high and low pressure lines.
You can determine exactly where the regulator is located after studying the fuel supply system of a particular engine. It is recommended to carry out initial diagnostics with a multimeter. Original Bosch sensors for COMMON RAIL have a service life of 10 years and are the last to fail, so in case of any disturbances in the operating mode of a diesel engine, diagnostics begin with checking the injectors, injection pump, and diesel quality.
You can change the RTD yourself in 15 minutes in the garage; the procedure is quite simple. But in order to change the element, you need to completely make sure that the incorrect operation of the internal combustion engine is associated with a failure of the regulator.
How much does a fuel level sensor cost?
The cost of the device depends on the manufacturer and the specific car model.
| Name | Price, rub |
| FLS for Lada cars | From 400 to 600 rubles on average |
| For Kia Sid cars | About 300-400 rubles on average |
| Sensor for Renault cars | From 500 to 2 thousand rubles |
| The price is valid for three regions: Moscow, Chelyabinsk, Krasnodar | |