How to Install a New Thermostat
If the best device for the VAZ-2110 has already been purchased, it’s time to start installation, especially since you can carry out the procedure yourself. You will need:
- gasket former - cost about 300 rubles;
- Cooling system cleaner – 150 rubles;
- pipes going to the stove radiator - 230 rubles;
- thermostat (in our case it’s Pramo) – 12,000 rubles;
- green antifreeze with a volume of 10 liters - up to 900 rubles;
- hairpin M8 at 70 m.
First you need to drain the used antifreeze. Place a 7-liter container under the drain hole and wait until the liquid is completely drained into the container. After this, you should clean the cooling system; for this it is best to use a special cleaning agent. Acids, soda and vinegar do not give such a good result, and lactic acid can ruin the internal parts of the car.
After pouring in the cleaning agent, add water inside and turn on the VAZ-2110 for 20 minutes. This promotes rapid detachment of contaminants and scale from the pipeline walls. The expansion tank should also be thoroughly rinsed. Now loosen the clamps of the hose coming from the radiator, then do the same with the clamps of the supply hose of the pump pipe and the hose that serves as the connecting element between the outlet pipe and the thermostat.
Remove the thermostat, install a new sample and repeat everything in reverse order. Don't forget to add coolant.
How to remove and check the thermostat of a VAZ-2110 with a VAZ-21124 engine
Removing the thermostat and disassembling it is necessary when the engine temperature is unstable: overheating or insufficient heating. In this case, you will need to not completely drain the coolant.
To check the thermostat on your car, you need to start the engine and touch the lower radiator hose with your hand - it should be cold.
Once the temperature reaches 85 – 92˚C, the hose should begin to heat up. If this does not happen, you need to remove the thermostat and check it.
1. To do this, drain the coolant, unscrew the plug located in the lower corner of the radiator, and drain the liquid into a substitute container
2. Using a 13 key, unscrew the plug on the front side of the cylinder block.
When finished, tighten the plugs.
3. Use a Phillips screwdriver to loosen the clamp.
4. Remove the supply hose of the coolant pump pipe from the thermostat housing pipe
5. Use the same tool to loosen the clamp
6. Remove the radiator outlet hose from the thermostat pipe
7. Using a 5mm hexagon, unscrew the three screws securing the thermostat housing.
We take out the screws with the spring washers located under them.
8. Remove the thermostat housing.
9. Use a screwdriver to pry off the rubber ring
10. And remove the rubber o-ring.
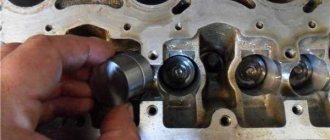
11. Overcoming the force of the spring, we press the fixing plate of the thermoelement down and, turning it in any direction, remove it from engagement with the grooves.
12. Remove the thermoelement mod. from the cover. 21082.1306100.
13. We check the thermoelement by lowering it into water heated to 78 – 80˚ C.
Heat the water, stirring constantly, to a temperature of (85±2)˚ C.
14. At a temperature of (85±2)˚ C, the thermoelement rod should begin to move out of the power element.
If this does not happen, replace the thermostat
Install the thermostat in reverse order, always using a new O-ring.
The thermostat is sold assembled with a housing. To prevent fluid leaks.
The pipes must be coated with a thin layer of sealant before connecting.
Symptoms and diagnostics
- The first sign of thermostat failure is engine overheating. This situation occurs if the heat-sensitive plate does not open when it reaches 87 degrees, then the coolant turns into heating fluid. The motor does not cool properly and overheats.
- When the bimetallic plate hangs in an intermediate position, the cooling system does not work properly: when the engine warms up, the temperature rises slowly, and when the vehicle is operated in difficult conditions, the engine boils.
- If the valve is constantly open and the coolant constantly circulates in a large circle, then the engine runs cold. This translates into increased fuel consumption.
We change the thermostat on a VAZ-2114 with our own hands: principle of operation and replacement on video.
Primary diagnostics of the thermostat on a VAZ 2110 is carried out without removing it. The check is done with the engine just started. Lift the hood and touch the upper pipe leading to the radiator. It should be cold and stay that way until the 60-70 degree mark on the instrument panel. After the needle has exceeded 70 degrees, the pipe begins to warm up. If everything happens as described, then the thermostat is normal. In other cases, replacement is necessary.
More accurate and complete testing of the temperature-sensitive element is done using special equipment at a service station. If you have doubts about the correctness of self-diagnosis of the work, use the services of a service station.
It is not difficult to replace the temperature-sensitive element on the 2110 with your own hands, following the step-by-step instructions. To perform repairs, you need to prepare the following tools and materials:
- new thermostat. Check which one is installed on the car (collapsible or solid body);
- silicone sealant;
- new pipes if the old ones are worn out or microcracks appear on them;
- new metal clamps;
- paronite gasket for a new type body;
- container for draining antifreeze;
- open-end wrench 13;
- Phillips and straight screwdrivers;
- antifreeze;
- rags.
Toolkit in the photo
Rags Wrench for 13 Screwdrivers Sealant Clamps Cooling system pipes
Important! Replace the temperature-sensitive element on a completely cooled engine. Antifreeze heats up to 120 degrees and can cause burns
Step-by-step instruction
- Place a container under the drain hole on the radiator. Open the tap and drain the antifreeze. There is no need for a complete drain; it is enough to reduce the level to the height of the temperature-sensitive element.
- Move the coolant container under the engine in the area where the thermostat is located.
- Remove the thermostat housing. If the car has an old-style heat-sensitive element, then to remove it, just loosen the clamps and disconnect the pipes. On the VAZ 2110 since 2003, the thermostat is attached to the engine with two nuts. To dismantle use a 13 key.
The housing is secured using pipes and metal clamps
Replace the temperature sensing element if a six-hole housing is used. Change the gasket between the housing and the motor. Wipe with a rag and degrease the body terminals and pipes from the inside. Apply silicone sealant to the inside of the pipes and to the thermostat terminals. Place the pipes and tighten the metal clamps.
Before installation, lubricate the terminals and the inside of the cooling system pipes with silicone sealant.
Add antifreeze to the cooling system through the neck of the expansion tank.
Installation video tutorial
To assess your strengths and understand the process of replacing the thermostat on the “ten”, watch the video:
Remember that replacing a faulty temperature-sensitive element on a VAZ 2110 cannot be postponed. If repairs are not carried out in a timely manner, a problem with the thermostat will lead to serious problems with the power unit and expensive repairs.
VAZ 2110 pump Which one to choose
22 Oct
The water pump plays an important role in the “life” of the engine. Thanks to the pump, the coolant can circulate freely throughout the cooling system, thereby removing the temperature from the heating parts of the engine.
A faulty water pump can lead to overheating of the engine and completely damage it. In order to prevent this from happening, you need to monitor the condition of the pump and its performance.
A faulty water pump makes itself felt by the following symptoms:
- Leaks in the oil seal area.
- Humming noise during operation.
- Poor circulation of cooling water.
- Increase in engine temperature.
- Coolant level drop.
To make sure that the pump is faulty, perform a few simple tests:
- Warm up the engine to operating temperature, then compress the upper hose. If, despite all this, you feel that the liquid in the system continues to circulate, you can conclude that the water pump is working.
- Listen to see if the pump is humming; if you feel a rumble, it is most likely “dying.”
It’s better not to wait for this to happen and replace the pump to avoid huge problems.
Not long ago I changed the pump because it was out of order, which I realized from the howling sounds.
Now I would like to tell you how to replace the water pump of a VAZ 2110 with your own hands without removing the generator drive.
Do-it-yourself replacement of the VAZ 2110 pump - step-by-step instructions
1. First, I decided to remove the adsorber for the convenience of doing the work without disconnecting the wires and hoses.
2. Next you need to remove the plastic casing from the engine, as well as the timing belt casing.
3. Now take a jack and jack up the right side of the car, your task is to lift the front right wheel. This is done in order to put everything according to the marks. For convenience, I was going to make one mark using snow-white paint; in the future, believe me, this was very necessary.
4. I didn’t seem to want to, but I still had to remove the wheel, because I needed access to the bottom bolt securing the plastic casing.
5. in excellent condition, so there is no point in changing it. In addition, I decided to try changing the pump without removing the generator drive belt. As it turned out later, this was a good idea that saved a lot of time.
6. But the plastic casing, and with it the pulleys with the camshaft rollers, still had to be removed. To do this, you need to loosen the tension rollers, then remove the timing belt from them.
7. Next you need to stop the camshaft gears with something flat in order to unscrew them. Be careful, the teeth are quite soft.
8. When the pulleys are dismantled, it is necessary to unscrew the plastic casing itself. The nasty thing is that one fastening bolt will need to be unscrewed from below, through the place near the wheel. Now we can say that we have reached the pump.
9. The VAZ 2110 water pump is secured with 3 hexagon mounting bolts. Unscrew them, then tap the body a little and try to remove them.
10. Place the dishes for coolant and be careful not to get wet.
11. Take the newest VAZ 2110 pump and make sure that it has a sufficient amount of lubricant. In addition, I recommend applying a thin layer of sealant if you have a cardboard gasket. Let it dry.
Replacing the VAZ 2110 pump - assembly
Assembly is traditionally done in reverse order.
- Reinstall the water pump.
- Install the plastic casing.
- Secure the camshaft pulleys in their places.
- Put on the timing belt.
- Using the previously marked marks on the camshaft, align and put on the timing belt.
- Turn the engine with the wheel, adjust the correct tension and position of the belt. When everything is installed, add antifreeze (or any other coolant) and you can check the operation.
Replacing the water pump took me 3 hours, everything works fine, the fault is fixed. Thank you for your attention, those who wish to add can do so using comments.
Source: https://autoruservis.ru/pompa-vaz-2110-kakuju-vybrat/
Replacing the thermostat on VAZ 2110, VAZ 2111, VAZ 2112
Steering rack VAZ 2112 with steering wheel DIY repair video
Welcome! Thermostat - thanks to it, the engine can heat up very quickly, and also practically not warm up at all, all this happens for the following reasons, in the thermostat itself there is a so-called valve, this valve is also filled with a special substance thanks to which the thermostat determines when it needs to fully open and when it needs to close completely, we all already know that when the engine is running (maybe you paid attention), the car heats up very quickly up to about 80 degrees, and after 80 degrees the engine heats up a little less, and after 94 degrees it does not practically does not heat up unless you are stuck in a traffic jam for many hours, the whole point is that the thermostat valve releases coolant into a large circle when it reaches 80 c°, and after 94 c° the liquid goes out to the same circle but only circulates the liquid in a small circle the circle stops altogether and as a result the car heats up less. Note! In order to replace the thermostat with a new one, you will need to stock up on: A screwdriver and one hexagon of approximately “5”!
Note! In order to replace the thermostat with a new one, you will need to stock up on: A screwdriver and one hexagon of approximately “5”!
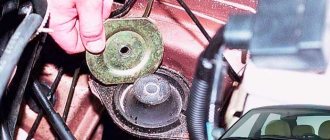
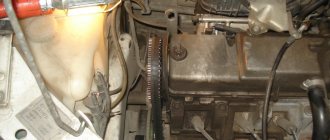
Where is the thermostat located? It is located just below the air filter housing, you can see it very easily; to do this, open the hood of your car, then look for this same air filter housing in the engine compartment and after finding it, look a little lower, so to speak, under it, and that same thermostat will be installed there (Or rather its cover, and this unit itself is located inside the cover), for example, the location of the cover is also shown in the photo below:
When should you change the thermostat? It is replaced only if it has stopped opening the valve that releases coolant to a large circle, and also if it has left the valve in the open position and this valve is jammed.
Note! In the first case, if the thermostat does not release liquid in a large circle, then the car will begin to heat up very much, in no case allow it to overheat and, if possible, replace the thermostat as soon as possible, especially if the engine of your car operates at elevated temperatures, then your cylinder head gasket will gradually burn out, and the friction in your car’s engine will also increase, because as we all know from the law of physics, the higher the temperature, then the metal expands accordingly, and the larger the metal becomes, the larger it becomes its friction, so watch the engine overheating very carefully.
In the second case, if your valve gets stuck in the open position, although this happens rarely, you still decide for yourself whether you need to replace the thermostat or not, because if the valve is in the open position, then the engine will practically not heat up , but if it’s winter outside, it would still be better to replace this unit with a new one!
How to check whether the thermostat is working or not? There are several ways to check, namely with this unit removed, and you can also check it directly without removing it from the car at all, to do this, just start the car and warm it up to operating temperature and after warming up, get out of the car (By the way, open the hood again before leaving) and look into the engine compartment, there you will find the lower pipe that comes from the thermostat, so feel this pipe thoroughly, it should be slightly warm at the very beginning, and then gradually warm up (Depending on the temperature of the engine).
Note! If it turns out that the lower pipe does not heat up at all but constantly remains cold, then this indicates that the thermostat has become unusable and it is time to replace it with a new one, by the way, due to this course of circumstances, the engine will heat up very strongly and quickly, so if all the symptoms are obvious, then the thermostat has really become unusable, and by the way, about such a check, see in more detail in the video clip below:
If you bought a new thermostat or found an old one in your garage and want to find out if it works or not, then watch the interesting video below that explains in detail how to check this unit separately from the engine:
Signs of a malfunction of the VAZ 2112 thermostat
If the thermostat does not release liquid to a large circle, the car will begin to heat up very much - do not allow it to overheat under any circumstances and replace the thermostat as soon as possible, because if your car’s engine operates at elevated temperatures, the gasket will gradually burn out cylinder head.
There are 5 main signs of a thermostat malfunction :
- The car engine takes a long time to reach operating temperature.
- The engine overheats quickly.
- The engine temperature gauge drops at lower speeds than usual and rises after stopping.
- After several minutes of operation, when the lower pipe is warm, this already indicates a prematurely opened thermostat.
- If the lower hose is cold while the engine temperature is close to boiling, this indicates a stuck thermostat.
How to replace the thermostat on a VAZ 2110-VAZ 2112?
Replacing the clutch cable of a VAZ 2109/2110/2112 with your own hands
Note! We will give you one piece of advice, it is recommended to replace this part only when the engine is cold, because if you decide to replace it on a hot engine, you will most likely get burned because when the engine heats up too much, the liquid also heats up, and if it gets on your skin, then this It may even cause burns, so be careful!
Removal: 1) At the very beginning of the operation, drain all the coolant from your car’s engine, otherwise you won’t be able to replace the thermostat normally, since you will have to disconnect the pipes from it that contain the liquid. (For information on how to drain the liquid, see the article entitled: “Replacing coolant in a VAZ”)
2) Then remove the air filter housing itself so that it does not interfere with further work. (For information on how to remove the housing, see the article: “Replacing the air filter housing”)
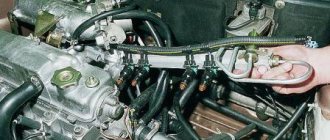
3) Then, when the liquid is drained and the body is removed from the car, pick up a screwdriver or a wrench (Depending on what type of hose clamps are attached that are connected to the thermostat) and use them to loosen the clamps of all hoses (Hoses should there are only two, namely the radiator hose and the coolant pump hose) which are connected to the thermostat and then disconnect them, by the way, you can also see both of these hoses in the photo below, they are shown with arrows.
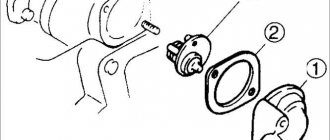
4) Next, take the hexagon in your hands and use it to unscrew the three bolts that secure the thermostat cover itself, and after unscrewing, carefully remove it.
Note! The thermostat itself will be installed inside this cover; in the photo below it is indicated by a red arrow, so you remove it from the cover and thereby replace it with a new one!
By the way, there will also be a sealing ring installed on the thermostat cover (Indicated by a blue arrow), if it is heavily compressed or cracked, or simply damaged or broken, for example, then in this case replace this ring with a new one!
Installation: Installation of the new thermostat and all previously removed parts is carried out in the reverse order.
Additional video: If you need some advice on how to remove the thermostat and a little about the expansion tank, then watch the video below, which explains all the nuances that you will encounter when replacing this unit:
The other day I checked whether the thermostat was working or not, using this method which is described here, in the end I came to the conclusion that it works because all the hoses become hot when the engine warms up and when I press them again, I feel that there is liquid inside, but from Why is my car overheating, if not because of the thermostat, please tell me?
Hello Vladislav! And you add coolant at normal intervals, it doesn’t go away very quickly, because it’s possible that a hole has formed somewhere in the hose and through it air slowly enters the system and at the same time the liquid also pours out, and that’s why it’s possible your car is running so quickly and overheats. Also check the coolant level, if necessary, bring it to your normal level. It is also possible that you have an air lock in the system, which appears after the system is depressurized, that is, after replacing any part that is part of the cooling system and after replacing the coolant itself! (For information on how to remove an air lock, see the article entitled: “Removing an air lock in the cooling system”)
Note! Also, the engine may still be overheating because you have low-quality or too old coolant that needs to be changed from time to time! (For information on how to replace the fluid, see the article: “Replacing the coolant”!
Methods for checking the VAZ 2112 thermostat
There are several ways to check, namely: without removing the thermostat and with dismantling.
To check the thermostat without removing it , you need to warm up the engine to operating temperature. Then find the lower pipe that comes from the thermostat and feel it - at the very beginning it should be slightly warm, and then gradually warm up. If the lower pipe does not heat up at all, but constantly remains cold, and the engine heats up very quickly and strongly, then this indicates that the thermostat has become unusable and it is time to replace it with a new one.
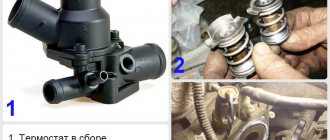
Checking the removed thermostat (both old and new) is done as follows:
- lower the thermostat into water heated to a temperature of about 80 degrees;
- raise the water temperature another 10 degrees;
- observe the “behavior” of the new device: if you notice that the rod begins to extend from the silicone element, this means that the thermostat is operational.
Signs of pump malfunction
Signs indicating possible pump failure:
- The occurrence of extraneous sounds, bearing noise or pump tapping.
- There is a significant increase in coolant.
- Pump leaks appear.
The reasons for the occurrence of these malfunctions:
- Critical wear of the pump shaft or bearing, affecting the circulation of the refrigerant and the appearance of leaks.
- Gasket failure due to deformation or wear.
- Shaft failure, as evidenced by its slipping, unstable fluid circulation and significant overheating.
- Pulley wear, as evidenced by belt wear.
Replacing the thermostat on an engine with a fuel injection system:
1. For more comfortable conditions for performing the above task, you will need to remove the battery.
2. Remove the plug from the expansion tank and unscrew the drain plug at the bottom of the radiator. Drain the liquid from there and screw the plug back on.
3. Next, loosen the two hose clamps on the thermostat socket cover pipes.
4. You will also need to remove the second rear hose clamp located on the water pump supply pipe.
5. Remove the front hose from the pipe.
6. When removing the rear hose, slide it along the water pump guide pipe.
7. Then unscrew the three bolts securing the cover, and then remove it and the thermostat.
8. The lid should be clamped in a vice; when performing this action, be careful and careful. The vice must have pads or jaws pre-installed in it to avoid damage to the aluminum cover.
9. Press the thermostat fixing plate downwards, overcoming the spring force. Rotate the plate in any convenient direction and remove it from engagement with the grooves. Remove the thermostat from the cover.
How to test a new thermostat?
10. Before you start installing a new thermostat, carry out the following actions on it: lower it into hot water, approximately 78–80 degrees and heat the water to 87–90 degrees, while stirring it constantly.
11. For a normally functioning thermostat at this temperature, the rod of the silicone element should begin to extend. If this does not happen, it means that it is not suitable and you need to buy another one.
12. Correct installation of the thermostat occurs in the reverse order of removal
When performing installation, pay attention to the rubber ring in the groove of the socket. If it turns out to be torn, deformed or has lost its elasticity, replace it
13. The last point in our work will be filling the cooling system with liquid. It should be poured to the upper edge of the expansion tank fastening belt (into the expansion tank). Then tighten the plug and start the engine.
One of the important points is to check that there is no leakage of coolant that may occur through the connections of the device’s pipes. Warm up the vehicle engine at idle speed to normal operating temperature to avoid air pockets in the system.
If you have a carburetor engine installed on your car, we offer you another way to perform this work.
The process of replacing a thermostat on a VAZ 16 valve engine
1
.
We drain the coolant, since otherwise it will not be possible to disconnect the thermostat (there will be liquid in the system). 2
. Remove the air filter housing so that it does not interfere with further work.
3
. After the 2 operations performed above, you can begin to remove the thermostat. First, take a screwdriver (or a wrench, depending on the fastener on the clamp). We unscrew the clamps on two hoses (to the coolant pump and the hose to the radiator) and loosen them.
4
. Now you will need to unscrew the 3 bolts that secure the thermostat cover using a hexagon.
5
. After this operation, remove the thermostat from the air filter, pay attention to the rubber in the thermostat, if it is intact, then we use a new one; if it is cracked or torn, we also replace it.
6
. Installing a new thermostat is carried out in the reverse order 4 – 3 – 2 – 1.
How to replace a thermostat yourself
Replacing a faulty thermostat in a VAZ-2112 with 16 valves is a fairly simple matter, so even minor skills in car repair will help the car enthusiast to perform this operation on his own. The part is replaced in stages:
- Start work only with a cold engine to avoid getting burns on your hands.
- All liquid intended for cooling must be completely drained, since replacing the part involves disconnecting the pipe in which it accumulates. To avoid spilling liquid during this process, you should place a container of the appropriate size under the bottom of the car.
- For ease of operation, it is recommended to remove the hardened air filter housing.
- Using a screwdriver or wrench, unscrew the connectors that secure the hose to the thermostat. There should be two such hoses - one is for the radiator, the other is for the thermostat.
- Using a hex wrench, unscrew the bolts, in triplicate, that prevent the element cover from moving when the car is running. After removing the fasteners, you should simply carefully remove the part from its permanent place.
If, upon inspection of the cover, any defects are revealed in the sealing ring, for example, cracks or deformation, this will indicate that the ring has also become unusable and needs to be replaced.
All car parts should be assembled in the reverse order that was used during disassembly.
The information described indicates that replacing a faulty VAZ-2112 16-valve thermostat is an easy operation, and if you approach the event responsibly and carry out the process step by step, then everyone will be able to correctly replace the faulty part on their car.
The redistribution of fluid flows in the engine cooling system is controlled by a thermostat. Over time, the thermostat valve may jam on a large or small circulation circle, and the cooling system will not work correctly (engine overheating/underheating). How difficult is it to check and change the thermostat yourself?
Checking the Thermostat
How to check the thermostat. In fact, there are several ways to do this in different situations: Checking the thermostat at home:
To check the thermostat, lower it into a vessel with coolant, heat the vessel and use a thermometer to control the beginning of the opening of the main valve.
For reference :
At a temperature of 87±2°C, the thermostat bypass valve begins to move, opening the main pipe; in this case, part of the liquid circulates in a large circle through the radiator. At a temperature of about 102°C, the pipe opens completely and all the liquid circulates in a large circle. The stroke of the main valve must be at least 8 mm. The thermostat of the VAZ-2112 engine has an increased resistance of the bypass valve (throttle hole), which increases the flow of fluid through the heater radiator.
Checking the thermostat on a car:
When checking the thermostat on a car after starting a cold engine, the radiator outlet (lower) hose should remain cold for a while and then quickly warm up, indicating the start of coolant circulation in a large circle.
Checking the thermostat upon purchase:
Checking the thermostat in the store is very simple, just blow into the thermostat fitting. Thus, we will check how tightly the small circuit is closed when cold.
Removing the thermostat VAZ 2110
I think everyone knows where the thermostat is located; in extreme cases, you can find out from photographs. Before removing the thermostat, you need to drain the coolant (in detail). We show dismantling the thermostat using the example of a VAZ-2111 engine:
- Loosen the radiator outlet hose clamps.
- Loosen the clamps of the supply hose of the pump pipe and the hose connecting the thermostat to the outlet pipe.
- Remove thermostat.
The thermostat is installed in the reverse order. By the way, this photo report shows an old-style thermostat. For more productive operation of the heater, it is recommended to replace it with a new one (six hole), and if desired, the thermostat can be modified.
Replacing Thermostat VAZ 2112 16 Valves
Replacing the thermostat on VAZ 2110, VAZ 2111, VAZ 2112
Thanks to the thermostat, the engine can heat up very quickly, and also not actually heat up at all, all this happens for the following reasons, in the thermostat itself there is a so-called valve, this valve is filled with a special substance with the help of which the thermostat determines when it needs to open one hundred percent and when it needs to be locked one hundred percent, we all already know that when the engine is running (Maybe we paid attention), the car heats up very quickly to about 80 degrees, and after 80 degrees the engine heats up a little less, and after 94 c° it actually doesn’t heat up at all unless you are stuck in a traffic jam for many hours, the whole point is that the thermostat valve releases coolant into a large circle when it reaches 80 c°, and after 94 c° the liquid goes out to the same circle but only the circulation of water in a small circle stops altogether and as a result the car heats up less.
In order to change the thermostat to a new one, you will need to stock up on: A screwdriver and one hexagon of approximately “5”!
It is located a little lower than the air filter housing, it is not at all difficult to see it; to do this, open the hood of your car , then look for this same air filter housing in the engine compartment and after finding it, look a little lower, so to speak, under it, and that thermostat will be installed there (More precisely its lid, and this unit itself is located inside the lid), for example, the location of the lid is also shown in the photo just below:
When should you change the thermostat?
It is replaced only in this case if he did not open the valve that releases coolant to a large circle, and also if he left the valve in the open position and this valve is jammed.
In the first case, if the thermostat does not release liquid in a large circle, then the car will begin to heat up very much, under no circumstances allow it to overheat and, if possible, change the thermostat recently, especially if your car’s engine operates at elevated temperatures, then your cylinder head gasket will gradually burn out, and the friction in your car’s engine will also increase, since as we all know from the law of physics, the higher the temperature, then the metal expands accordingly, and the larger the metal becomes, the larger it becomes its friction, so watch the engine overheating very closely.
In the second case, if your valve gets stuck in the open position, although this happens occasionally, you still decide for yourself whether you need to replace the thermostat or not, since if the valve is in the open position, then the engine will actually will not heat up, but if it’s winter outside, it would still be better to replace this unit with a new one!
Replacing the thermostat VAZ 2110-11-12
Replacement
covers
VAZ 2112
If you want to contribute to the Yandex channel means 410013139365069 QIWI 79293953175.
Replacing the thermostat VAZ 2110-12-Priora Do it yourself
A channel on the topic of cars, worthy of attention and useful.
How to check whether the thermostat is working or not?
There are several methods of checking, specifically with this unit removed, as well as directly, you can check it without removing it from the car at all, to do this, just start the car and warm it up to operating temperature and after warming up, get out of the car (By the way, open the hood again before the exit) and look in the engine compartment, there you will find the lower pipe that comes from the thermostat, so feel this pipe well, it should be a little warm at the very beginning, and then warm up evenly (Depending on the temperature of the engine).
In this case, if it turns out that the lower pipe does not heat up at all and remains cool all the time, then this means that the thermostat has become unusable and it is time to change it to a new one, by the way, due to this course of events, the engine will heat up very quickly, because if all the symptoms are obvious, then the thermostat has really become unusable, and by the way, about such a check, look more carefully in the video clip below:
In this case, if you purchased a new thermostat or found an old one in your garage and want to find out whether it works or not, then watch the fascinating video below that carefully explains how to check this unit in a separate state from the motor:
How to replace the thermostat on a VAZ 2110-VAZ 2112?
We will give you one piece of advice, it is recommended to replace this part only when the engine is cool, because if you decide to change it on a hot engine, you will most likely get burned because when the engine heats up too much, the liquid also heats up and if it gets on your skin, this can even cause burns, so be careful!
THIS IS INTERESTING: The cigarette lighter of the VAZ 2107 does not work
1) At the very beginning of the operation, drain all the coolant from the engine of your car; otherwise, it will not be possible to replace the thermostat normally, because you will have to disconnect the pipes from which the liquid is located. (For information on how to drain the liquid, see the article entitled: “Replacing cooling water on a VAZ”)
2) Then remove the air filter housing itself so that it does not interfere with the upcoming work. (For information on how to remove the housing, see the article: “Replacing the air filter housing”)
3) After this, when the liquid is drained and the body is removed from the car, pick up a screwdriver or a wrench (Depending on what type of hose clamps are attached that are connected to the thermostat) and use them to loosen the clamps of all hoses (There should be only two, namely the radiator hose and the cooling water pump hose) which are connected to the thermostat and then disconnect them, by the way, you can also see both of these hoses in the photo below, they are shown with arrows.
4) Next, take the hexagon in your hands and use it to unscrew the three bolts that secure the thermostat cover itself, and after unscrewing, carefully remove it.
The thermostat itself will be installed inside this cover; in the photo below it is indicated by a reddish arrow, so you remove it from the cover and thereby replace it with a new one!
By the way, there will also be a sealing ring installed on the thermostat cover (indicated by a blue arrow), if it is very compressed or cracked, or simply damaged or broken, for example, then in this case replace this ring with a new one!
Installation of the new thermostat and all previously removed parts is carried out in reverse order.
If you need some advice on how to remove the thermostat and little about the expansion tank, then watch below that describes all the aspects that you will encounter when replacing this unit:
Source: https://sis26.ru/zamena-termostata-vaz-2112-16-klapanov-video/
Purpose of the VAZ-2110 thermostat, design and principle of operation
Thermostat is a unit installed in the car’s cooling system that regulates the direction of coolant in a large and small circle (depending on the engine temperature).
The node performs two tasks:
- Helps the engine warm up faster in cold weather;
- Eliminates the risk of overheating.
Both functions are realized thanks to temperature control and the ability of the main valve to change its position (open or close under the action of the trigger element).
Structurally, the VAZ 2110 thermostat is a unit with a cylindrical cross-section and three, five or six outputs, depending on the design.
Main exits:
- To the pump;
- From the radiator;
- From the engine.
The functionality of the device is ensured by the following elements:
- Bypass valve;
- Main valve and its spring;
- Piston and its holder;
- Heat sensitive composition;
- Bypass valve spring.
Operating principle:
- Inside the device there is a valve with a special substance inside, which expands (contracts) as the temperature increases (decreases).
- When a certain temperature level is reached (80.6-81.5 degrees Celsius), the mentioned substance presses on the valve, gradually opens it and directs the flow of coolant through the outlet pipe to the radiator (large circle). When 94 degrees Celsius is reached, the main valve opens to its maximum (about six millimeters), and the bypass valve closes.
- At low temperatures, the thermostat bypass valve is in the open position (the main one is closed), and the coolant flows in a small circle (without the participation of the radiator). This ensures quick warm-up of the engine.
Read more about the operating principle of the thermostat here https://autotopik.ru/obuchenie/944-princip-raboty-termostata.html.
A stuck or other valve malfunction can cause the following problems:
- Overheating of the motor with the ensuing consequences;
- Inability of the power unit to reach the required temperature (relevant in winter).
Design and tasks of the VAZ 2110 thermostat
On cars under the Volzhsky Automobile Plant brand with a carburetor, and even on injection cars, until 2002, a thermostat was installed in an all-metal housing (i.e., on 8-valve gasoline engines). The unit was secured using four pipes. People call the VAZ thermostat a 4-hole thermostat. The first terminal of the housing is connected to the engine, the second is connected to the radiator, the third goes to the heater and the cooling system pump, the fourth (the thinnest) is connected to the expansion tank.
Until 2002, a four-hole tremostat was installed on carburetor and injection internal combustion engines
Inside the case there was a heat-sensitive element - a thermostat. You can see it only after complete disassembly. The operating principle is based on changing the shape of a bimetallic plate when heated or cooled.
When the engine starts, antifreeze circulates in a cold circle. When the power unit warms up, the coolant also heats up. At +87 degrees Celsius, the thermostat opens slightly and some of the antifreeze begins to flow in a large circle. When 102 degrees is reached, the temperature-sensitive element opens completely. A radiator is connected to the engine cooling process.
A car thermostat regulates the flow of antifreeze in the cooling system
On injection VAZ 2110 since 2002 (the engine by this time had become 16-valve), a thermostat is installed in a collapsible housing with six outputs. One additional terminal is connected to the stove when antifreeze circulates in a small circle. The second pin is used to heat the throttle valve.
Since 2003, a new model unit has been installed on the VAZ 2110, as well as on Priora and Kalina. The housing has 6 pins and is attached to the power unit unit using 2 nuts
When using a housing that can be disassembled, there is no need to purchase an assembled unit. Since 2003, on the VAZ 2110, Priora and Kalina, in the event of a malfunction, only the heat-sensitive element must be replaced.
Factors affecting cost
If you want to purchase a working radiator, spending a minimum amount of financial resources, then it is recommended to visit different places that sell auto parts and compare the cost and quality of the part you are interested in. The cost range for the VAZ 2112 auto radiator is wide. This is due to the influence on the price of such factors:
- Type of auto parts.
- Originality.
- Brand.
- State.
- Quality.
- Place of purchase.
- Seller's fame.
All auto radiators can be divided into four types:
- Equipped with oval tubes. They have excellent heat transfer. The prices are reasonable. The disadvantages are the general hardness and the small number of manufacturers.
- With round tubes. Their heat transfer is lower. Special gaskets are required for this to work.
- Monolithic aluminum. Characterized by excellent quality. This part is susceptible to corrosion. Its cost is high.
- Sintered. They are distinguished by quality, reliability, durability, optimal heat transfer. Suitable for powerful engines.
Also, all radiator devices are classified into:
- Liquid (coolant circulates due to the operation of the pump).
- Oil-based (characterized by complex manufacturing work, durability and higher cost).
For gasoline engines, the latter option is usually chosen for auto radiators.
Depending on the material of manufacture, there are radiators from:
Today, aluminum options are more often used due to their low cost and optimal characteristics. Copper parts are considered the most expensive and high quality.
Depending on the condition, car radiators for the VAZ 2112 are classified into:
There are also original and non-original devices. The latter can be of the following brands:
What are the features of the classic and alternative connection options?
In the first case:
- The main thermostat valve is flushed with coolant from the main radiator and engine;
- The thermostat opens for additional cooling - in this case, there is control not only over the entire coolant temperature in the system, but also over the temperature of the coolant leaving directly from the engine, and this, as is known, is the hottest place in the cooling system.
The standard connection diagram for a six-hole thermostat will look like this.
Connection example.
In the second case:
- The thermostat is additionally washed with coolant from the heater and bypass.
- The device controls the temperature, which is lower than the motor temperature (from the thermostat output or from the bypass). It turns out that in winter such a thermostat will work later than according to the classic connection scheme. The functioning of the stove also improves, which works more actively the lower the temperature outside.
The alternative connection diagram has two options.
As for the speed of warming up the engine, it remains unchanged, because the path of coolant flow until it reaches 82 degrees Celsius has not changed, as has the heat capacity of the system.
Is it possible to check the thermostat on a VAZ-2110 with your own hands?
The condition of the thermostat can be determined by service station workers, but this can also be done by every car owner who has at least a superficial understanding of the structure of domestic cars.
Start the engine and monitor the temperature to which the coolant, antifreeze or distilled water heats up - the data is indicated on the dashboard showing the status of the devices. The opening temperature of the thermostat on the VAZ-2110 reaches values in the range of 83-87 degrees.
When the engine temperature is less than the above, the device valve is closed and antifreeze flows in a small circle.
You can understand this by trying everything with your own hands. To do this, feel the radiator hose that approaches the latter from below, as well as the radiator itself. If the thermostat is closed, their temperature is colder than the thermostat, this is due to liquid entering the radiator.
- If the temperature in the cooling mechanism rises to 85 degrees Celsius, the main valve starts to move, which means that the engine cooling liquid begins to circulate not only along the small, but also along the large circuit. Then the radiator and the hose located below heat up.
- If the temperature reaches 102 degrees, the main valve opens completely, the radiator feels hot on top and cooler on the bottom, the pipe at the bottom remains hot.
- If the valve from the thermostat is open, but the lower pipe and radiator do not heat up, we can conclude that the valve is not working. This means it’s time to replace the old device with a new device.
There is also one sure way to check the thermostat on a VAZ-2110 at home. While the engine is running, the radiator gets warm in exactly the same way as the thermostat housing, but the car interior still remains cold? This means that the device is not completely covered. Incorrect operation of the thermostat in this case provokes rapid wear of the engine - for the latter it is important to reach operating temperature. Replacing a part is what can save a VAZ-2110 from a much more serious breakdown than its malfunction.
If you have a pan of water and a technical thermometer, it is easy to check the functioning of the thermostat. To allow the valve stem to move, add artificial wax, which will change its quantity accordingly when the melting pattern changes.
When heating water with a thermostat inside, you can independently regulate exactly when the valve operates. The temperature at which the valve is open is most often indicated on the body of the device.
Of course, it is better to seek help from professional equipment that will accurately test problems in the operation of the unit, but if this is not available, all of the above methods will do.
New cooling system
The sequence of your actions in this case is as follows:
- First of all, for safety reasons, disconnect the negative terminal of the battery. We drain the cooled antifreeze or antifreeze, first opening the expander cap. To drain the liquid you will need a container with a volume of 4-5 liters.
- Now, after unscrewing the two nuts, remove the wipers from the car.
- Then we dismantle the released protective plastic cover under the windshield, which is secured with 2 nuts and 4 self-tapping screws.
- To access the stove, remove the frill of the car by unscrewing 5 self-tapping screws, 1 screw and 2 nuts located at the bottom, in the middle of the frill, in the area of the steering rack.
- In order to remove the stove, remove the yellow cross brace, if any, as well as the curved bellows of the air filter.
- We pull the chokes off the radiator pipes.
- Then disconnect all electrical wires from the stove terminals.
- At the steering rack, unscrew 2 nuts that secure the heater, 1 nut securing the heater to the body.
- We unscrew the 3 screws connecting the two halves of the stove.
- We take it out by swinging the right side of the stove, first moving it to the right.
- The radiator in the removed half of the stove is secured with 3 screws. We take it out and replace it with a new one, not forgetting to put on the foam seal. We check the operation of the fan and, if necessary, repair it or replace it with a new one.
- Before installing the assembly, it is advisable to rinse the coolant supply hoses with running water.
- Assembly is carried out in reverse order.
Characteristics of DTOZH
First, let's look at the main characteristics of the regulator, which is often called a fan switch sensor. Let's start with the operating principle.
Principle of operation
The design of the part is based on a thermistor-resistor, which changes the resistance level depending on the temperature conditions. The thermistor itself is installed in a steel case with a thread applied to it. Directly connected to the body is the rear plastic part of the device, which contains the contacts necessary for connecting the power wires. One of these contacts is positive and it comes from the ECU, the second is negative, which is connected to the body.
In order for the engine temperature sensor to operate, it is powered by a voltage of 5 volts. The voltage is supplied from the ECU through a constant resistance resistor. Since the DTOZh thermistor itself has a negative temperature coefficient, as the temperature increases, the resistance parameter on it will begin to fall. In addition, the voltage supplied to it will also decrease. As a result of the decrease, the ECU calculates the temperature of the power unit, and the corresponding readings are transmitted to the instrument panel. The regulator should turn on when the ignition is turned on.
Where is?
If you are the owner of a VAZ 21124, you will probably be interested in knowing where the coolant temperature regulator is located on a VAZ. On Ladas of the 12th family, the location of this device is quite simple - as can be seen from the photo, it is installed in the metal exhaust line of the cooling system on the cylinder head. The VAZ fan switch located here allows you to accurately determine the temperature of the consumable, since antifreeze passes through this line.
Replacing the thermostat Lada 21124 (VAZ 21124)
Operations carried out when replacing the thermostat on a VAZ 2170 2171 2172 Lada Priora
Raising the question of the applicability of thermostats from various engines 21124 and 21126, we can conclude that the thermostats are interchangeable (the thermostat for these engines is shown on the left in Fig. 1). In auto parts stores, in addition to the assembly, you can purchase its cover with a heat-sensitive element separately. But keep in mind that thermostats are manufactured by several factories and the insides of each may be different - “inconsistency” of parts is possible. For the 11194 engine, the thermostat is more compact (in Fig. 1 on the right). The coolant temperature sensor of the engine management system (arrows on the instrument panel) is the same for all engines.
The need to remove the thermostat and replace it may arise if the engine temperature is unstable: overheating or insufficient heating. In this case, it is not necessary to completely drain the coolant.
Figure 1 Applicability of thermostats for engines 21126 Lada Priora, 21124 and 11194 Kalina
To check the thermostat on your car, start the engine and touch the lower radiator hose with your hand - it should be cold. After the coolant temperature reaches 85–92 °C, the hose should begin to heat up. If this does not happen, remove the thermostat and check its operation. You will need: a 5-point hex key, a Phillips-head screwdriver.1. Remove the plug from the expansion tank. Unscrew the drain plug at the bottom of the right radiator tank and drain the liquid from it (see “Replacing the coolant”). Close the drain plug. 2. Loosen the two hose clamps on the thermostat cover pipes...
3. ...and remove the hoses from the cover pipes.
4. Remove the three bolts securing the cover...
5. ...and remove it together with the thermostat.
Note
Pay attention to the condition of the rubber sealing ring in the groove of the thermostat cover. Replace a severely deformed, torn or lost elasticity ring.
6. Overcoming the force of the spring, press the thermostat retaining plate down and, turning it in any direction, disengage it from the grooves.
7. Remove the thermostat from the cover.
8. Before installing a new thermostat, check it by immersing it in water heated to 78–80 °C. Heat the water, stirring constantly, to a temperature of (85±2) °C.
9. At a temperature of (85±2) °C, the thermostat rod should begin to move out of the power element. If this does not happen, replace the thermostat.
10. Install the thermostat in the reverse order of removal.
Helpful advice: In order to eliminate the possibility of coolant leakage in the future, before connecting the hoses to the thermostat cover, lubricate the cover pipes with a thin layer of sealant.
11. Fill the cooling system with liquid (see “Replacing the coolant on a VAZ 2170 2171 2172 Lada Priora”). Close the expansion tank cap, start the engine, check for coolant leakage through the thermostat hose connections and warm the engine at idle to operating temperature to remove any air pockets from the system.
Source
- https://www.autosecret.net/motor-vaz-2170-2171-2172/sistema-ohlazhdenija-dvigatelja/554-zamena-termostata
Why install a Granta thermostat on a VAZ-2114?
Thermostat Lada Granta
Any adjustments that are made to the design and interior heating circuit of front-wheel drive VAZ cars are designed to either improve ventilation or improve heating and raise the temperature in the cabin in winter. Almost since the appearance of the first 2108, no changes were made to the cooling system and its architecture, which means that heating the interior remained ineffective.
With the advent of the modernized cooling system of the Lada Granta, the situation has changed for the better and here's why.
Cooling system VAZ-2114
If you look closely at the coolant circulation diagram in a Samara family car, it becomes clear why the heater radiator warms up last. The diagram shows that the cold (small) circle of the heating system does not include a heater radiator; more precisely, the heater radiator is connected in parallel, which certainly does not contribute to the rapid heating of the heater.
At the same time, we also take into account the ability of thermostats to react incorrectly to temperature and leaks in the air ducts, so until the engine warms up and the large full circuit of the cooling system turns on, you can’t even dream of heat in the cabin.
Replacing the thermostat on a VAZ-2112 16 valves with your own hands (+ video)
This article will propose a consideration of replacing the thermostat on a VAZ-2112 car. All issues of interest will be discussed in detail in this work. What is a thermostat? What is it for? How to replace it? Small circle and large circle, differences? All these and other questions will be directly addressed and described in detail in this article.
Video about replacing the thermostat on a VAZ-2112 with your own hands:
The video shows the process of replacing a thermostat, choosing a thermostat and tips for carrying out work to remove it.
Malfunctions
VAZ 21124 engines have the same set of characteristic disadvantages characteristic of all VAZ engines. The most common:
| FAULTS | CAUSES | REMEDY METHODS |
| The engine is unstable or stalls at idle. | Broken idle speed sensor. Air leaks through the crankcase ventilation hoses and the hose connecting the intake manifold and the vacuum brake booster. | Change the idle speed sensor; replace damaged hoses; tighten the hose clamps. If this does not help, check the serviceability of the fuel injection system. |
| The motor does not develop full power. | The throttle valve does not open fully. Broken throttle sensor. The air filter is clogged. Poor quality fuel. | Adjust the throttle valve drive; change the faulty sensor; change the air filter. |
| Increased fuel consumption. | Fuel leaks in connections. Broken injectors and/or ignition system. Increased resistance to vehicle movement. | Fill with high-quality fuel; check and, if necessary, tighten the fastening clamps. Replace damaged parts; check the operation of the engine control system and fuel injection; Check the alignment of the front wheels, the operation of the brake system and the tire pressure. |
The Lada of the tenth family in the hatchback body is the VAZ-2112 model. All cars of this family were produced until 2009. The range of engines included four options. Among them, by the way, were two 8-valve engines. Below we present the characteristics of 16-valve engines, but engines with 8 valves do not deserve attention. The torque graph proves these words true. So, let's look at the characteristics of VAZ-2112 engines with four valves per cylinder.
124 engine under the hood of the “two-wheeler”
The pistons of the 124 series engines have grooves for the valves. Simply put, the internal combustion engine of the VAZ-21120 is plug-in (as a result, and then depending on your luck), and 21124 is not plug-in (). Let's estimate the torque.
Moment of force, N*m
The most interesting thing here is the VAZ-21120 engine. In terms of “low-end traction” it is not much inferior to 8-valve engines.
Formal characteristics
Here are the characteristics of two different motors:
- ICE model: 21120/21124;
- Working volume: 1,488/1,596 l;
- Compression ratio: 10.5/10.3;
- Power: 93/90 hp;
- Rated power speed: 5600/5000 rpm;
- Maximum torque: 140/131 N*m;
- Recommended fuel: AI-95/AI-95;
- Ecology: Euro-3/Euro-4 or Euro-3.