Today we will talk in detail about chips. How many virtual spears were broken in keyboard battles regarding the need for chipping! Of course, too many of them will not decorate any model, but they cannot be neglected, because chips are something without which it is impossible to imagine modern model making! At least its armored direction. So, I suggest you put aside the model you're currently working on for a few minutes to dive into the topic of chipping!
What are chips and why are they needed?
First, let's define what chips are. Unlike washes, filters and oil points, everything here is just chips - these are chips! They are designed to imitate themselves))). Like all other tinting techniques and trends, this one came to us from the West, where it is called chipping, and the chips themselves are called chips (not to be confused with chips:). Even in the old works of Francois Verlinden, made in the 80-90s of the last century, one can see the desire to “tear” the model a little, although at that time this was often done with ordinary pencils and by today’s standards it looks somewhat exaggerated. In the early 2000s, chips in the form in which we are accustomed to seeing them today came into use for most modellers. It should be noted that this was a very noticeable qualitative leap in painting, greatly changing the appearance of the average model for the better.
Why are chips needed? It's simple, the chipping technique is the simplest and most common method of simulating mechanical damage to the paint surface, which almost no tank or car that has been in war can do without. Among all the classic tinting techniques (filters, washes, oil), chips are the most noticeable to an outside observer. They literally catch your eye. Any model, after chipping, takes on a shabby appearance.
From my own experience, I can say that once you try to apply chips, in the future you can no longer deny yourself the pleasure of at least slightly “scratching” the next model. It is important to remember that this method has one sharp pitfall - when drawing chips it is very easy to overdo it with their number and intensity. This is especially noticeable in the works of beginners, which are sometimes simply colorful, and often completely covered with a uniform layer of chips. To avoid such mistakes, I recommend following four simple rules (and a banal sense of proportion).
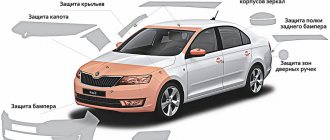
How to fix cracks in a car's paintwork?
To avoid swelling, cracking and peeling of the paint coating on the car body, it is imperative:
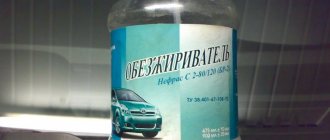
- Clean the body from old varnish and primer to bare iron and degrease the surfaces. Use a sanding tool and sandpaper with the finest grain (100-230).
- Apply a thin layer of putty and fill with certified auto putties all uneven surfaces, chips, and cracks in the metal surfaces of the body.
- Select only certified paint and varnish compositions and mix in strict accordance with the manufacturers' recommendations, using measuring containers.
- Painting should be done in a clean and dry box, with strict adherence to the temperature and humidity levels in the room, in the complete absence of dust and drafts.
We apply chips where needed
FIRST. Chips should be applied only in logical places, where they can appear on the prototype of your model (places of damage, access hatches to the fighting compartment and equipment, the surface around them, handles and handrails, tool fasteners, towing eyes, slats, side screens, as well as "route" along which the crew often moves around the tank. Particular attention should be paid to the interior, if it is present in the model. Elements of the breech, gun aiming flywheels, drive levers, seats - all these elements can bear a large number of chips.
From which side should you approach applying chips?
Despite the fact that in life a paint chip is a kind of bald spot that exposes the previous paint layer or the surface of a painted element, in modeling the result is completely the opposite effect. Since we are working with very small objects, it is easiest to paint the chips on top of the paint. As paradoxical as it sounds, a chip carefully painted over the paint looks like a depression. This is a kind of optical illusion due to the small size of the object and the contrast of shades.
Before you start chipping, I recommend taking a closer look at the technology around us. I understand that seeing tanks in person is a rare opportunity, but the contemplation of ordinary tractors, tractors, and just trucks can help us well in this matter. High-quality photographs of military equipment can be no less helpful. As a last resort, you can start with the simplest thing - try to copy chips from a photograph of a model you like by an experienced craftsman. I don’t think it would be shameful, and the master most likely won’t mind))).
What paint should I use on chips?
I am often asked this question - believe it or not, the answer is very simple - almost any type suitable for painting models. It doesn’t matter so much whether it’s acrylic or enamel from Tamiya, oil paint 502 abt, or the now fashionable Vallejo - with due care the result will be approximately the same. I can back up my words with examples from several of my works.
According to my subjective feelings, the properties of the three above-mentioned paints are approximately the same when applying chips. Almost any modeller with the slightest experience of working with a brush can work with them. As for beginners, I recommend that they apply chips with oil paint.
Any chips you don't like can simply be washed off with solvent and reapplied. The oil has one feature - it takes a long time to dry. It is advisable to let the paint dry for 5-6 hours after applying the chips.
The most popular paint for chipping is Vallejo acrylic. Most serious craftsmen work with this method, but I want to warn you that if you purchased such paint, this does not mean that chips will occur on their own. Vallejo paint is very specific and requires some experience.
The chips on this tanker were painted with Vallejo acrylic. Currently, this is what I use most often. The paint is very suitable for simulating chips, but is somewhat specific and can cause difficulties for an inexperienced modeler. As you can see, it is not so important what manufacturer’s paint you use to apply chips - the main thing is to do it carefully and without haste. It is much more important what shades and what tool you will use...
Local painting
Why does oil get into the air filter, the main reasons, what to do, how to avoid the problem Why does oil get into the air filter and what to do
Local painting is used if the damage affects only one part and occupies no more than 50% of its area. But sometimes it's easier to paint a small part, like a trunk lid, in its entirety. In this case, the type of paint matters, as well as the color of the car. The lighter the car, the more difficult it is to make unnoticeable docking.
The greatest skill is required when joining light “metallic”. With local touch-ups, craftsmen make sure that the varnish extends far beyond the area being repaired. Thus, the transition is almost imperceptible. If a stain remains after local painting, then this is an obvious defect that needs to be corrected. Well, when it is not possible to paint a part locally, it is repainted entirely.
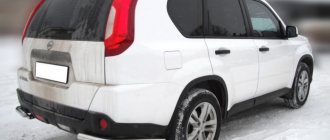
Partial painting may be necessary when only some individual parts are damaged. Very often, cars are stripped on one side, but there is no point in painting the entire body. Full painting is performed only when the paintwork needs to be updated, or when there are too many points of damage and they are scattered throughout the car.
Transition painting is, in fact, a special case of partial painting. This refers to a partial transfer of paint to an adjacent part that is not damaged. This may be necessary, first of all, when we are dealing with metallic paint.
The color discrepancy with the original is barely noticeable, but with sharp boundaries, for example, when only the hood is painted, a difference with the wings may be present. However, if you apply paint to the wings and make a smooth transition on them, you will no longer be able to see the discrepancy with the eye.
When spot painting, which is carried out in case of spot damage to the paintwork, it may also be necessary to move to an adjacent part. If the area to be repaired is located at the very edge of the part, then for light metallics a transition cannot be avoided.
Interesting video: how to paint a car in the garage and what you need for this
- What is useful to know about partial painting of a car body
- Methods for painting areas of a car body with a transition to an adjacent part
- Choosing the cheapest car painting option
What shades should I use for chips?
As for the shades, everything here is also quite simple. Before choosing a color, you just need to think a little about how this or that chip could have appeared, take into account the life path of the machine you are building, and most importantly, what the “peeled off” element is made of. Remember that a tank, armored car or truck is not all made of the same material. Chips can be to armor steel, wood, aluminum, plastic, ordinary metal, etc. But the most numerous, of course, will be armor or metal. What color should I apply them in? If the chip is completely fresh, then it may well have a slight metallic sheen, but in real life the metal oxidizes very quickly, so within a few hours a fresh chip will acquire a brown tint. In my opinion, the most optimal are dark shades of brown, which can be obtained by mixing black and brown colors. Rust often appears around old chips.
If the device is made of aluminum (airplane models, BMD or M-113), then the chips should be painted with aluminum-colored paints. If the car has more than one layer of paint on it, the chip should expose not bare metal, but the previous paint layer. A typical example is the Afrika Korps, where there was a large amount of initially gray equipment that was repainted sand or, for example, captured equipment, painted according to the standards of the new owners. There are many similar examples.
Repair materials
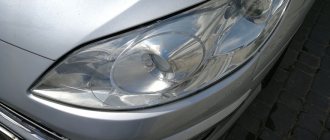
In order to repair the hood you need to acquire the following things:
- Sandpaper designed to work in wet conditions. The paper must be marked from P1500 to P2000. The abrasive grain size is from 24 to 12 microns.
- Polishing pastes.
- To avoid lengthy polishing operations by hand, it is best to find or buy a polishing machine.
- Nitro putty.
- Varnish and paint of the required color.
If the stone has penetrated deeply and the corrosion process has begun, then it is necessary to have a primer.
How to apply chips?
This question is very important, because the type, shape and accuracy of the chips will depend on what you work with.
Over the many years of working with models, I have tried many different application methods. Through trial and error, we obtained four optimal tools for this procedure
Thin brush
This is my main tool when doing chipping. A thin brush allows you to paint individual small chips, as well as groups of chips and small areas of damage to the paint layer. In addition, a thin brush can be used to apply scratches. I usually use synthetic brushes 0, 00 or 000. Depending on the size of the brush, you can vary the size of the chips. Most often I use the 00 brush. Less often I use 0 (for larger chips). I use 000 especially for very small chips and scratches. The application technique is quite simple - you just need to carefully draw chips and scratches. An important feature is that the paint on a thin brush dries very quickly. Once you dip your brush into the paint, you only have time to apply a few chips, after which you need to rinse the brush in solvent.
Old wide brush
An old brush that has been splayed out in all directions is also good for applying chips. The optimal brush size is No. 6. It is very important that it be very frayed, with hairs sticking out in all directions, this will allow you to get reliable and chaotic chips. The convenience lies in the fact that in one movement, you immediately apply a whole group of chips. The application technology is simple: after dipping a brush into a jar of paint, you must first touch it to a piece of paper to make sure that there is no excess paint, and only then apply it to the model. This will help avoid blots and sloppy marks. Apply the paint optimally using stitching movements.
Foam rubber
Foam rubber is excellent for applying irregular chips. To do this, you need to tear off a small piece from a piece of coarse-grained foam rubber and dip it in paint. Under no circumstances should you cut off a piece with scissors. Only a torn edge will help you get a unique chip shape every time. The size of the area where the group of chips will be applied depends on the size of the piece. As in the previous case, you need to be sure to leave excess paint on a piece of paper to get the most accurate result. By the way, if you apply paint tangentially, running the foam along the part, you will get several parallel scratches of different sizes at once. The main thing in this method is extreme accuracy. It is very easy to overdo it with the amount of paint and the force of pressing on the foam, which will lead to the appearance of blots.
Sponge
The Spreader is another handy tool that's great for touching up large, chipped areas of paint. The fine-grained structure of the sponge allows you to achieve a realistic transition from one color to another. As with foam rubber, it is important to first blot the sponge on the paper to remove excess paint, and only then touch the surface of the model. It is better to buy sponges as a set at once, since each of them will be disposable. The principle of working with a sponge is identical to working with foam rubber.
Source (currently unavailable) - https://ost-front.ru/2011/05/06/masterklass_skoly/
Causes of damage to the varnish coating of a car body
To paint a car, a special acrylic paint is used, which applies tightly and adheres securely to the body surfaces.
- However, the coating can be damaged in an accident, when washing a car with uncertified chemicals, under the influence of reagents for melting ice and snow on the road, under the influence of solar ultraviolet radiation.
- Immediately after painting, “hairs” may appear on the surface of the body - small cracks that over time spread over a wide area of coverage. Reason: poor quality of work of the craftsmen, careless removal of the old coating or incorrectly selected proportions of the paint composition.
- If, before painting the car body, too thick a layer of putty was applied to the surface, the acrylic paint begins to burst.
- Acrylic paint cracks if it is diluted incorrectly, if it is forced to dry, if it is applied in excessively thick layers, or if incompatible mixture components are used.
- If sprayed poorly or too far from the surface of the car body, the paint forms a rough coating (“orange skin”) and begins to peel off over time.
- Paintwork can also begin to peel off due to strong temperature changes and corrosion processes on the surface of the car body, when exposed to heaters and contaminants.
- Applying new coats of varnish to wet underlying varnish layers and exposing the car body to high humidity will cause a “fill defect,” and painting in a dusty area can result in a grainy finish.