It is generally accepted that the surface of a car can only be damaged as a result of a traffic accident. However, according to statistics, half of the cars have some kind of minor damage as a result of normal use, be it chips, scratches or abrasions. Timely restoration of the paintwork without painting will help increase the time intervals between major repairs. Because if a small crack is not treated in time with a protective agent, then in a year rust will most likely appear in its place. And to eliminate it you will have to put in a lot more effort.
Volkswagen Tiguan “blue crocodile” › Logbook › Do-it-yourself paintwork repair.
Recently, while chatting on our forum, I discovered that many car owners never bother with “covering up” chips and scratches.
This surprised me - after all, most car manufacturers have special, so-called pencils for these purposes. VW and Skoda are no exception. On my baby Fabia, I repaired about a dozen chips in three years, half of which were down to the metal—not one of them bloomed. And the paintwork on Skoda and Vagenov is capricious. I decided to share my experience - I’m tired of writing about this on the forum. First of all, there are two types of kits: sprays and bottles with paint and varnish (for non-metallic paints without varnish). The spray is inconvenient to use, so I opted for the second option (photo below).
The set contains two bottles with brushes for painting. One with paint, the second with varnish. On the top of the paint bottle cap there is a special metal brush for removing rust.
In Exist, the set costs 300-400 rubles, depending on the color. For example, the pencil code for my color is LST 0M2 HX5
. For metallics, only the last three characters change - the paint code. For mother-of-pearl, M changes to P, for regular ones - to U, as I understand it. But there are also more intricate codes.
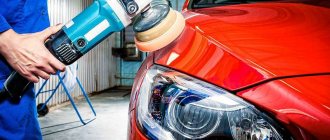
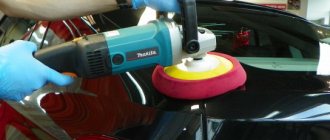
I would like to disappoint everyone who wants to leave paint shops without work - it will not be possible to paint over a chip to the metal unnoticeably. For large areas this set is also of little use. The easiest thing to do is to patch deep scratches using varnish followed by polishing.
Both varnish and paint can be easily washed off with strong alcohol, so you shouldn’t be afraid to experiment.
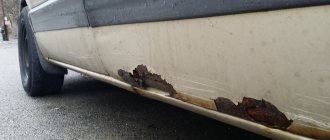
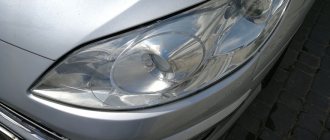
So. Below are two drawings. The first shows types of chips in layers. Let me make a reservation right away: if the scratch is shallow (1), then it is easier to polish it with the same anti-scratch agent, or you can leave it. Starting with deep scratches on the varnish (2 and further), it is worth treating, and the sooner the better. There were chips on the hood of my Skoda that seemed to be in the varnish - I spat on them. But, apparently, the varnish in these places cracked deep and allowed salt to get under the paint in winter. The result is peeling of the paintwork with the primer, so far without rust. In reality, most chips outside the city will be 3, 4 and 5 - before paint and primer. Here a patch for winter is required.
I also experimented with my brother’s Golf 6 - I gained a lot of experience. I can say one thing: the main protection of the body on metallics is varnish. If it is damaged badly enough, expect trouble in winter. You can check whether the varnish is damaged by wetting the damage with water or alcohol. If the scratch becomes invisible, we only need varnish for repair: - carefully place the varnish with a toothpick into the scratch with an overlap
on the original varnish. We wait an hour. Polish with anti-scratch polish. - if there are several scratches on the varnish at once (I once had about 20 boards “fly” into the back door on the dusty varnish), then you can use cling film with a drop of varnish applied to it, press it to the scratches and smear it over the entire area, remove the film. Polish later. To reduce the layer, you can wipe it with alcohol (the varnish will become cloudy, but will later become transparent after polishing).
If the damage lies deeper than the varnish, you will need to apply paint (with a toothpick) before the varnish. The metallic paint from the set cannot be polished - it becomes lighter with alcohol and changes color. Therefore, be careful at this stage. By and large, we only need paint to mask the damage - its structure seems to be moisture-permeable, unlike varnish. That is why we complete the repair of the chip with varnish. See the second picture (paint - green, varnish - pink). I declare with full responsibility that it will not work out better. And even if it works, the patch will not protect the chips - the varnish must be applied with an overlap and not overdo it when polishing with anti-scratch.
It makes sense to use the brushes from the set for larger areas of damage. A well-repaired chip will take 3 years to repair without problems. The unplanted one will bloom in St. Petersburg in the first winter. A quick repair of a chip takes me 15 seconds. Thorough about 15 minutes in total (not counting drying).
ps before the operation, of course, wash and degrease the area to be painted.
Source
Auto Nerd › Blog › My polish is peeling off... (part 1)
“—Wait, bear, don’t roar, Explain what you want?” (© Chukovsky)
The guy painted half the car, paid the car service and went to rejoice.
And then, with each wash, ripples began to appear on his varnish, then bald spots, then all the paint began to peel off. With each subsequent wash the situation worsened.
When the varnish peels off, it's definitely a bad sign.