On the Internet today you can find information about repairing various machine parts, regardless of performance. If you ask experienced forum members about checking a shock absorber or how to repair a body, you will receive really practical advice in response. And here we will talk about installing a new set of brake discs.
When to change brake discs
There are only two ways to replace brake discs. Let's figure it out. Option number one is suitable for those car owners who want to tune the brake system or improve it slightly by installing special ventilated discs. On classic models today, disc brakes are installed instead of drums, which are more effective, and to a significant extent. Such work will not take much time; making a faceplate-adapter for the brakes is not a problem. You can either purchase ready-made ones, or order turning.
Option number two is to repair and restore the brake system, which has stopped functioning due to failed brake discs. This can happen either due to mechanical damage or due to natural wear and tear.
But how can you determine that it is time to change your brake discs? The behavior of your car will tell you this. Due to the unsatisfactory condition of the brake discs, the car may slow down for too long, may “steer” to the side, the amount of brake fluid has decreased, and the brake pedal itself seems to have become soft. These are sure signs that it is time to check the brake system for serviceability.
In particular, it is necessary to measure the thickness of the brake discs themselves. This can be done using an ordinary caliper, taking measurements at different points on the brake disc. You can find both the minimum and maximum thickness right on the disk. After receiving the results, the decision to replace should be made by you. Remember - when it comes to brake discs, you should not skimp or leave almost worn-out discs in the hope that they will last a little longer.
You need to replace disks on the entire axis at once; you cannot install only one new device. Even if you do not drive fast, the condition of the brake discs should be checked systematically, not for wear, but to look for any mechanical defects.
In practice, it has long been proven that the front brake discs have to be replaced more often than the rear ones. There are reasons for this. If we take into account the fact that there is more pressure on the front of the car, then the front suspension will experience more loads than the rear brake. From a technological point of view, the process of replacing brake discs on the front wheels is almost the same as on the rear. You need to think about replacing the brake system discs immediately after the first groove of the installed discs has been made by specialists. You cannot sharpen the discs a second time.
What you need to replace brake discs
Before replacing discs, you must purchase one or two pairs of new brake discs. Experts strongly recommend buying two discs per axle, and you also need to buy pads. The best option would be to purchase both discs and pads made by the same manufacturer.
Sometimes, in order to save money, car owners do not change brake pads, but install new discs. This will cause grooves to appear on the new disc, and such damage is caused precisely by old pads. This happens because the contact area of the planes is different.
To replace, you will need to assemble an ordinary set of tools:
1) A set of wrenches according to the size of the fastener;
2) Lift and “balloon” for wheels;
3) “Goat” for installation and stops for fixing the machine;
4) A piece of wire for fixing the car;
5) Repair hole in the garage floor.
It will be better if someone helps you in dismantling and installing a new set of brake discs. Before removing and installing discs, read the manual, or best of all, ask the owners of the same car model on car forums whether you need to buy new “self-locking” bolts or can you use old ones. But it is still better to replace them.
Brake disc replacement technology
Different models and brands of cars may have different design solutions, but the procedure for updating the brake system itself is quite typical.
The sequence of actions is as follows:
1) Using “shoes” you need to fix the car;
2) The desired side of the car must be raised using a jack, after which you need to put a tripod and remove the wheel;
We recommend: Is it possible to ride on Velcro in the summer?
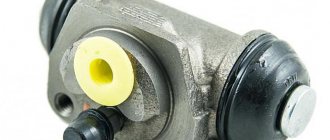
3) Before removing the brake disc, you need to press out the piston of the working cylinder;
4) It is necessary to clean the surface of the caliper and hub from dirt so that there is no need to change the bearing afterwards;
5) One must hold the steering wheel firmly while pressing the brake pedal, while the other must unscrew the bolts that secure the brake disc to the hub. If the threads are rusty, lubricate the bolts with WD fluid;
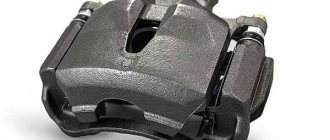
6) Next, you need to remove the brake caliper and secure it with wire so that it does not interfere and pierce the brake hose;
7) Then you should disassemble the caliper assembly: you need to remove the pads, check their wear and make sure that new ones need to be installed, after which you need to remove the pressure springs and the bracket itself;
The hub must be fixed, all fastening bolts must be unscrewed and the old disc removed.
Installing a new brake disc follows the same sequence of steps, but in reverse order. Remember that new pads need to be installed. At the end of the replacement procedure, you need to bleed the brakes.
Subscribe to our feeds on social networks such as Facebook, Vkontakte, Instagram, Pinterest, Yandex Zen, Twitter and Telegram: all the most interesting automotive events collected in one place.
Hello, dear motorists! We will continue to consider with you options for repairing your car yourself and at the same time finding ways to save your family budget. On the agenda is a solution to the question of how to change brake discs with your own hands.
Replacing brake discs is a fairly simple operation for any motorist. For theoretical preparation, you just need to have at hand the Operation and Repair Manual for your car model.
And if necessary, help from members of the forum (virtual club) of car lovers of the exact brand that you own.
The Internet today provides invaluable assistance to car owners in terms of transferring advanced national experience in the repair and maintenance of any brand of car from Tavria to Bentley.
It is enough to ask a question on the forum about how to repair a body or how to check a shock absorber, and you will hear objective and useful advice. And we will try to figure out how to replace brake discs.
When to change brake discs
The answer to the question of when to change brake discs exists in two versions. The first option is needed by those motorists who decide to tune the brake system or slightly improve it, in the form of installing ventilated brake discs.
On “classics” today, drum brakes are being replaced more often with disc brakes due to the latter’s higher efficiency. Not much work, adapting the faceplate to disc brakes is not a problem. Either you buy ready-made ones, or they will be made to order for you.
The second option is to carry out repair work on brake discs that have failed for any reason. This may be natural wear or mechanical damage to the discs.
How do you know when it's time to change your brake discs?
The behavior of the car will tell you. The braking distance increases, the car “goes” to the side when braking, the brake pedal has become “soft”, and the brake fluid level has dropped.
This is your signal that you need to check the condition of the brake system. Including measuring the thickness of the brake discs. The measurement is carried out with a conventional caliper at several points on the disk. The manufacturer indicates the minimum and maximum thickness of the brake disc directly on the disc.
Based on the measurement results, you decide on replacement. And remember that this is not a case when you need to save money or hope that “they’ll still come.”
Brake discs must be replaced in pairs on the same axle. Even if you are a supporter of a calm driving style, you need to carry out diagnostics of brake discs systematically. Not for wear, but to check for mechanical damage.
As practice has proven, front brake discs are replaced more often. There's a reason for this. Taking into account the fact that the load on the “front” of the car is greater, the braking system of the front suspension experiences greater loads than the rear brakes.
The technological process of replacing front and rear discs is, in principle, no different. Experts recommend making a decision to replace brake discs after the first disc resurfacing procedure. Grooving the discs a second time is not allowed.
What you need to replace brake discs
First of all, the brake discs themselves. It is highly recommended that when purchasing new brake discs, do not forget - a pair for one axle, and immediately buy new brake pads. The ideal option would be to purchase brake discs and pads from one manufacturer.
Some car enthusiasts, trying to save money, leave old brake pads when replacing discs. This leads to the fact that the grooves on the new brake disc will be filled with old pads. After all, the planes will not have a uniform area of contact.
To replace brake discs, you will need a standard one.
- standard set of wrenches according to the size of the fastener;
- jack and tire carrier for wheels;
- repair pit;
- tripod or “goat” for mounting a car;
- stops (shoes) for fixing the car;
- wire for fixing the caliper.
It is advisable that you have an assistant, who will be needed when dismantling the old and installing a new brake disc.
Before you begin removing and installing disks, check in the manual, or better yet, with fellow car models on the forum, whether you need “self-locking” bolts. Or you can use the old ones. Although, new ones are better.
Brake disc replacement technology
With the exception of some design nuances of different brands and models of cars, the procedure for removing and installing brake discs is typical.
- we fix the car using “shoes”;
- jack up the desired side, install the tripod and remove the wheel;
- before removing the brake disc, dismantle the operating point brake system, press out the piston of the working cylinder;
- remove all dirt from the surface of the hub and caliper so as not to change the bearing;
- the assistant presses the brake and holds the steering wheel tightly, and in the meantime, you unscrew (“tear off”) the bolts securing the brake disc to the hub. If necessary, pre-treat the bolts with Miracle Liquid WD;
- remove the brake caliper and secure it with wire so that it does not interfere with or damage the brake system hose;
- Next, we disassemble the caliper assembly: remove the brake pads, admire their workmanship, and are glad that we took new ones, remove the clamping springs, the caliper bracket itself;
- fix the hub, unscrew the fastening bolts completely and remove the old brake disc.
We recommend: Fuel filters for VAZ 2110–2112: do-it-yourself replacement
Installing a new brake disc is carried out in reverse order. Don't forget to install new brake pads. After replacing the brake discs, bleed the brakes.
The most important thing on a car is the serviceability of the brake system. At the slightest malfunction of the brakes, the driver risks not only his life, but also the lives of passengers, as well as other road users. One of the important parts of this system is the brake disc, which is rigidly connected to the front wheels. Replacing a VAZ 2107 brake disc is carried out when there are appropriate symptoms, which are described in detail in the material.
The process of replacing brake discs with your own hands
Unscrewing the wheel
Before starting work, the vehicle must be placed on a flat surface and, using “shoes,” securely fix it in place. Then the desired part of the car body should be raised using a jack, after which a metal support (tripod) is installed under it. Next, the operating point brake system is dismantled and the working cylinder piston is pressed out.
We loosen the caliper.
The next step is to remove the brake pads. If there is no unobstructed access to the brake disc, the caliper must be disassembled. In most cases, 1 - 2 screws are used to connect the disk and hub. After removing them, the brake disc is removed from its place, after which its seating surface is cleaned of rust, dust particles and other debris. If it is not cleaned, the likelihood of the disc becoming bent increases, and it will not be able to fit perfectly onto the dirty surface.
Old brake disc
Almost all purchased brake discs contain lubricant applied by the manufacturer. Factory grease does not need to be removed before installation, because it protects the surface of the product from the formation of microscopic cracks and from the occurrence of rust. New discs also do not need to apply an additional layer of lubricant, because excess lubricant can cause uneven pressing of the disc to the hub, as a result of which there is a high probability of its misalignment.
Ready to install
During the installation of new disks, it is necessary to monitor the tightening force of the disk mounting screws. Strongly overtightened fasteners often cause severe radial runout. During fastening, it is best to use a torque wrench, which allows you to adjust the force. In this case, the recommended force value is in the range from 100 to 120 Nm.
We install a new brake disc
After installation work, it is recommended to check the amount of runout of the brake disc using a special dial indicator. There are many tables on the Internet with data regarding the permissible runout value for a particular brand of car. If the measurement results are too high, it is necessary to re-tighten the fastening bolts.
Additional details
The working surface of the installed disk must be thoroughly cleaned of lubricant using special solvent-based compounds.
Installing an old block
When assembling the caliper, special attention should be paid to the surface of its mating flange. It must be cleaned of any dirt and rust.
This will not only protect the pads and brake rotors from premature and uneven wear, but will also reduce the likelihood of the caliper jamming. Fasteners, as in the case of installing a brake disc, are best tightened using a torque wrench. When replacing brake discs, it is recommended to also replace the pads.
Installing the caliper
At the last stage, you need to carry out the procedure of bleeding the brakes and running in new brake discs. During break-in, it is advisable to avoid aggressive and sporty driving styles, which involve elements of extreme and prolonged braking.
How to remove a rear disc
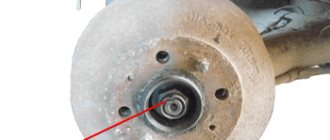
How to remove the rear disc? I unscrew the rear wheel, followed by the disc (there are studs on it), this disc is secured with 4 nuts. I unscrew the 4 nuts, but the disk does not come off, it moves, but does not come off. how to remove?
there are literally 2 options 1. there are threaded holes on the disk, we screw the bolts in there, they rest against. I don’t remember where. pull off the drum. 2. hammer. this method can cause drum damage
Tap the drum around with a hammer. Remove the car from the handbrake, then you can screw on the wheel and by slightly shaking and pulling the drum should tighten. If not, you can screw on a few nuts (wheel nuts) and, using a mounting tool, leaning on the middle, pull off the drum.
but the disk does not come off, it moves, but does not come off. how to remove?[/QUOTE]
try lowering the handbrake
2 Ecorn. My disk does not have threaded removal holes. There are no holes at all. I was surprised when I was filming it.
Easy to remove! In principle, you don’t even have to unscrew the wheel from the studs, if you can unscrew those 4 nuts, for this you need a head about 17 long, I think. I did this, removed the wheel, then unscrewed all 4 nuts, put the wheel back, tightened it slightly with 2 nuts, then kicked the wheel, again without fanaticism, and the brake drum came off.
why the handbrake? he's not worth it. and it is not installed. I do everything for him. I want to change the cables. I took it off already. More precisely, he tore it away from the car. There's no other way to say it.