Date of publication: January 22, 2021. Category: Automotive equipment.
Protection of the main components and assemblies of the car is an integral (and for our roads, necessary) part of tuning. After all, no one has any questions when installing engine crankcase protection or automatic transmission. The radiator, which is responsible for cooling the engine, often also needs additional protection. An additional mesh for a car radiator, installed in front of or behind the standard grilles, significantly extends the “life” of the radiator and ensures uninterrupted operation of the cooling system.
Additional mesh for the radiator: pros and cons
Advantages of installing additional grids on the radiator:
- They reliably protect the metal elements of the radiator from stones and other solid objects (which can freely penetrate through the rather large holes of the standard grilles) flying out from under the wheels of vehicles moving in front of your car.
- The entry of dust, fluff, insects, sand, small leaves, grass and other debris into the intercellular space of the radiator significantly impairs the efficiency of the engine cooling system. Installing additional protective elements relieves the motorist from the listed troubles. And cleaning and rinsing the mesh is much easier than cleaning the radiator itself.
- These decorative accessories improve the appearance of the car, giving it individuality and exclusivity.
Opponents of installing an additional protective mesh on the radiator grille talk about the following negative (albeit very ambiguous) points that arise after its installation:
- About reducing the aerodynamics of radiator airflow. Allegedly, the factory specialists thought through everything when designing the car, and a decrease in air flow can only lead to a deterioration in the car’s performance. However, rarely does anyone install additional meshes with a cell size of less than 5X5 mm (and this is unlikely to significantly affect the natural airflow of the radiator when the car is moving). It’s not for nothing that such protective devices are produced by studios that specialize in tuning expensive Porsche, Maybach or Bentley models (and they won’t “hang” additional “things” on a car without preliminary testing).
- About turning on the fan more often when parked for a long time in a traffic jam (especially in hot weather). However, when the car is not moving, natural cooling of the radiator does not occur at all. And the mesh certainly cannot interfere with the operation of the fan (drawing air through small cells).
Mesh screen installation technology
If your plans include installing a protective and decorative mesh on the radiator grille, you should decide on its location. This can be an external or internal arrangement of the mesh screen, with each method characterized by its own set of advantages and disadvantages.
In particular, the external installation method allows for additional tuning of the car’s exterior. If the mesh screen is located internally, it will practically not be visible behind the radiator grille, and in some cases this will require removing the bumper, and for many foreign car models this is a problem.
For the mesh to perform protective functions, the cell size must be within 2.5-5.0 millimeters - this is a reliable barrier to small stones, debris and insects, and at the same time, air will penetrate to the radiator fins with virtually no interference.
Let's look at the main differences between internal and external methods of installing a mesh screen.
Mounting on top of the radiator grille
If previously a car had only one monolithic grille, recently it has often been practiced to install protective elements consisting of two parts: one located in a regular place, the other behind or under the bumper.
Most car brands practice placing a nameplate in the middle of the grille, which will have to be removed during external installation.
The procedure for externally installing a mesh to protect the radiator in the bumper consists of the following steps:
- determination of the geometric dimensions of the mesh screen. The best and most accurate way is to use an overlay sheet of thick paper or cardboard and transfer the outline of the hole with a pencil;
- using the resulting template, a mesh of the required size and shape is cut out of the rolled material using metal scissors;
- if the edges of the mold are too sharp, it is necessary to select a cable whose inner diameter of the insulation coincides with the outer diameter of the mesh wire. Using a utility knife, we cut the insulation and place the resulting hollow PVC tube on the edges of the mesh along its entire perimeter;
- the resulting structure is attached to the radiator grille in any convenient way.
If you plan to install parking cameras in the area of the mesh screen, a hole of the appropriate diameter should be cut in the places provided for this.
Installation of the mesh from the inside
In this case, the first two or three stages are completely identical, but there are some nuances. In particular, only in every fourth foreign car the radiator grille is removed from the outside. In other cases, to install additional radiator protection, you will have to dismantle the bumper, which significantly complicates the procedure.
If you succeed, take a close look at the bumper: most likely, on its inside there are standard fasteners and other structural elements to which our mesh can and should be attached.
Factory fixtures
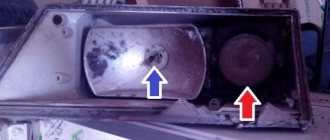
Almost all modern cars have fairly large holes in the protective grilles installed between the headlights and in the bumper. This leads to both damage to the radiator and rapid clogging of the free space between the cooling plates.
Numerous manufacturers of car accessories have not ignored such a tuning element as the manufacture of a protective mesh for the radiator. Nowadays, finished products can be purchased (or pre-ordered) for almost any brand of car.
Advantages of a finished factory product:
- Easy to install on a car, since the fasteners are designed for a specific model. Designers and manufacturers take into account all design features. As a rule, installing such products does not require dismantling the standard grille and bumper. These products are designed for do-it-yourself installation, so no special skills or special tools are required.
- For anti-corrosion protection and, as a result, to increase durability, manufacturers apply a special polymer powder coating.
On a note! For some cars, additional nets are produced only for installation in the bumper. It is this part that is most vulnerable, since it is closest to the road surface.
An additional protective mesh for installation in the bumper from the outside for Renault Duster, Nissan Almera or Hyundai IX35 today costs 2200–2500 rubles. The cost of a set of two nets (the upper one for installation on the grille, the lower one for installation in the bumper) for Mazda CX-5, Mitsubishi Outlander or Kia Ceed will be 4400÷4800 rubles.
How to make and install an outdoor version with your own hands?
To manufacture a protective element designed for external installation, you should purchase the following materials:
- aluminum fine mesh;
- universal glue;
- a piece of thick electrical cable 2-3 m long;
- tape and clothespins;
- a sheet of cardboard (mesh packaging works well);
- plastic clamps, preferably transparent or black, to match the color of the grille.
Materials and tools for DIY
To make a mesh frame and place it on the car, prepare a set of tools:
- stationery knife;
- regular scissors and for cutting metal;
- tape measure, ruler;
- marker.
A device for safely cutting the cable is made from a knife and a strip
Since this simple design is attached to the radiator grille from the outside with clamps, no tools are required to disassemble the bumper.
The cable is cut lengthwise to remove the insulation
The production and installation of the outer mesh is carried out in the following sequence:
- Take a sheet of cardboard, apply it to the car grille and carefully cut out a template that exactly repeats its shape. If necessary, modify the template with scissors, achieving maximum coincidence of the contours.
- Place the template on the mesh and trace with a marker, then cut out the workpiece with metal scissors. Try it on the radiator on your car.
- Tape a utility knife to a wooden plank as shown in the photo. Using this tool, make a longitudinal cut in the cable insulation and pull out all the conductors from inside.
- Form the edging of the element by placing the cut and gutted insulation on the ends of the previously made workpiece. Fill it from the inside with glue at several points and clamp tightly with clothespins.
This is what a homemade external mesh looks like on a car
When the glue has completely dried, the clothespins can be removed and the mesh can be installed on the car. If you did everything correctly, it will fit tightly to the grille from the outside. All that remains is to tighten and secure the resulting element with plastic clamps. After tightening, cut off their ends and turn them so that the clamp clamps are inside and do not stick out in plain sight. When you need to remove the protective element, just cut the puffs with wire cutters.
Homemade devices that do not require dismantling car parts
Those who do not want to spend several thousand rubles on purchasing a ready-made protective device can make it themselves. No special technical skills are required for this. There are a lot of options for making an additional protective net for a car with your own hands. It all depends on the specific brand of car.
If dismantling a standard grille or bumper requires a lot of effort (use of a lift, the presence of special tools), then the most acceptable option would be to manufacture an additional protective mesh with external fastening (that is, on top of the standard protective devices).
For this you will need:
- Metal mesh for a car radiator (aluminum or steel) with the size and pattern of cells most suitable, in your opinion, for the design of the car.
- Vinyl tubing or outer insulating layer of electrical wire. This will be needed to make the framing edging.
- Plastic clamps.
- Metal scissors or jigsaw.
Manufacturing algorithm:
- We make a template from a suitable piece of cardboard that exactly matches the size of the ventilation hole.
- In accordance with it, we apply markings on the metal grill using a marker. To simplify this process, it is better to secure gray plumbing tape on the mesh structure in the places where the lines are drawn.
- We cut out the workpiece strictly according to the applied markings.
On a note! If we use aluminum mesh for production, then you can use scissors; if it is steel, then it is better to use a jigsaw.
- We make an edging from a vinyl tube or insulation from a wire of a suitable diameter. To do this, we make a longitudinal cut along the entire length (tube or wire).
- We fix the edging at the end of the metal workpiece (for more reliable fastening, we apply glue in several places).
- We mount the manufactured mesh into the bumper on top of the standard grille using plastic clamps.
The main advantages of this method of additional radiator protection are:
- There is no need to disassemble the car or dismantle individual elements.
- Ease of manufacture and low cost of the finished structure.
About internal installation
Motorists who want to install a fine-mesh mesh directly in front of the radiator need to prepare the following tools:
- a set of keys and screwdrivers for removing the front bumper or radiator grille (if possible);
- metal scissors;
- roulette, ruler.
Most often, plastic clamps are used to secure the mesh.
To fasten the mesh, you can use the same clamps or self-tapping screws, if the design of the body kit allows it. Instead of aluminum cellular material, it is possible to use a plastic mesh secured with a glue gun. The installation algorithm is as follows:
- Wash and dry the car. If fog lights are installed in the bumper, disconnect the negative terminal of the battery before starting work.
- Remove the front body kit by disconnecting the fog lamp connectors.
- Applying the mesh to the grille opening from the inside, cut out the blank with a margin of at least 1 cm on each side.
- Attach the workpiece to the body kit. Here you can use a combined method: first, tighten the mesh to the grille with clamps, and then screw the edges with self-tapping screws. Attach the plastic material with a glue gun at several points.
- Reinstall the front body kit, connect the headlights and battery.
Mesh attached to the removed bumper This is what the mesh installed inside looks like
Anti-mosquito nets
Another convenient device for protecting the radiator from small debris and insects is a mosquito net, which can be installed in two ways:
- Mounted in front of the radiator (behind the inside of the standard protective grille). To install such a device, it is necessary to dismantle the standard protective grille.
- They are fixed externally to the car radiator grill using special harnesses and hooks. This device is very convenient to use as temporary radiator protection during long trips on the highway or in forested areas. It can be quickly installed and removed.
Anti-mosquito devices are made from elastic mesh material with small cells. The main advantages of these products are:
- versatility (can be installed on almost all brands of cars);
- low cost;
- ease of installation/disassembly and subsequent cleaning/washing.
Do-it-yourself manufacturing and installation
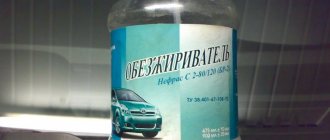
How to degrease the surface of a car body before painting
Despite the large number of products that can be purchased at auto parts stores, some drivers construct the mesh for the body kit themselves. Among the reasons are the unusual shape of the bumper air ducts, as well as the desire to stand out and create a unique part.
To make a bumper mesh with your own hands, you will need the following tools and materials:
- Scissors for paper and for cutting metal.
- Net.
- Screwdrivers and keys.
- Self-tapping screws.
- Marker, cardboard and pencil.
- Soldering iron power 100W.
Mesh construction is divided into several stages:
- Removing the vehicle bumper. To make the operation easier, the car is driven onto an overpass, inspection hole, or a jack is used.
- Creation of patterns. To do this, cardboard is applied to the holes in the air duct, and the resulting figure is traced to the required dimensions. Next, cut out with scissors.
- Creating a part. The resulting template is applied to the mesh, and the required part is cut out with metal scissors.
- Fit. The resulting part is applied to the opening of the air duct; in case of some discrepancy in size, the edges of the cut mesh are folded and applied again.
- After the adjustment is completed, the part is fixed to the vehicle body kit.
The protective element is mounted either on the inside or outside of the bumper.
From the inside
When installing the mesh on the bumper yourself, use a soldering iron. With its help, the element is attached to the edges of the air duct openings. The edges of the mesh are heated with a tool and soldered into the bumper. After this procedure, the body kit is sanded on both sides, coated with primer and varnish.
An alternative fastening method can also be used. The mesh is installed on the body kit using self-tapping screws. They are carefully screwed into the thickened parts of the bumper.
Outside installation
You can also install the mesh on the outside of the bumper yourself. This method of fastening has its own nuances. The element is attached with self-tapping screws instead of the standard radiator grille. The method is not feasible if the car has a complex-shaped radiator grille.
MYTHS
Also, opponents may say that such grids are not only not useful, but they also contribute to overheating of the engine. Allegedly, if you take the thinnest cell, then it is:
Firstly, it will be poorly blown with air, poorly dissipating heat
Secondly, it will clog very quickly, completely clogging this mesh
Thirdly, the engine will overheat in traffic jams
But friends, this is not so, the radiator itself is made of aluminum, even without blowing it dissipates heat very well, because it is specially made ribbed (so that each rib) dissipates as much as possible.
Again, even the thinnest cell will pass the incoming air quite well (there will be an obstacle, but it is not significant). When it comes to engine overheating in traffic jams, the grille and the mesh have almost no meaning; here a large load falls on the fan, which turns on when the critical temperature is reached.
I will say even more, there are cars (standard, not tuning) whose front part was completely covered for the sake of beauty. And nothing overheating happened, just the standard fan turned on more often and cooled the car.
Positive points
There is a healthy grain in such improvement of the car, especially if in the summer you often move along the highway, from one city to another. The thing is that modern cars have large radiators (which can extend far down) and double grilles that are supposed to protect them. One is mounted between the headlights, but many manufacturers now build the second into the lower part of the bumper.
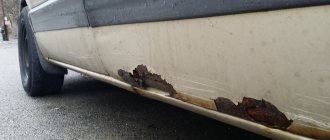
Grilles are supposed to protect - but they don’t! And why? This is because now they often carry purely design solutions; there is a large cell where not just a fly, but a really large stone from under the wheels of the car in front will fly.
All this can really cause damage to the surface of the radiator; it’s certainly difficult to break through, but it’s easy to get clogged with flies or fluff. And here the decision to fix the protective mesh is very justified, because all the insect fluff and other delights of our roads will settle on it. And you can easily wash it all off at the nearest sink.
Is it possible to do it yourself?
YES of course you can. And it will be many times cheaper than buying from a dealer. To do this, we need to buy either a metal mesh at the nearest store (as I wrote above, the best is aluminum, because it is easy to work with). Or take a plastic one, preferably made of fiberglass, but which bends easily.
Then we simply remove the radiator grille (or two, upper and lower, if any), cut the protective mesh to size and fasten it with screws and ties. I would like to note that on many cars the grille needs to be removed along with the bumpers, because there is no way to get through.
For those who do not want to mount it rigidly, but want to make it removable, you need to make a frame onto which we stretch the mesh fabric (a rigid wire is suitable for this, or you can use a PVC pipe). And then insert it between the bumper and the cooling element. I repeat once again - THE MAIN THING IS NOT TO RUB ANYWHERE.
The cost of both elements will be about 300 - 500 rubles, plus your time.
Now we are watching the video version
I’ll finish this, I think it was useful. Sincerely yours, AUTOBLOGGER
What is it made of?
Now there are two types of such grids:
- Factory - already for your car
- Homemade - made by the owners themselves
Both are often made from metal mesh (only the cell size is different), or from durable plastics that are difficult to destroy even in the cold. The most common ones are now made of aluminum; in fact, it’s very easy and quick to do it yourself, but more on that a little later.
For vehicles with an easily removable standard radiator grille
For some cars, such as the Jeep Wrangler, removing the standard radiator grill can be done quite easily and quickly. For owners of such cars, the most optimal option for installing an additional protective mesh would be to attach it to the inner surface of the standard grille.
Required materials and tools:
- plastic mesh of the required size (easy to purchase at any garden supply store for 200–300 rubles);
- platforms for laying and fastening electrical wiring (size 20X20 mm, packing 100 pieces costs only 150÷170 rubles);
- plastic zip ties (size 2.5x100 mm, pack of 100 pieces costs 40÷50 rubles);
- universal instant adhesive gel (110÷130 rubles);
- household scissors;
- ruler or tape measure.
The manufacturing process is simple, does not require technical skills and does not take much time:
- disconnect the wire connectors from lighting fixtures, sometimes mounted on the radiator grille (turn signals, fog lights, etc.);
- carefully remove the upper protective grille;
- along the edges of the large ventilation holes on the inside of the grille, using instant adhesive gel, we fix areas for subsequent fastening of the mesh;
- let the glue dry so that the fixation points acquire the necessary strength;
- Using scissors, we cut out blanks of the required size from a plastic mesh (so that they completely cover the ventilation holes);
- we secure the pieces of mesh with plastic clamps (it is necessary to ensure that the tension is strong enough and there is no sagging);
- cut off the excess mesh and the “tails” of the clamps;
- we install the modernized grille in place.
On a note! Depending on personal design preferences, the mesh can be chosen in red, blue, green, orange or black.
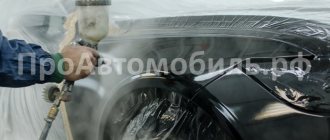
Coloring protection.
The manufactured device is already ready for installation on the car. But for greater effectiveness, it is necessary to give the grille a colorful appearance. If you decide that the grille and frame will be painted the same color, then you can process the assembled protection. If you select separate colors for the mesh and frame, it is better to paint the element before complete assembly. The process of painting the radiator protection is completely similar to painting the metal surfaces of a car. Before applying paint, it is necessary to thoroughly clean and degrease the surface. Then, you need to apply a layer of primer and wait until it dries completely. After this, we apply paint to the surface of the element. Often, the protection frame is covered with film. Thus, you can get an interesting appearance of protection. After complete processing, we mount the part in place. Independent production and installation of an element is a fairly simple, but very effective way to modernize a car. With enough desire and enthusiasm, you will definitely achieve the desired result and make your car more attractive. Good luck!
Sequential steps for replacement
Body-matched grille
For the work you will need a screwdriver and an awl. Auto mechanics distinguish 2 methods for dismantling the grille.
- The bumper is removed.
- The bumper cannot be removed.
At the first stage, the ground wires are disconnected from the battery. Then the engine mudguard is removed. To do this, you will need to unscrew the 3 bolts from below that attach the bumper to the protective covers. The next step involves removing:
- screws securing the bumper to the front of the body;
- 2 screws for fixing the left and right headlight housings;
- 2 screws on the right and left side of the arches, they attach the bumper to the front fenders.
Removing the grille is completed by removing the bumper. If you remove the Priora SE grille using the second method, then you will need to press the locking washer located near the bumper. Then the washers securing the grille are removed. Otherwise, the hood is raised and secured with a stop. After this, the screws securing the combination lights to the front panel are removed. The lights themselves are removed, the electrical wiring is disconnected from them. Using a screwdriver, turn the locking washers 1/4 turn. The old grille is then tilted forward, pulled up and removed.