Life hack: radiator grille of Priora 2 and 1 - how to change it, part numbers
The cooling of the car starts from the grille at the front.
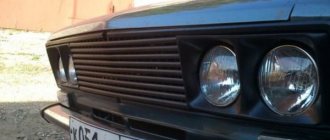
A good part can cool the engine only with the flow of air. The radiator grille in Priora 1 and 2 (SE) has such functions. The price of the part is from 700 rubles. On long trips, they allow air to pass through perfectly and cool the radiator. There are several spare parts options for Priora. For example, the radiator grille called the saber looks great. Our Priora is like a Lego. This type of tuning is popular among car owners - change the headlights, or the grille with bumper. As if the Lada Priora will no longer be a Lada. The black radiator grille of the Priora car without a badge also looks great on the car. It is popular with those pelvis workers who constantly rip off badges as if it won’t be a pelvis after that. The part is the “first step” in the air purification system entering under the hood of the car. The main purpose of the part is to prevent foliage from getting inside. The mesh structure with which the standard spare part is made can only stop relatively large lumps of dirt and leaves. If its structure contained too small a honeycomb, the volume of air entering under the hood in a given unit of time would decrease. This will negatively affect the temperature of the car.
- Standard radiator grille for Priora - article number and price
- Radiator grille on Priora 2 - restyling
- Lower grille: article number, price
- Saber – article number, price
- Basic faults
- Replacement: how to remove the radiator grille on a Priora
- Replacing the lower grille
- Winter grille cover
Removing the radiator grille from Lada Priora: step-by-step instructions
Replacing the cooler protection can be done in several ways:
- without removing the front body kit;
- with removal of the front bumper.
The second method is more suitable for carrying out a full range of modernization of the front body kit of a car, which involves not only replacing the upper protective frame, but also installing additional tuning elements, including replacing the bumper with a new one.
It is recommended to remove the factory radiator frame of the Lada Priora Lux 2015 without dismantling the front body kit in the suggested sequence:
- 1. Open the hood and secure it using a special support;
- 2. In the upper part of the bumper mount, unscrew 3 side screws that secure the headlight mudguards;
- 3. Unscrew the 4 fastening screws securing the bumper to the car body;
- 4. Carefully bend the upper part of the front bumper away from the car body;
- 5. Slowly unscrew the 5 screws securing the radiator grille at the top and bottom. The work should be done from the hood side using a short screwdriver, since there is quite a small space for work at this stage;
- 6. Carefully pull the upper protective frame of the bumper forward and remove it from its place.
grille and bumper installation diagram
When dismantling the car's upper protective frame, you should not resort to prying or excessive force to remove it. Such actions will lead to defects in plastic parts.
How to remove the radiator grille on a Lada Priora
Selecting and installing a new grid
Modifying the grille on a Lada using moldings
Recommendations
Replacing such an element as the Priora radiator grille often arises in the minds of owners of a Lada car of this model. This car's grille doesn't have the most attractive appearance. To improve the appearance of the car, car owners often resort to tuning. Designers of automobile corporations never cease to amaze us with new forms and models of vehicles. Small details play an important role in the overall appearance. The radiator grille is no exception.
New radiator grille for Priora
There are always large holes on the bumper. They serve to keep the engine cool and the engine compartment to be freely blown and ventilated. A mesh is placed behind the radiator grille. It is designed to protect the insides of the car from various debris, insects, and small birds that can get under the hood while driving. The mesh performs a protective function. In tandem with the radiator grille, the mesh also plays a decorative role. This is why craftsmen love to experiment with this part of the body and make the car unique.
If you install a new grille on the Lada Priora, you can significantly change its appearance. Before you begin work on improving the design, you need to know how to remove the grille. Consultation with a specialist will not be superfluous. An experienced master will give advice, make recommendations and share the secrets of performing the work.
Replacing the Priora radiator grill is a simple process that you can do yourself. The process will depend on which grille you plan to replace the old one with. Before starting work, disconnect the wires from the battery and remove the engine splash guard.
There are two ways, with and without removing the bumper. To remove the grille on a Priora, you need to press on the washer that secures the bumper, and then remove the washers that hold the grille directly.
The Lada Priora se radiator grille is attached with nine screws, so there is no need to remove the bumper. Just open the hood and pull it out.
Replacing the radiator grille on a Priora
How to remove the radiator grille on a Lada Priora
So, to remove the radiator grille, you can use two methods:
- with removal of the front bumper;
- without removal.
If you decide to completely transform the appearance of your car, then the second method would be ideal. It may be needed if you decide to install new tuning elements or replace an existing bumper with a new one.
How to remove the radiator grille on a Priora? If dismantling the body kit is not required, we perform the following processes:
- We open it, and with the help of a support, we fix the hood of the car.
- Unscrew the three side screws securing the headlight mudguards.
- We also unscrew the fasteners securing the bumper and car body.
- Bend the upper part of the bumper away from the body. This must be done carefully.
- We remove the screws holding the radiator grille on the top and bottom sides. Due to insufficient space, we carry out the work using a short screwdriver.
- We pull the grill forward and carefully take it out.
- We install the grille in place in the same way, only in reverse order.
Removing the radiator grille on a Lada Priora car
Selecting and installing a new grid
A fairly common tuning method is to install a mesh instead of a radiator grille. This action can improve the protection of the space under the hood from various debris and insects. The appearance of the car is significantly improved. The radiator is cooled better. You can use a mesh made of different materials. The most popular are plastic and metal.
Removing the front bumper
We carry out the work when repairing and replacing the front bumper, the energy-absorbing beam of the front bumper, removing the headlight unit and for access to the hood lock and sound signal. Unscrew the nuts securing the power unit mudguard 5–6 turns (see “Removing the power unit mudguard”). We unscrew the screws securing the fender liners to the front bumper (see “Removing the mudguards and front wheel fender liners”). In the wheel arch...
… use a Phillips screwdriver to unscrew the self-tapping screw securing the bumper to the front fender bracket. Similarly, unscrew the screw on the other side of the car.
Using a Phillips screwdriver, unscrew three screws 1 and one self-tapping screw 2 securing the decorative trim of the headlight...
...and remove the cover. Similarly, remove the decorative trim on the other side of the car.
Using a Phillips screwdriver, unscrew the two screws securing the bumper to the upper cross member of the radiator frame.
Using a little force, remove the bumper side flange from the body bracket. We perform a similar operation on the other side of the car.
Remove the front bumper. If it is necessary to remove the energy-absorbing beam of the front bumper...
...using the “8” head we unscrew the three bolts securing the energy-absorbing beam to the body...
...and remove the energy-absorbing beam. We install the energy-absorbing beam and the front bumper in the reverse order, ensuring uniform gaps between the bumper and body parts. After the bumper is secured to the body, we press the sidewalls of the bumper to the body brackets until the sidewall flanges are fixed on the body brackets.
The value of tuning
Tuning is a modification of a car that allows you to improve its appearance and change its factory characteristics. With the help of tuning, engine efficiency and power are increased, suspensions and braking system performance are improved.
Tuning the grille allows you to improve the appearance of the car, as well as increase the protection of the radiator. Refinishing can hide damage and defects.
Main options
Before starting work, you need to determine the final type of grating. There are several types of modifications. The chosen type determines what materials and tools will be used in the work.
Most often, the radiator grille is replaced with a metal fine mesh. ABS or fiberglass construction is also used. Using silicone glue, various decorative elements (for example, brand labels, letters and even drawings) can be attached to the part.
When doing tuning yourself, you must avoid partially or completely blocking the air flow through the grille. Otherwise, due to a decrease in the efficiency of the cooling system, overheating of the lower part of the body is possible.
How to tune it yourself?
Independent modification of the radiator grille is carried out in several stages.
Removing the factory radiator element
To carry out work, the part must be removed. Usually the grille is fixed with bolts and self-tapping screws. But modern models are equipped with plastic latches. Dismantling is carried out carefully so as not to damage the fasteners and grooves intended for them. You can remove the grill in about 20 minutes.
This is interesting: Review of small cars for women with automatic transmission
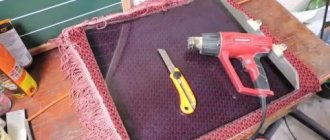
Making LED lighting
LED lighting is placed around the perimeter of the removed part. To install it, you should think about the connection in advance. It cannot be attached to parts that heat up during movement. It is best to install diodes on the grille ribs. You can securely fix the tape using silicone or quick-drying glue.
We equip chrome protection
The chrome plate on the radiator protection will give the old design a mirror-metallic shine. When creating it, special binders are applied to the surface of the product. They are dried at a temperature of +65 °C.
The work involves performing the following actions:
- a layer of activator is applied using a spray gun (for example, ST. 2516);
- then the grate is washed with distilled water;
- using a double gun, “Metachrome” and a reducing agent are then applied.
A pre-purchased radiator protection cover can greatly simplify the work.
Tuning "Lada Priora" using moldings
A very interesting radiator grille (Lada Priora) is obtained if you use a couple of moldings. This tuning allows you to radically change the appearance of the front of the car.
The work is quite simple - you do not need any special skills.
- remove the radiator grille;
- cut off the VAZ icon located in the middle;
- We mark 2 chrome moldings along the length and cut them to the required size with a hacksaw;
- Using epoxy resin, we glue the moldings to our base and wait for it to dry;
- use a file to smooth out any unevenness if necessary;
- We install the resulting product on the car - and the tuning is successfully completed.
Grid installation
Quite common is tuning, which consists of installing a mesh instead of a radiator grille. This allows you not only to give the car a more modern appearance, but also to provide effective protection from dirt and high-quality radiator cooling.
For this purpose, you can use a plastic or metal mesh. The installation process looks like this:
- remove the radiator grille;
- Using a hacksaw, we cut off all unnecessary vertical and horizontal elements, leaving only the outer contour;
- we seal the resulting holes using putty (some use fiberglass for this purpose);
- When the putty dries, sand it until smooth. This is a rather labor-intensive process - you need to carefully monitor the shape and smoothness of the lines;
- prime;
- paint with a spray can or a regular brush;
- We attach the mesh with self-tapping screws (the base will need to be heated so that it does not burst), or with glue if it is made of plastic;
- apply paint to the entire product;
- varnish;
- we install it back on the car - at this point the work can be considered complete.
The main reasons for changing the grille
Another design option
Tuning and grille removal are necessary to give the car an original appearance. Car owners should know how to replace a part if cracks appear on it. It should be noted that this design has:
- resistance to large temperature changes;
- individuality;
- low price.
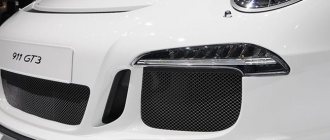
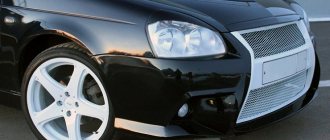
Tuning the Priora se involves installing an “aggressive” grille. This model will give the vehicle a sporty look by increasing radiator cooling. Some Lada owners prefer to tune the factory model. For this you can use chrome strips and moldings. They stick easily to the ribs.
Tools you will need:
- hacksaw;
- scissors;
- double sided tape;
- epoxy.
The radiator grille of the Priora se can be easily tuned with your own hands. To do this, you will need to cut out the VAZ badge using a hacksaw. Then you will need 2 moldings, which are first placed on the plane, marked and cut to size. This element is attached to the grille with tape. Moldings must be wrapped with masking tape in advance. This will prevent damage to the main element.
The next step is to dilute the epoxy glue in a container. Moldings and radiator grille are coated with it. Then the strips are applied, pressed down and held for some time. After the glue has dried, the edges are trimmed. A file is used for this.
Replacing the Lower Bumper Grille of a Priora
Preliminary replacement of the front bumper
Welcome! Front bumper . basically when we drive around the city it suffers the most from the front bumper, we catch the car in front of them and sometimes we put out reinforcements or just a stone lying on the ground that we see and end up getting hit which deforms the bumper and it's bigger doesn't become as nice as it used to be because many owners immediately choose to replace that bumper, giving 100 cars to many people, they would like to take a lot to replace because basically most people prefer replacement, you save on your car and, as they say, your money and your time for trips to the service, well, even more so, because the bumper essentially does not change the work, since it is only attached to the bolts, completely unscrewing it, which can be unnoticed, we will talk about this in this article .
The note! To replace the front bumper on a Prior, you will need to stock up on a set of tools that will come with them: a wrench or socket of about “10”, as well as a screwdriver to unscrew the side screws. this is to attach the bumper!
Result:
Where is the front bumper of the previous one? Many people at this point will say: “Why open this question at all, it’s clear where it is before the grill,” the main answer. people who have never encountered replacing a bumper on a Prior, the fact is that on most cars this bumper is actually located strictly under the grille, and it is removed separately from it, while the previous one, in principle, is still the same, this bumper is strictly under grille, and the grille, it seems, is also considered a bumper, since it comes as a single unit. The block with it, on many cars it is not done ethnically, because when people find out about oh, even they are surprised to tell me to change the strip, but on the other one I need Should I remove and replace the entire bumper? Actually, no, the radiator grille can be replaced without removing it or even replacing the bumper itself, you just need to know how (how to remove the radiator grille, see the article entitled: "Replacing the radiator grille. About priority") Take a close look on the subject, for example, under the photograph showing a standard Lada Prior car bumper:
Repair and replacement of the front bumper of Lada Priora
repair and replacement
front
bumpers
frets
in
.
Priority: install grille and eyelashes
In this video we install a new grille
radiator instead of the old drain,
play in
, and put eyelashes.
How to replace the front bumper on a VAZ 2170-VAZ 2172?
Removal: 1) You will need this at the very beginning of the operation to disconnect the battery because you will still be working with the wires when you disconnect the bumper from the body of the car (Working with the wires involves disconnecting the wires from the fog lights, so if you don't have those headlights, you cannot disconnect the battery).
The note! Many people say: “Why turn off the battery? What if I don't turn it off? The point is that when moisture gets on the exposed wires, it can easily cause a short circuit, after which you will have problems with the wiring, and when the battery is de-energized, this will not happen because the wires will not be alive! (For information on how to disconnect the battery, see the article "Replacing the battery", point 1).
2) Then crawl under the front of the car and there you will find the bolts that secure the engine block to the bumper, some call this crankcase swing, so the bolts that secure the engine block to the bumper need to be unscrewed. and, having unscrewed, carefully lower the syringe so that it hangs a little, as shown in the small photo below:
3) Next, without leaving the car, locate the six screws that secure the bumper to the fender of the car, and then unscrew them completely, this way all the lower bumper mounts will be removed and you can stand up and move not too far towards the wheel arches.
4) As you approach the wheel arches, there will be three more screws that secure the bumper to the front fender, so unscrew the three screws on each side, then get into the car and pull the handle that opens the hood.
Sequential steps for replacement
Body-matched grille
For the work you will need a screwdriver and an awl. Auto mechanics distinguish 2 methods for dismantling the grille.
- The bumper is removed.
- The bumper cannot be removed.
At the first stage, the ground wires are disconnected from the battery. Then the engine mudguard is removed. To do this, you will need to unscrew the 3 bolts from below that attach the bumper to the protective covers. The next step involves removing:
- screws securing the bumper to the front of the body;
- 2 screws for fixing the left and right headlight housings;
- 2 screws on the right and left side of the arches, they attach the bumper to the front fenders.
Removing the grille is completed by removing the bumper. If you remove the Priora SE grille using the second method, then you will need to press the locking washer located near the bumper. Then the washers securing the grille are removed. Otherwise, the hood is raised and secured with a stop. After this, the screws securing the combination lights to the front panel are removed. The lights themselves are removed, the electrical wiring is disconnected from them. Using a screwdriver, turn the locking washers 1/4 turn. The old grille is then tilted forward, pulled up and removed.
The main reasons for changing the grille
Another design option
Tuning and grille removal are necessary to give the car an original appearance. Car owners should know how to replace a part if cracks appear on it. It should be noted that this design has:
- resistance to large temperature changes;
- individuality;
- low price.
Tuning the Priora se involves installing an “aggressive” grille. This model will give the vehicle a sporty look by increasing radiator cooling. Some Lada owners prefer to tune the factory model. For this you can use chrome strips and moldings. They stick easily to the ribs.
Tools you will need:
The radiator grille of the Priora se can be easily tuned with your own hands. To do this, you will need to cut out the VAZ badge using a hacksaw. Then you will need 2 moldings, which are first placed on the plane, marked and cut to size. This element is attached to the grille with tape. Moldings must be wrapped with masking tape in advance. This will prevent damage to the main element.
The next step is to dilute the epoxy glue in a container. Moldings and radiator grille are coated with it. Then the strips are applied, pressed down and held for some time. After the glue has dried, the edges are trimmed. A file is used for this.
Making a part with your own hands
The radiator grille from Priora se is easy to make yourself. To do this you will need the following materials:
Where to unscrew the screws from the grille
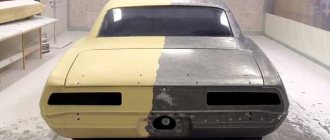
First, the old unit is dismantled. The middle of the part is cut out with a jigsaw. To carry out tuning, holes are drilled in the mounting points. Then you will need a thin and bendable material - plastic or cardboard. It goes around the internal contour of the future unit. It is recommended to note how many centimeters the part will go inside. Based on the obtained dimensions, cardboard or plastic is cut.
The radiator grille is well cleaned with sandpaper and degreased. A solvent is used for this. It is applied to the place where there is contact with the epoxy resin. Otherwise the connection will be loose. To obtain reliable contact and the desired thickness, you will need to repeat this process. As each layer dries, the cardboard or plastic comes off the product. This will allow you to find out whether the material is tightly glued. The next step is to level the surface. For this, putty is used.
When sanding, you need to make sure that the radiator grille does not have holes or scratches. The main task is to keep the product safe and sound. Then it is painted and primed. Tuning is complete. The radiator grille is installed in place. To do this, you will need to bend it at several points.
Tuning "Lada Priora" using moldings
A very interesting radiator grille (Lada Priora) is obtained if you use a couple of moldings. This tuning allows you to radically change the appearance of the front of the car.
The work is quite simple - you do not need any special skills.
- remove the radiator grille;
- cut off the VAZ icon located in the middle;
- We mark 2 chrome moldings along the length and cut them to the required size with a hacksaw;
- Using epoxy resin, we glue the moldings to our base and wait for it to dry;
- use a file to smooth out any unevenness if necessary;
- We install the resulting product on the car - and the tuning is successfully completed.
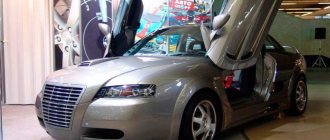
In the photo you can see what the radiator grille (Lada Priora) will look like after you do this tuning.