Despite the fact that car manufacturers are constantly working on their design and devote a huge amount of time and effort to creating completely new style options, almost all cars are still similar to each other to one degree or another. Many motorists do not like the fact that their vehicle is hardly distinguishable from the rest. That’s why they decide to resort to tuning their iron beauty and turn to specialized services for help. This useful material will talk about the simplest and most affordable, but at the same time very effective solution, namely, making a lip on a bumper.
What is a car bumper
Before getting acquainted with the additional functions of these body elements, let’s understand what a bumper is. This is a mounted or built-in part of the car body, which is always located in the front and rear of the vehicle. Most often this is the outermost point of the car, both front and rear.
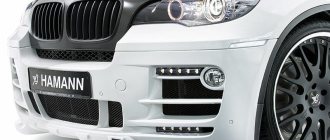
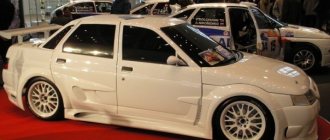
Depending on the design idea of the automaker, the bumper in the car can be integrated into the body, visually forming a single whole with the entire car. In some cases, as can be seen in the photo, this element can be a beautiful accessory that gives the car originality.
Do-it-yourself aerodynamic body kit
Making an aerodynamic body kit and generally giving the car the desired appearance is comparable to creating a sculpture, but with a small nuance.
As Michelangelo said when he was asked how he manages to make such wonderful statues (according to some historians and art critics, the words belong to Rodin) - “I just take a block of marble and cut off all that is unnecessary.” In our case, the opposite happens. We take the source code and add the missing elements until we get a masterpiece. To say that making a body kit yourself is not an easy task is to say nothing! Before you start mentally designing your future body kit, ask yourself the question - Can I do it? Am I good enough at drawing to even be able to reproduce this on paper? Are the arms inserted at that end to implement this on the plastic? Are there the necessary tools, space and the ability to get materials and consumables? If these moments are difficult for you to overcome, you should not get involved, you will lose time and money. It’s better to sign up for a tuning studio, or buy all the elements yourself and install them.
Main purpose
Many motorists and pedestrians mistakenly think that bumpers in cars are needed solely as a decorative element. For this reason, some car owners remove protruding “decorative” elements as an initial “tuning”.
In fact, the decorative properties of this element play a secondary role. First of all, this is a part designed for the safety of pedestrians. In addition, rigid hinged structures prevent damage to important parts located in the front part of the engine compartment, as well as load-bearing parts of the body. It is much cheaper to replace this element than to straighten a car damaged in a minor accident.
A modern bumper is an elastic element that acts as a damper in the event of a collision. Although it is more likely to break and be shattered into small pieces, it is designed to absorb a significant portion of the kinetic energy generated during a collision.
Manufacturing procedure
The most affordable method is epoxy. Plastic and metal are considered more expensive options. Some people use fiberglass in their work.
The base for the future part is made from ordinary foam plastic. Using a sharp knife and using plasticine, the surface of the body kit is exposed for subsequent gluing. Then fiberglass is applied, the thickness of which is determined according to your wishes. The foam is removed, the surface is cleaned, and fasteners are installed. The body kit is ready for installation. Finally, all that remains is to putty it, cover it with a primer and paint it.
If you decide to use plastic, the technology of work remains virtually unchanged. You just need to make a suitable base from balsa, linden or dense foam. To give it strength, the surface is primed with nitro varnishes, to which talc or baby powder is added. The surface of the base of the body kit is leveled with the same mixture.
When using polystyrene foam, it is treated with diluted acetone, varnish or epoxy. After this, the surface must be rubbed with a candle or polish.
Functionality of modern bumpers
In addition to the passive external safety mentioned above, modern car bumpers also have additional functions, which is why some models are called Front-End. Here are the characteristics a modification of this element may have:
- Protect pedestrians from serious injury in accidental collisions. To do this, manufacturers select the optimal rigidity, shape and equip them with additional elements, for example, rubberized cushions.
- Safety after a minor collision. Most of the old modifications of bumpers made of metal, as a result of hitting a pointed obstacle (for example, a vertical pole), are deformed, acquiring a dangerous shape (in some cases, their edges stick out forward, which makes the car more dangerous for pedestrians).
- Modern parts are manufactured taking into account the aerodynamic characteristics of the car. In many cases, the edges are turned back, which increases downforce. More expensive modifications are equipped with air intakes that provide a larger volume of air entering the engine compartment to cool the units.
- Parking sensors can be installed in the bumper (more details about the device are described separately ), as well as a rear view camera.
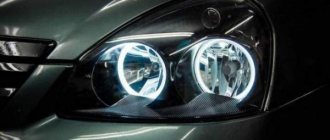
- Additionally, fog lights are installed in the bumper (they should be located as close to the ground as possible) and other lighting equipment.
So, ABS plastic.
This material is an impact-resistant plastic based on a copolymer of acrylonitrile with styrene and butadiene. This plastic is quite popular among domestic body kit manufacturers and is used not only in the development and production of auto parts, but also furniture, as well as household chemicals.
"Pros" of ABS plastic:
- fairly low price;
- the ability to restore its original shape after minor deformations;
- good flexibility and impact resistance;
- good ability to hold paint (adhesion).
"Disadvantages" of ABS plastic:
- products will become brittle at low temperatures if, albeit slightly, all production technologies are not followed;
- You will also need skill to adjust the parts during the installation process.
How to check the quality of bumpers
Since the bumper represents an important element of car safety, before each modification goes on sale, its design undergoes a series of tests, the results of which determine the quality of the form and whether specific materials are suitable.
There are several tests that determine whether a part can be installed on a machine or not:
- The element fixed to the stand is struck with a heavy structure (pendulum) with a certain force. The mass of the moving structure corresponds to the mass of the proposed car. In this case, the force of the impact should correspond to the impact if the car was moving at a speed of 4 km/h.
- The strength of the bumper is also tested directly on the test vehicle. The car crashes into a rigidly fixed obstacle at the same speed.
This check is carried out with both the front and rear bumpers. A part is considered safe if it is not deformed or broken as a result of the impact. This test is carried out by European companies.
As for American standards, testing takes place under more stringent conditions. So, the mass of the pendulum does not change (identical to the weight of the car being tested), but its speed is twice as high, and is 8 km/h. For this reason, bumpers in European car models look aesthetically pleasing, while the American counterpart is more massive.
Story
Most sources mention 1930 as the year the bumper car was introduced.
Henry Ford, owner of the Ford brand, ordered a U-shaped metal piece to be welded to the front of the car. This was the very first car bumper in the form in which you know it. In 1989, Leopold Switak also installed such a buffer on a car that is now called Tatra. For a long time, vehicles did not have bumpers at all, although some prudent drivers could install homemade buffer devices. More than eighty years later, that is, in 1971, in America everyone was required to install this important part of the car to ensure the safety of drivers and passengers.
Along with the car bumper, the concept of safe impact speed appeared. It was initially set at 4 km/h, later raised to 8 km/h and indicated the speed at which the bumper neutralizes the impact and consequences of a collision for everyone in the car, as well as for the car itself. Now they use the first of these standards, which is considered less dangerous for pedestrians. In addition, a bumper reinforcement made from metal materials is placed in fiberglass, thermoplastic and other similar car bumpers.
Design features
Unfortunately, many modern car bumpers have lost their original purpose. Thus, in passenger vehicles, the element of external passive safety has turned into a decorative strip of metal, which is deformed at the slightest impact on foreign objects.
In the case of trucks, the other extreme is observed. On many, the manufacturer installs a powerful beam, which is practically not damaged even if the car is hit hard, which is why it turns into a convertible in a matter of seconds.
Many bumper models have the following elements:
- Main part. Most often, the design is already painted in the color of a specific car. There are models on which only a primer layer is applied. The motorist must independently paint the part in the color of the car body.
- Radiator false grille. Not found in all modifications. Although this element performs only an aesthetic function, when struck during movement (for example, a bird or a stone), it absorbs a little energy, so the radiator itself does not suffer so much.
- In some modifications, the design has a lower grille, which is designed to direct air flow into the engine compartment.
- To soften the impact of a car on a solid obstacle, there is a seal, or top pad, on the top of the bumpers. Basically, it does not stand out in any way from the main part of the structure.
- Most modern car models have bumpers with a lower pad made of elastic plastic. It is painted black. The purpose of this element is to warn the driver that he is approaching a high obstacle that can damage the bottom of the car or the lower part of the engine.
- On the inside, all bumpers have appropriate fastenings.
- A special hole is made in the bumper on the side of the towing hook. Some cars do not have this element because the tow loop is located below the bumper.
- Many automakers allow the presence of various decorative elements on bumpers. These can be rubberized linings that prevent scratches from minor contact with a vertical obstacle or chrome moldings.
Unlike modifications used on cars of the 1960s era, modern bumpers are integrated into the body, providing it with a logical completeness.
To ensure that the bumper provides adequate protection for the internal parts of the engine compartment, its internal part is reinforced with metal. Many models have aerodynamic elements on the front and rear parts.
Some tips
- When making lips yourself, I recommend preparing epoxy glue in small portions, as it can quickly lose its viscosity.
- It is most convenient to apply epoxy glue with a brush; a spatula is less suitable for it. And don't forget to wear rubber gloves.
- The rubber lip on the bumper is not always securely attached with tape and can fall off while driving. I recommend additionally securing it with self-tapping screws. This is a universal and reliable method of fastening.
- When purchasing a universal lip, pay attention to the quality of the material. The rubber must be sufficiently hard and elastic. And when deformed, return to its original shape.
Read more about materials for integrated bumpers
The main material from which integrated bumpers are made is thermoplastic or fiberglass. Sometimes there are models made from a different polymer. The material affects how much the bumper costs.
By default, such modifications are called plastic. Their main advantages are lightness, resistance to high temperatures and beautiful design. The disadvantages of integrated bumpers include expensive repairs and fragility. Such modifications are mainly installed on passenger cars, crossovers and inexpensive SUVs.
As for full-fledged SUVs, they are often equipped with metal bumpers. The reason for this is that such vehicles are often used to travel over rough terrain, and can seriously hit a tree or other obstacle.
You can find out what material a particular part is made of from the factory markings, which are applied to the inside of the product. The following materials comply with this marking:
- For thermoplastic – ABS, PS or AAS;
- For duroplast – EP, PA or PUR;
- For polypropylene – EPDM, PP or POM.
Each material uses its own methods to repair. Thus, fiberglass cannot be soldered, since it does not soften when heated. Thermoplastic, on the contrary, softens when heated. The polypropylene model is the easiest to weld. It can be restored even if the bumper has shattered into pieces.
Some models are made of steel and coated with chromium ions on top. However, such elements are extremely rare in modern cars. Most chrome-plated parts are made of polymer, and are processed by galvanic or metallization (what these procedures are is described separately ).
Fiberglass (fiberglass).
Fiberglass is resin-impregnated fiberglass. This material is often used in tuning the exterior and interior of a car. A large number of body kits are made from fiberglass.
“Pros” of the submitted material:
- predominantly low cost;
- if the technology is followed correctly, the quality of the finished body kit made from this material will be in no way inferior to its “colleagues”;
- ease;
- ease of repair;
- capable of returning to its original form under physical influence.
"Disadvantages" of fiberglass:
- the manufacturing technology of fiberglass parts requires strict adherence, otherwise the final part will be of poor quality, capable of losing its properties at low temperatures;
- painstaking adjustment of parts during installation and manufacturing;
- toxicity of the material.
More about power bumpers
The main application of this category of bumpers is on SUVs. Such cars are often adapted for extreme off-road driving. In such operating conditions, there is a high probability of a collision with a tree or another car, so the car must be more protected from damage.
Reinforced bumpers are no longer made of polymers. Basically it is sheet steel about 4mm thick. Factory models are manufactured in such a way that their installation on a car does not require changes to the body structure.
Such models are excellent for vehicles participating in off-road races because they can withstand strong impacts. In addition to the massive appearance, such modifications will have:
- Fasteners for winch installation;
- Reinforced parts on which the jack can be rested;
- Towing loop;
- Place for installing a towing reel (allows you to quickly wind up a towing rope or tape);
- Fasteners for installing additional lights, such as fog lights.
As for the rear reinforced bumpers, a significantly smaller number of elements are installed on them. Most often, there may be an earring for towing and a reinforced element for jacking. A standard or removable guard can be installed on the reinforced bumper at the front and rear (read about what this part is and why it is needed in a separate review ).
Polyurethane.
There are two types of polyurethane: foamed and rubberized. The last one is of better quality.
Rubberized polyurethane and its features:
- quality is “at the top”;
- has good flexibility and high impact resistance;
- is able to return to its original shape even after significant deformation;
- resistant to fractures;
- does not require lengthy adjustments when installing the finished product;
- holds paint well.
Foamed polyurethane and its features:
- due to the absence of rubber, it is not resistant to fractures;
- in other respects it is not inferior to its “colleague”.
Both types of polyurethane are classified as materials that have a fairly high price.
Types of damage to bumpers
Most often, the front of the car suffers due to the driver’s fault: he caught up with the car in front, did not calculate the dimensions of the car, hit a pole, etc. But the rear bumper is not protected from damage: an onlooker caught up, the parking sensors did not work, etc.
Depending on the financial capabilities of the car owner, the damaged bumper can either be replaced with a new one or restored. In this case, you should take into account what material the part is made of. Here is a list of the most common damage to external passive safety elements:
- Scratch. Depending on its depth, the recovery method may be different. Some require puttying and then painting and polishing, while others require only polishing with abrasive pastes. Learn more about how to remove scratches from plastic. Here.
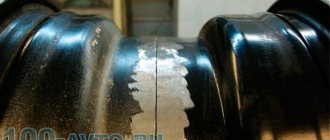
- Crack. In some cases, such damage is not noticeable. Such damage can only affect the paintwork, and often after an impact the plastic itself bursts, but returns to its place. If a metal bumper bursts, it is more difficult to repair. Often such damage is accompanied by deformation of the part, which is why it first needs to be bent (and in places with stiffeners this is extremely difficult to do) and then welded. Repairing polymer models is a little easier. If such a breakdown is detected, you should not delay its elimination, since the rigidity of the part directly depends on the size of the crack.
- Break. This is the most complex damage, as it can be accompanied by complete or partial separation of particles from the main structure. Such a bumper should only be repaired by a professional. In this case, the use of reinforcing mesh, soldered fiberglass and polypropylene linings often only provides aesthetics to the product, but does not make it as strong as before.
Read more about repairing plastic bumpers here . Regarding the repair of polymer bumpers, there is no clear recommendation: whether the part is worth repairing or whether it needs to be replaced. It all depends on the degree of damage, as well as the cost of a new part.
Tuning instructions
As you already understand, the basis for creating tuning for the bumper will be such simple and affordable materials as polystyrene foam and polystyrene foam. However, the point is not only their cheapness, but also the ease of work, since both polystyrene foam and foam are very easy to give the desired shape with your own hands. Another reason for using just such a base is its light weight - the new lining will not weigh it down, and therefore will not affect the power of the car in any way.
In general, the instructions for tuning the front bumper look something like this:
- To begin with, using the selected material, the desired shape is created. This is where sharp tools come in handy.
- Then you need to properly prepare the resulting surface for treatment with resin.
- Resin and fiberglass are applied to the future overlay in several layers.
- Now it’s the turn of putty - with its help we give it a more perfect shape and smooth out all the corners.
- Before applying paint, it is necessary to prepare the surface with a primer, otherwise it may be partially absorbed or lie unevenly. Therefore, the next step is to apply a primer.
- The job is completed by painting it in the appropriate color. The shade may be exactly the same as the factory one or may be different. Now you should wait until the bumper dries and you can install it in place.
Many people are interested in what exactly is the difference between polystyrene foam and polyurethane foam when using them as the basis for a bumper cover. And the main difference is that the foam does not need to be dissolved with resin, since it can be sculpted directly
. And the foam plastic must first be sealed with special technical plasticine. The plan has been outlined and you can start creating bumper tuning with your own hands. For greater clarity, we will talk about each of the methods - and which one to choose is up to you.
Foam bumpers
To create the overlay you will need about eight large sheets of foam. If you have already acquired the necessary amount of material, then you can start working.
- First, the bumper needs to be dismantled and thoroughly cleaned of accumulated dirt. Then the surface is degreased and wiped until dry.
- The foam sheets must be fastened together using glue. It is best to use liquid nails, since this composition is capable of tightly gluing any materials. At the same time, you need to act carefully so that the layers do not dry out in the wrong position.
- While the foam is drying, you need to make a sketch of the future product and transfer the contours to the material. Cutting foam is much more difficult than cutting foam, so it can take a long time to create the correct symmetrical shape. It is important that the knife is sharp enough.
- Now you need to apply technical plasticine to the workpiece, and on top - a couple of even layers of putty.
- In order for the surface to be smooth, it needs to be sanded thoroughly. Here you will need fine-grit sandpaper.
- Several dense layers of resin and fiberglass are applied on top. The resulting structure should be left until completely dry.
- Now you need to do the finishing work and apply a primer to the bumper.
At the final stage, the bumper is painted and varnished. When the decorative layer dries, the part can be installed in its rightful place and admire the result.
Foam bumpers
The creation steps are very similar to working with foam plastic. But during the process, it should be taken into account that polyurethane foam has a rather aggressive effect on any metal, which means it should not come into contact with metal parts until it dries completely. In total you will need about four cylinders of material.
- First you need to pour the entire composition onto a flat surface and wait until the mixture dries. This usually takes at least 48 hours, so be prepared to wait a bit.
- You will have enough time to think through and implement your ideas in the form of a sketch. Then you need to transfer all the lines onto the dried foam and you can start cutting.
- Try to make the gaps as symmetrical as possible so as not to spoil the product. Afterwards you can proceed to applying resin and glass wool.
- We wait until the new material dries, after which we carry out all the procedures described above - sand, prime, paint and varnish.
Among other things, there is another, combined option, when foam is combined with polystyrene foam. Using this method, you can make an additional overlay on an existing bumper.
Also, do not forget about installing a mesh for tuning the bumper - it must be purchased in advance. We can conclude that tuning a bumper with your own hands is not such a difficult task. However, experts advise first practicing on unnecessary material so that the tuning of the front bumper turns out to be of high quality the first time.
Methods for choosing bumpers
If you decide not to repair a damaged element, then the following methods will help you choose the right one:
- Selecting a part by checking the car's VIN code. This is the most proven method, since the set of numbers and letters includes not only the make and model of the vehicle. This marking also contains important information regarding minor modifications that often occur on similar machine parts. Details about what information automakers encrypt in this code and where to find it are described here .
- Selection of bumpers according to vehicle model. Some cars do not undergo major modifications, so just tell the seller this information and he will find a suitable modification for the part. Sometimes, in order not to make a mistake, the seller may ask for the release date of the car.
- Selection in the online catalogue. This method combines the two previous ones, only the search is carried out by the buyer himself. The main thing in this case is to correctly enter the code or other necessary information into the search field.
Some motorists believe that you should always buy original parts. In this case, you should clarify whether the automaker manufactures spare parts for its models or uses the services of third-party companies. In this case, the “original” spare part will cost more only because it bears the automaker’s label.
Communities › Fiberglass › Blog › manufacturing a bumper matrix from start to finish. (video)
Hello. I made a video of making a bumper matrix. I think I told you everything. Such a video would have helped me a lot when I was studying. Maybe it will be useful to someone. ps. MATRIX IS DISPOSABLE. I need one copy of the bumper.
Comments 34
Tell me what to smear or paste over the part in order to remove the matrix from this part and be able to easily separate it from the part itself?
ALL! I went to make a new bumper!)))
Thank you for the video! Respect and respect to you!
In general, it is recommended to wax first, then alcohol, but I like it better the other way around
Give me a continuation! Part manufacturing
I’m interested in two points: what size in centimeters is enough overlap of glass mat? or is end-to-end enough? and the second point about problem corners - what can replace Aerosil? Is it enough to cut glass mat or fiberglass with scissors and then mix it with resin? Is the Aerosil used flexible and does it have good adhesion to the resin and mat layers being applied? Were there any cases where the aerosil broke off in a whole piece when the part was taken out?
The overlap I usually get is 2-5 cm. Aerosil can be replaced with roving, or a mess of chopped glass mat. For a normal matrix, I would use the mess in the corners. The adhesion of Aerosil is very good. I didn’t notice any elasticity. With normal force, the aerosil breaks into pieces.
Thank you for the information!
I’m interested in two points: what size in centimeters is enough overlap of glass mat? or is end-to-end enough? and the second point about problem corners - what can replace Aerosil? Is it enough to cut glass mat or fiberglass with scissors and then mix it with resin? Is the Aerosil used flexible and does it have good adhesion to the resin and mat layers being applied? Were there any cases where the aerosil broke off in a whole piece when the part was taken out?
Do not use Aerosil in matrices!
accepted. What do you use?
Resin and mat and veil
Thank you. To bookmarks
Is it possible, instead of drilling, to insert something into the holes in advance that does not interfere with seclomat?!
Brand tour
On the auto parts market you can often find original bumpers from the automaker, but among high-quality products there are also worthy analogues that are not inferior in quality to the original.
Here is a small list of bumper manufacturers whose products you can trust:
- Budget products can be selected among products from Polish (Polcar), Danish (JP Group), Chinese (Feituo) and Taiwanese (Bodyparts) manufacturers;
- Belgian (Van Wezel), Chinese (Ukor Fenghua), South Korean (Onnuri) and American (APR) bumpers can be mentioned as products of the “golden mean” between price and quality;
- The highest quality, and at the same time most expensive, models are those made by Taiwanese manufacturers TYG, as well as API. Some users of these products note that sometimes their products are even superior in quality to analogues that are sold as the original.
Sometimes motorists pick up spare parts for their cars at disassembly sites. If you select a bumper, you should pay attention not only to its condition, but also to the nature of the damage that caused the car to end up on this site. It happens that the car received a serious rear impact, completely crippling half of the body, but the front remained unharmed.
In this case, you can buy a front bumper by removing it directly from the car. There are much more pitfalls when buying parts that have already been removed from cars. It is not known whether a particular bumper has been repaired or not (some craftsmen carry out the restoration so well that the part cannot be distinguished from a new one), so there is a high probability of buying a broken part for the price of a working one.
Coating
Coat the resulting body kit with a single layer of epoxy resin with fiberglass, which must be cut into small pieces. Apply the resin first, followed by the fiberglass. Glue the entire body kit. In some places, dripping drops of resin form. It is recommended to remove them after the resin has hardened. At this stage, it would be a good idea to follow a few tips:
- Stock up on pieces of fiberglass
- To obtain normal density, overlap the fiberglass
- Small pieces of fiberglass are easier to glue
A durable layer is achieved by pressing down the fiberglass with a brush soaked in resin. Swipe it from the middle to the edges until the material is completely saturated with resin. Avoid the formation of air bubbles.
Once dry, begin applying a layer of coarse putty. The main problem at this stage will be applying an even layer. This process is necessary to remove all irregularities and flaws. After this, go through the sandpaper to remove problem areas. To get the best result, you will have to repeat the procedure several times. We remove small indentations with putty.
When everything is dry, carefully look at the design. Make sure that symmetry is maintained and feel free to move on to the next step of how to make a body kit with your own hands. Now you are required to:
- Remove the resulting element from the bumper
- Unfasten the original skirts and wipe them well
- Make a template for the outline of the skirt on the side, touching the fiberglass bumper. Apply several layers of fiberglass to ensure the template is durable
- Carefully remove the workpiece from the bumper
- Clean the resulting part from polystyrene foam. Do this gradually, as the model loses its rigidity, so treat it with fiberglass, and then apply a layer of resin
- Detach the side skirt templates to provide a mounting base
- Make several cuts on the fastening strip to later connect it to the skirt. Similar cuts are made on the skirt.
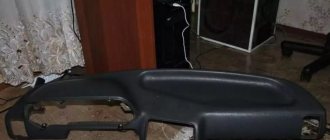
Volkswagen Vento Red Devil › Logbook › DIY bumper tuning.
After buying my car, I bought a new bumper, because the old one was killed, the skirt was torn off, there were many cracks, chips, the skirt mounting groove was badly damaged and many other shortcomings. I installed a new bumper on the car, but was in no hurry to throw out the old one, and when I got my hands on it, I started thinking about what to do with it. and so I started working. During the work I used fiberglass - epoxy resin and fiberglass. The first thing I did was cover up the windows for the turn signals and fog lights.
then he cut off the bottom bar and inserted two blocks of foam into the grooves of the fangs.
Then I set about making a new frame. The entire frame is easy to make from polystyrene foam, polyurethane foam, and similar materials; they are easily processed by sticking foam with excess and starting to process it with a knife, file, or sandpaper. We need to display the required form. After the required form is displayed, we get something like this.
Then Burum hands on fiberglass and epoxy resin. We cut the fiberglass into pieces 5X10 10X10 centimeters. The smaller the pieces, the more convenient it is to work with them. This is how the whole thing sticks together. 1. Coat the surface to be glued with epoxy resin (pre-mixed with hardener) 2. Apply a piece of fiberglass. 3. To glue it well and expel air bubbles, it is most convenient to use 3x-4 centimeter paint brushes. Using a brush, we press the fiberglass fabric into the resin and coat the surface. 4. Pieces of fiberglass are glued overlapping. 5. Repeat the entire procedure until a layer of 3-4 millimeters is obtained.
After about a day (depending on the resin used), the surface can be processed. Fiberglass is most easily processed dry! When I got tired of processing it manually, I went and bought myself a screwdriver - it helped a lot. The sanding attachment and p36 sandpaper did the job.
Well, the frame is ready! We remove unnecessary foam from the inside.
After removing the foam, the inside of our bumper also needs to be glued with epoxy and fiberglass, I did this in 2 layers (1.5-2 mm). Epoxy resins are not resistant to prolonged exposure to moisture, so the entire surface needs to be primed
Now let's start removing all the jambs. The process of debugging - that is, getting rid of BUGS