In the last few years, cars with wide wheels have begun to appear on the roads. This innovation came to Russia from the West and became popular, especially among Auto VAZ owners. It is clear that many car enthusiasts are trying to decorate their “iron horse” and make it stand out from the gray stream on the road. But ordering the creation of welding joints in a car repair shop is an expensive pleasure. Drivers are starting to think about how to make welding joints with their own hands so that they fit perfectly into the overall picture. Let's look at what this type of tuning is and what its distinctive features are.
How to make splices
Weldings are made in two ways - by welding a strip of metal into one disk, or by welding two partially cut disks into one. It doesn’t sound very convincing, but, despite everything, it is quite reliable and the car almost does not lose any driving characteristics after installing the welding joints. Despite this, problems still exist and they are quite predictable. The most serious difficulty is the selection, installation and mounting of tires. Most often, for wide rims, regular rubber is used, which is heated and stretched over the rim, which definitely does not add strength to it. In addition, it is impossible to remove the rubber in the same way. It should also be noted that there is a possibility of unscrupulous work by the welder, who may poorly weld the disk by damaging the metal or even missing a hole through which air can escape. To solve the problem of flat tires, there is only one way out - using cameras that have long been out of constant use. Due to the increased contact area, the vehicle's maneuverability decreases and fuel consumption increases.
The width of these rims usually ranges from six to nine inches. A special advantage is considered to be the wide “shelf” obtained by welding, made from cast wheels, most often of extremely low quality, or by welding a plate onto the front rim.
However, installing wide rims cannot be a one-time case of tuning your car. Most often, along with welding, the purchase of low-profile tires is made, as well as lowering the car. This is done to reduce the "off-road" effect where the wheels appear disproportionately large for the vehicle. With a more detailed approach to the use of welding joints, almost the entire car is prepared, changing the camber angle, modifying suspension parts, changing the width of the wheel arches, etc.
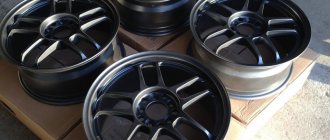
The use of welding strips makes any car a bright individuality, constantly attracting the attention of passers-by, raising interested questions and heated debates about the appropriateness of using these discs. Many rims are painted in bright, provocative colors such as pink, yellow, blue and poisonous green. A modified car with welding strips has a big chance of getting into the newspapers, and a “rat look” car “shod” in this way, already distinguished by its increased originality, will shock most ordinary people.
Below you can watch several videos on how to make splices with your own hands in a garage.
What extension is allowed
Kuzma77 Blog Online wheel fitting
The standard wheel size is 6.5J, where 6.5 is the width in inches, and J is the side flange profile. J is the most popular option, but there are other sizes: JJ, JK, K, L. You can find the designation - 6.5 without a letter. This means that profile J is used by default. The width of the welding is not limited by anything, only by wishes. But tuning a car using welding can require significant financial investments for two reasons:
- When installing rims that are too wide, you need to adapt the car itself to fit them - enlarge the wheel arches (they are cut out or widened).
- Wide tires are expensive and are ordered from abroad - Europe, the USA.
Most car enthusiasts do not try too hard to find wide tires, but put standard tires on the welding joints, having pre-heated them. And the wheels used for manufacturing are not new, but already used ones, so this method of tuning can be classified as a budget option. But regular tires worn on a wide rim wear out faster. Before driving on unwelding wheels and doing any unwelding in general, it is necessary to roll the discs to eliminate deformation.
Disc width
The dimensions of a regular standard stamped disc are 6.5 J. The numbers 6.5 are the width in inches (one inch equals 2.54 centimeters, so 6.5 x 2.54 = 16.51 cm). The letter J (Jay) means the profile marking of the side edge of the rim. There are markings JJ, JK, K, L.
Since most disks are 6.5 J in size, some do not write the letter, but simply indicate the width.
Such wheels can only be fitted with standard tires of the same width. If you want to tune the wheels so that they stand out from the wheel arches of the wings, for example, install 10 J tires, that is, the width is 3.5 inches larger, and this is almost 9 cm, what should you do? Only by unwelding the disks.
Before boiling the wheels, you need to find out if such wheels have rubber. If not, why make them.
How to make unwelding yourself
Car exhaust pipe attachment photo, video
For welding, stamped discs, used or new, are used. Cast and forged options are made to order and are expensive. There are only three methods for making welds:
- Cut two disks so that one of them remains with a stamp, and the other without a stamp. Moreover, the outer side of one is cut off, and the inner side of the other, and then the large parts are welded. To make 4 disks you will need 8 standard ones.
- The rim is cut off from one die and between the parts of the wheel, in the middle, a steel strip of approximately the same thickness and characteristics as the disc material is welded. From 4 standard stamps, 4 boiled stamps are obtained, and this option does not imply any restrictions on width.
- The disk is cut, a strip of metal is welded inside, the hub part is modified, and other modifications are made.
The second option is for those who are looking for how to make splices in the cheapest way; the latter is used less often, as it involves painstaking work and adjustment.
The procedure for making welds yourself includes:
- cutting;
- welding of parts;
- processing;
- painting.
In order to make welding at home, you will need special equipment, and you need to have the skill to use it:
- four (eight) discs;
- grinder with cutting and grinding disc;
- drill with drills 4-5, 10-11 mm;
- metal sheet for making strips that will be welded between the parts;
- acid soil;
- balancing machine;
- calipers;
- car cargo tie;
- sealant (optional);
- rolling machine (optional);
- automatic welding.
It is recommended to use new disks, since they are not deformed and it is easier to make welds of proper quality from them yourself. However, this recommendation is often neglected and used “stamps” are used. Used wheels must first be inspected and the deformed parts corrected. Deformation is determined using a ruler and construction tape. A deviation of 1-2 mm is considered acceptable. from the factory axle. Large deformation is significant and dangerous.
- The disc is put on the machine or the car hub and scrolled forward. The same operation is carried out with the second stamp.
- For a disc whose runout is more pronounced, the outer rim is removed.
- The other is cut so as to remove the rim on the other side.
- If the runout is strong, the dies are rolled on a machine.
This is the general principle for preparing parts. Step-by-step instructions for making disc seals with your own hands using the second method are as follows:
Remove the weights. Cut the disc at a distance of 1 cm from the rim inwards
It is important to saw off the rim and not saw through the stamp itself. Prepare an even strip of metal 2.5-3 mm thick. The metal strip is rounded using a pipe bender or any round object. If you don’t have a pipe bender, it’s better to take metal 2.5 mm thick
– it bends easier. It is recommended to weld the strip first to the rim, and then to the stamp. The metal plate is tightened with a load tie so that it fits evenly on the rim, and is secured in one place by welding. The tie is relaxed so that the other section is flush with the rim and grabbed again. In this way they continue until the end. The length of the metal strip is adjusted to the location when it is almost completely welded to the rim. The edges are overlapped, marked and sawed off evenly with a grinder. Seize the joint by welding at three points. Try the rim on the stamp and check that there is no runout. Adjust by turning the rim and putting it on again. When they achieve the desired result, grab the rim in a circle at 5-6 points. The seams are completely welded. Sand the seams by putting a sanding disc on the grinder so that the seams do not damage the camera if the appropriate rubber is installed. If the tire will be installed tubeless, then it is necessary to apply sealant from the inside of the disc. The composition must dry well, after which it is cleaned until smooth. It is recommended to paint with powder paint. Before painting, the disc is degreased and a primer is applied. The paint is applied in several layers, allowing each layer to dry. After the paint has completely dried, a protective varnish is applied.
Ready-made welding dies need to be installed in the same way as regular dies, but if the disc is too wide, you need to prepare the car body before installation. A car with welding marks will not pass MOT. In addition, driving a car around the city can result in a fine or the vehicle being sent to an impound lot.
Such a car attracts the attention of not only ordinary citizens, but also traffic police officers
Painting process
Applying a paint coating to the wheels is the final stage of production.
The powder composition is best suited for this. Immediately before painting, the discs are cleaned of old paint, traces of corrosion and degreased. Next they are treated with a primer. They are allowed to dry. After this, you can proceed directly to painting. It is recommended to apply it in several layers, allowing the previous ones to dry. Finally, a layer of varnish is applied. With this method of painting, the paintwork will last for quite a long time.
What are the welding methods?
Selection of rims by car make with online fitting
If you have all the necessary tools at hand, then you can easily make new disks yourself; others can turn to a specialist for help.
In addition to the two main methods of welding discs, which will be described below, car owners also use rarer ones, which are more difficult to perform and it is better to start working only if you have the necessary experience.
With the first method, you need to have not four, but eight stampings, four of which will be used as donors for expansion. The discs are cut lengthwise and then welded together again using these donors.
The second welding method involves using a metal strip, the thickness of which can be 2.5-4 millimeters.
How to make it yourself
At this time, there are only three main types of manufacturing such disks:
- Connecting two disks. They are cut in a certain way so that the middle part of one is wider and then connected by welding. Thus, out of two, only one disk is obtained.
- Insert into the middle of a metal strip. The disk is cut, then a sheet (strip) of metal (usually steel) is installed in the middle, similar in characteristics to the base material. Then the whole thing is welded.
Combined method. It should be noted that it is practically not used, because it is the most complex and very easy to make a mistake. The inner and outer parts of the disk are separated, a strip is welded in, and the hub part is transferred, sometimes the inner and outer parts are changed.
I will say this, the first two points are the most popular now; it is with the help of them that most of the “unwelding” for cars is now done. The method of inserting a strip into a welding disk is especially popular. Now a short video.
I would like to note that it is very difficult to do it yourself, practically impossible, you need to maintain proportions, you need to maintain the size of the welded strip, weld the disc correctly, process and paint it. If something is violated, then all the work can go down the drain.
Danny-D Blog HOW TO MAKE UNWELDERS WITH YOUR OWN HANDS
What are weldings? These are wheels of increased width. The car looks more interesting and unusual on such wheels. Unwelding can be made from any disk; most often they are made from ordinary factory stamped steel disks (“stampings”). Let's figure out how to make such a disk. To make one wide disk, you will need: - standard steel disk (stamped) - 2 pieces - grinder - welding machine - seam sealant (optional, read about this at the very end of the article) Let's consider the first method Let's take two ordinary ones stamped disks and sawed off with a grinder or on a lathe along the red line.
We remove unnecessary residues from the second disk with a grinder
We put the remaining part of disk 1 on the rear axle hub, fix it with nuts and put on the second part. Google Chrome browser is considered the fastest and most secure. Developers constantly release new versions of it, which constantly reach the top positions of current ratings. The new Google Chrome is available for free. It is available in 43 languages, supports Linux and Mac operating systems. The security and high speed of this browser are confirmed by expert tests by independent IT specialists. We align the second rim relative to the first, eliminate the runout, and weld it at four points at the joints.
Boiling areas are indicated in green.
And this is what came out of it:
For tubeless installation we simply need to seal the seam in the middle of the rim. This of course should be done before painting. For this purpose, we will use 3M joint sealant.
Alternatively, it can be diluted with a Degreaser. Attention! Precisely a degreaser, and not a solvent or, God forbid, white spirit! Apply diluted sealant to the seams. Wait until it gets up, remove the excess (a chisel, sandpaper, etc.), and paint it so that it doesn’t rust and makes you happy with the appearance.
The second method is slightly different from the first. The point is that one disk is cut into two parts, and a strip of metal is welded into the middle. This method is much more economical, because we only need one set of disks.
We cut the disk into 2 parts as shown in the figure.
Exactly cut off a strip of metal of the required width and bend it. The thickness of the metal, as far as I remember, is 3mm. You can bend it any way you like, but it’s better to use special rollers. Next, we take part of the disk with the hub and attach the strip to it by welding. The hub part holds the strip well and sets it in the right direction.
Next, we attach the strip to the second part of the disk. And we weld all the seams, trying to make sure that the disc does not move. It’s good if it is possible to automatically weld a rotating part - everything is much stronger and more predictable.
We clean the seams and check that everything is holding together. It’s good if you have a lathe to clean the seam on the disk shelf in the place where it will later please the eye. This will also help correct the geometry of the disk if it is slightly disturbed (and this is very likely). Even if everything is done carefully, it is advisable to roll the resulting discs before painting to be sure of their geometry. Our weldings pleased us with the quality and, despite the seemingly not very smooth rim (the rims were used), they showed minimal runout.
To be fair, I note that this method is universal in every sense. I assumed here from the very beginning that most often everyone needs to boil the disk outward to get a shelf and a specific look. But needs and ideas are different. You can boil the disk in the other direction.
This is what happened with the test welding. We weren’t very happy about this at that moment, but now we can show these photos here. The seams are not additionally processed and are clearly visible.
If you use a little imagination, it’s not at all difficult to guess that you can boil the disk in both directions at once.
Here's another video for you:
And this video is for those who think that welding joints are not a reliable product!
Thank you all for your attention! Materials from the article were borrowed
>Unwelding from two disks>unwelding from two disks with your own hands
Use of donors
In the first case, to create a welding of the wheel rims, we will need donor wheels, from which we will take the missing width. As a rule, used parts are used in the process.
To work at home we will need:
- welding;
- grinder with attachments;
- sealant;
- drill with drill bit 4/5 and 10/11.
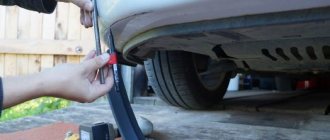
Before you start welding the discs, you need to prepare the spare parts, namely, look for any irregularities and remove them. The easiest way to evaluate the ideal surface is to hold the car hub in a vice, install the spare part on it and spin it.
When assessing the level of runout, know that a figure in the region of two millimeters can be considered acceptable; if it is more, then the stamping must be corrected on the equipment. If he is not at home, then use the services of a specialist, but you should not neglect this stage in welding the discs, otherwise the car’s handling on the road may suffer.
After checking, the second part begins - cutting off the outer rim of the disk, which is carried out to the inner part closer to the middle. The illustrative example below shows the cutting process well schematically.
We won't need this rim, so we can remove it. The remaining rim will become the outer rim for the other part. We put it on the rear axle hub and fix it. Only after this we put on the second cut part.
It is important to well align both halves of the weld with respect to each other and eliminate runout. By welding we make several clamps at the places of the cuts
You can see more details about this method in the video.
Only now we will need the sealant, which is applied to the center. After complete drying, excess material is removed with sandpaper and, as a final step, painting begins.
Can changes be legalized?
If the owner wants to legitimize that he has changed the design of the car, then he must conduct an examination.
The preliminary stage must be completed before installing the welding joints. If the products are already “in place,” then you will have to first remove them, replace them with standard ones, and then begin the examination. After the procedure begins, you can begin tuning. But this can be done in a special company that will issue a package of documents (certificates for the supplied equipment).
The same organization must be tested for compliance with safety standards. The company must ensure that the transport complies with the rules of the technical regulations of the Customs Union. It turns out that the procedure itself is not so complicated, but it requires time and money.
The cost of checking equipment in different cities of our country differs. The price varies from 5,000 to 20,000 rubles. If the cost is too high for the driver, he will usually give up on the idea.
What extension is allowed
Factory wheels have a standard size - 6.5 J in width. Once the expansion is done, this figure can increase to 8-10J. The final width is not limited by anything, only by the imagination of the car owner and the characteristics of the vehicle. The resulting updated spare parts must fit into the arches under the wing of the car, this is the main condition that must be met, but even here you can cheat and roll out the arch, if this is permissible.
Important! Before making welds, it is necessary to calculate the final width and overhang, otherwise problems may arise with the subsequent installation of the product. Choosing the width is not so easy, because the rubber is much narrower in size, so it must be soft
It is also worth remembering that the increased width of the rim affects the track width of the vehicle, and therefore the stability of the vehicle.
Particular attention should be paid to the quality of the weld, on which safety on the road and tires, which can behave unpredictably in a critical situation, will depend.
Advantages and disadvantages of tuning
Each tuning has positive and negative factors. When installing welding joints, the car owner only thinks that his car will acquire a stylish look. Along with this, tuning is cheap. Well, the last advantage is a large grip spot. Off-road performance is better if the vehicle has large wheels. Now let's move on to the cons.
Rubber. It is impossible to find wide tires in Russia for example for R13, since such sizes do not exist. You have to look for them in another country and order from there. You should not wear narrow tires, as they are more likely to slip when turning, which will inevitably lead to an accident.
Seam strength and sealing. A well-welded seam does not mean it is airtight. It is easy to deform. This is dangerous, especially when driving at high speeds.
Installation of rubber. It is quite difficult to install tires without outside help.
Dynamics. The rims and wheels become several times heavier than usual, so acceleration of the car is more difficult if you compare the dynamics with the standard “equipment”.
Track. In winter, the car gets into a rut, especially with 9.5-10 mm wheels. This greatly affects the speed. A little inattention can result in a crash into oncoming traffic with fatal consequences.
Experts say that there are several times more disadvantages to installing welding joints than advantages. However, this does not stop true lovers of fashionable cars. If, despite everything, you want to decorate your car with cool and large wheels, then the driver should study this issue from the legal side. As a last resort, you can legitimize your “interference” in the structure.
How to weld discs with your own hands 2 methods to choose from
Proponents of self-tuning rarely ignore the wheels, since welding the discs with your own hands is quite simple, and the effect is amazing. Even a model that was unprepossessing or outdated in the last century begins to look more solid, modern and expressive.
And it will certainly stand out among the standard representatives of the model range. For those who have never engaged in such improvement of the appearance of their car, let us explain: welding is called increasing the width of the disk.
Most often it is made external to create a kind of shelf-ledge. However, there are options when they resort to sinking, in which the inside of the disk goes inward, as if under the bottom of the car. And the most original enthusiasts sometimes boil the disk in both directions. In any case, the overall impression of the car and its appearance change greatly, and for the better.
How to weld discs with your own hands? People have come up with 2 methods. The first is more expensive, since each wheel will need to use 2 disks. The second is more economical, but more labor-intensive, since you need to carry out more manipulations with the wheels of the car.
Ideally, of course, it is better to take new discs for unwelding. But few people do this, so they use used ones. It is clear that their condition may not be brilliant. Therefore, first you need to check them for evenness. To assess the condition, the disk is put on the drive axle of the car (do not neglect safety measures, place saw cuts or bricks under the car) and 1st gear is engaged. Runout - if present - is measured both horizontally and vertically. Up to 2 mm it can be neglected; if the parameter is exceeded, the discs will have to be rolled.
For the base, stamping with the best performance is noted; the second will act as a rim.
Another point: the width of the weld. Wheels that are too wide will require additional operations: rolling out, trimming wheel arches, and often the installation of special flares. The most harmonious way would be to unweld a 13-inch disk by a maximum of 7 inches.
As already mentioned, each wheel will require 2 disks.
- The outer rim is cut off from the second rim disk with a grinder or lathe;
- The base is cut along the outer rim to the inner part. Usually the line runs closer to the middle;
- The base is put on the corresponding hub and secured with the original nuts;
- A rim is put on it, which is aligned with the first disc. The transmission is started again, the runout is measured and eliminated;
- In several places where two parts meet (at least 4), they are secured by welding;
- The seam must be smoothed - both for reliability and for the future integrity of the slopes. Take 3M joint sealant and dilute it a little. For this, only a degreaser is used, no solvents or, especially, white spirit. The seams are generously coated; after drying, they are cleaned with sandpaper, needle files and other things that are at hand.
When welding, the geometry of the disks is almost certainly somewhat disrupted. After sanding the seams, it is better not to rely on chance, and not to be lazy and roll them. The final touch will be painting the welds - and maybe even opening them with varnish.
The second method, economical, requires only a disk for the wheel, and in addition to it, a strip of steel of the required width and length (it is equal to the circumference of the disk) from a sheet 3 mm thick.
The disk is sawn circumferentially into 2 parts; The strip is bent into a ring of the required diameter and welded. You can bend by any method, although the best results are obtained by using a special roller; The ring is welded first to the part on which the hub remains. It will also set the desired direction for mounting the second half of the disk; The remaining part is seized. The welded welding is checked for beating; if everything is in order, the seams are completely welded; Both seams are carefully sanded. It would be ideal to use a lathe: manual cleaning will certainly leave burrs. Rolling and painting, as in the first option, remain unchanged
Please note that if the tires are tubeless, then no additional actions are required. However, for old skates, before welding the disks with your own hands, you will need to drill a hole in the disk for the nipple
A few words about painting: it is better to use powder paints, since they hide minor defects well and last much longer when welded.
Content
- Preparing Disks
- The first method of unwelding
- Method two, economical
How to weld discs with your own hands? People have come up with 2 methods. The first is more expensive, since each wheel will need to use 2 disks. The second is more economical, but more labor-intensive, since you need to carry out more manipulations with the wheels of the car.