Stencil airbrush
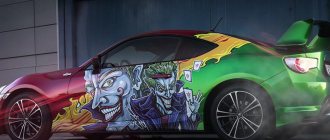
Bright and original designs on cars have long ceased to be a curiosity. Although, they still cause admiration and attract a lot of attention. Airbrushing is a great opportunity to stand out from the gray mass and get a unique car. It’s also a great opportunity to show off your creative talents. Of course, you can contact a specialized salon and get the finished result. But it’s much more interesting to do the airbrushing yourself. Such a drawing, even when using a template, will be unique and will become a source of pride. Just for those who want to decorate their car themselves, airbrush stencils come to the rescue.
How to create a stencil with your own hands
If you want to decorate your car with airbrushing, but you don’t yet have the opportunity to turn to the services of professionals, you can do the work yourself using patterns.
Be sure to firmly glue the stencil to the surface and additionally secure it with masking tape. Otherwise, there is a risk of paint getting under the pattern, as a result of which the entire drawing will be damaged and will have to be redone.
Stencils for cars can be made from plastic, it is more durable and the pattern can be used several times. The drawing is transferred to the stencil in compliance with all proportions independently, or you can use various computer graphics editors for transfer and printing.
To make the outline of the drawing perfectly even, you need to cut it not with a stationery knife, but with a plotter. As an option, a drawing for a stencil can be downloaded from a thematic site on the Internet. You can do this completely free of charge, but you need to understand that the drawing will not be original.
This method is suitable for those who do not have practical airbrush skills, but want to practice applying a simple design to the body. Screen film for airbrushing, which can be purchased at a specialty store, is best suited for the job.
Making a stencil will not take much time and effort, but the main thing is to follow these rules:
- The stencil must be constructed in such a way that there are no inclusions of other shades on its black parts.
- It is advisable to secure all its parts in such a way that they are not damaged during operation. Craftsmen recommend using thick paper or cardboard for the backing and attaching the stencil to it.
- It is recommended to use a sharp stationery knife when cutting or a special plotter. This will make it possible to draw a picture with the smallest details.
This type of drawing can only be done using airbrush
How to draw
The main rule when using airbrush templates is to glue the base tightly to the base. If the design is small and cut out on paper, you can stick the workpiece to the body using water:
- Lightly moisten one edge of the stencil and apply it to the machine.
- Wipe the surface with a dry, lint-free cloth. Be sure to make sure there are no gaps.
- Airbrush and let the paint dry.
The paper will either fall off the body itself, or it just needs to be removed. The lines of the drawing will remain perfect. It often happens that it is necessary to draw additional details on the first base of paint. Here you need to prepare several paper templates and glue them with water using airbrushing.
Plastic or cardboard stencils are reused many times. The difficulty of airbrushing with these improvised means is that if you do not glue the stencil tightly to the body, the paint will flow over the edge and the design will be ruined. To prevent the problem you need:
- Place double-sided tape around the edge of the stencil. Do not leave small internal parts bent out.
- Place the stencil tightly.
- Spray the paint and let it dry.
- Remove the stencil. Protect the adhesive part of the template with film from adhering dust and debris.
Drawing with patterns is the easiest way to make large-scale airbrushing in the style of cubism, flames, and line transitions. Craftsmen often do not fix the pattern on the body, but hold it with their hands, drawing clear boundaries.
For high-quality airbrushing, it is necessary not only to select a stencil, but also to choose an airbrush, always with a filter, and the appropriate paint. After work, the drawing must be additionally varnished using car polishes and protective varnishes.
Painting in camouflage
- Paint in a well-ventilated area. Use a respirator and gloves. Do not spray paint near open flames.
- Start with a base color that covers the entire piece, and then work your way down to individual pieces.
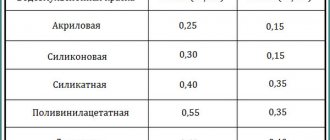
- The main color that paints the entire surface is usually the lightest. This way, other colors will be more visible on this base. In most cases, two thin coats are enough to cover the surface with the base color.
- Next, you need to let the paint dry. Then the stencil is glued and another paint is applied.
- Start with a light color and work your way to a darker color. Decide in what order you will paint the subsequent colors. Paint each color in stages, one color at a time. Thus, if the base color is yellow-brown, then the spots will be dark brown, then black. Yellowish-brown spots never appear on top of brown or black. Brown never goes over black. It is important to follow the order (sequence) of applying and overlapping colors to get a good result.
- Secure the stencil with masking tape to ensure it stays in place after spraying while the spray paint dries. They don't have to be glued straight. They can be located in different ways. This will create a personalized look to your work.
- Place the second spot or pattern in a free area where there is no spot or pattern yet. You can slightly overlap the previous stencil print with a new print.
- You can make 4-5 designs in one color (or more, depending on the size of the part), then move on to another color.
- You can make sure that spots or patterns of different colors do not have clear boundaries between each other. One color will transition smoothly into another. To do this, you need to hold the template or stencil with your hand and not lean it completely against the surface. This will make the edges look a little blurry, and there won't be a clear contrast between the edges and the rest of the surface.
- When painting with a spray gun, adjust the torch to a narrower spray pattern. Paint the edges of the stencil first, then fill in the middle.
- Different distances will give different degrees of smoothness to the edges. A farther distance provides a blurred edge, like a shadow, while a closer distance provides a sharper color change.
- Unpainting and minor unevenness are not critical. The main thing is that there are no leaks.
- When using natural objects (leaves, branches, grass), you need to lean them against the surface and spray paint on top. It is better to collect a variety of specimens. It will be more convenient to use flatter leaves so that they fit well on the surface. You can spray paint only on their edges. This way the outline of leaves and branches will be imprinted on the surface. After the paint has dried, the process must be repeated, using paints of other colors and leaning other leaves, positioning them differently. You can also overlap already painted leaves with subsequent ones.
- There is no need to do too many designs or spots so that the base color does not disappear and remains the main one.
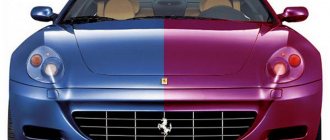
- If you want to paint a car or other object in a camouflage pattern consisting of several large segments of different colors, as in the photo below, then each, before painting each segment, you need to cover the adjacent surface with masking tape and covering material. After one color has dried, you need to move on to masking the already painted surface and painting a new one.
Camouflage consisting of two colors.
- If the surface was not painted with special matte paints, then the resulting “camouflage” can be varnished. The varnish serves as protection for the base paint. Special matte paints do not require varnish.
- You can use the painted car the next day.
Preparatory work
As with other paint jobs, before airbrushing a car, the surface must be prepared. Careful preparation guarantees that the design will look attractive and the pigment will not peel off over time.
The area where you will do airbrushing should be matte. Matting is carried out:
- Dry or wet;
- Manually with sandpaper or using a sanding machine;
- Scotch Brite with matting paste.
As a result, many tiny scratches should appear on the surface of the body, which will ensure the best adhesion of the pigment when drawing an airbrush design.
Materials and consumables for preparatory work. Click on photo to enlarge.
DIY stencils for decor: templates and their use
Painted walls always make a room unique and unique. However, not everyone knows how to draw beautifully, and even the most skilled artist will not be able to repeat the same drawing in the same way. Stencils of drawings on the wall can correct this situation. Their use makes it possible to apply the required number of images, and at the same time they will be the same.
To apply a quality design to the wall using a stencil, you need to choose the right paint
In addition, the use of stencils allows you to add volume to the surface, visually expand the space and smooth out unevenness on the wall. Templates are a great way to change a room without making a significant financial investment. The owner can show his creativity and give the room a special uniqueness.
Construction stores offer ready-made stencil templates for walls. However, you can choose your own design. Then making a template using it is simple and easy.
Templates and stencils are actively used in everyday life. In addition to decorating walls, they are great for creating interesting solutions on doors, windows and cabinet doors. Great for creating greeting cards, posters, collage compositions. Quite often they are used in the design of paintings and photographs. In this case, the stencil is placed in the corners.
Templates for the stencil can be drawn yourself or downloaded from the Internet
Simple Templates
Simple airbrush templates
You can buy a simple stencil or template for airbrushing: zodiac signs, anchors, hearts, skulls, logos of football clubs, musical groups, gothic and other fonts, etc.
The theme of the drawing on the car is suggested based on the preferences of the car owner: sports, fantasy, automotive themes, landscapes, animals, national symbols.
Using airbrush stencils or working with your free hand, you can give your car an original and unique look using simple, standard images.
Source
What to pay attention to when creating butterflies
First, you need to decide on the form. If you don’t have your own ideas on this issue, you can look for suggestions on the Internet. There will definitely be templates and stencils for cutting, as well as examples of finished work. You can also watch the creation of such a panel in the video:
Secondly, you need to choose the colors of future butterflies
After all, the design of any apartment is individual, so it is so important to take time to select the appropriate color option for the future decor of the butterfly on the wall. Use the most successful color combinations, then the decor will best fit into the room and will be in harmony with all the elements
The shape deserves special attention. Today, ready-made multi-colored butterflies are offered in the form of stickers. They can be ordered at any store. They come in a wide variety of colors, as well as simple and intricate shapes. But we are looking at decorations that are made independently, so for beginners it is worth familiarizing yourself with the basic recommendations.
Butterfly stencil on the wall - diagram, photo
At the initial stage, you should create a sketch of butterflies for cutting. Using a program that draws or edits images can help with this. Subsequently, based on the sketch, butterfly stencils are made for cutting out in different sizes from the appropriate material. Templates can be made without even using a computer.
You just need to take a pencil in your hands and create sketches on plain paper or tracing paper - the outlines of butterflies and then cut them out.
Advice! The best option is not to use strict symmetry. And for this you should try not to mirror the wings. It is best to depict them slightly different in size - literally just a little.
Thanks to this, decorative butterflies on the wall will be more voluminous and dynamic. And the applique will look great, regardless of the method of attachment to the surface. But you shouldn’t bend it too much, because the wings should be moderately different from each other.
Stencils of simple butterflies for wall decor, photo
Once the butterfly drawing is ready for cutting, you can move on to the next steps.
It is necessary to decide on the format of the future decorative element, the number of butterflies, as well as the method of securing them. Then you can modify the image and make it in several sizes, and then print it. You can also draw everything completely by hand if you don’t have a printer and cut it out.
After this, we make a butterfly stencil for cutting. It won’t be so difficult to do this if you put the printout on a sheet of cardboard - and the outline of the butterfly is ready for cutting.
The printed silhouette of a butterfly is first trimmed along the outer edge, only then can you proceed to the internal holes and cut them out where necessary using thin nail scissors or a special knife. Butterfly stencils for the wall made of paper - photo of the cutting process
To decorate walls with butterfly decor, you can also use an option such as origami. You will not need to spend energy on drawing the silhouette of a butterfly for cutting out of paper, but will only have to learn the ability to assemble origami.
Important! You should not achieve the grace of a butterfly by increasing the number of folds or frills on the wings: openwork butterflies look more airy.
Further cutting with scissors or a paper cutter will be meticulous and the many details will quickly tire you.
In fact, creating such elements is not very difficult. There are quite a lot of ready-made training videos on the Internet on how to make butterflies on the wall, and also lessons on making origami. Here is one of them:
Select a design and decide how to apply it
It all depends on your imagination. What size will the drawing be, how many colors will be used when applying it, will you paint by hand or using a stencil - all these questions must be answered before you begin the actual painting work.
So, the drawing has been selected. However, before you start doing airbrushing on a car yourself, you should create a sketch of the image. Graphic editors, for example, the Corel DRAW program, can help in this matter. In any case, be patient, because this stage is one of the most time-consuming.
Airbrushing as a technique for applying images pays special attention to shadows, so even when you draw on paper or in a graphics editor, decide where you will have such elements.
At home, you will most likely use plain paper to make a stencil. If your choice is on ready-made stencils, then they can be made from paper, self-adhesive, cardboard, film, and even lead foil. As a rule, such stencils are designed for one-time use. Reusable stencils are used only in professional workshops where airbrushing is on stream.
Stencils for camouflage
How to paint a car camouflage with your own hands? For this purpose, the easiest way is to use special stencils. No less often, blanks are used in specialized services and tuning studios, although the price of professional painting in camouflage will be quite high. You can find a variety of stencils on the Internet, print and cut them out:
- blurry spots;
- outlines of animals;
- grass;
- branches;
- net;
- cells;
- "blots";
- leaves;
- stripes;
- geometry, etc.
It is better to print several identical stencils so as not to transfer them, but to immediately cover a large surface area. You can also create a drawing yourself, then cut it out and apply it in the same way. In addition to paper, for this technique of painting a car, you can take a transparent film, which is used by airbrush masters. It is a little sticky, so it is very convenient to work with. The required shapes are cut out of the film, glued to the base, and after the paint and varnish material has been applied and dried, they are removed.
Stencils - types and methods of production
Professional artists involved in automobile airbrushing and who have completed dozens of works prefer not to use stencils, since it is believed that their use does not allow achieving clear boundaries of paint colors, especially after covering the entire image with several layers of varnish to hide the difference in their height. But if automobile airbrushing is not a hobby, but a form of income, and the artist values his own efforts and time, then using templates is a worthy alternative to completely manual painting.
Stencils are divided into types depending on the possibility of reuse.
Disposable - such stencils are convenient to create for individual orders or one-time jobs. A disposable stencil can be made:
- from self-adhesive film;
- made of cardboard or thick paper.
Self-adhesive stencils, thanks to the adhesive backing, are ideally fixed to almost any surface without the need for additional fastening. In addition, the adhesive backing also performs a protective function against paint flowing under the template. They are also easy to remove: just pull the edge.
Reusable - such stencils are convenient for applying both relatively simple and multi-layered images. Reusable stencils are usually made:
- Made of plastic, made using plotter cutting.
- Made from thick polyvinyl chloride or metal-plastic.
The stencil is fixed using aerosol glue, and for greater reliability it is also fixed with tape. The main disadvantages of using them are poor flexibility and the possibility of paint flowing beyond the boundaries of the future image, so experts recommend attaching reusable airbrush stencils only to straight surfaces.
- Reference - necessary to maintain the proportions of the image object when transferring it to the working surface (it is made from ordinary paper and is most often disposable, since the paper becomes unusable due to exposure to car paint).
- Local - necessary for drawing any details of the image or achieving a certain color effect, as well as for making copies of the same element (most often made from self-adhesive or the same plain paper).
- A pattern is a reusable stencil, made primarily of plastic and used for quickly drawing silhouettes or image elements.
Advantages of airbrushing
- Your car will be unique and inimitable - no one else will have one like it.
- Drivers often use airbrushing as a great way to hide defects after an accident. For example, if there is a dent or scratch on a car, then with a drawing you can hide such nuances so that no one will guess.
- We can say that the picture on the car is your business card and an additional level of security. A bright car will be noticeable, so not everyone will dare to steal it, because it is much easier to find.
- As an idea, you can apply airbrushing not only to the car body, but also to the outer surface of the mirrors.
Airbrushing is a great way to stand out from the crowd of cars and demonstrate your impeccable taste and sense of style. The size of the drawing and its theme will depend solely on the imagination of the car owner and the amount he can pay for such a service.
Applying even a simple drawing to the body is quite difficult, especially for beginners who want to do all the painting work with their own hands. Therefore, when applying airbrushing, experts recommend using special stencils for the car. They will help maintain the proportions of the drawing, and their preparation will not take much time.
Airbrushing is a type of artistic painting that can be done on different surfaces, including the body of a vehicle. The customer can choose a drawing from a ready-made catalog, or come up with a sketch himself and the master will transfer it to an airbrush stencil.
Experienced artists practically do not use stencils in their work, since they already have a full hand and it is much easier to achieve clear boundaries of the drawing. But for a specialist who values his time, they will help him apply several identical elements of the design in the shortest possible time. Advantages of airbrushing on cars:
- The vehicle becomes unique.
- Small body defects can be hidden using a drawing.
- Such a bright car will be protected from theft, since a car with airbrushing is very noticeable.
You can make stencils for airbrushing with your own hands, but before that you need to carefully familiarize yourself with their varieties:
- Support stencil. Its main function is to simply transfer the pattern to the surface of the body. At the same time, it is necessary to preserve the existing proportions, so it is made of paper.
- Pattern. Usually made of durable plastic because it is used regularly. Most often, with their help, the master quickly draws silhouettes or similar images.
- Local. It can be made of a special self-adhesive film or paper. Such car stencils are used to transfer some parts of a pattern or to achieve the desired color effect.
Transforming a car with your own hands - how to use a template?
If you want to completely change the appearance of your car, it's time to decide on the type of pattern. To apply a portrait or a complex landscape, a drawing of an animal or a plot painting onto body parts, you need to have some experience as an artist, and also be able to use an airbrush no worse than a brush. But this is a rather complex form of airbrushing, which is best ordered by specialists. Using a template, you can apply simple drawings to your car.
It is important to follow a certain procedure:
Find the best stencil option for your task. The type of drawing, as well as the complexity of its implementation, will depend on this. Make or buy a ready-made template from suitable materials.
Make sure you have all your airbrush tools. A good compressor and normal paint will be a big advantage and will help you apply a quality design to your car.
Prepare the car
It is important to remove all contaminants from the paintwork. If the pattern will cover the entire surface of the part, the paintwork can be slightly matted by removing the top protective layer of varnish
Place the stencil in place, making sure that all corners match perfectly. Make sure that there are no folds anywhere and that the product fits snugly to the paintwork of your car.
Next, use your painting equipment and apply a coat of paint over the entire surface. Do not remove the stencil immediately, let the paint dry a little. In just an hour you can safely remove everything.
Airbrushing using this technology can be done without any special professional tools. Simple paint equipment will ensure that the paint is properly applied to the holes. This will ensure full, high-quality use of resources. But the quality of the image itself depends on two factors - correctly selected materials and professionalism of painting. You will still need experience with a spray gun or airbrush to complete the task.
Why is it difficult to do airbrushing on your car yourself?
Today, there are a variety of airbrush stencils freely available. This suggests that the procedure for applying paint in this mode will be very simple. But in reality, the use of technology is very complex, and a person without experience will not be able to perform airbrushing efficiently. The problem is that the paint is applied through a stencil to the body parts, so in this case you simply have no room for error.
If the work is done incorrectly, you will have to completely clean and wash the part, repaint it in its original color, and then apply the design again. And this will already be quite expensive. Therefore, do not think that just a high-quality stencil is the key to successful airbrushing. This is a precondition for a job well done for a professional, but not for a beginner.
What are stencils used for in airbrushing?
- Speeding up the drawing process. Due to the fact that many car owners select similar design elements, such as images of animals, skulls, fire and other designs, all this has led to the fact that craftsmen compile entire template catalogues, among the options of which the client’s decision on this or that is formed image.
- Accuracy and precision of work. Even without many years of experience, using templates for airbrushing on a car you can accurately apply a design without streaks of paint along the edges or distortion of the shape of the image itself.
- You can apply elements of any complexity.
- You will already know in advance what the drawing looks like, which cannot be said in the case when the artist draws at his own discretion, and there is a possibility that he will not make the format that you need.
As you can see, there are many advantages. One of the disadvantages is the uniformity of the image, and it is for this reason that individual airbrush artists, even after the appearance of stencils, are busy with work.
To apply a design, you can go to a workshop where professionals will do everything for you, or you can apply airbrushing using a stencil with your own hands. To work independently, you will need to find a vector image on the Internet, there are actually a lot of them, and in the future, following the technology, apply the desired design to the car body. In addition to paid templates, there are a number of free stencils on the Internet that you can use.
Types of templates
According to the method of use, all stencils for airbrushing can be divided into two types:
- disposable. Mostly used by beginners. You can buy them on the market, or you can make them yourself from film or paper materials. After use they are thrown away.
- reusable. These are templates made of plastic, thick film or cardboard. They are used on-line, in the same auto repair shops and airbrushing studios. They have a more complex manufacturing algorithm and a higher price tag, but in the future they will pay for themselves very quickly.
What materials are stencils made from? There are several options:
- lead foil.
- cardboard or thick paper.
- films, both self-adhesive and regular.
- plastic.
According to their functional purpose, templates are:
- local. It is mainly made from film. Temporarily applied to the surface of the part and removed after paint treatment. In most cases, the entire drawing is transferred at once.
- supporting These are stencils made of denser materials such as plastic or cardboard. Characterized by reusable use. With its help, both the entire image and its individual elements are applied.
- pattern for airbrush. It is also made from dense materials such as cardboard or plastic. Allows you to apply geometric shapes, contours of a picture, or individual geometric shapes, like flames.
How to make a stencil for airbrush?
The entire process of producing such a template can be divided into three main steps.
Step 1. Search for a design.
For beginners, you can choose any vector template from the Internet; drawing your own images is much more difficult and time consuming - it will take a long time. But if you have the desire and experience, then you can try.
Step 2. Transfer the design to the stencil material.
For these purposes, plotters or ordinary printers are used, in the case of film.
Step 3. Cut out the template using a sharp stationery knife.
This work must be done very carefully so as not to damage the boundaries of the template.
Some masters use a movable type of template. They are made from transparent plastic or thick film.
Recently, self-adhesive film has been in high demand among car owners who decided to apply airbrushing to the car body with their own hands using stencils. We will talk about its use below.
Types of drawings
All manufactured templates can be divided into two types:
- commercial. These could be company logos that need to be applied to an entire fleet of vehicles.
- non-commercial ones that car owners use to make their vehicle stand out from the crowd.
The airbrush stencil designs themselves differ in size, genre, and color.
If we talk about the most popular artistic types of images, these are:
- image of animals (wolf, tiger, bear).
- birds (eagle, owl, hawk).
- fire.
- landscapes.
- night sky.
- dragons and other fantastic creatures.
- There are also unique solutions for painting body elements like wood or granite.
In fact, there can be many such options; here everyone chooses what he likes.
Airbrush application technology using self-adhesive film
The whole process can be divided into step-by-step instructions.
Here is a video example of the work.
This completes the process of applying airbrushing using a film template. As you can see, there is nothing complicated here.
How did you apply airbrushing to your car and what was the final result? We would appreciate your comments below.
Today, applying drawings to a car body is becoming a separate art direction. Many artists offer services for painting beautiful graphics, subject images, portraits and even landscapes for quite a lot of money. You can step by step learn all the specifics of performing this work and create the image yourself. But the easiest way is to find and produce templates for airbrushing. In this case, you will need step-by-step instructions, but everything will be much simpler.
Such templates for drawing on a car body can be found freely available for download. Most often they are offered in a specific format for special computer programs. You can produce the stencil itself for airbrushing using various methods. This can be a laser cutting machine, manual production, milling of any material. True, you can do it easier and buy a ready-made stencil.
Airbrush application technology using stencils and patterns.
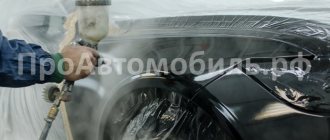
Important! High-quality stencil airbrushing of a car is obtained if it is performed on a surface well prepared for this. The surface must be washed and degreased
The room in which airbrushing is carried out must contain a minimum of dust, and the air temperature must be at least +16C. Paints must be of high quality, rich in color and with fine-grained pigment. These paints do not require filtration. It is necessary to use an airbrush because the spray gun produces too thick a layer of paint. Varnishes must also be of high quality; they protect the design from fading and do not impart yellowness.
- Step 1. Glue the stencil onto the car. If it is paper, use tape. If it is a self-adhesive film, then remove it from the base and glue it to the car. Don't forget to remove the film from the front of the stencil, if it is there.
- Step 2. Apply paint to the drawing using an airbrush. The number of layers depends on the selected pattern.
- Step 3. Give 10 - 15 minutes to dry and remove the stencil. If necessary, we adjust the image (for example: shade the outline) or complete the composition.
- Step 4. Dry. Drying time depends on the chosen paint.
- Step 5. Wipe the image with a damp cloth to add shine.
- Step 6. Apply varnish. Let's dry it. Polishing.
So let's summarize:
For beginners, airbrush stencils can be downloaded on the Internet for free. The sites offer both standard and unusual designs. But you still have to pay for interesting stencils. They can contain elements of the layout of the future drawing and, in addition, carry a semantic load. There are no boundaries to stencil airbrushing. There are simply two types of images:
- commercial (corporate logos, advertising of companies, products);
- and non-commercial (“nature”, animals and their habitat; “military” style, “ala Khokhloma” painting; as well as a combination of surreal, ornamental and abstract themes).
Any themes are possible.
Any themes, styles, genres are possible. The volume and plot are also not limited. The external individualization of the car has long found its connoisseurs. And airbrushing has become a means of self-expression for car owners, turning the serial, unsightly appearance of a car into an easily recognizable and defiantly beautiful one. Today she is able to express anything and capture the imagination with both stylish, small strokes and panoramic images.
How to apply an image correctly using airbrush?
Let's start by securely attaching the prepared stencil to the selected area of the car body. This is usually done using masking tape. If you're concerned about paint getting onto other areas of the cabinet, cover them with old newspaper.
If the car body is dark, then airbrushing involves transferring only light elements of the design. How to make an image more voluminous? Apply successively different shades of paint, highlighting and shading the necessary areas.
If you need to draw small details, you can make additional stencils or do it manually. As a result, you will be able to draw a realistic drawing.
After you finish applying airbrushing, be sure to varnish this area of the body to protect the paint layer from mechanical damage and fading in the sun.
Types of camouflage painting
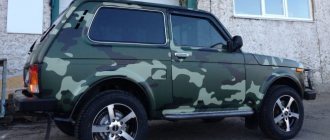
Camouflage is a method of camouflage inherent in military uniforms, weapons and equipment. It is precisely for the ability to camouflage a car against the background of the environment that camouflage coloring is highly respected among those who like to hunt and fish: a car can literally blend into its surroundings.
Despite the existence of traditional brown-green-yellow colors, there are other camouflage options - winter, urban, forest and many others. They differ in color, type of pattern, and method of application.
For the final coating, varnishes with the following effects are used:
- glossy - gives shine in the sun, which eliminates camouflage, is often used to comply with fashion trends;
- matte - ideal for creating camouflage coatings for hunting, fishing, and military purposes.
It’s worth taking a closer look at the options for camouflage colors and pattern types to choose the one that’s right for you.
Traditional camouflage
This is a pattern in the classic khaki style, combining non-staining, discreet dusty earth tones with marsh and brown. Gives the car a real military look, ideal for camouflage, but poorly suited for urban conditions and everyday driving.
Geometric camouflage
This pattern is often called chopped. It provides an original design effect - “crushing” the silhouette of an object into parts. Most often, geometry is used on sports cars with a low body height. Also, a similar color is used by the US Army on fighter aircraft. Traditionally, gray, black and white colors are used to create decor, but in unusual versions you can even find pink and purple inserts.
Urban camouflage
Intended for driving in city conditions, it has a number of specific features: the predominance of gray, blue, white, the presence of angles and straight lines.
Digital or pixel camouflage
This design is incredibly stylish, rare, it resembles a combination of small squares that imitate digital pixels, which are noticeable when you magnify the monitor screen. The appearance of the car will look blurry relative to the terrain, despite the angular outlines of the decor. Color combinations can be similar in tone or contrasting - at the request of the owner.
Forest or hunting camouflage
Forest camouflage is a pattern based on dark green, beige, black spots with smooth, soft lines. It is most often chosen by hunters; it is also used to paint military equipment. A type of forest camouflage includes images of grass, vines, shrubs, and savannas.
Winter camouflage
The pattern within winter camouflage imitates nature during the cold season. The most popular colors are gray, white, blue in the form of blurry spots on a light background. Corners and edges can also be used, but in a minimal amount.
White camouflage
It is a subspecies of winter camouflage with the difference that the predominant color is white. It is usually applied by those who hunt in the taiga forest in winter, as well as for military purposes in the North.
Sand camo
Sand camouflage is also called “desert storm”. The main shades here are brown, yellow, and beige. The coloring is popular in the prairies, used by the military in the corresponding area. For application, they resort to the technique of spraying layers in different ways, and then they make the final finishing of the pattern with an airbrush.
Types of stencils
Stencils for walls for painting vary not only in the material from which they are made. They also differ in the type of pattern:
- Simple or single. The entire drawing is painted with one color. If desired, you can make a gradient - from a darker shade to a lighter one. But that's all. Parts of other colors are not available.
- Combined or multi-colored. This is a whole series of templates, each of which is painted with a different color of paint. To ensure that the details of the drawing match, marks are applied to them. When placing the stencil on the wall, these marks are aligned.
- Reverse or anti-stencil. This template is cut out according to the reverse principle, that is, what is cut out in ordinary templates remains in this one, and it is these parts that are mounted on the wall. Then paint is applied, but it paints the areas not covered by the stencil. It turns out that there is a halo around it from a different paint, but the drawing itself remains the base color.
- For three-dimensional drawings. Decorative plasters and putties are now on sale. They can also be used to apply designs to walls. Stencils for them are made specially - thick, made of polyvinyl up to 4 mm thick. When applying the pattern, the slots are filled with putty and left until dry. The result is a three-dimensional drawing.
It's easiest to work with simple templates. For starters, you can try this type of pattern. If you are confident in your abilities, you can work with more complex combined ones. When working with them, remember that you can remove the film only after the paint has dried.
Toyota Camry Second life of Kamryukha › Logbook › Airbrush - part 4. Working with a stencil
First of all, I wanted to say thank you
, to those who follow my car - for your support and for your messages and comments. Drive, overs and other nonsense in themselves have no value for me, I publish my work with no less pleasure on many forums - where they know me and where I like to communicate, but that’s not what I’m talking about now. I kept thinking - is there a need for entries in the blog about paint, stencils and other little things, and even at the beginning - I thought about doing everything about airbrushing in one message upon completion, BUT after I received several personal messages with requests - to write in even more detail, I I was really motivated to do this, otherwise I created these messages with such laziness...
Plastic stencil
This type of stencil is suitable for those who want to know how to make a letter stencil. For letter stencils, it is better to use a thicker material than paper. Sheets of plastic purchased from a hardware store will work just fine. So let's get started.
Apply the image to the plastic. It is recommended to do this with a permanent marker. Keep the lines clear, do not smear them.
After completing the design, start cutting out the stencil with a sharp utility knife. Be sure to secure the template with tape or spray adhesive.
After finishing the work, it is necessary to smooth out the sharp corners. Sand the template sections with soft sandpaper.
The edges must be smooth - this is important, otherwise the drawing will not be clear. Wipe off dust from the plastic with gauze or cotton cloth.
Types of patterns
A template or stencil for airbrushing is classified by type of use, material of manufacture, simplicity of image, etc.
Disposable airbrush templates are made of soft film or thick paper and can be used only once. If during the drawing process the base is poorly installed on the wing or hood, the paper or film is bent, and the airbrush may be damaged.
Professional or reusable stencils are used up to 100 times; they are made of plastic or thick cardboard. They are widely used by artists in workshops, studios, etc. The use of a ready-made sketch allows the price to be reduced by up to 70%, the speed of work increases, the driver can get a painted hood and painted wheels in an hour.
Depending on the material, stencils for airbrushing on cars are divided into the following:
- film, often self-adhesive;
- dense ordinary polyethylene;
- cardboard with a glossy edge;
- lead coated foil.
The bases for the image are classified according to the type of paint application:
- Supporting. They are used to apply part of a sketch and are made of dense material.
- Local. The entire pattern or its main outline is depicted on the template; film is often used, after which the base is thrown away.
- Pattern. Allows you to create crisp lines for large images when painting a door or hood. Made from plastic.
The advantages of using ready-made forms over original drawings are obvious. Many, succumbing to fashion, choose images that are similar in style. These are fantasy plots, mythology, and military themes. Templates allow you to quickly create a drawing based on common shapes.
Using blanks, you don’t have to worry that the drawing will have blurry edges due to the lack of experience of the artist. Stencils allow you to draw lines, make color transitions of any complexity, and use retouching and shadowing. In addition, a stencil image is hundreds of times cheaper than the work of an artist. When choosing a ready-made base, the driver knows in advance the shape, color scheme, can figure out how the image will highlight his vehicle, etc. Adding an artistic vision allows you to make the template design unique.
Airbrushing is used as an alternative to complete repainting of the body if straightening work has been carried out. The sketch will be applied to the primer and will hide repair defects, chips or scratches.
According to statistics, cars with unusual and bright airbrushing are stolen seven times less often than cars with a plain body.
The truth is in the middle of the picture on the car body
And don't be afraid to improvise. The most crazy ideas sometimes give good results. And it happens that stencil airbrushing gives a second life to a car from which you no longer expect anything good. For example, a drawing applied to a car after an accident transformed it so that its flaw became invisible.
The importance of stencils in airbrushing should not be overestimated. Just like underestimating them. Because diametrically opposed opinions are radical and irreconcilable. The first claim that airbrush stencils complicate the work on the drawing (due to the rise in the final cost of the car), while the second believe in the miracles of transforming a used car into a new one (which, moreover, you can still make money on).
The art of stencil airbrushing uses:
- disposable
- and reusable stencils.
Airbrush stencil
As a rule, the use of reusable ones is ineffective and is used only per stream for pipeline work. And for one painting, it is necessary if you are not sure that you can skillfully and in compliance with the proportions apply the drawing directly to the car, or if you have not yet worked with an airbrush.
Most likely, the decision is made in each specific case individually: draw with your free hand or use a stencil.
For its manufacture, lead foil with holes for the outline of the design, and special types of films, cardboard, and plain paper can be useful.
It all depends on the purpose of the stencil. If the possibility of repeated use is expected, it is better that stencil airbrushing is performed using supporting paper patterns. And for a one-time, local one - from film. Patterns require durable material for constant use when the need arises.
It will be useful How to polish glass headlights with your own hands - step-by-step instructions
A temporary stencil is used to achieve a clear outline effect on a segment of the image. The purpose of its use is simple: to achieve the desired effect.
Pattern for airbrush
The reference works when transferring an image to a car body, maintaining the proportions of the object, as well as for:
- creating smooth lines or circles;
- clarity of contour, parallel and straight lines;
- obtaining the desired effect or accurately copying a design (for example, a font or pattern).
Pattern for airbrush
Using patterns of various shapes, a specialist in a matter of minutes will create image elements that cause delight (circles, abstract motifs of curved lines, flames, rhombuses, etc.). Or whatever your soul desires and the idea is enough (cars, silhouettes of people, skulls, spears).
Patterns, unlike templates, can be used repeatedly in work. They are made from fairly durable plastic. Wonderful, easy-to-cut patterns for airbrushing also come out of printing film.
Stencils for walls
Making a stencil for a wall is more difficult, but still possible. It can be sawn from wood or carved on plywood. This makes it easier to apply paint or plaster.
In addition, such a stencil will not be disposable and will be useful to you in the future. From these materials it is easy to create stencils of flowers with your own hands and even trees.
What else can you use to make a stencil, you ask? Polystyrene foam is an excellent alternative to wood and plywood. Another option is a decorative baguette.
You can apply the image to large stencils using printed fragments. An A4 sheet with printed patterns is placed on the workpiece using tape and cut with a stationery knife.
Using the remaining cuts you can make a large stencil. Or place tracing paper under A4 sheets and simply transfer the image.
Airbrush using film
Sometimes airbrushing is done not with liquid paints, but with the help of special films. Of course, in this case, the choice of design will be limited only to those images that are on sale, but this method requires much less effort.
The surface for gluing the film with a pattern must be perfectly clean and free of grease. The film is attached so that there are no air bubbles underneath it. A special varnish is applied over the film, which will not only protect this decorative element, but also make the image deeper and more saturated. The application of film airbrushing is completed by polishing, which will create a mirror effect.
Airbrushing with film. Click on photo to enlarge.
So, now you know how and with what tools airbrushing is done. Try, experiment, use your imagination, and after all the work done, enjoy the beauty that you created on your car with your own hands!
The technique of applying designs to various surfaces using a special spray gun is called airbrushing. Drawing is possible both by hand and using airbrush stencils.
Let's sum it up
If you want to use a stencil to apply a design to the body of a car, immediately look at the photo of the results. In most cases, independent work is not as interesting as you would like. To achieve a good result, you need to be able to work with an airbrush and have a good understanding of the intricacies of the entire airbrushing process.
Also pay attention to ready-made templates sold that promise excellent results. This is often not the best option for changing the appearance of a car. Using such ready-made kits, you will not be able to get the result as in the picture
And this should always be taken into account. Before performing complex tasks, watch the instructional videos and make sure that you can perform all the tasks correctly.
Drawing
Before you start creating the stencil itself, you should decide on the image. If drawing by hand is not your thing, you can take the simplest route and print the picture. But in this case, you should understand that the image is unlikely to be individual.
Homemade stencils for drawing
It’s better to start with the simplest abstract patterns. To make the picture look organic on your car, it is better to use computer modeling. This way you can choose the optimal solution for placing the picture on your car.
If you decide to print a drawing, it is better to pre-process it in any graphics editor to obtain the desired extension.
After this, the finished image must be printed on sheets of the required format. It will be correctly detailed according to the required size. At this stage, work with the drawing will be completed.